-
Forum Statistics
7.5k
Total Topics50.7k
Total Posts -
Member Statistics
135,967
Total Members16,800
Most Online


WanV
-
Posts
37 -
Joined
-
Last visited
-
Days Won
11
Recent Profile Visitors


WanV's Achievements
Just Getting Started (2/10)
27
Reputation
-

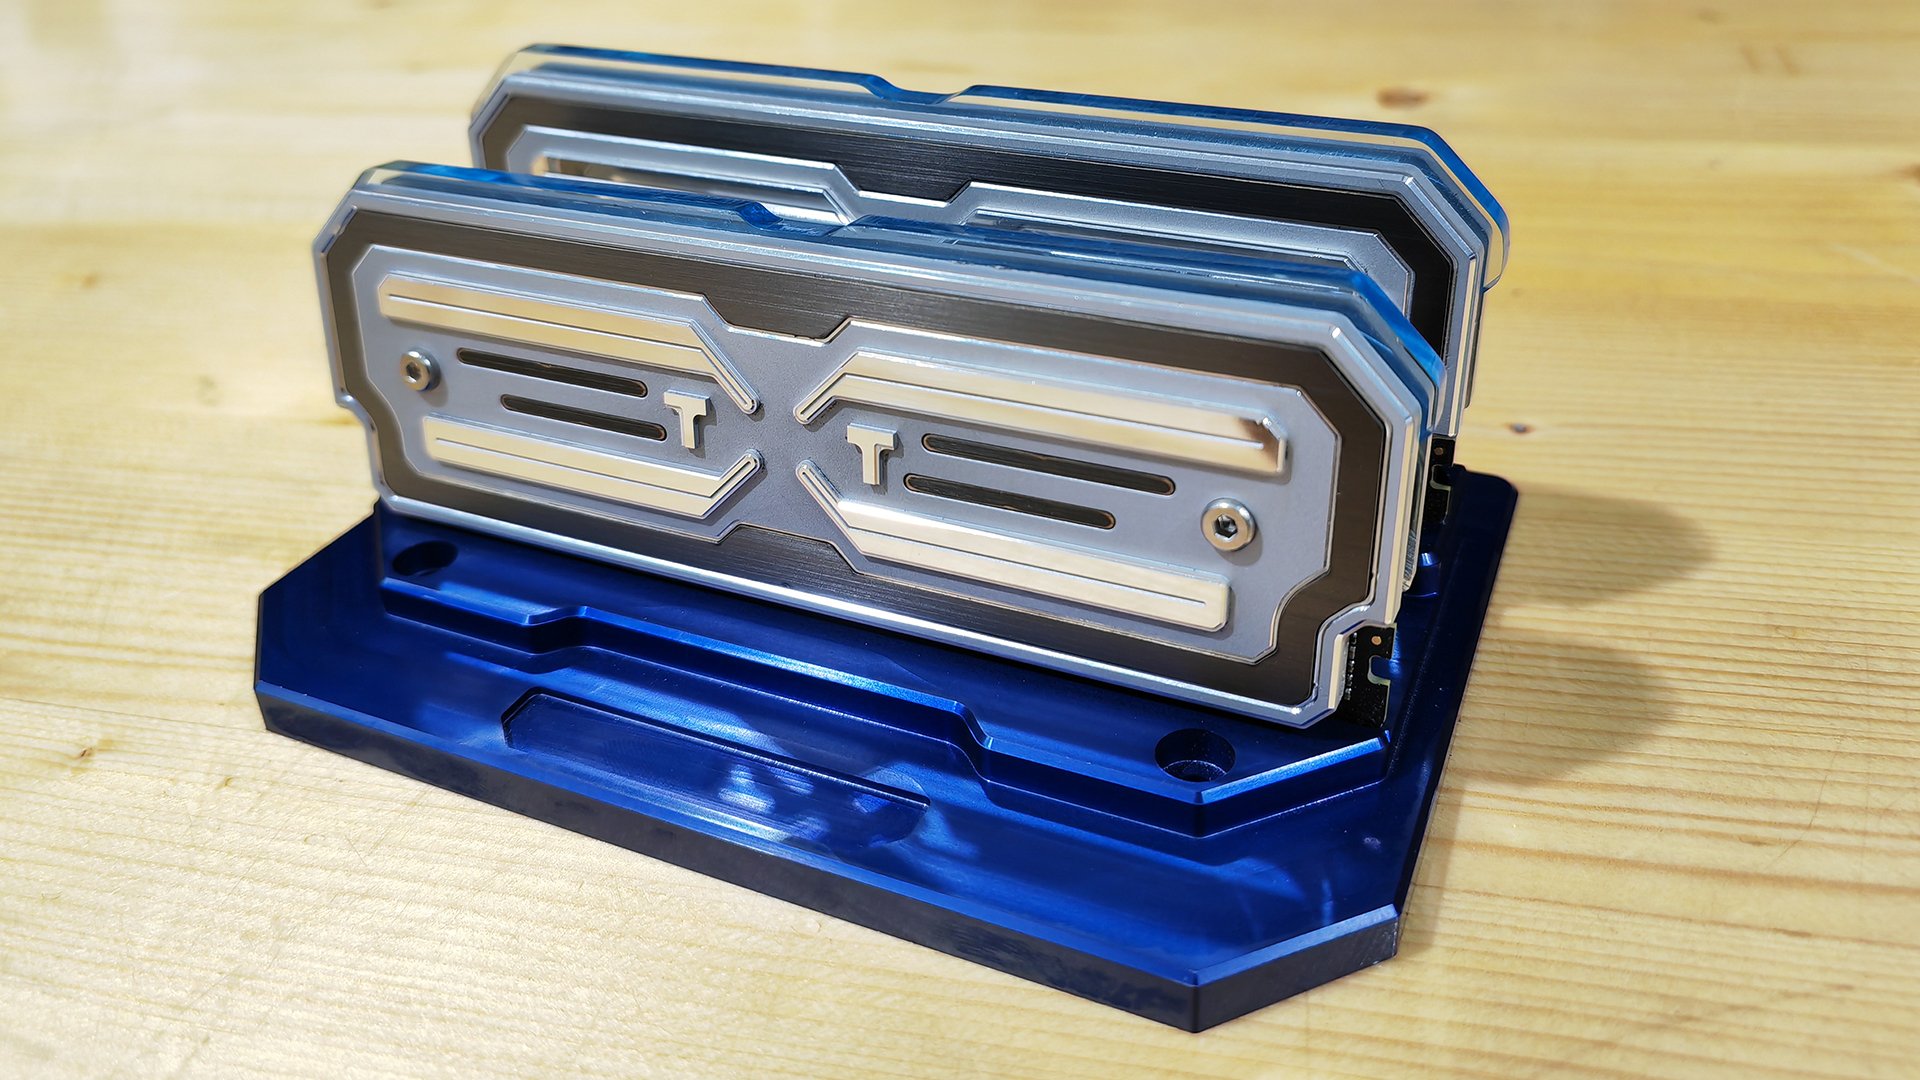
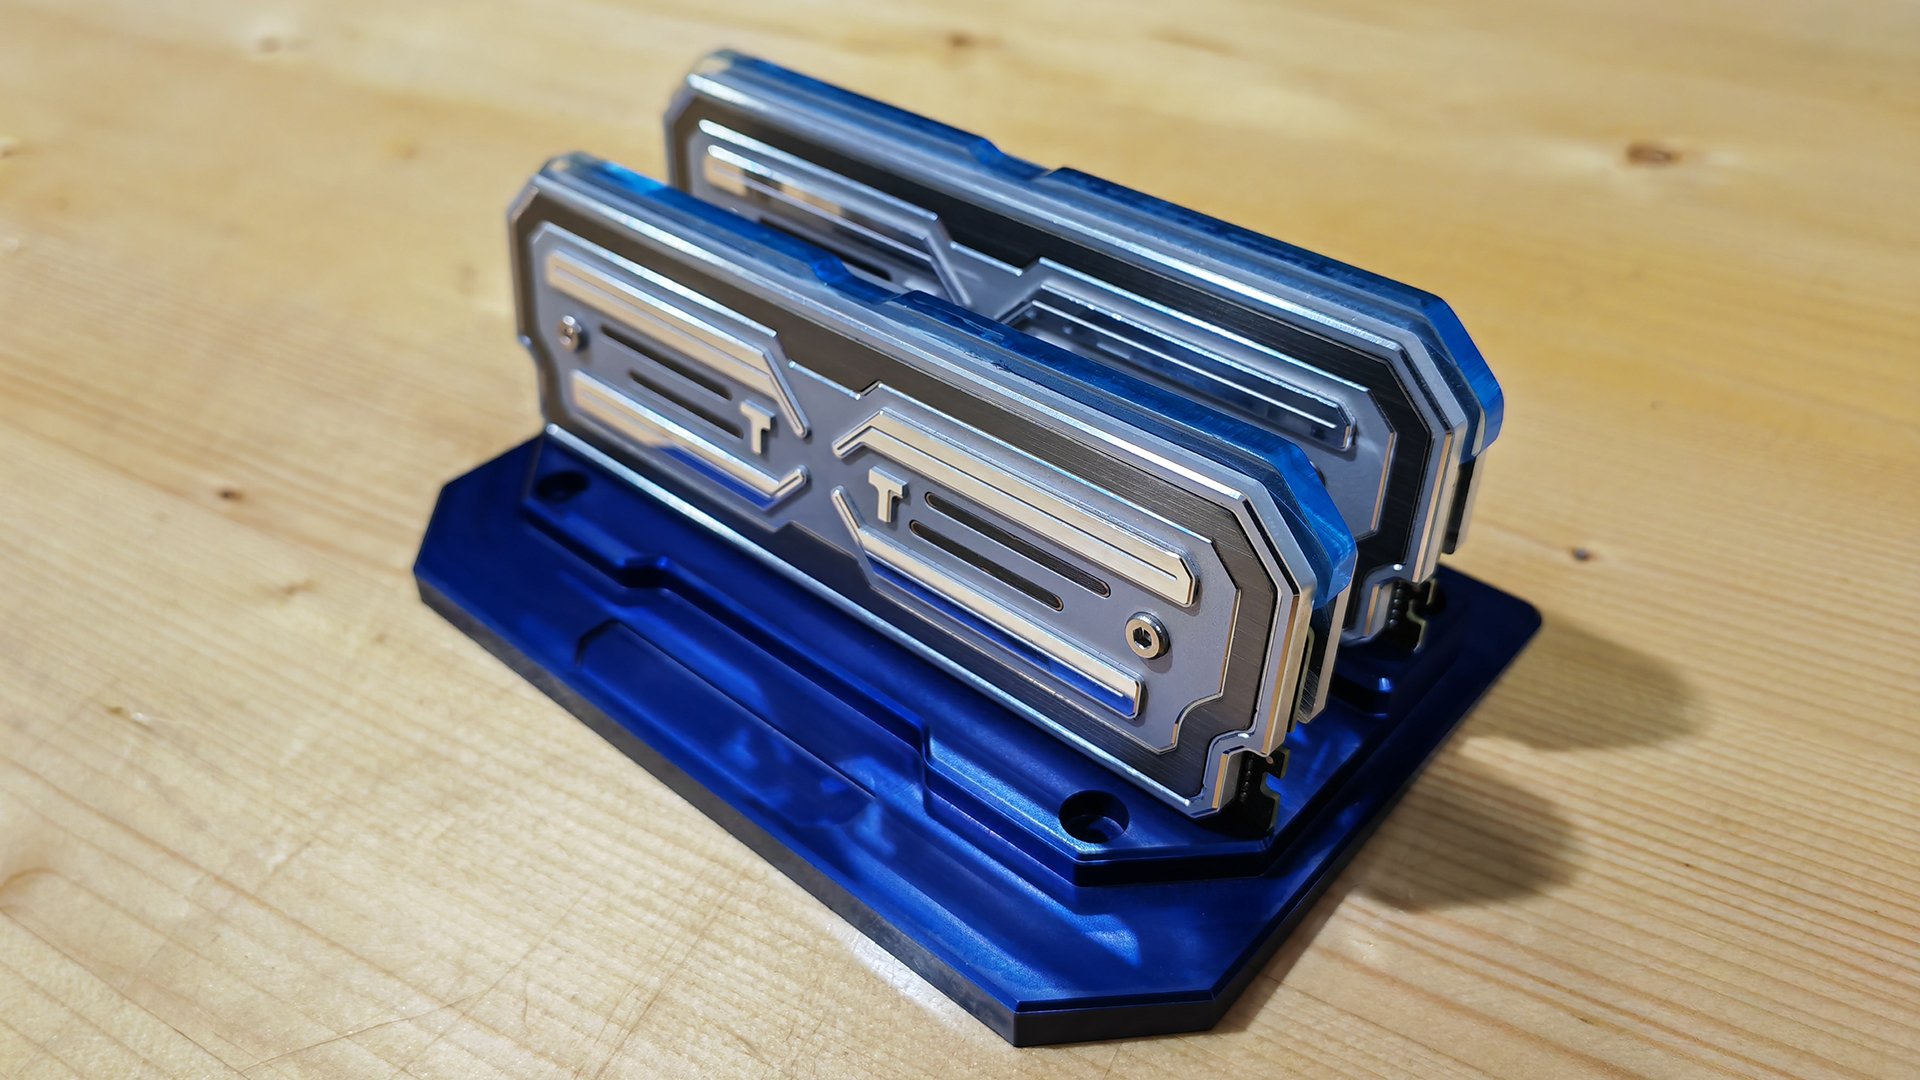
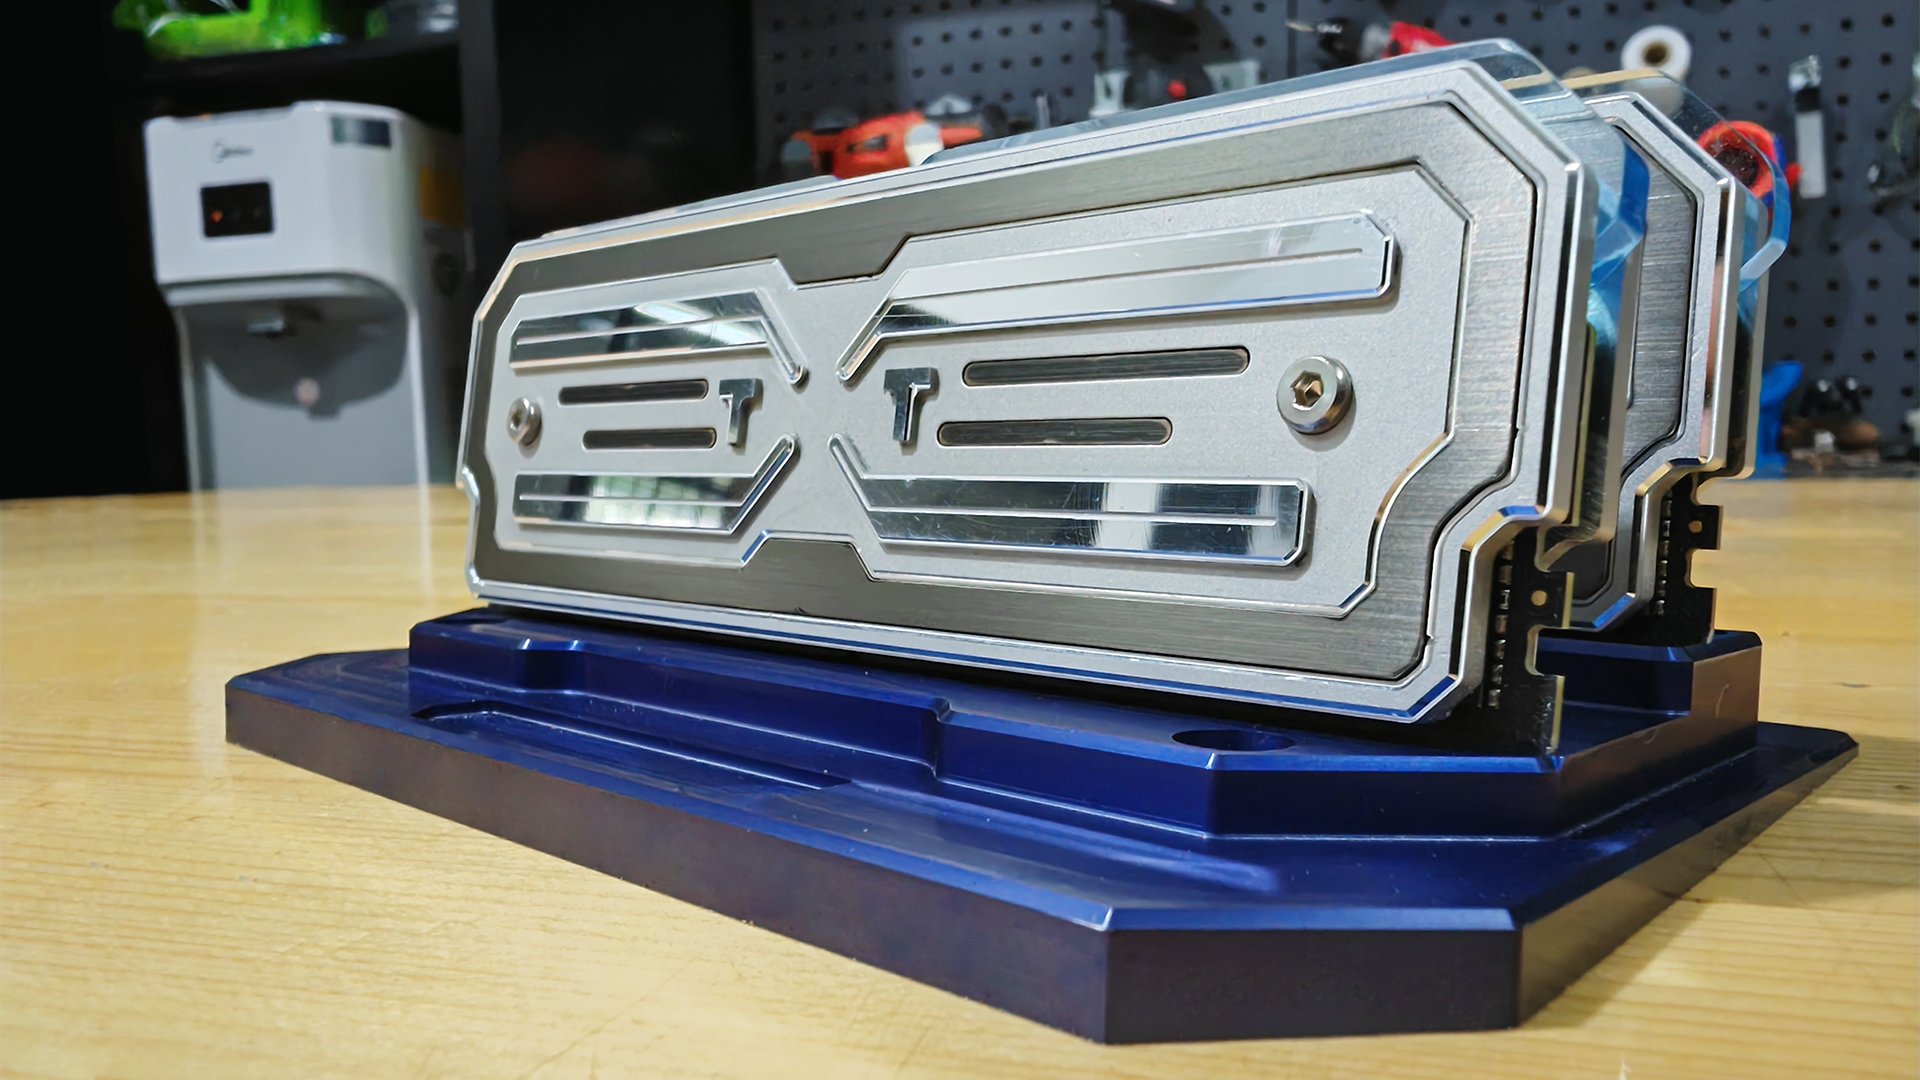
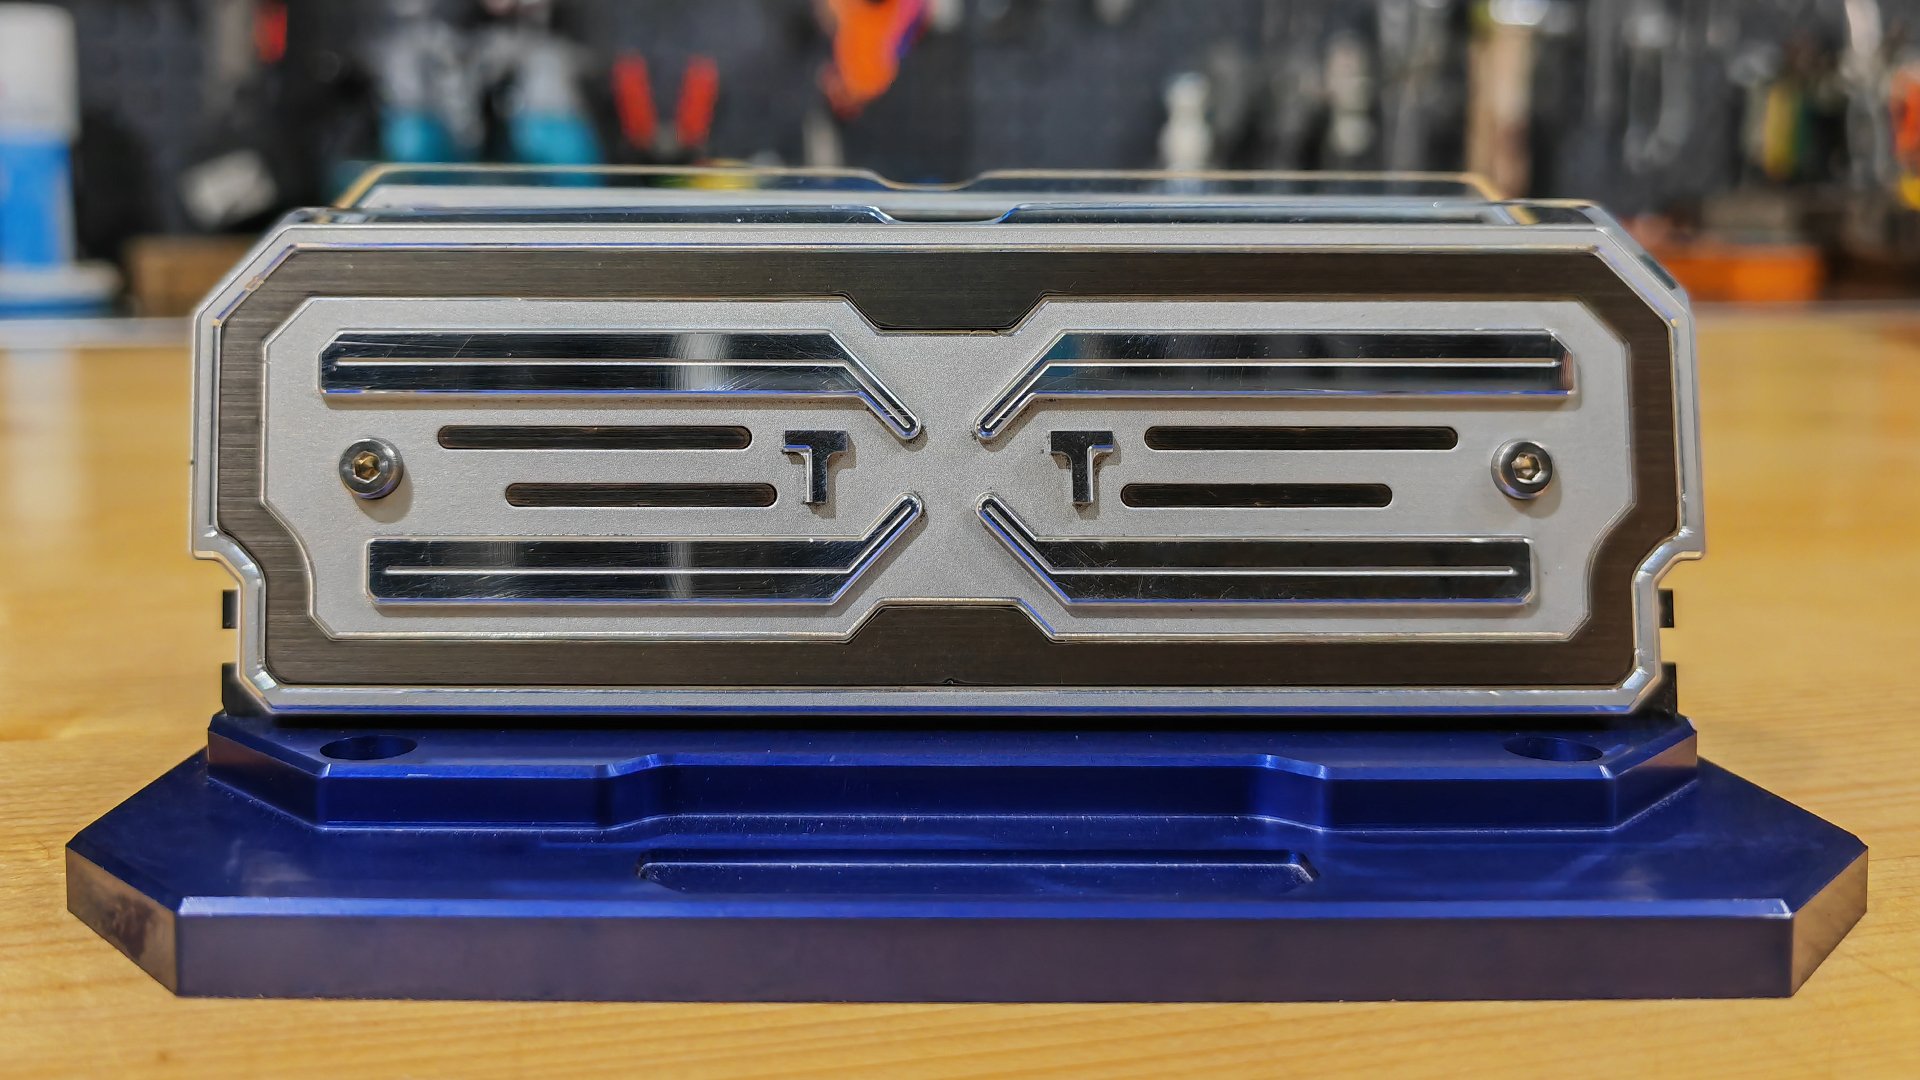
[Malaysia] Ahmad Safuan
WanV replied to TT Amanda's topic in 2023 Thermaltake RAM MOD Invitational Season 1
Final Video -
[Malaysia] Ahmad Safuan
WanV replied to TT Amanda's topic in 2023 Thermaltake RAM MOD Invitational Season 1
Final Photo Thanks to THERMALTAKE for competition invitation.its would be nicer if i have DDR5 mobo to see it glow Video will be uploaded tomorrow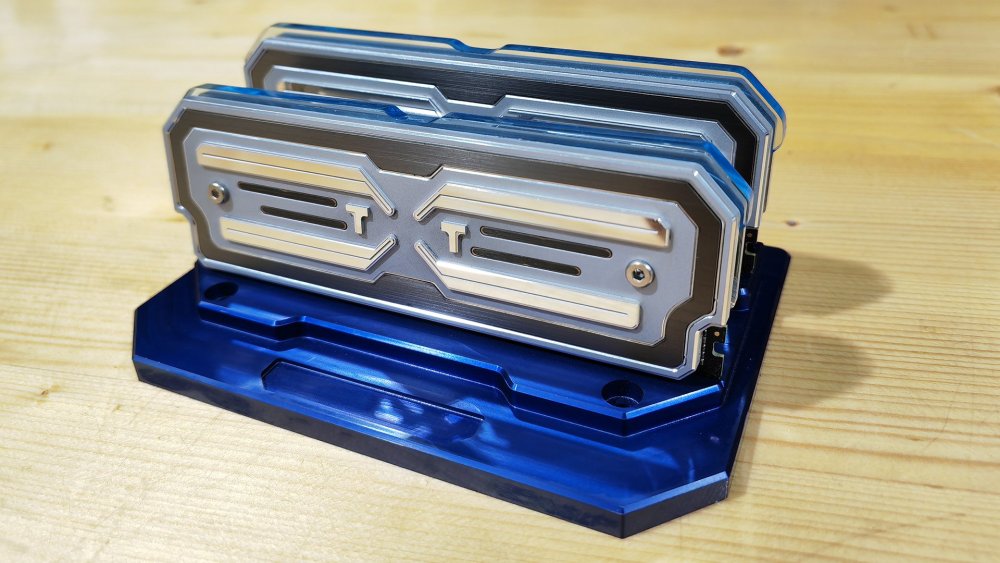


-
[Malaysia] Ahmad Safuan
WanV replied to TT Amanda's topic in 2023 Thermaltake RAM MOD Invitational Season 1
Cutting some stainless steel sheet for added element test fit 100% without glue or tape very precise tolerance also change to cyan colour acrylic to replace the original white led bar and a little sanding at edge with 2500 grit sandpaper.thumb.jpg.fca84be277aa4f4254829686bcbcf3e1.jpg)
.thumb.jpg.65f52cb2daf7542f32575065c260246e.jpg)
.jpg.d75bb4cb31a7c280b00f8654b1040f52.jpg)
-
[Malaysia] Ahmad Safuan
WanV replied to TT Amanda's topic in 2023 Thermaltake RAM MOD Invitational Season 1
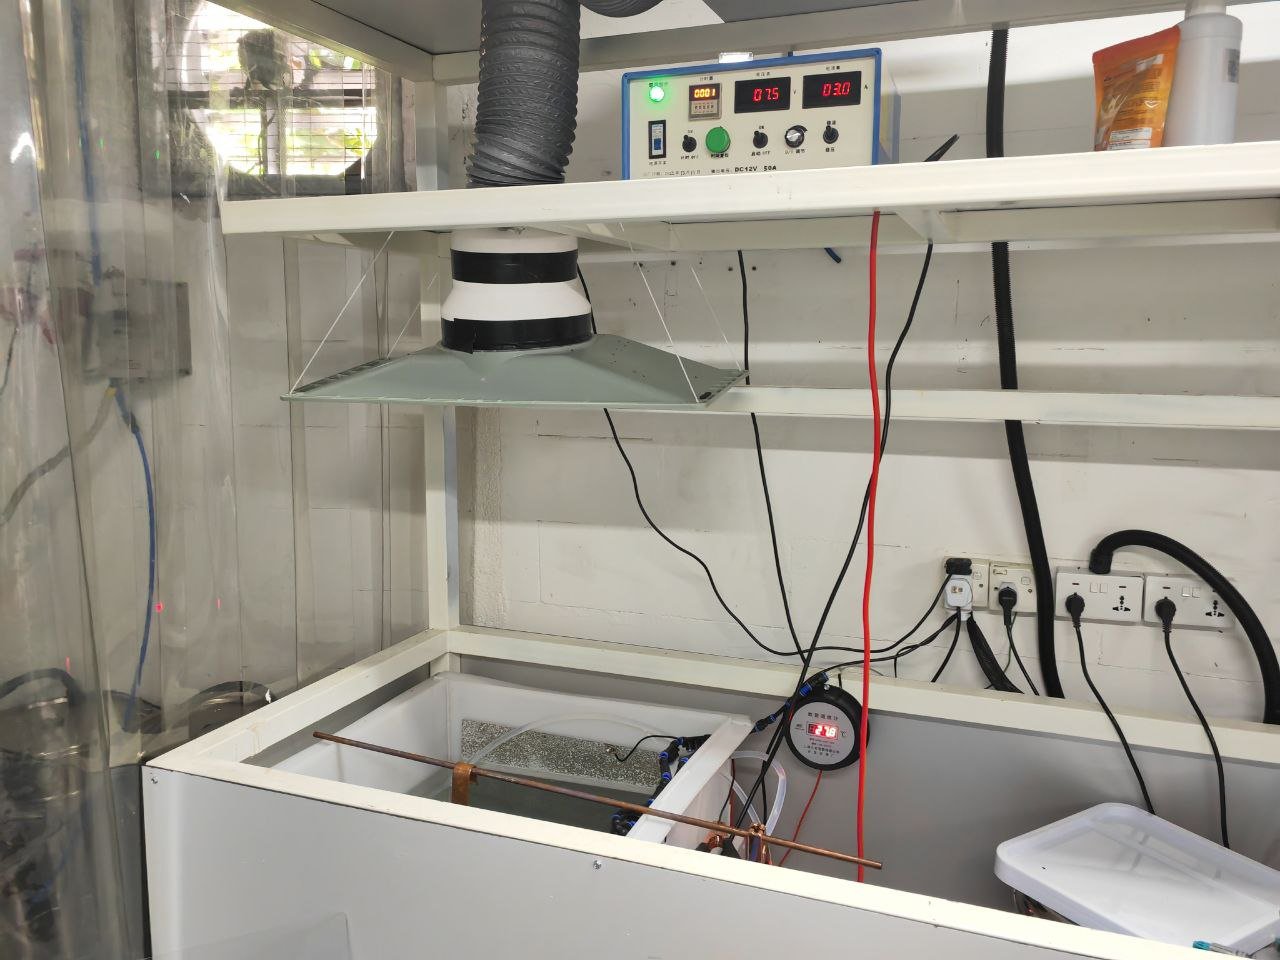
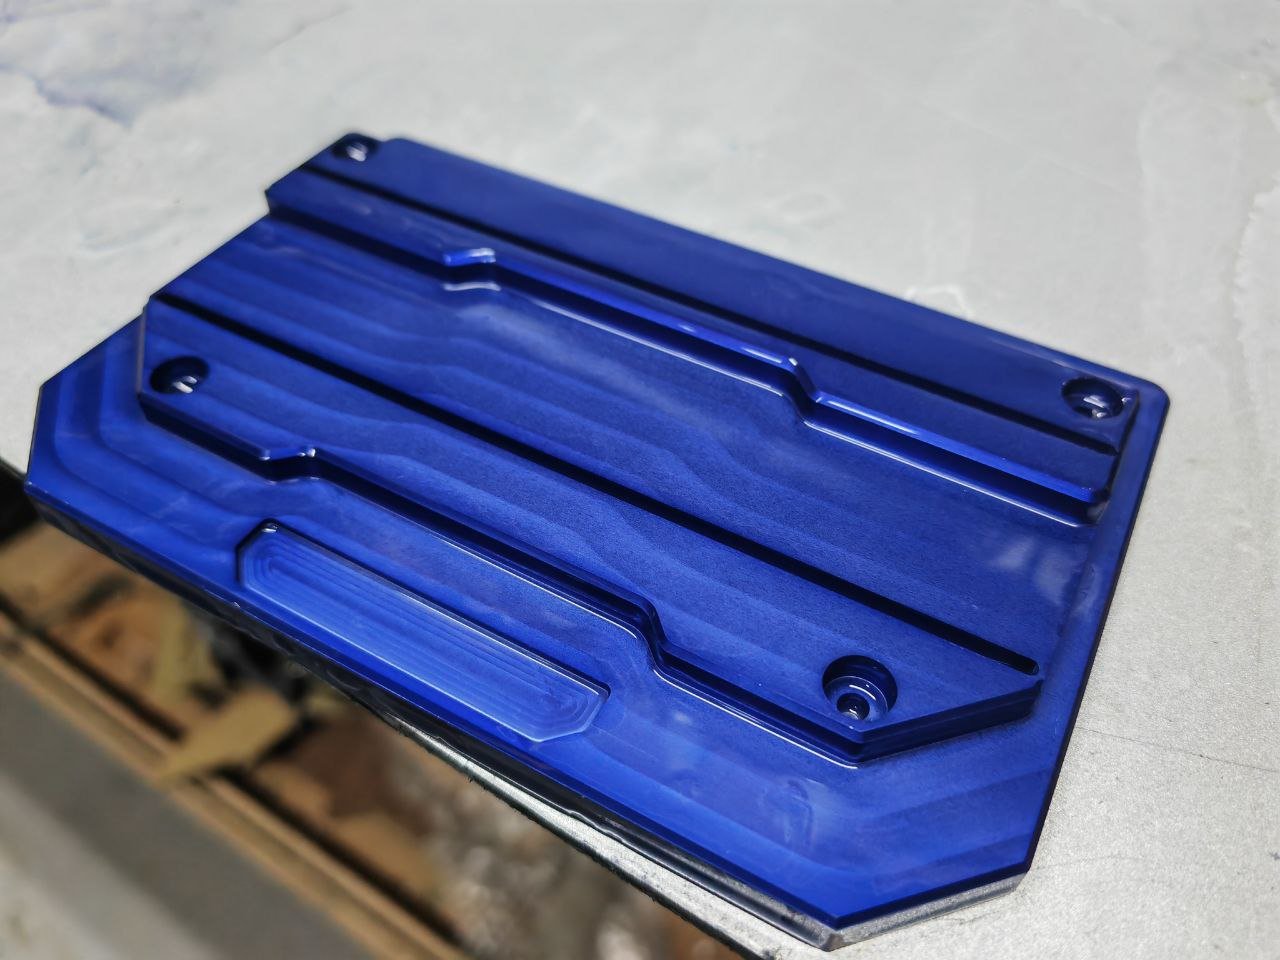
My diy anodize system 3Amp with automatic voltage psu Dipping the part in 15% sulfuric acid for 1 hours Not sure what blue colour is this more like with purple tint dye Waiting the part to dry for awhile before sealed process Done look very nice with tool mark.thumb.jpg.825cf9266fb1839cadbc2dc9a225e4c9.jpg)
.thumb.jpg.72cbc8b7d562622f201d62d021fad9f2.jpg)
.jpg.20524d9f3836170d91d519f2eb75b5d9.jpg)
.thumb.jpg.7e4084e485c3a51e333c35e58fc9c6de.jpg)
.thumb.jpg.e0cd2ebee66aa2e96b928c2125b3bb61.jpg)


-
[Malaysia] Ahmad Safuan
WanV replied to TT Amanda's topic in 2023 Thermaltake RAM MOD Invitational Season 1
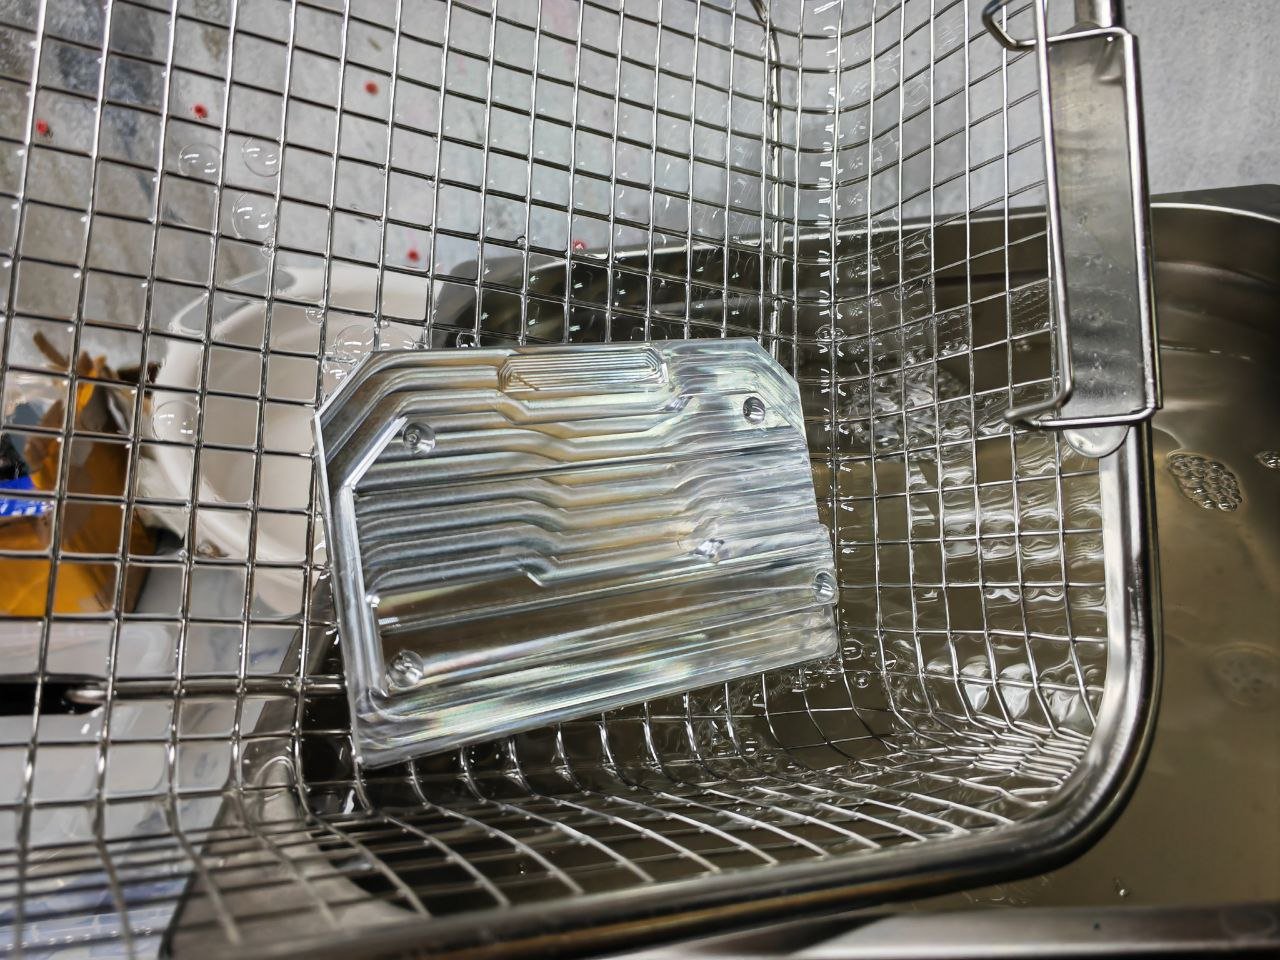
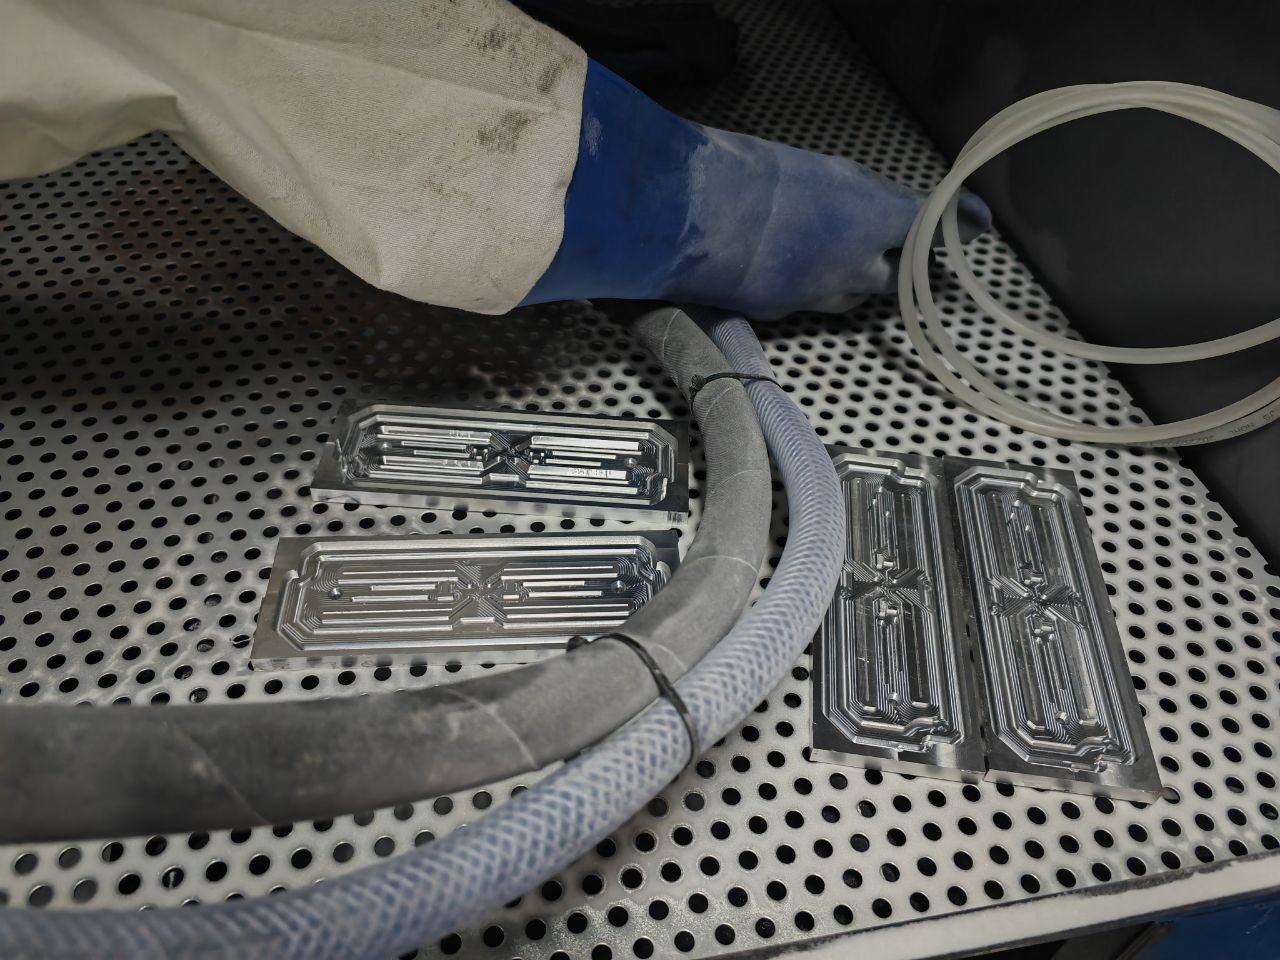
at the same time im doing some ram base to stick for showcase Cleaning the part to remove all grease with ultrasonic cleaner the part look nice and clean Etching process ,im not trying to remove all the tool mark just to make it less visible so it have some texture that why i am machine with that pattern Etching with NaoH 2% solution to water its react very fast
.thumb.jpg.31d8414913645a1a7000a538e01d45d2.jpg)
.thumb.jpg.4ebeea3be9f5b32bad3979c98135866f.jpg)

.thumb.jpg.205524c36dbf805382711da35e28bc98.jpg)
-
[Malaysia] Ahmad Safuan
WanV replied to TT Amanda's topic in 2023 Thermaltake RAM MOD Invitational Season 1
flipping part to do some chamfer with diamond bit
-
[Malaysia] Ahmad Safuan
WanV replied to TT Amanda's topic in 2023 Thermaltake RAM MOD Invitational Season 1
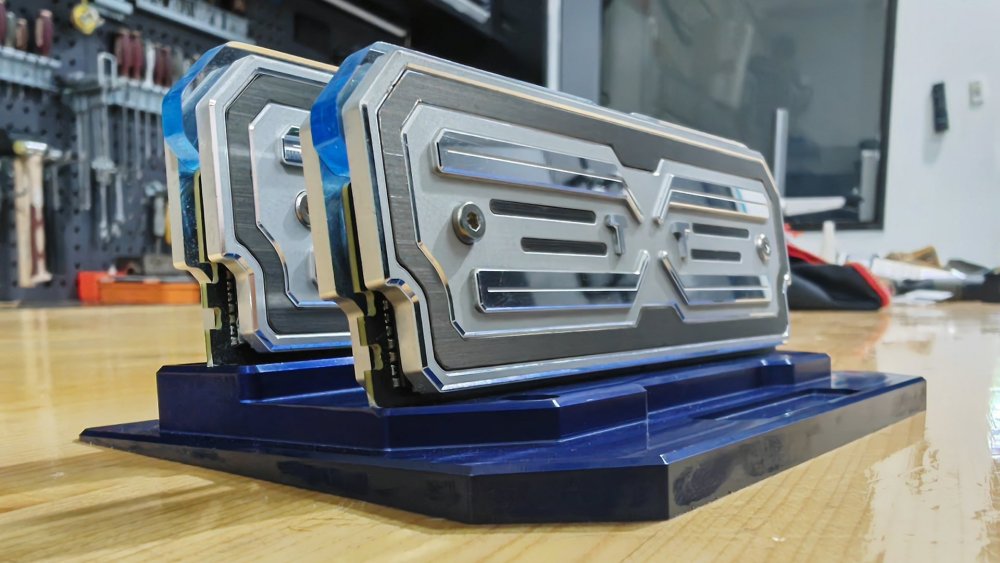
Once done sandblasting i am trying to make all the ram will fit side by side on motherboard slot ,this process will remove some material to make it thinner and added some position circle to flip the part and chamfering,since after sand blast all the shiny part is gone.
-
[Malaysia] Ahmad Safuan
WanV replied to TT Amanda's topic in 2023 Thermaltake RAM MOD Invitational Season 1
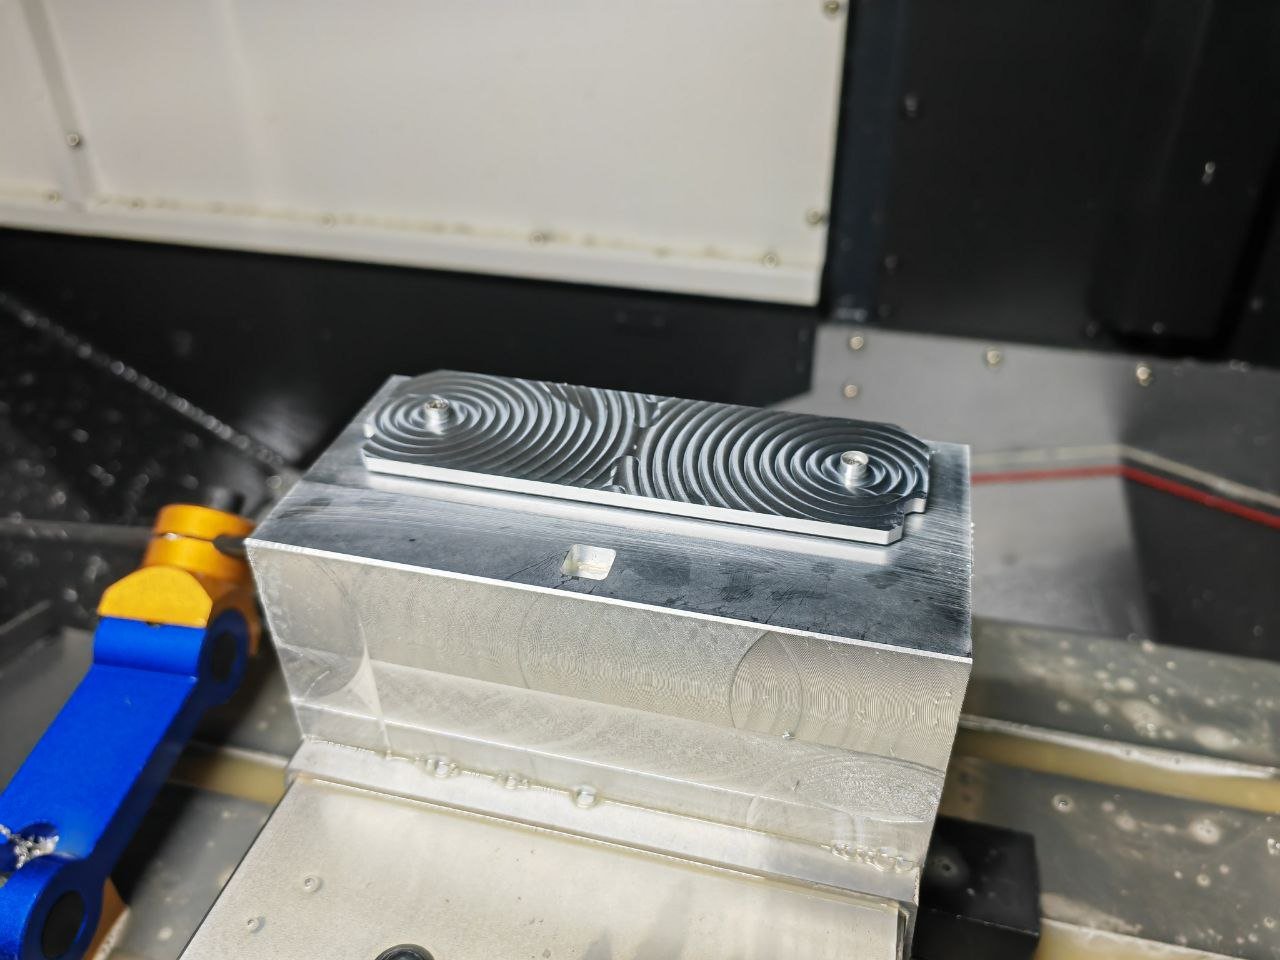
for this part we sandblast the part with glass bead to increase visual effect for added element later..thumb.jpg.27aa9afb47dbef7ca9d2868f5337b82e.jpg)

.thumb.jpg.56e2eab3cb6f80b1080fc78faef386b8.jpg)
.thumb.jpg.ceee00f8b10714a30c63617e40d49dca.jpg)
-
[Malaysia] Ahmad Safuan
WanV replied to TT Amanda's topic in 2023 Thermaltake RAM MOD Invitational Season 1
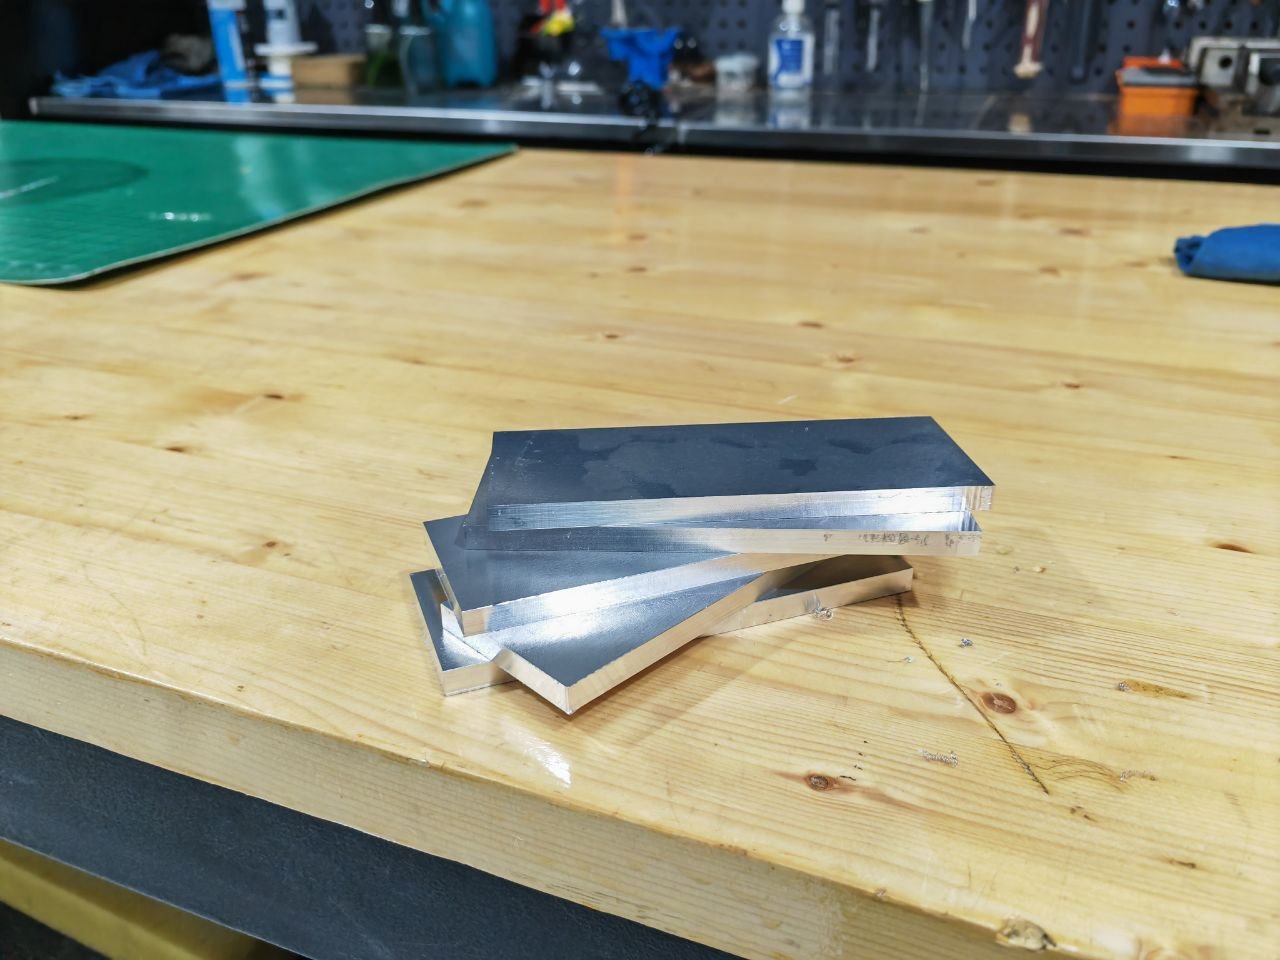
Machining 5052 Alu ,its just rough still need alot of finish and machining..thumb.jpg.b1736a1ae28d8c09f7fa00926b8d1072.jpg)
.thumb.jpg.33bd47866c79b0004084c7042c281c29.jpg)
-
[Malaysia] Ahmad Safuan
WanV replied to TT Amanda's topic in 2023 Thermaltake RAM MOD Invitational Season 1
Cutting 8mm aluminium large sheet to small size for better fixturing and precision since im going to maintain flatness for all heatsink.thumb.jpg.e38f8ab071df7f88f2aad3e8f8191ee0.jpg)
.thumb.jpg.cafd3cf9a4625df4bb413a4f85094f81.jpg)

-
[Malaysia] Ahmad Safuan
WanV replied to TT Amanda's topic in 2023 Thermaltake RAM MOD Invitational Season 1
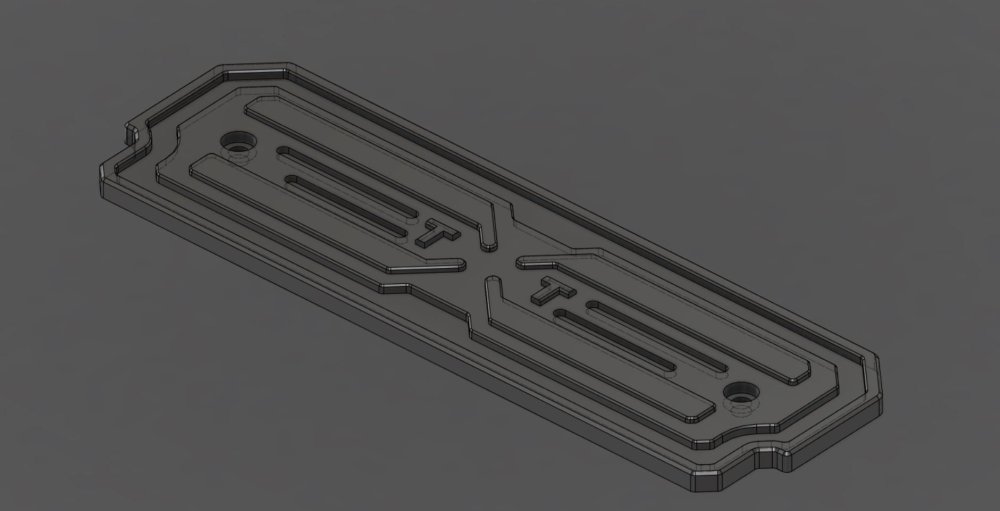
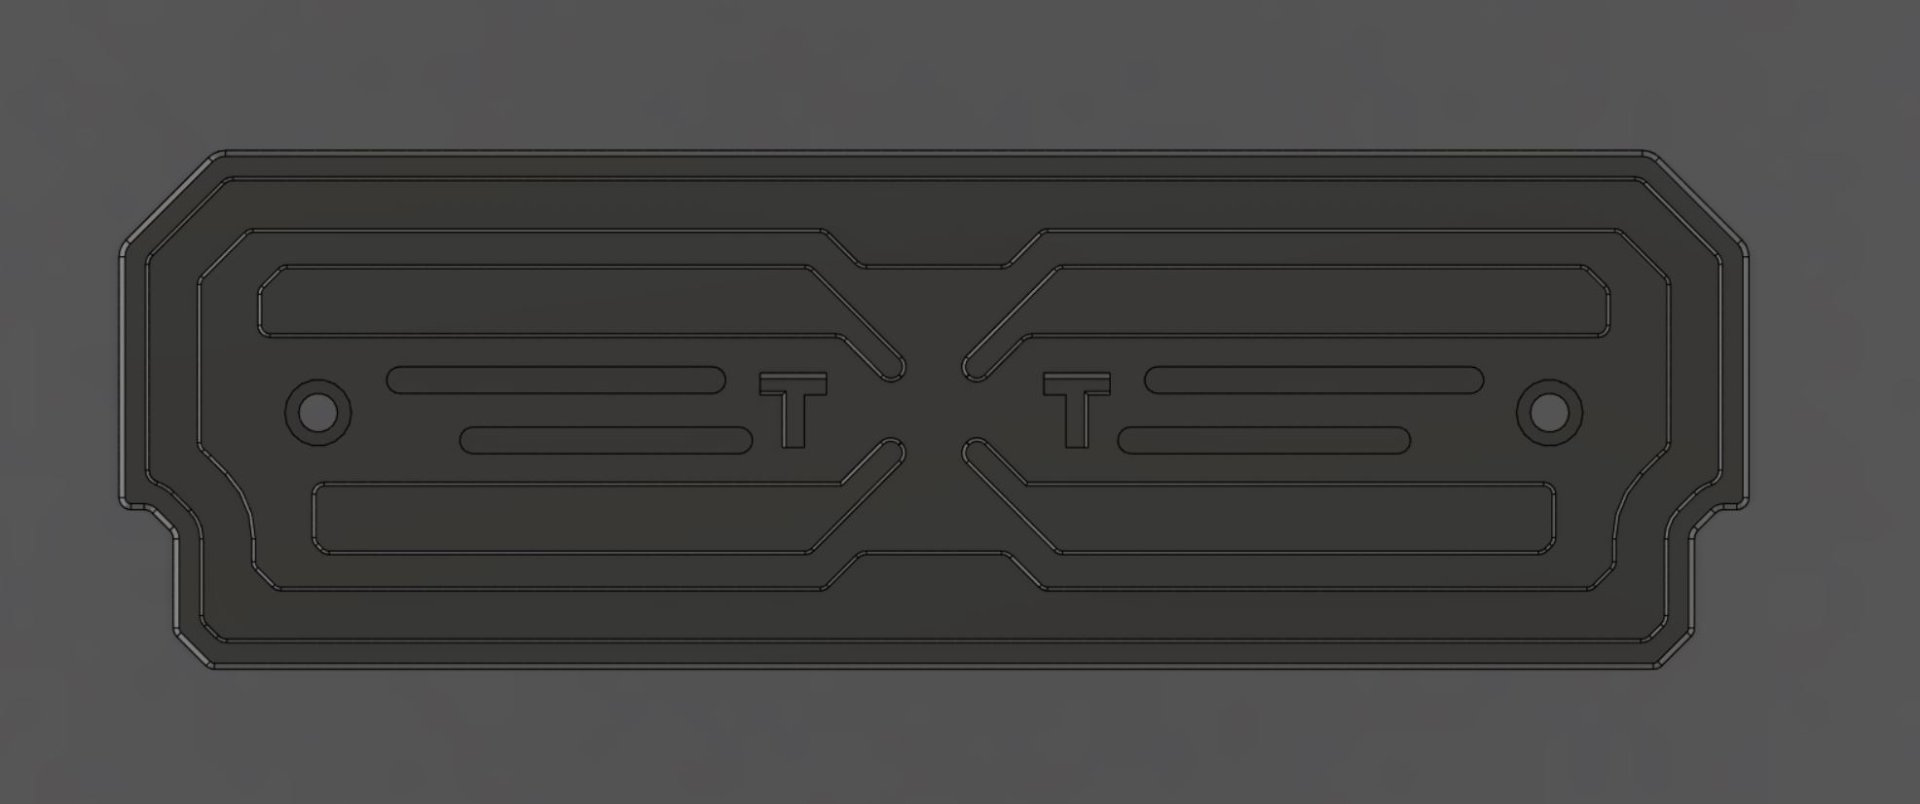
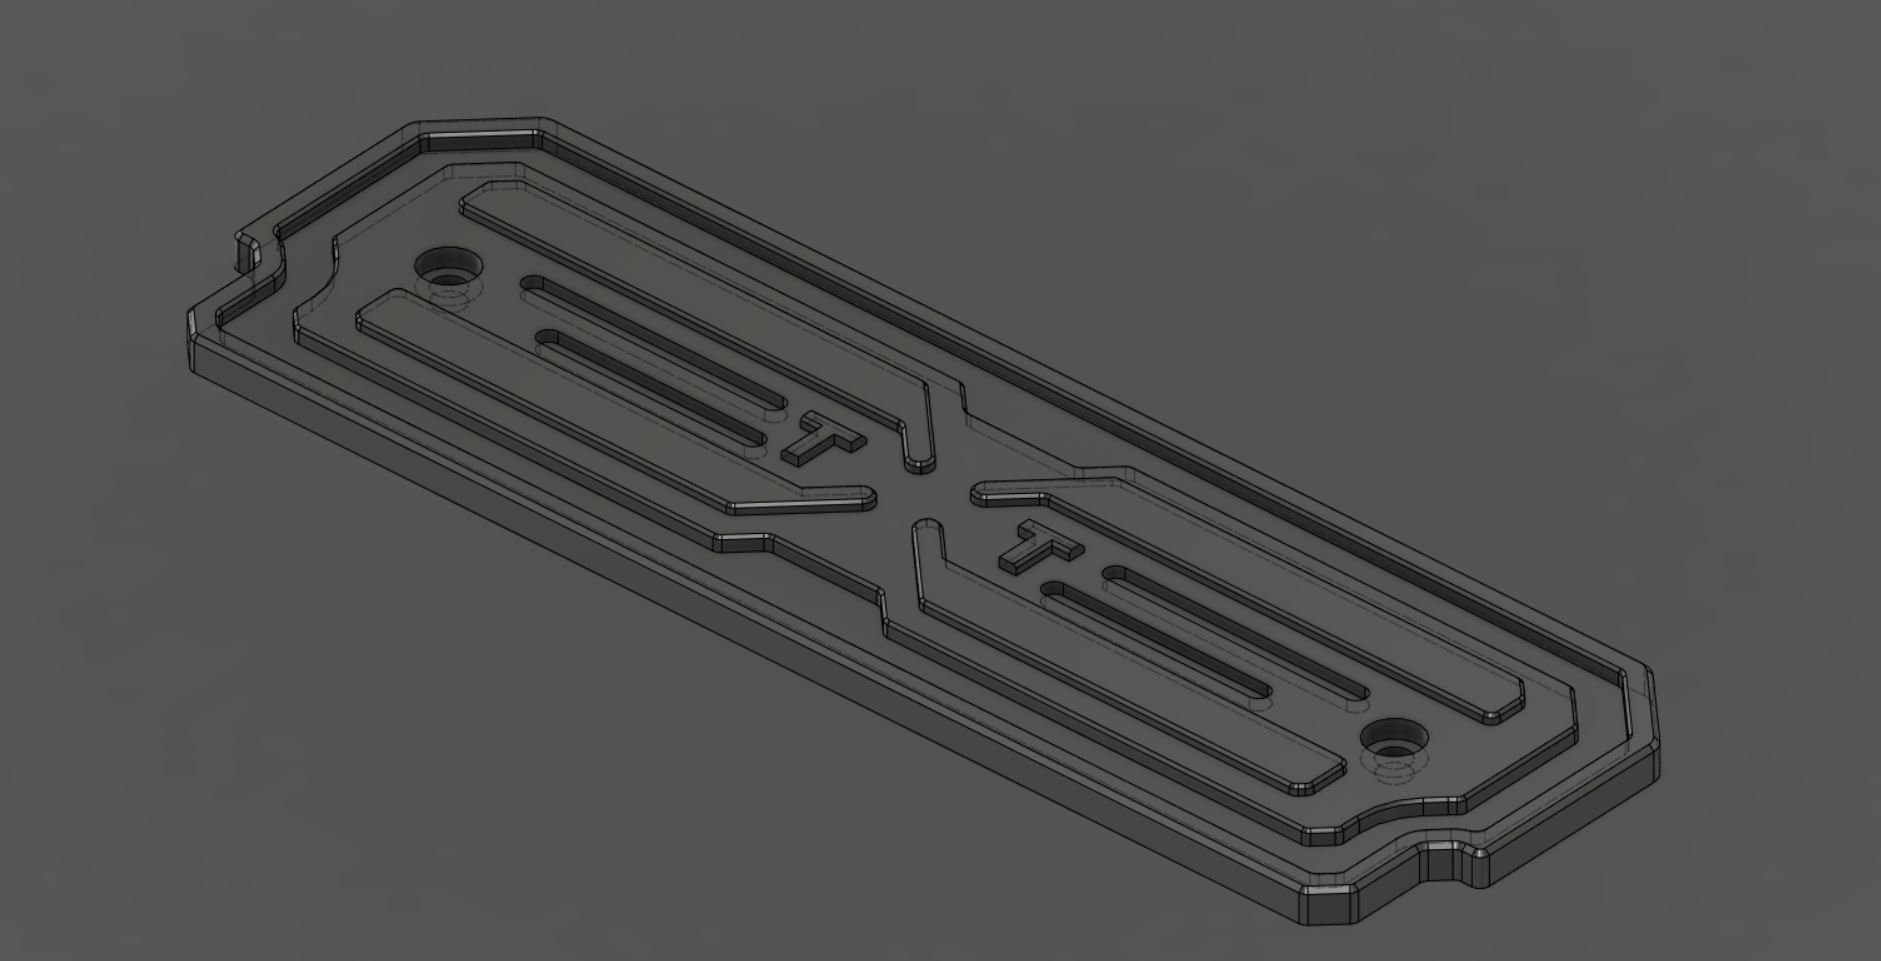
All design made in Fusion 360 ,originally trying to make it fancy but im trying to keep it simple and look premium,so im not going to use original heatsink and just totally made a new heatsink for it,to improve cooling performance and look its ram mod after all ;D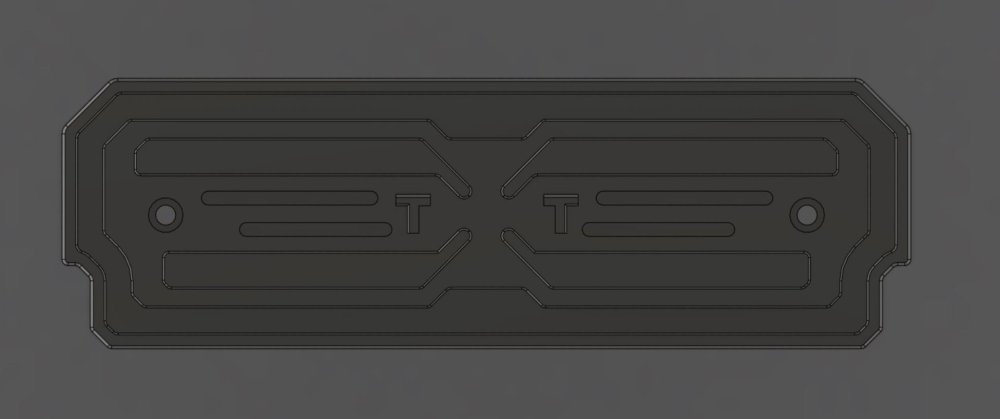
-
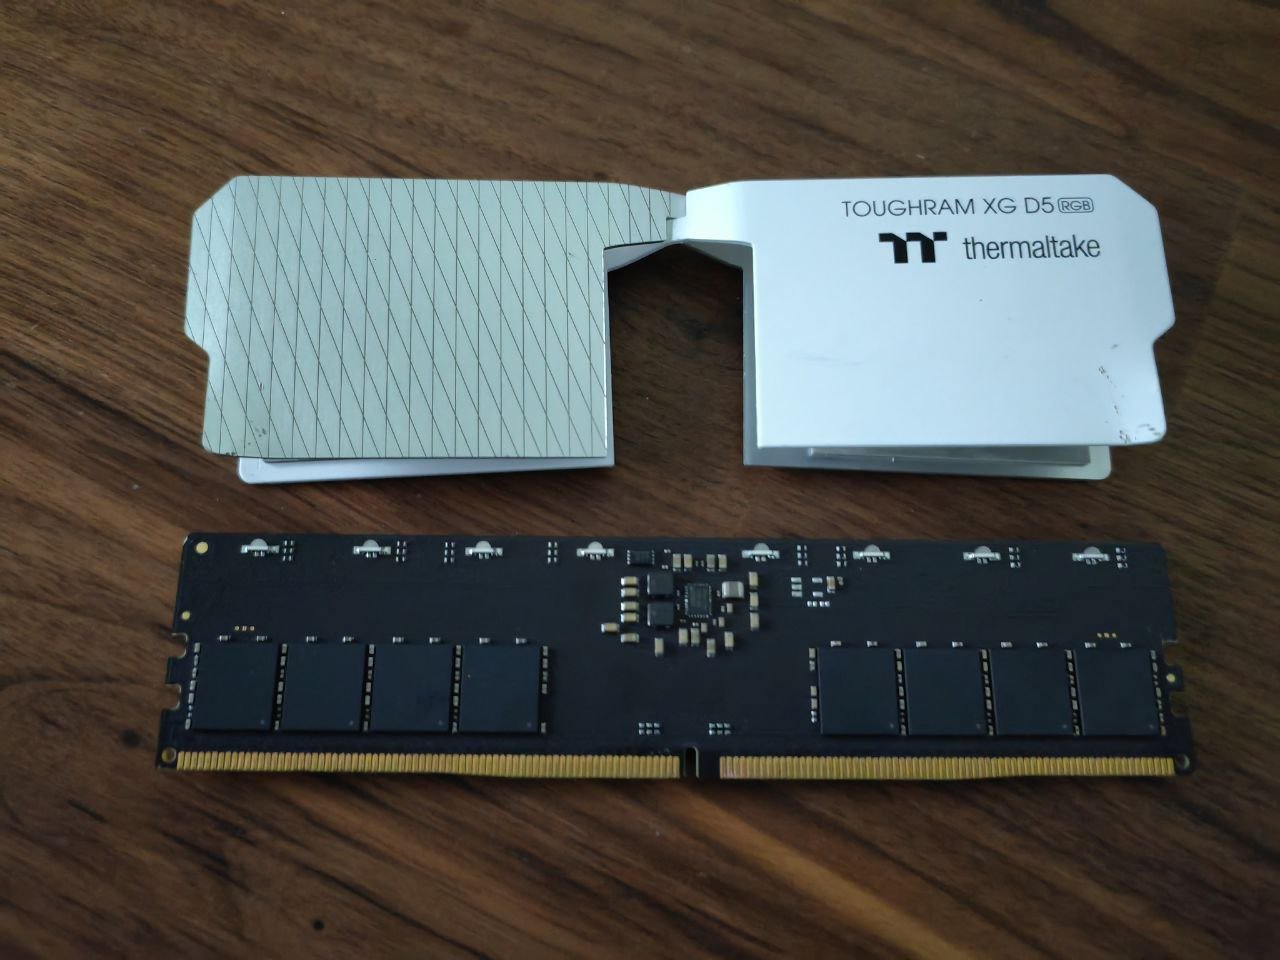
[Malaysia] Ahmad Safuan
WanV replied to TT Amanda's topic in 2023 Thermaltake RAM MOD Invitational Season 1
dismantled Thermaltake DDR5 Ram for measurement,pretty easy to remove original heatsink with heatgun since its all stick with double tape.
.thumb.jpg.30265ab439c94cadf0ae7a65730cb330.jpg)
-
 mrahmat9 reacted to a post in a topic:
[Malaysia] Ahmad Safuan
mrahmat9 reacted to a post in a topic:
[Malaysia] Ahmad Safuan
-
Jean R built reacted to a post in a topic:
[Malaysia] Ahmad Safuan
-
Jean R built reacted to a post in a topic:
[Malaysia] Ahmad Safuan
-
Final Voting Starts Now!
WanV replied to TT Lily's topic in 2021 Thermaltake CaseMOD Invitational Season 1
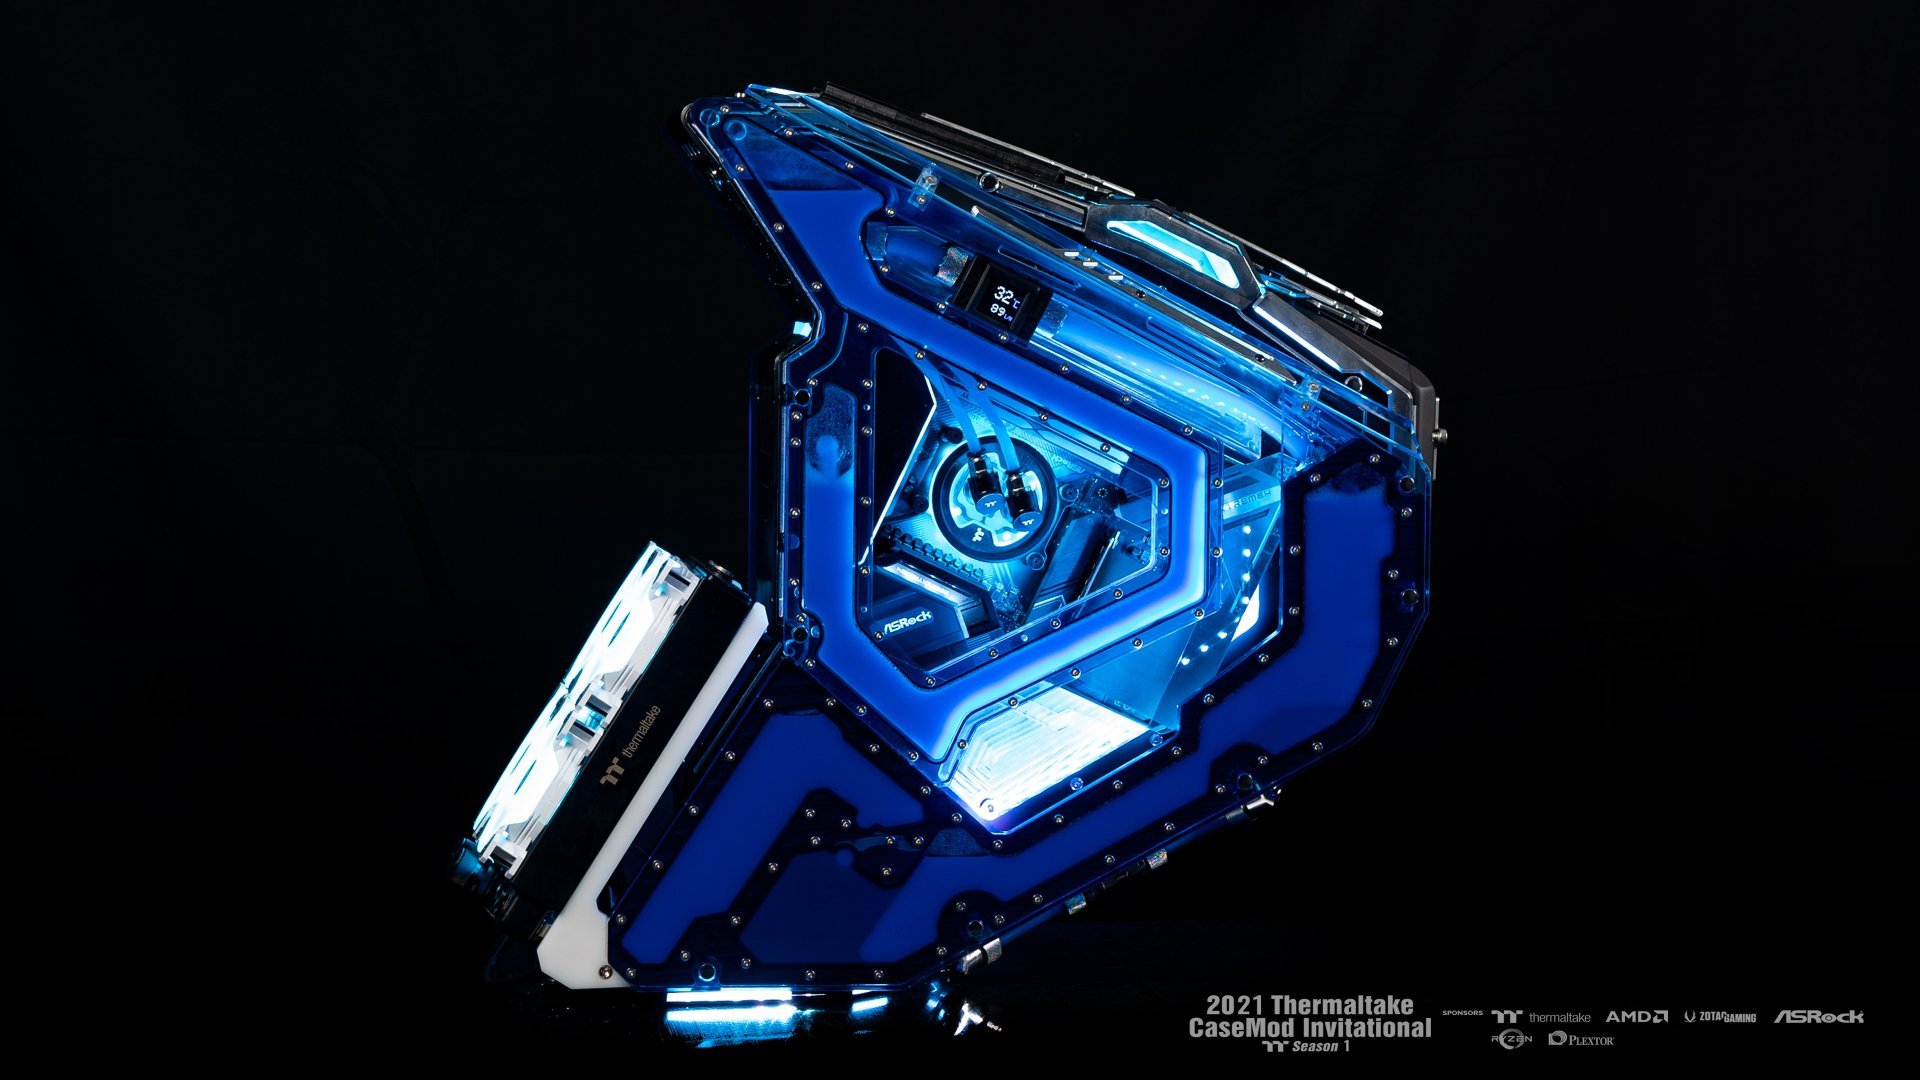
my vote go for clerence while my case look right his looking left -
WanV reacted to a post in a topic:
[Malaysia] Ahmad Safuan
-
 WanV reacted to a post in a topic:
[Malaysia] Ahmad Safuan
WanV reacted to a post in a topic:
[Malaysia] Ahmad Safuan
-
MERRICK reacted to a post in a topic:
[Malaysia] Ahmad Safuan
-
WanV reacted to a post in a topic:
[Malaysia] Ahmad Safuan
-
[Malaysia] Ahmad Safuan
WanV replied to Tt Andy's topic in 2021 Thermaltake CaseMOD Invitational Season 1
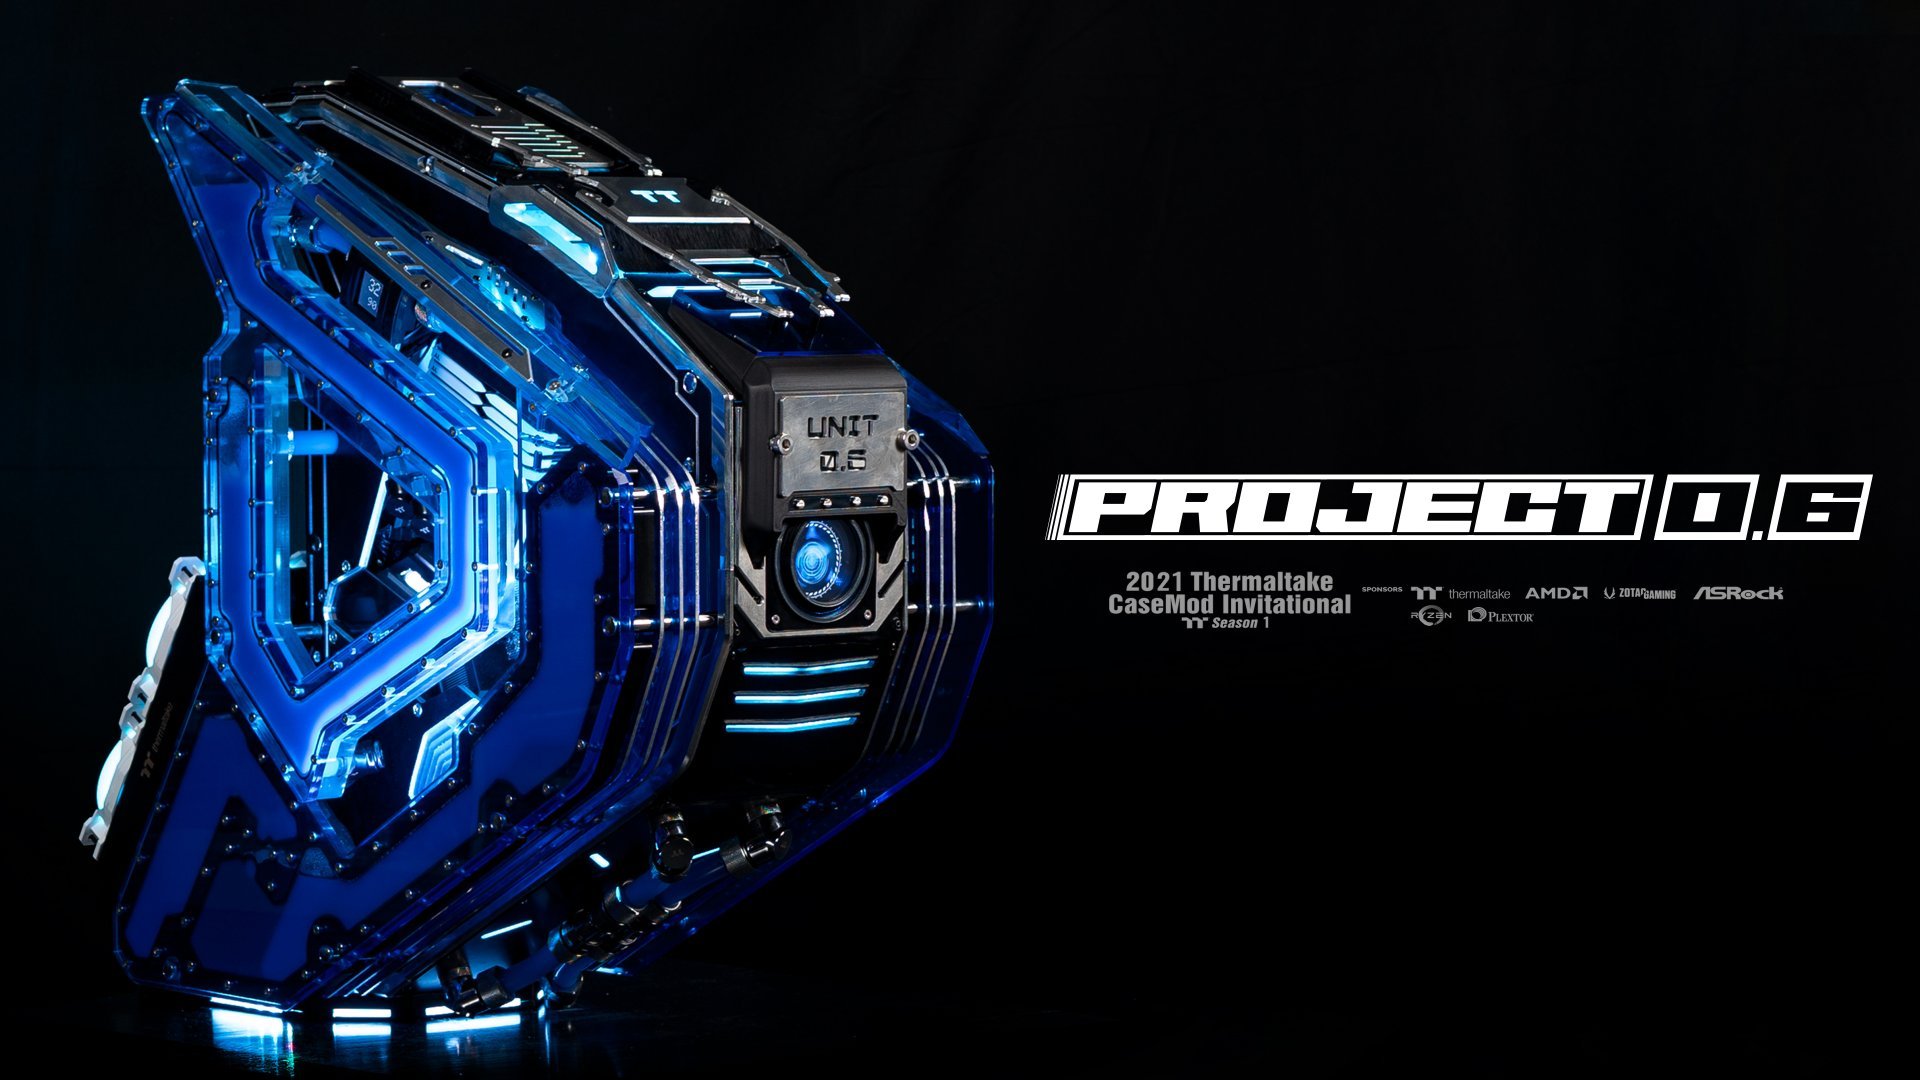
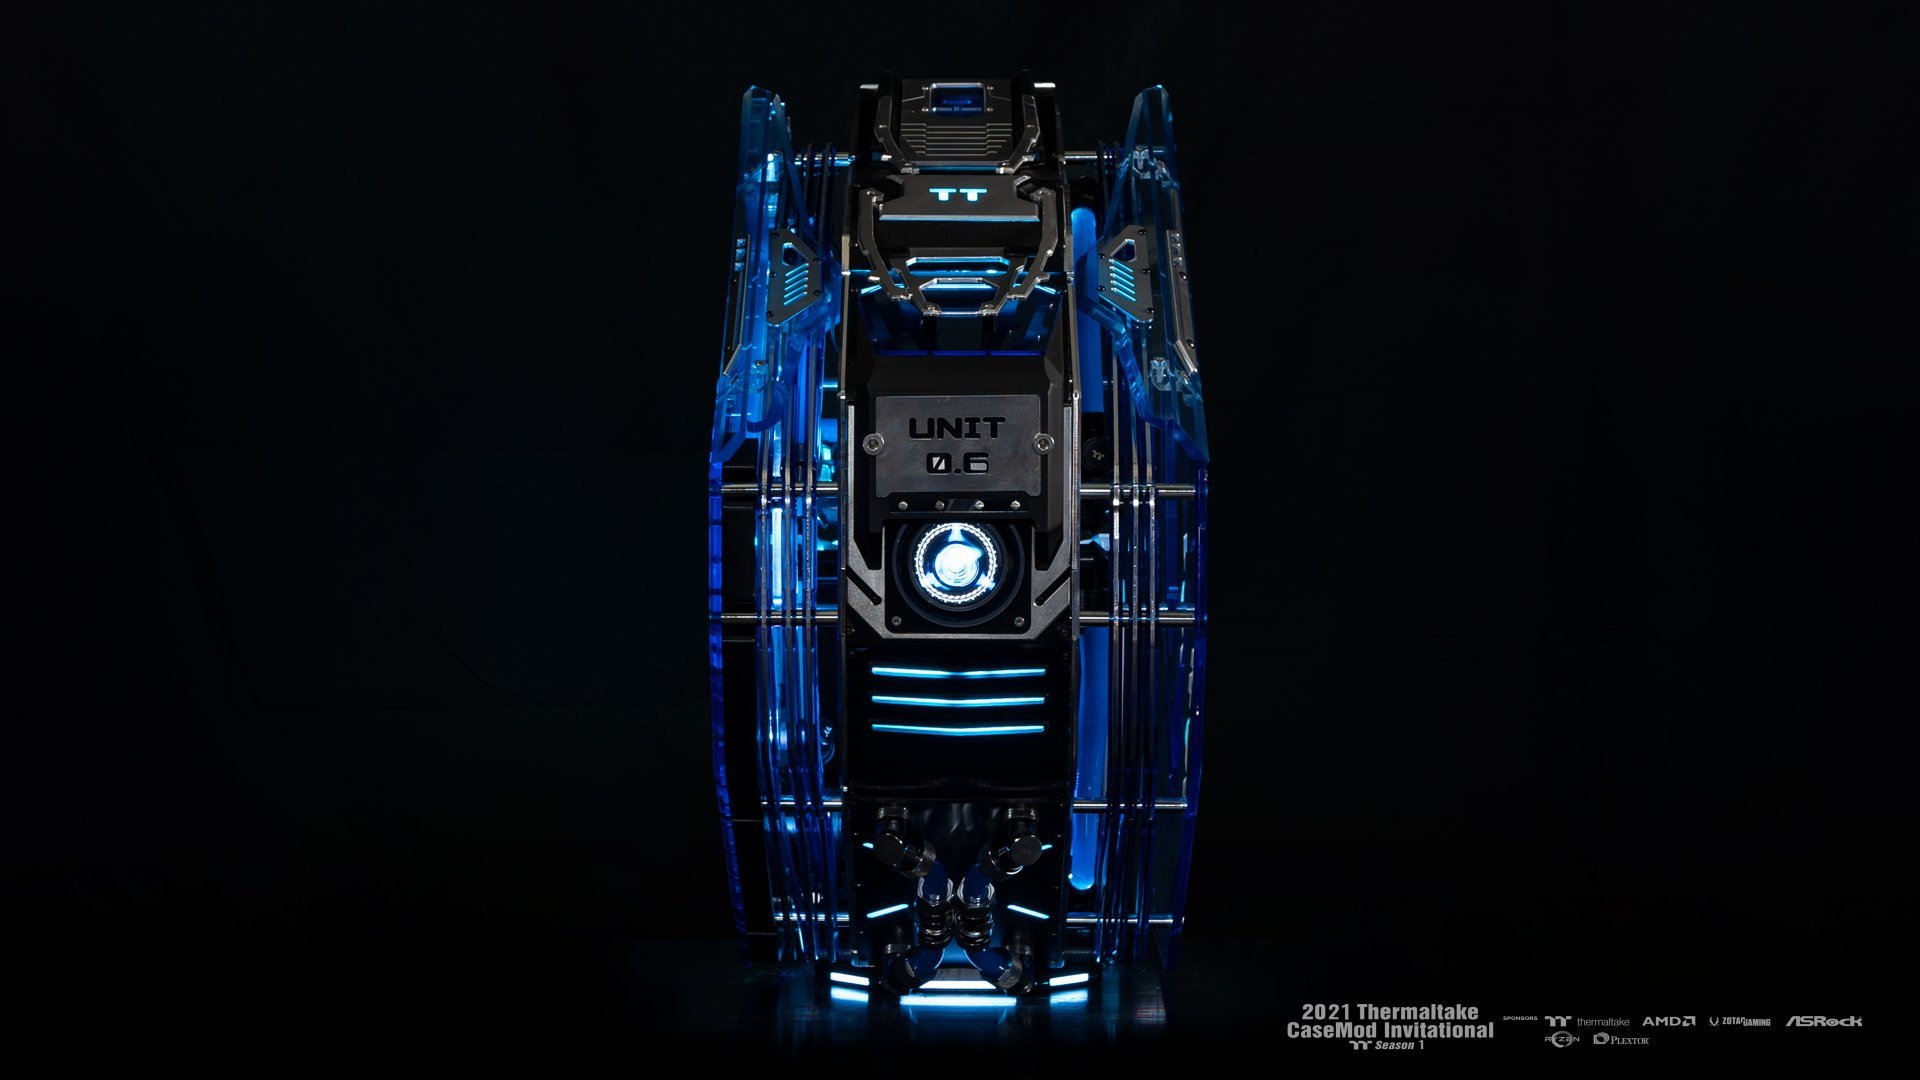
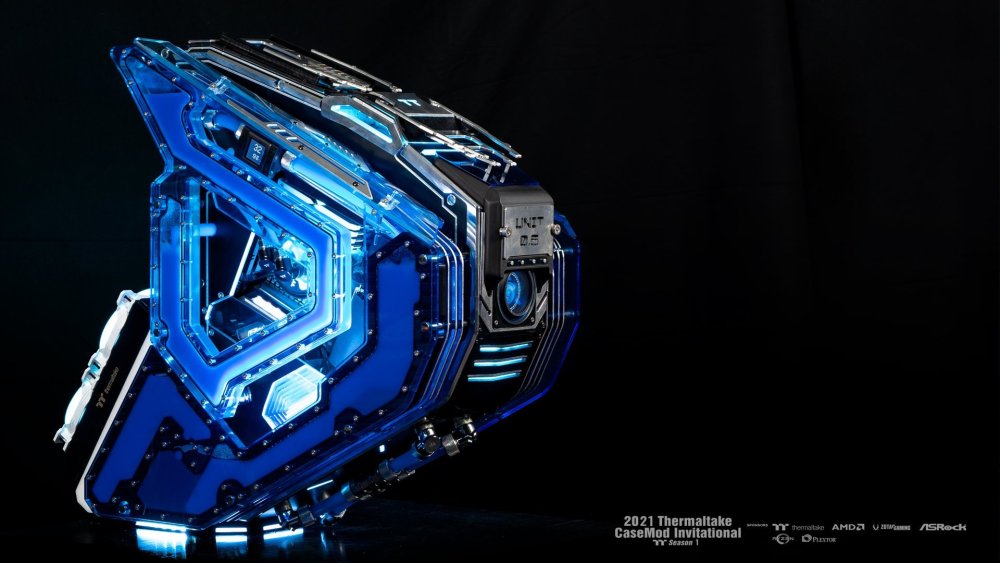
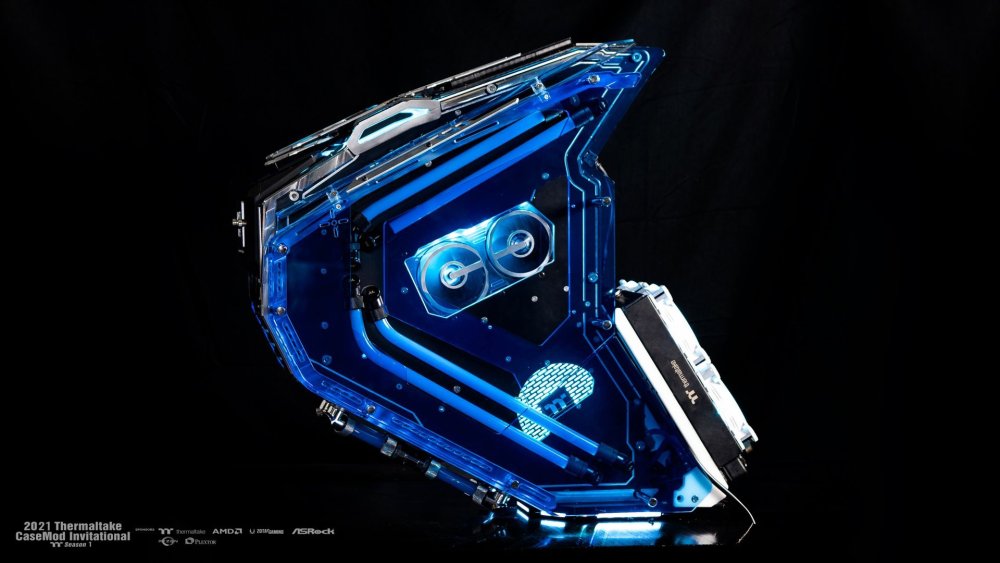
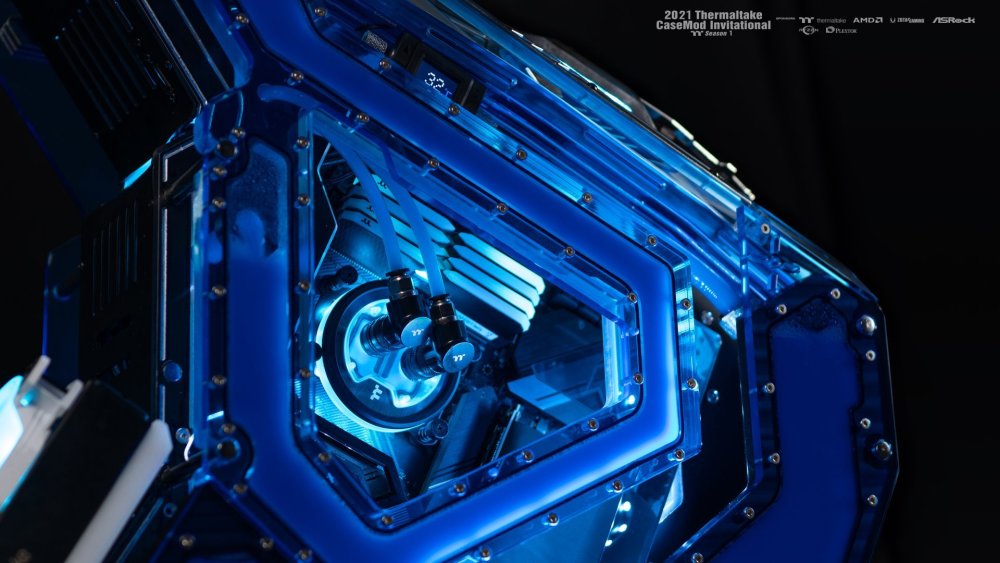
Thanks for all support and comment that all of you give me,overall my thought about this case mod is quite tiring and painful to be done,that true i use alot of part with cnc machine to have the shape but overall there alot of hand work and sanding to be done for finishing to get this effect for using such a cheap cnc machine that have finishing problem. alot of part need to be hand fix such a problem with roundness and material flex,overall its a satisfying result for me that i design with Fusion 360 took almost 3 weeks and the end product look exactly with what i imagine in design. Final photo for PROJECT 0.6 sorry for video wobble we already use gimbal but forgot to calibrate, first time doing video sorry about that and enjoy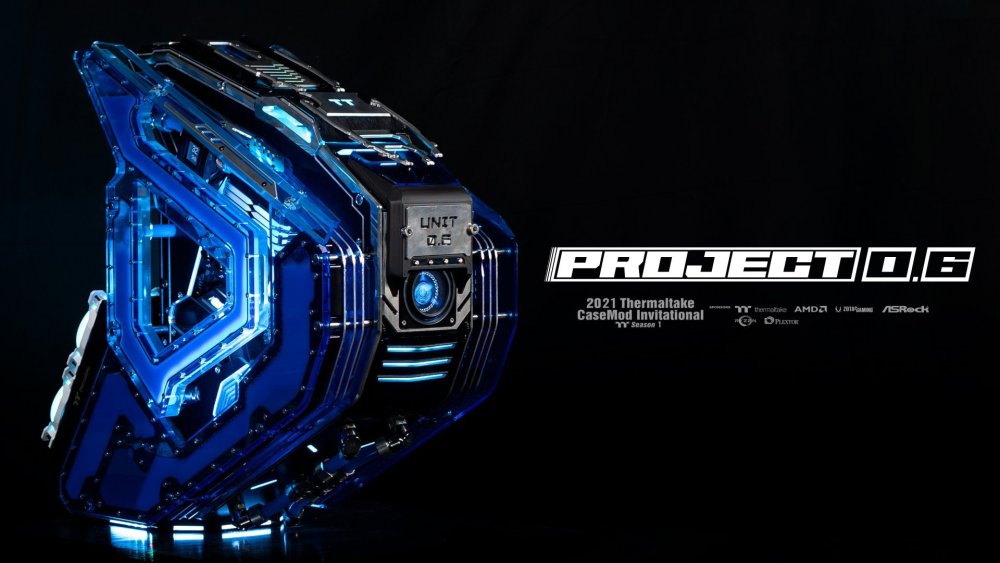


-
MERRICK reacted to a post in a topic:
[Malaysia] Ahmad Safuan
-
[Malaysia] Ahmad Safuan
WanV replied to Tt Andy's topic in 2021 Thermaltake CaseMOD Invitational Season 1
already done assemble all the part will release the photo and video soon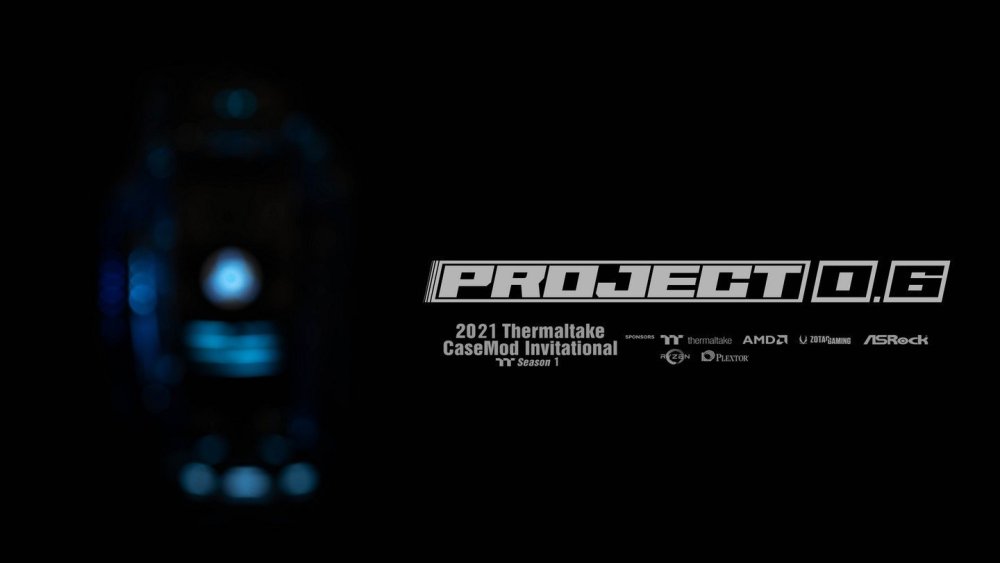

.jpg.e64d22cf2110645c8f6daf31d28875c8.jpg)
.jpg.f7c7c607acd1d67632f1476385004130.jpg)
.jpg.789050be823a63c245554f101620a982.jpg)
.jpg.1a8405a91a574742afb0228a2050f984.jpg)
.jpg.7f2f8496ea57ded423dc773d26be9a0f.jpg)
.jpg.2d3f06482e4bd8a5a68960f11161cf12.jpg)

.jpg.063675152627a595b9560cd5a93e0b92.jpg)
.jpg.2ee278e9c87c950fd1253a9e7aac61ec.jpg)
.jpg.861de6120cf7cc7740473f7c08385af9.jpg)

.jpg.4c942eb6a5656ad52679c1040b25291a.jpg)
.jpg.da533b601290efc432aa599b69b89e03.jpg)
.jpg.9e334ceee6237f73423315a5cd04763a.jpg)
.jpg.c321bd1197e8c39475b6848a633f40de.jpg)
.jpg.cb720b6d068f5cf22378b41d02e960c0.jpg)
.jpg.d745075f93c60ca7a93e3160b0c99a06.jpg)
.jpg.c70d635231aace992e04eca670c1ae48.jpg)
.jpg.3ea891104dcecdc14c4702960241db6e.jpg)