-
Forum Statistics
7.5k
Total Topics50.7k
Total Posts -
Member Statistics
135,974
Total Members16,800
Most Online


Wingfat
-
Posts
13 -
Joined
-
Last visited
-
Days Won
2
Wingfat's Achievements
Just Getting Started (2/10)
11
Reputation
-
 ThermalMike reacted to a post in a topic:
Broken reservoir\ pump (only 20 days old)
ThermalMike reacted to a post in a topic:
Broken reservoir\ pump (only 20 days old)
-
Tt Andy reacted to a post in a topic:
Broken reservoir\ pump (only 20 days old)
-
It was a pleasure to speak with you today.... Tonight I received the UPS label for shipment back to California. I have included a small section of tubing for your inspection. Looking forward to reinstalling system. Thanks again, Jeff
-
Thank you for your quick reply.... I bleed the system on and off for 5 days and left the system in a vertical position for at least 3 of those days. I was being very cautious as per the prior warnings. Initially the fill port cap was off for a minimum of the first two days. I guess I should call customer service this morning?
-
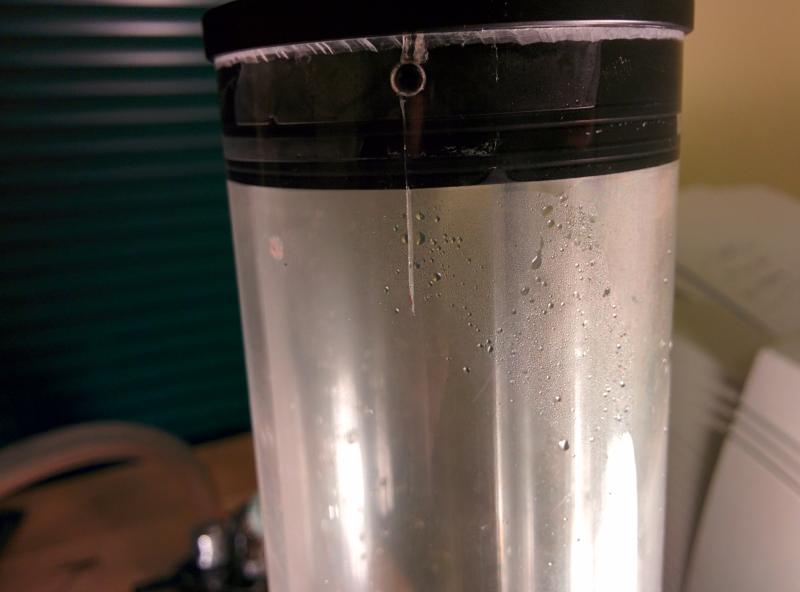
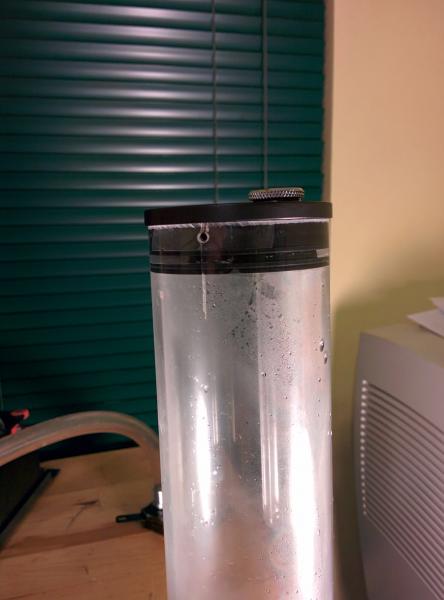
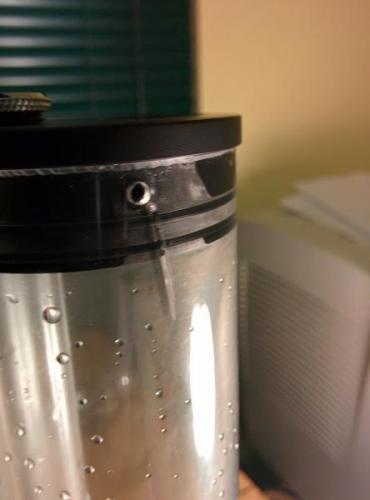
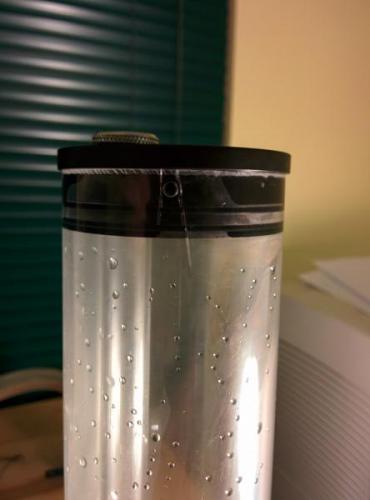
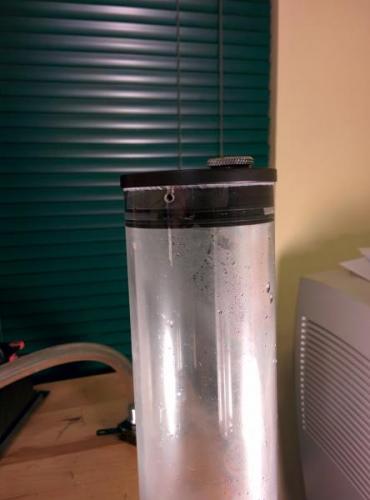
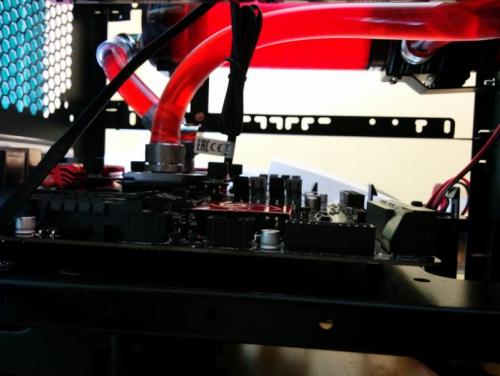
I really don't know how to say this... so I'll just post some photos... My system started booting and rebooting a few times and then stopped. I pulled the power to find about a tablespoonful of coolant sitting on the motherboard. I didn't notice any loose connections so I pulled the cooling system and rinsed it out to start clean.... Then I noticed the cracks on either side of the reservoir.... I'm very upset. The system was actually off for 2 days prior to the leak (or more accurately) the MB malfunction.

-
ThermalMike reacted to a post in a topic:
RL-240 Water Kit / Core V21 Build Photos
-
Tt Kenny reacted to a post in a topic:
RL-240 Water Kit / Core V21 Build Photos
-
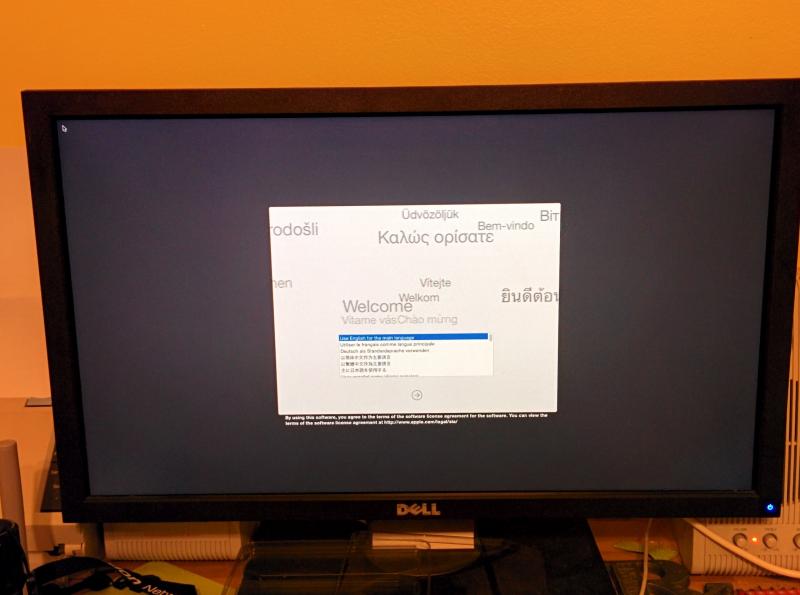
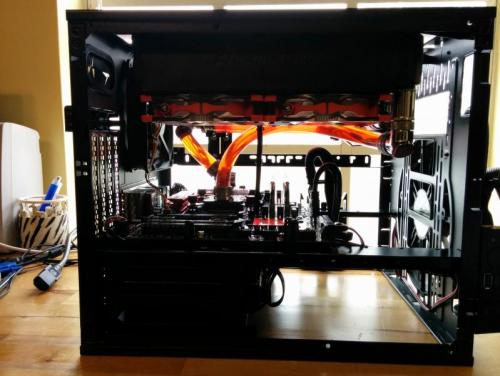
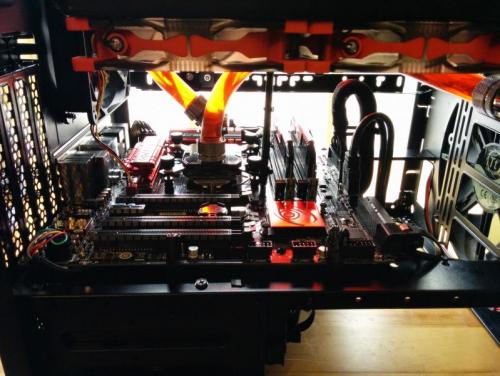
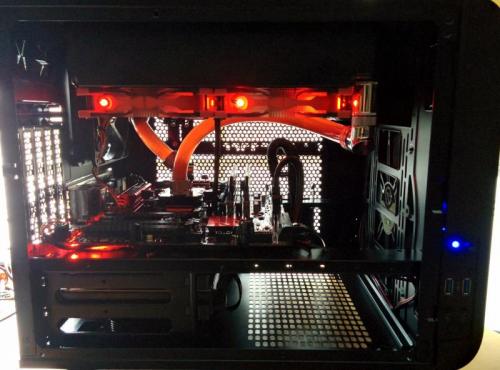
Final Touches... threw a GT-640 in there .."just" enough clearance. Loading OSX 10.10.2 Yosemite... For those not familiar with OSX... what your looking at is the Apple Welcome Screen. Absolutely no problem or commands needed... too easy.


- 8 replies
-
- 2
-
-
- pacific
- thermaltake
- (and 5 more)
-
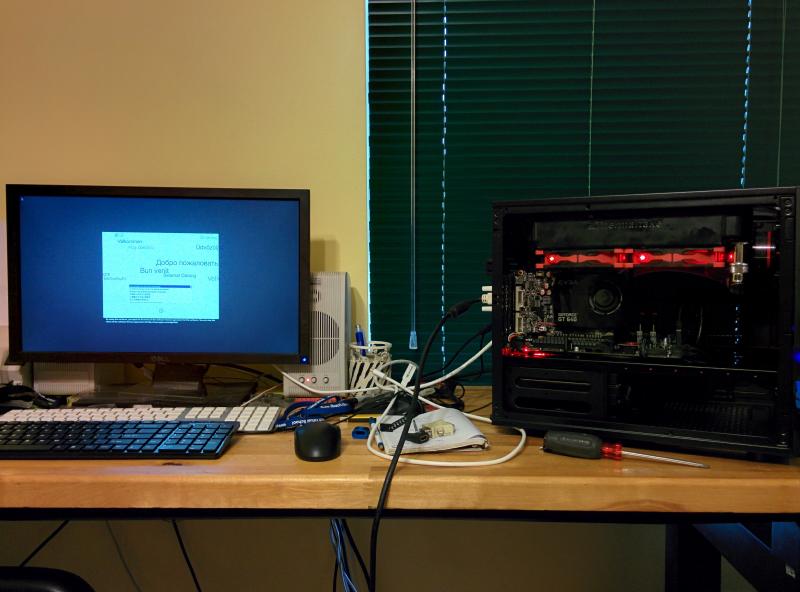
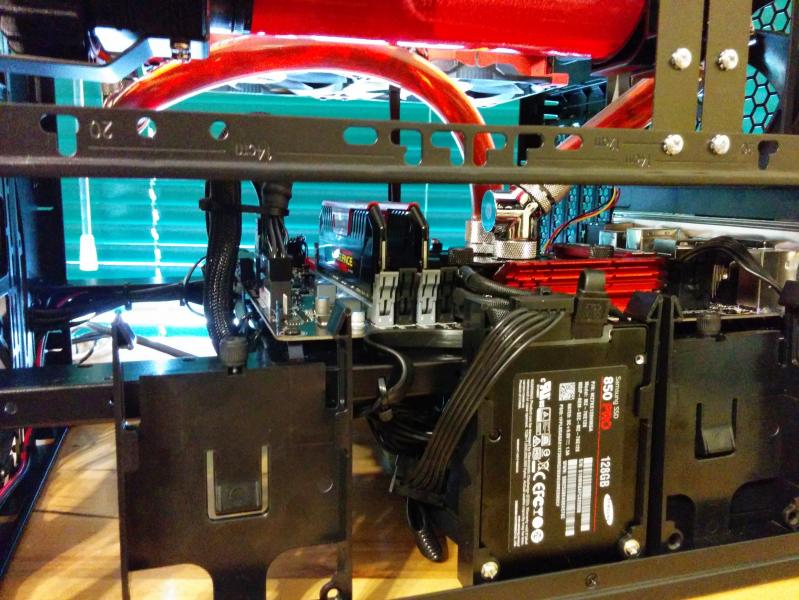
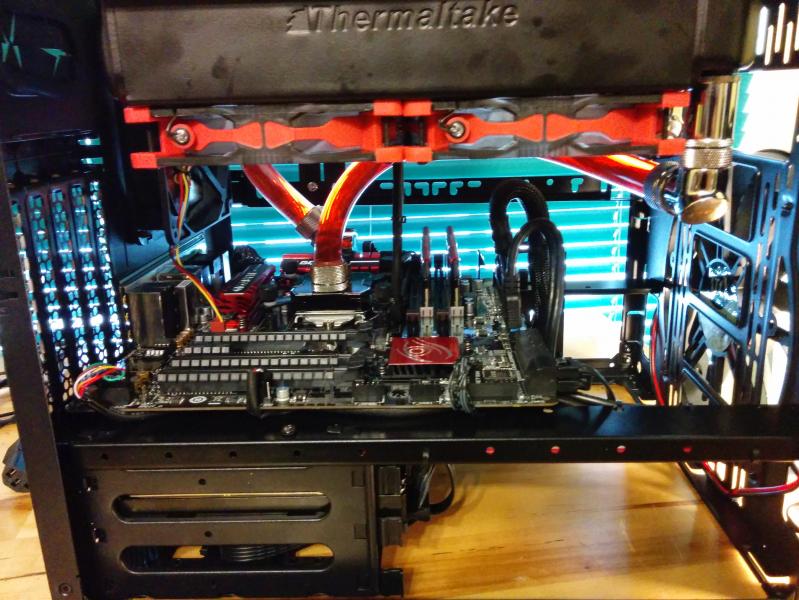
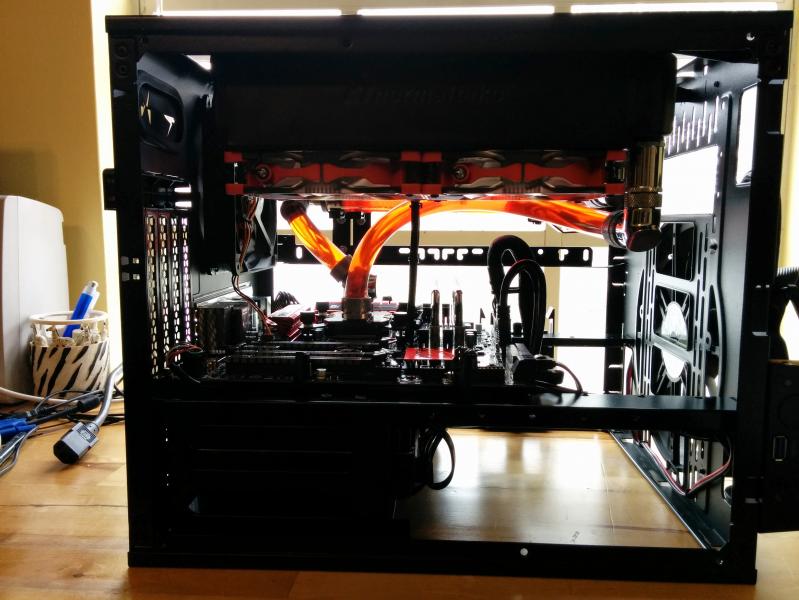
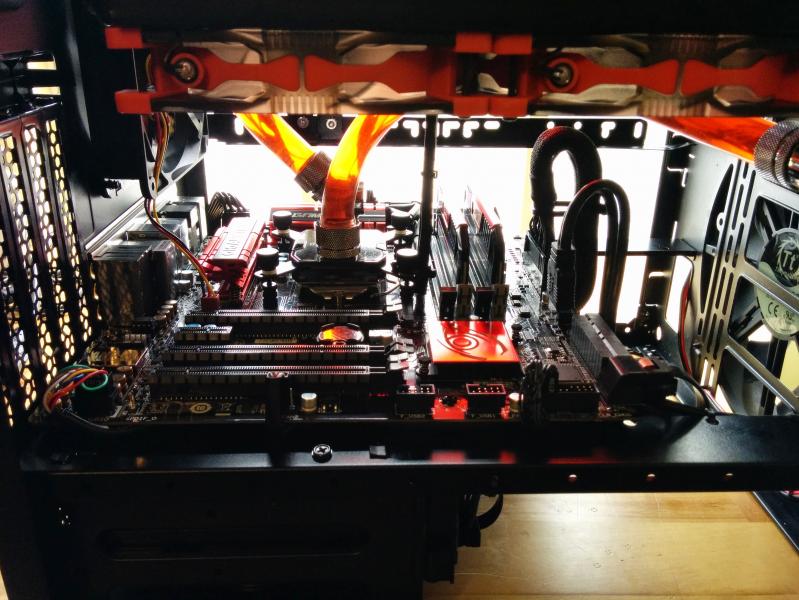
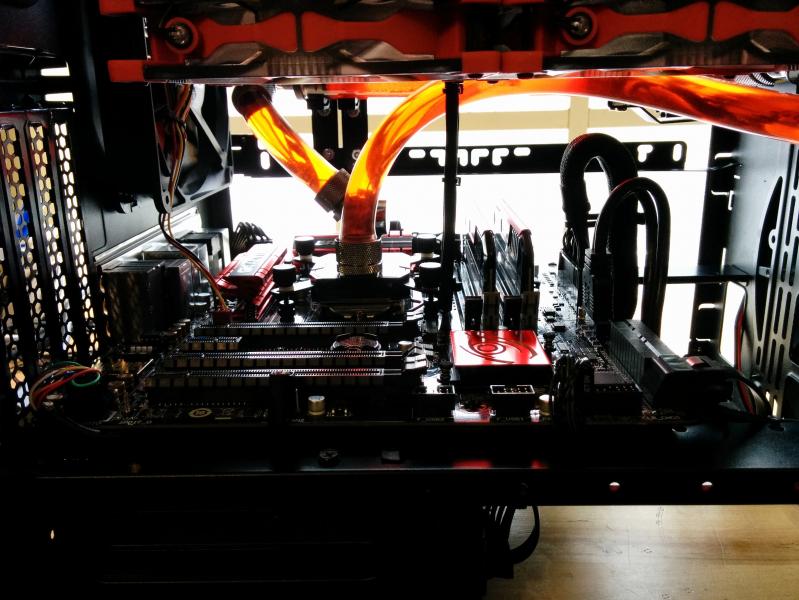
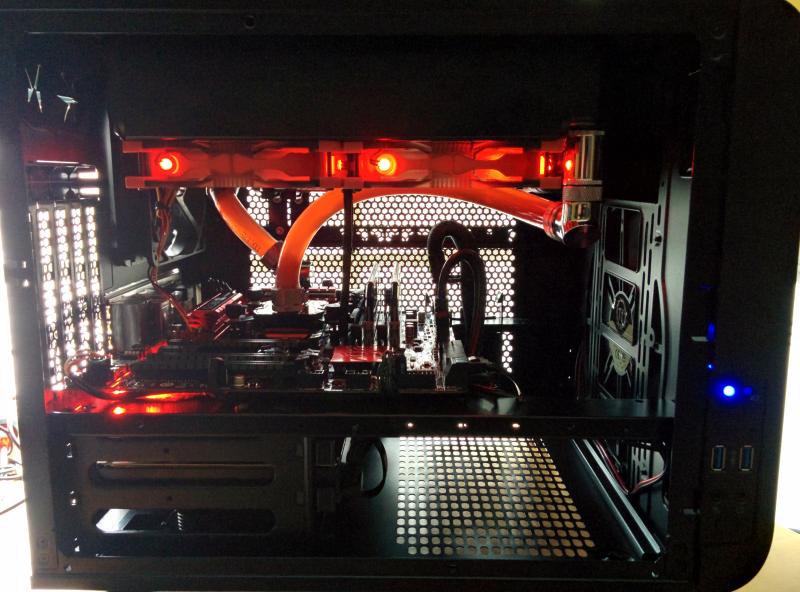
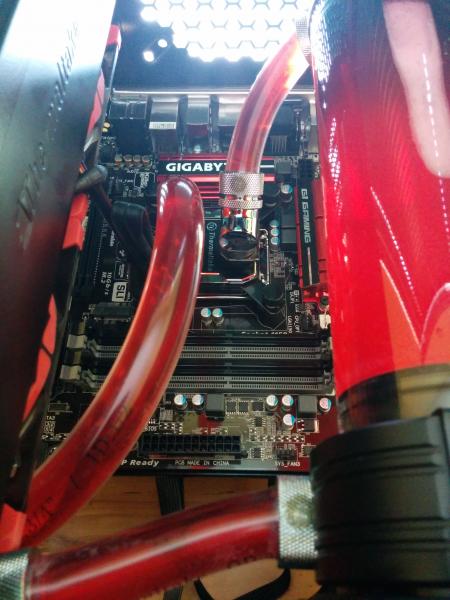
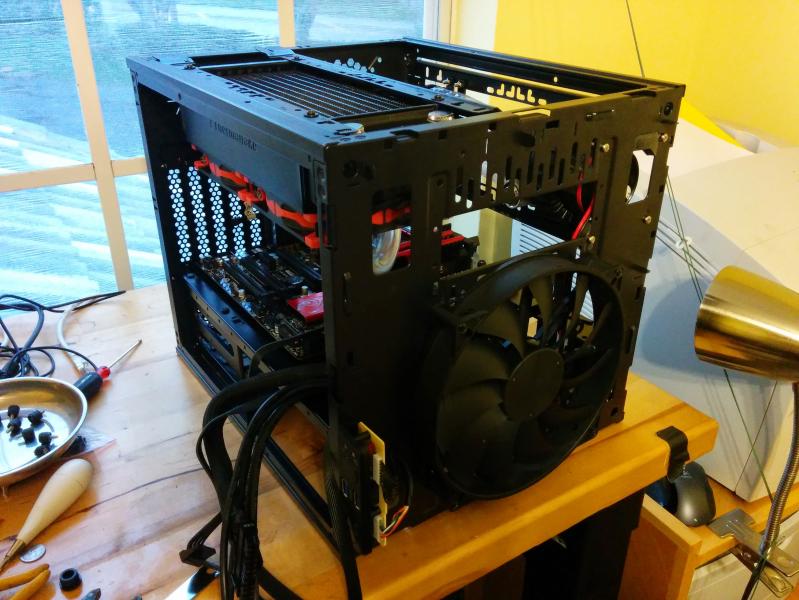
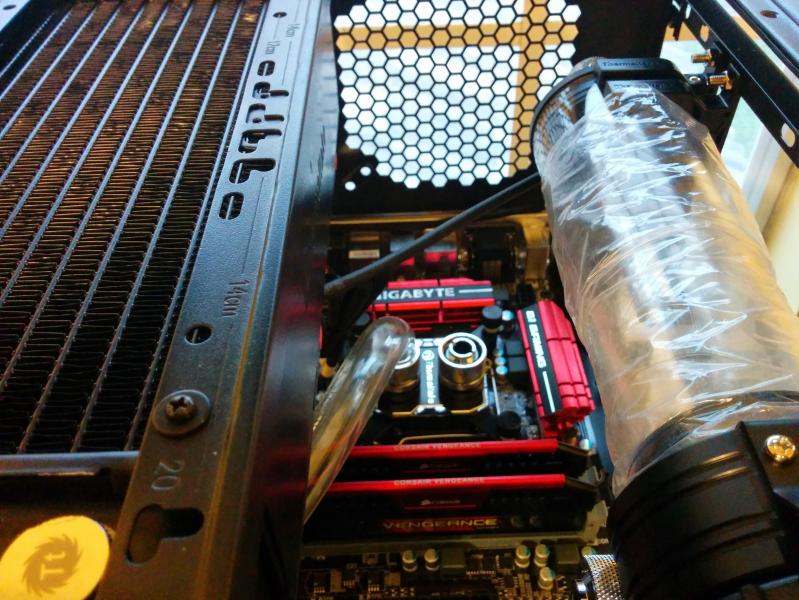
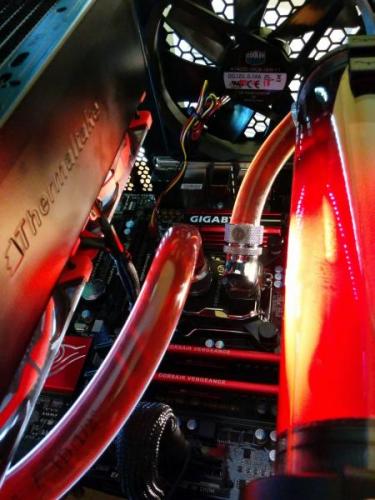
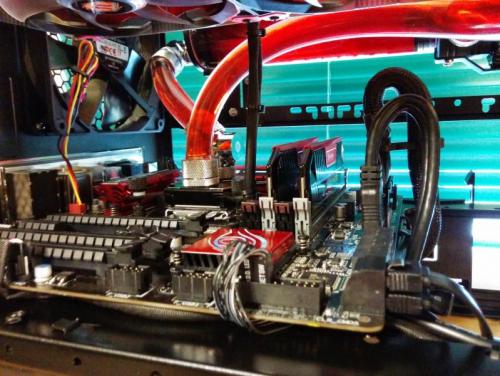
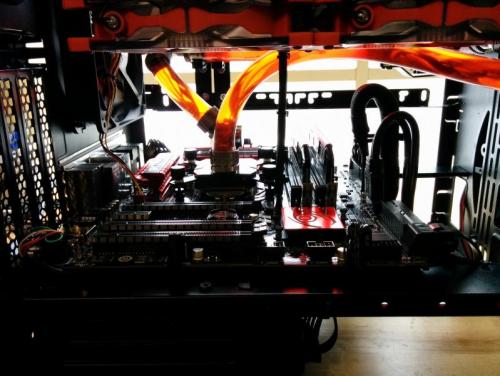
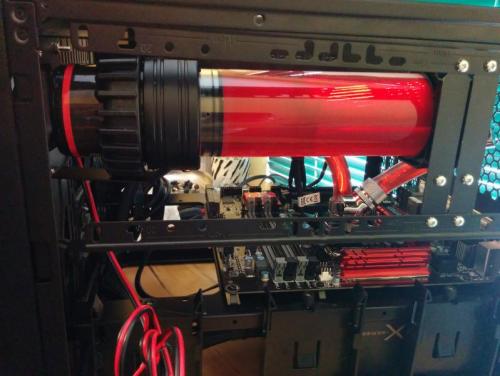
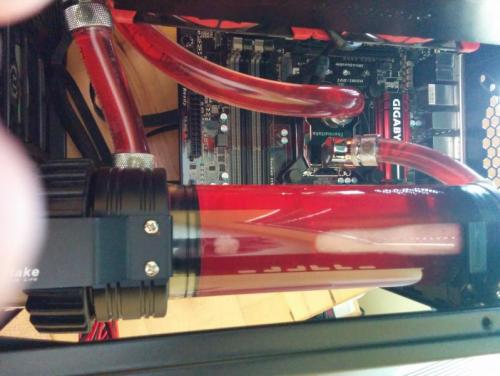
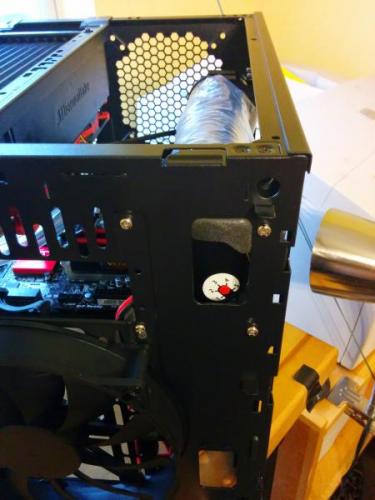
Wiring 101... Finished wiring the system... What a great case to work with! Whats inside? Motherboard: Gigabyte GA-Z97MX Gaming 5 Memory: Corsair Vengeance Pro 16GB (2x8GB) 1600 Hard Drive: WD Black Series WD3003FZEX 3TB SSD: Samsung Pro 850 128GB Case: Thermaltake Core V21 Cool Master 140mm Fan CPU: Intel i7-4790K Thermaltake Pacific LCS RL-240 Water Cooling Kit Thermaltake 90 & 45 degree connectors Power Supply: Seasonic X Series SS-650KM 650w 80 Plus Gold OS: OSX


-
Tt Andy reacted to a post in a topic:
RL-240 Water Kit / Core V21 Build Photos
-
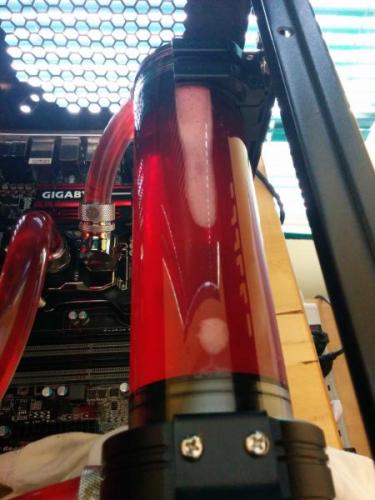
Studying your graphic I find my setup is reversed. Using the single port on the far end for reference, my input and outputs are reversed. In order to achieve the pictured flowI would have to turn the rad upside down ( so the logo would be upside down) and swap the connections. Does it really make a difference?
-
ThermalMike reacted to a post in a topic:
RL-240 Water Kit / Core V21 Build Photos
-
I did indeed turn the system vertical while filling and bleeding excess air. I would have preferred to orient the D5 vertically but there was little if any clearance to do so. Although ascetics is important to me function and performance are paramount. Progress so far.... Dealing with microfoam. Put a few drops of cascade in the system. Pump was set at 5... had to turn it down to 2.

- 8 replies
-
- 2
-
-
- pacific
- thermaltake
- (and 5 more)
-
ThermalMike reacted to a post in a topic:
RL-240 Water Kit / Core V21 Build Photos
-
I'm thinking I figured it out.... The top port with the internal tube attached must be the the return flow inlet. Although I haven't run the tubing yet, my reasoning is that if/when the system/pump is shut off, there is a possibility of suction occurring at that inlet. If the internal tube is submerged then only fluid would be drawn in. If the port was exposed to air in the reservoir then air would be sucked back into the system.
-
Vitor reacted to a post in a topic:
Pacific PT40-D5 Question
-
Once again please forgive my lack of knowledge concerning certain aspects of this hardware. The inclosed documentation is a bit sparse. My question concerns the top of the PT40-D5 and which port to use for filling and tube hookup. Does it really matter which one I use for the tube hookup? In my orientation the port with the plastic tube is on the bottom of the tube. I'm thinking it would be better to use this port for the return flow? Please advise... Thanks!
-
Vitor reacted to a post in a topic:
Broken reservoir\ pump (only 20 days old)
-
Oh my.... Thats kind of scary. Hope Thermaltake helps you out.. The crack seems to have originated at the pre drilled hole.... Did you perhaps try to screw anything into it? You have just convinced me to run my system for a full week before supplying power to the motherboard and other peripherals. A few years back I had a Zalman Reserator XT which sat on top of my PC. After 2 years it leaked into my system destroying it. It's taken me a long time to venture back into water cooling. I have checked my PT40-D5 and seems fine.... I won't be checking for leaks till late next week after some 90 and 45 degree connectors arrive. I want to reduce any excess strain on the tubing as possible. Please let us know how Thermaltake responds to this problem.
-
Tte Martin reacted to a post in a topic:
RL-240 Water Kit / Core V21 Build Photos
-
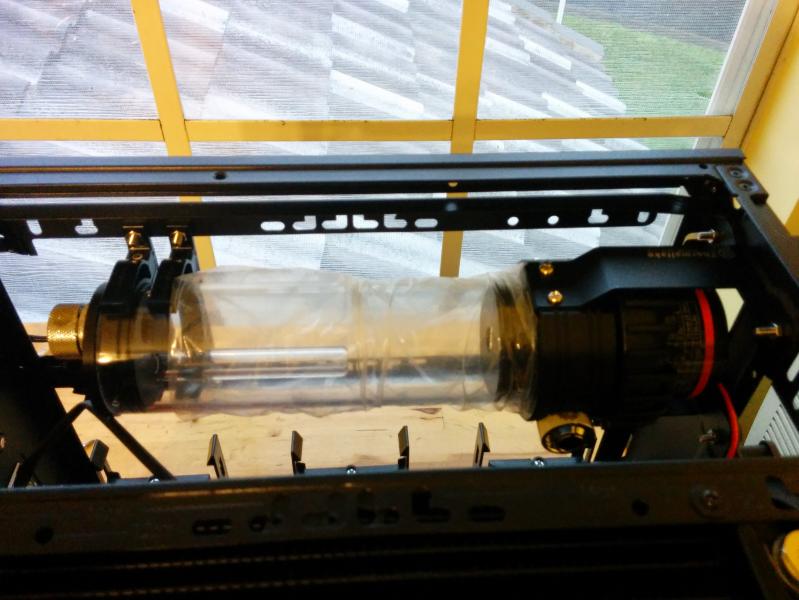
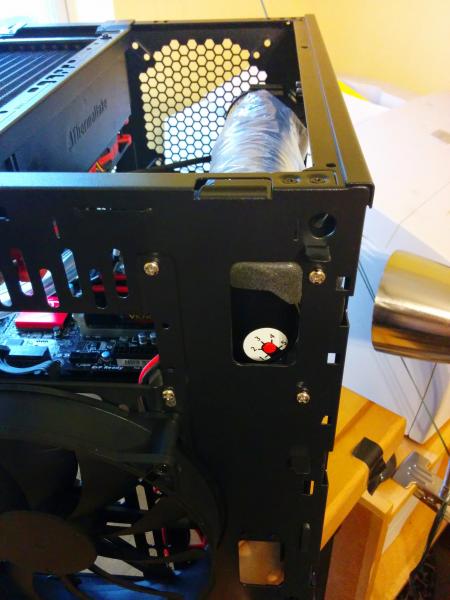
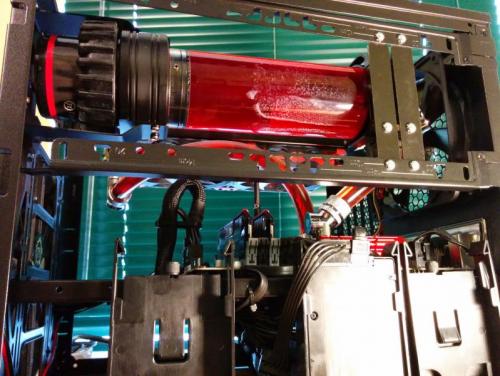
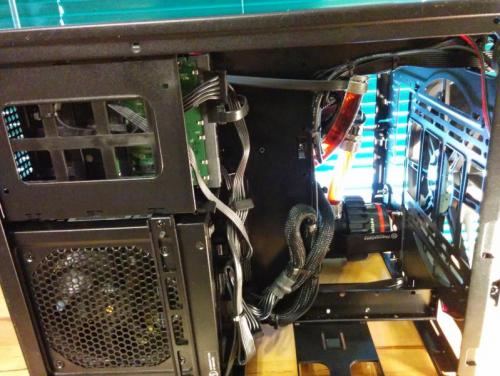
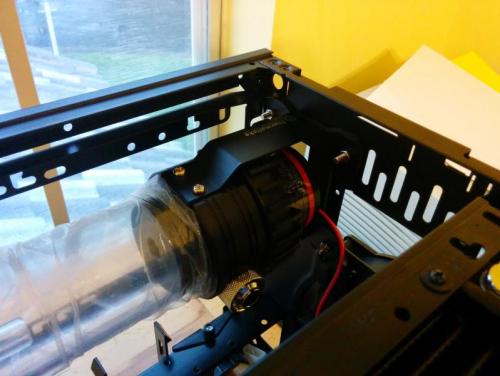
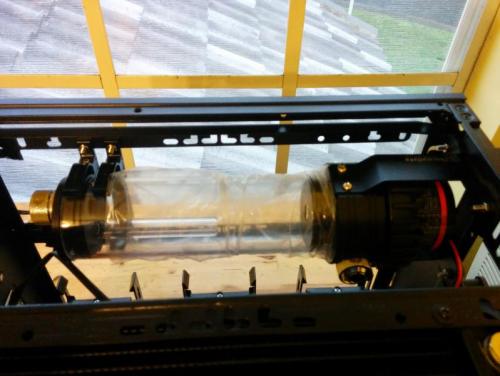
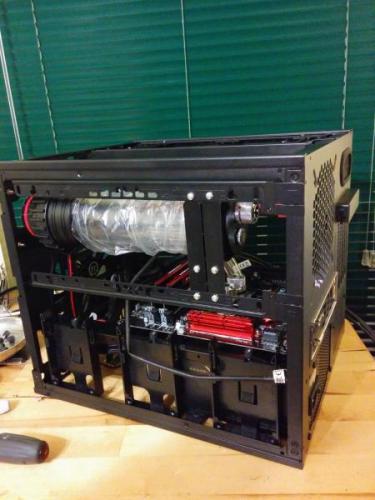
I started to build a system featuring the RL-240 Water Cooling Kit and the amazing Core V21 case. For a while I had a problem figuring out just where and how to mount the large pump/reservoir. I did a bit of custom mounting... easy... just a few holes... so I've decided to share the build up to this point. I have a few 90 Degree fittings on order to make my life a bit easier... Note: You can even adjust the pump speed easily as the adjustment dial is exposed thru a cutout in the front (already available). The mount for the far end of the reservoir is made from 2 old expansion slot covers. Edit: Now Painted Black.


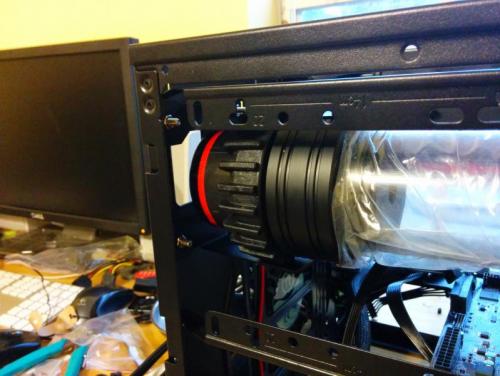
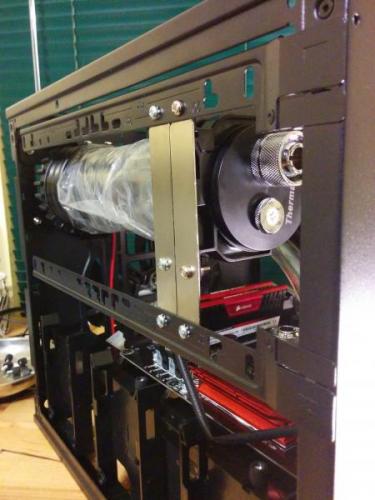
- 8 replies
-
- 2
-
-
- pacific
- thermaltake
- (and 5 more)
-
Please don't laugh at my question but I need to know which two ports on the radiator to use. If held with the "Thermatake" logo in the normal horizontal position, then the single hole on the left is towards the bottom of the unit. I'm going to assume I use the two ports on the right bottom? Also which is input and which is output? There is no documentation on this subject. Thanks in advance.
-

Thermaltake Pacific Series DIY LCS Now available @Newegg
Wingfat replied to ThermalMike's topic in Liquid Cooler
Newegg is sold out on the RL-240 Kit... Anyone know of another source (in stock) or when they might be re-supplied? Thanks (:- 5 replies
-
- 1
-
-
- Pacific
- Thermaltake
- (and 5 more)