-
Posts
17 -
Joined
-
Last visited
-
Days Won
2
Content Type
Profiles
Forums
Downloads
Events
Gallery
Blogs
Everything posted by Papa Smurf
-
Let's Talk About Airflow Dynamics and my W100 Mods - Loop 3 Water Cooling 3.) This loop was a tough one to figure out. I had to decide how to get the water cooled back down by getting the best airflow across X2 560 radiators with X4 140mm fans in a chamber that is only a total depth of less than 90mm Bear in mind Tt doesn't recomend mounting radiators on the side of this chassis, only fans. Probably due to the very tight, restricted space. You really gotta think thin when looking for Rads & Fans that will fit let alone pull enough air. The Radiator I chose was a 540 (that's 4X 140mm fans wide) It also had to be ultra thin with lots of fins and can be run on it's side At this time I am only water cooling the Intel i7 5960x 8 core Over Clock CPU in 1 loop. The Rad is a Hardware Labs Black Ice Nemesis 560GTS® XFLOW Ultra Stealth Cross-Flow Low Profile Radiator Well that was the original plan, but as luck would have it, the Rad arrived with dented side tank. Freight dammaged? Maybe, so Performance PCs gave me an RMA and Shipper Damage claim because I paid for insurance, and they replaced it, But they sent the wrong model (not the XFlow), any way I finally got the correct Rad and was told to keep or through way the dented Rad. So of course I kept it having faith that it would still function normally. So I either save it for another loop or through it into this loop. So I am incorperating it into this loop as an experiment. The W100 has 2 RAD/Fan mounts availible on the side on this chassis, so each Rad gets a home. This Rad is a one-pass, quad fan stealth implemenation, 16 FPI 25 Micron Copper Fins, that utilizes vectored cross-flow tanks and is an optimized stealth form factor solution in systems ulitilizing impingement-type waterblocks. It is optimized for sub-800 rpm ultra-stealth fans and can run under Supercruise optimizations for scalable performance with high speed fans.The Rads will suck up 29.6mm of my 90mm fixed depth. The mounting brackets supplied with the W100 is mm thick. The Air Filter Mesh is about mm thick and magnetically mounts to the inside of the side panel and will only be used on the intake end to filter out dust. The gap from the top outside edge surface of the Rad mount to the inside surface of the side panel at the side panel's vent holes is sealed offf airtight with a dense weather stripping foam. This now will leave mm between the back of the Rad to the chassis internal divider panel for fans, fittings, and still leave enough room to breath. This will be like sucking an elephant through the neck of a wine bottle I see that 15-16mm thick 140mm fans out there but all have 120mm mounting and not a lot of static pressure The next thickness jumps to 25mm fans with 140mm mounts. The best available at the time of this build was EKWB's Furious Varder 140mm PWM FF$-140 2500 RPM to be continued
-
Let's Talk About Airflow Dynamics and my W100 Mods - Loop 2 Main - Ambient Case Airflow 2,) Next challange is handling of ambient air in the main area internal of the case. Components atributing heat generation factors are: A.) The front Drivebay Column (containing up to 6 HDDs or SSDs & 1 Optical Drive) B.) ASUS Rampage V Extreme Mainboard (air cooled) C.) Intel i7 Haswell 5960 Extreme CPU with EK Waterblock D.) Corsair Dominator DDR4 RAM X4 or X8 (air cooled) I chose to utilize the venting on the front panel. I removed the LED srip and it's mounting bracket, sealed all the holes in the front chassis pnl. Added plexi glass window into front panel and sealed panel (which is now a hinged panel) with dense weatherstrip foam so it's airtight. Incoming cool air passes through the front panels vent strip Note: I blocked off the lower 4" of vent because there are no drives mounted in that area and did same on the lower section of 5 1/4" drive slots ) Cool air flows through the gaps between the drive carriers and over the drives, picking up the heated air generated from the drives. The air is the pulled toward the rear of the chassis Note: It is important to ensure this chamber is made Air Tight. I had to add a long sheet metal plate across the big gap at the top inner mounting panel and block off the top panel's vents. I think Tt left this space open so a radiator and fans can be mounted at the top of the case. I also flattened down all the HDD mounting tabs and filled the gaps with Bondo to make airtight. The air flows across the Graphics card & GPU, ASUS Mainboard , & RAM. The heated air colunm is then pulled through and out of the case via a rear panel mounted 140mm EK Furious Vardar 2500 rpm high static pressure/high CFM fan. I speculate there will be some turbulence around and below the Graphics card due to 3 cooling fans integrated on this card pointing downward. Also minor turbulence if I choose to utilize Corsair's Dominator cooling fans add-on. Note: Static pressure is minimally equalized between the radiator chamber and the Main chamber under the ASUS Mainboard and backside of the 2011-v3 socket exclusivly through the cut out in the divider panel. I also used cork padding to direct and dampen the airflow across the bottom of the mainboard.
-
Let's Talk About Airflow Dynamics and my W100 Mods - Loop 1 PSU I chose to divide my W100 into 3 isolated compartments or paths for airstream 1.) First the most simplest is the airflow for the Power Supply, My build I am using the Corsair Hx1000i mounted with the fan facing the bottom of my case. I will run it in Pull Mode so it draws cool air in from the rear of the case over it's components then transferes the heated air down through the bottom of the case. Thermaltake gives you a plastic standoff with an adhesive to hold up the weight of the PSU at the end oposite the mounting surface. I swapped it with a rubber softer standoff to reduce the transmission of noise and vibration of the PSU fan. The case already has a fan mount hole under the area where the PSU is mounted, so to take advantage of that hole I used a 3/4 x !/2" soft dense foam rubber from office depot, stuck to 3 of the bottom edges of the PSU to make an airtight fit to the bottom of the case, so that the fan hole becomes the exhaust port of Loop 1.
-
Yeah Tt kinda dropped the ball on the W100 not only falling short of giving us the extra bracket and still half a year later we still cant get a spare. What I really cant for the life of me figure out is why they didn't make these with SATA backplanes? I had to mod my own.. Hey if you hear about the brackets becoming available please give me a shout, cause I need one as well
-
The W100 has four panels for external skins. Both the right and left side panels are hindged in the rear with small magnets in the front to hold them shut. One panel has a large plexiglass window veiwing the motherboard. The oposite side has two long vertical vents for two rows of four fans each as does the top panel has one row. The front pannel has several knock out vented covers behind which the hard drive bays reside, etc. Both the top and front panels snap on to the frame. the back and bottom of the case has no cover panels. I enhaced the panel system by making all four panels hinged, adding dampening hinges to the rear of the top panel and the right of the front panel. It would be nice if Thermaltake can supply me with two extra panel monted handels like the ones in the side panels. I can't seem to find a manufacturer that makes them. For hindges I used nice dampened cabinetry hindges that when opened they will spring outward and when you close them they slowly draw themselves shut. I used the 1/2" overlay versions and since I am not mounting to wood I used spacers and countersunk screws throught the fronts of the panels. I also removed the inserts that cover the drivebays off the front panel and added a plexiglass window to the front so you can see all the drives and 5.25 control panels. I will add busy LEDs to the drivebays that connect to my backplanes so you'll see the LEDs from the front panel. Oh and swapped the factory blue LED strip that shines thrugh perferations on the front panel to red to mach my scheme. (I will add pictures of all of the later, cause I gotta get the Smurf outta here. Oh I would like to thank Tt Andy & Tt Leo (Admins) for taking the time and to look at what I am doing. I am taking my time on this project because it will be my personal computer when I get done and I will post a complete parts list then as well as cost.)
-
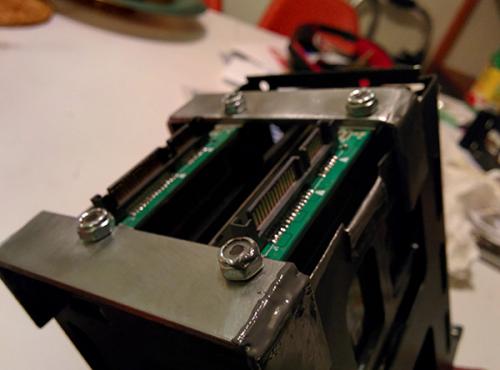
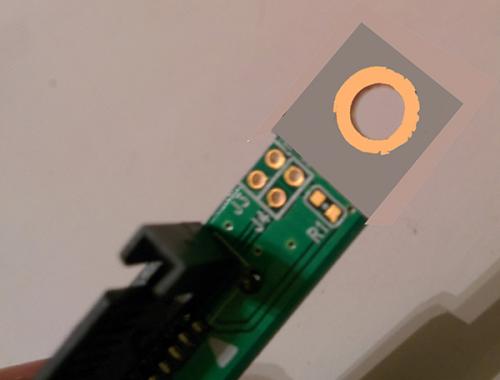
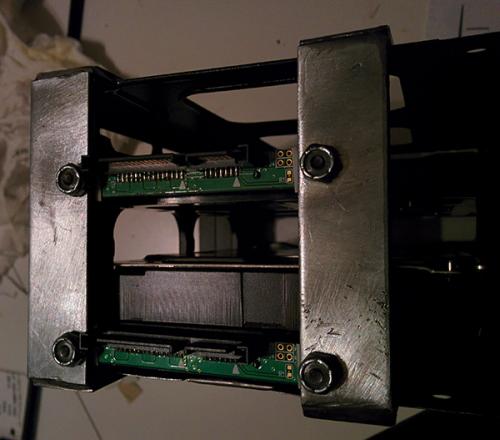
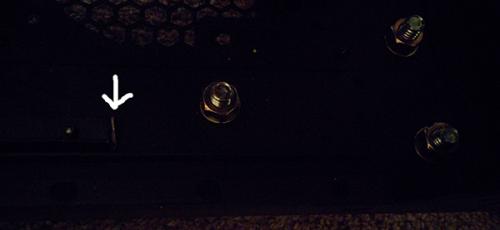
OK Wheel issue resolved, I would like to mow address my changes and enhancements on the Drive Bays. Thermaltake give you good flexability with three general mounting configurations where if needed can be mixed in any combo you like. Before I get into this, in my drive configurations, for my needs I use only SATA Drives, I don't use RAID in this build, just plain SATA I, II, & III. Some 2.5 SSDs and 3.5 HDDs. One of Thermaltake's tripple option lets you mount drives to the backside of the center pannel, which is behind the motherboard, with mounting hardware. I wont be using this option in my build, which I will explain in a later post. The second & third mounting option's involves using the 5.25 rack spacing. In both of these options the drives can be mounted in a vertical stacking pattern. I will refer to the second option, which I also chose not to use, as the internal rackmount system, because all the drives will be inside the case, behind the windowed side door, to the right of the motherboard, by two aluminium vertical rails that kind of mimics the vertical mounting thru the front panel. The reasons I chose not to use this option were; A.) the two supplied rails would have to bear all the weight of six to eight 3.5 HDDs all 100% off center oof the rails, just didn't feel it would be rigid enough, especially if I was going to make it all "Hot Swapable". B.) you would also have to open the side windowed door to access them C.) I will need this area to mount two 240mm resevoirs for my watercooling loops. Call me "Old School" but I like the traditional style of having all my drives to have access through the front of my cases. I will refer to this as option three. I will arrainge my drive bays, in sequence from top down, starting in the top 5.25 slot with my ASUS Rampage V Extreme O.C. Panel display mounting frame. Followed by the 5.25 Thermaltake Power & I/O panel. I want the ASUS panel on top for two main reasons; A.) there will be NO cables hanging over the display from the Thermaltake panel, like USB cables, or Headset cables, etc. B.) so i can pull the ASUS O.C. Remote controller out through the front to access the O.C. controlls and lay or stand the device on the top of the case. The third slot or maybe at the very bottom I will mount my 5.25 Blu Ray drive. In between I mounted the three dual drive carrier brackets supplied with the kit. This leaves a void in the front panel where there is room for a fourth dual drive carrier bracket. I have no idea why Thermaltake didn't include a fourth in this kit? I have heard a few people whith this same concern and if they should start adding the fourth in this kit, they should either charge more or give a free one to those who bought a first release who didn't get it. If they don't add it, it would be very nice for them to make it available at a reasonable price in spare parts. I truely believe good spare parts supplies need to be available to case owners. I have called Customer Support and have been told that this item should be available soon so I planed for it in my design. OK now this is what really disapointed me the most, and I do shame Thermaltake on there utter lack of foresite in developing this case. Can someone please explain why would someone want a removeable slide-in drive carrier that is NOT Hot Swappable? This just utterly mistifies my me of what I concider pure ignorance. What gaul to give customers a nice slide-in 3.5/2.5 drive carrier even designed so that either style drive has their SATA connectors in the same symetricle position, "Hot Swap Ready", with absolutly NO SATA Backplane? It's like they were gonna give us that as they were half way there, then someone dropped the ball. I love my W100 but for this issue alone, I am not sure I would recomend it to my worst enemies. If a company relleay wants to pride themselves as an industry leader and inovator in designs and claims a Core series case as their Flagship model, I will have to shake my head in discust. What is so stupid is that if you want to change a drive on a slide-in configuration, is that you have to get to the back of it to change two SATA connectors. This defeats the whole purpose folks, and I challange any audiance who dissagrees. So what do we do as consummers? Well I guess some people have to now live with this fact, the few mundain folks who I guess just don't care. Or in my case, rise to the challange and making ultimate mods, by fabricating my own backplane bolt on upgrade, making my system maybe one of the first if not the only "Hot Swappable Core W100". I engineered and fabricated a very durable, ridged, steel frame that bolts onto the dual drive carrier bracket and a complete SATA connectorized backplane. I have not decided to add my photos of it yet but it does work extremely well. Oh one more thing on this topic of W100 dual drive carrier brackets is that in it's current design you can't plug in angled down SATA connector cables on the lower drive as they interfere with the lower rear lip of the dual drive carrier bracket, and you will need to notch the brackets if you want to use these types of cables. I like them for wire management purposes as the flat cables can be stacked in layers from the angle down connectors quite neatly. note: I am adding this comment after completing this build and using my "Hot Swap" setup. The backplane adapters and brackets have been working flawlessly. All of my various SDD's, HDD's both 3.5" and 2.5" drives mounted on the plastic Thermaltake drive carriers make perfect, consistant, insertion and contact to my SATA Backplane Adapters. By my photos it may look a bit crude, but I needed to have a rigid bracket that would not flex or bend, and would stay in perfect allignment to the Thermaltake dual drive carrier brackets. I used the locknuts you see in the photos to allow the Backplane Adapters to float just fractions of an inch so they would align themselves to the drive's SATA connectors when the drive is locked into it's slot. I made the holes that the Backplane Adapters mount just a bit oversized in my brackets to give it the slop I needed and when I tightened the locknuts I took them down to where I couldn't jiggle the adapters and the backed the nut ou just enough that the adapters would move freely without binding. I could have found a SATA Drive Hot Swap system that would mount into the W100 but I wanted to keep the cost of the build down so the Backplane Adapters I found by first Googling images took me to eBay and Amazon I found the adapters that I wanted to use. I found the manufacture and produt number, then called them directly so I could verify specifications. My source is PACTECH www.pactech-inc.com tech@PACTECH-INC,com You need to call or email them because the product is not in their online catalog. The part number is: RH-SATA-25D and cost was around $6-$8 each. I bought about a dozen of them incase I messed some up in the process and to have backup supply and for some expansion should Thermaltake make available the dual drive carrier bracket assemblies. I also wanted to put insulation on the Backplne Adaptors on the side that contacted my metal brackets because the circuit boards had traces that ran close to the mounting holes for LEDs. I had some thin teflon sheets with adhesive backs that I cut into strips the width of the adapter and punched holes in them with a paper punch for the mounting screws and stuck them down to the adapters. This also helped to alow the adapter to float without binding. (see phots below) I made the brackets from 1/8" x 1/2" flat stock rods and hardware from Home Depot. The brackets are mounted in place with 5 minute epoxy and are aligned using 2 SATA drives plugged into the adaptors. Hope this info can help anyone who wants to do this. OK that's all folks, and sorry about all my complaining, but someone's gotta do it. LOL My next concerns is the snap on or hinged skins of the W100.
-
Well so far all 3 of us made the same error. I blame Thermaltake for not refrencing this issue in the manual. They never use instructions, only images to assemble things, I guess they don't want to make multi language manuals. GO FIGURE
-
yeah I am also waiting on many parts including the same brackets. your refering to the bracket that supports two hdd slide in drive carriers? The really should give four of them in the kit so you can mount eight total drives in slide in brackets. What really gets me is who the #### engineered this drive bay system must be on Crack or the project got cut due to the fact that the designer quit his job before they got done cause he had to have his hemmoroids removed! Why have slide in drives that are not Hot Swapable? So you got a slide in carrier that connects you to nothing. To pull a drive you got to open the case and remove cables first? Sorry but I have to laugh. I would assume most people use SATA drives or occasional SAS. So why didn't Tt use a backplane system? Well mine is totally Hot Swap modified. I found backplanes and fabricated my own backplane retainer to support eight SATA drives. So my SATA cables all plug into the backplanes and the drives can be pulled straight out and replaced by just slide it in and you good to go. I might have to start selling these to W100/200 case owners.. LOL
-
Job well done. I see you found you red leds for front and nice touch on the emblem. I did something like that with mine too. Great shot of your res too, the colors look awsome
-
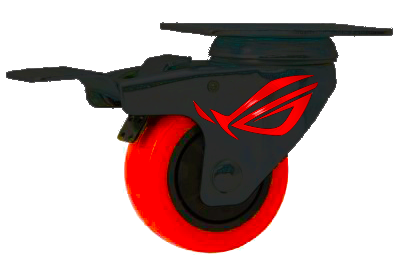
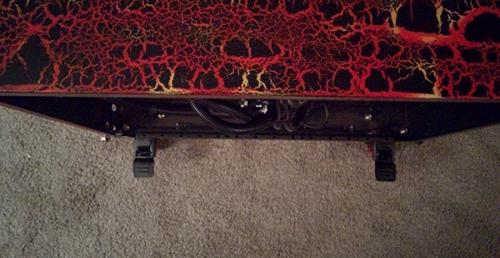
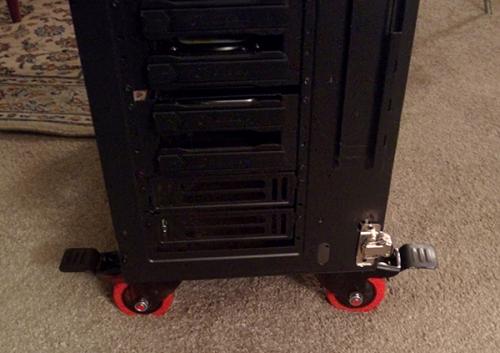
What is really cool a bout the W100 is that you get to put most of it together yourself. It gives you the oportunity to see what works and what doesn't or how can I make it better. So I put the case together using the manual. While assembling the case the first thing I really had a problem accepting was the casters that Thermaltake supplied. The problem I had with those caster was two fold. First of all just seeing them in the bag of parts, I knew would be a joke to put on anything I own. Here you got this really cool, big industrial size, awsome case and couldn't imagine putting a cheap, substandard caster on it. I have had many products in the past with basically the same design casters. Typically seen on various inexpensive office chairs, and other light constuction particle board cabinets or small filedrawers. All of which wound up in the trash often due to those cheap type caster. I have seen the wheels separate, I have had the plastic wheel break, they don't roll very smooth espescially when you put a bit of weight on them. They don't even use ball bearings. So I already had a negative attitude about the casters before I even put them on. OK I put them on anyway just to look at how stable or unstable will this case be? For me it made the case too low to the ground as far as using any of the lower ventalalation built into the bottom plate. Refering to dust and pulling or pushing any air that close to the floor alway means major dust issues. Then just general stability for me was a big thumbs down with those caster. On a solid smooth floor or not really gonna move it around much, maybe OK. I have a carpeted floor. One issue with carpeted floor and those casters is the debris and fibers off the floor get wrapped around the caster's axels making it hard to roll around. Lets take a quick look at the case and see how it relates to weight transfer. The inside of the case is basicaly devided into two sections. The side with the window being the deepest with a vertical wall about two thirds the depth for Power Supply on the bottom and mainboard, video cards and watercooling res, pump, water, etc putting it's weight about centerline of the case. Looking at options here, say you mount your drives either to the front rails of the case puts weight again kinde of over the centerline but when stacking drive you lose any low center of gravity, which means easier to dump over. If you choose to use the extra mounting rails and keep drives the facing the window you start shifting the center of gravity to the windowed side. The last option is to mount yor drive on the backside of the vertical wall thus moving your center of gravity to the door behind the main board. Or even if you use that side for radiators, water, and fans will still put weight to that side of the case. So what happens when your case has most of it's weight on eitherside with these casters, say on a carpeted floor. One thing to add is the fact that these casters piviot on an offset depending on which way you roll the case. So for example, you have drives mounted to the backside of the vertical wall. With that kind of weight and say you roll the case in that same direction, the casters piviot in toward the center of the case. The case will not be very stable and can easily fall over or be pushed over to crash on its side. Can you imagine watching your new build or project falling over not to mention the damage to your expensive hardware. That's not what's going to happen to my build. So I pulled the casters off and through them out. That way insured that I would never use them, and forced me to resolve this problem. I took a trip over to my local Home Depot for a solution, as they have a good selection of heavy duty casters to choose from. Here are the casters I chose: http://www.homedepot.com/p/Everbilt-3-in-Polyurethane-Swivel-Caster-with-Brake/203672194 Everbilt Model # 4120545EB Store SKU # 194726 cost $8.98 ea. 3" Polyurethane Swivel Caster with Brake Bear in mind they don't come looking like this. They come in bare metal but wheels are red and black. All ball bearing with 175lbs load capacity What is really cool about this caster is the locking brake mechanism. When actuated, it not only locks the wheel from turning but it locks the caster in any position you want it to face. Why is this so cool? If I want to make my case virtually imposable to fall or even be pushed over I lock all the wheels facing away from the case giving it a very wide base. See photos: It will be a bit of a challange to mount these to the bottom of your case. I had cut out adheasive backed density foam rubber pads to use between the case and caster to reduce noise and vibration. I recall cutting out a small portion of aluminium supports that were pop rivited to the bottom panel in order to place the mounting bolts through the caster plate and bottom panel. I used wide flat washers to aide in support to keep the bottom panel from flexing and was able to keep enough clearance around the fan vents to still mount fans if I ever want and the magnetic air filter still lays on the bottom.
-
First I would like to say how much I love my W100 case. I litteraly spent two or three months trying to decide on what case to by. I knew I needed lots of room for watercooling with two loops plus room for system expansion. I liked the Level 10 cabs but it just seemed too confining, then I started looking at pedistal type cases or main cases with top and bottom modules, and then almost bought the CoolerMaster Half Stacker and found out Thermaltake was making the W100/P100 and W200 series. I wanted the W200 but it wasn't released yet. So I bought a W100 and figured if I need more room I would add the P100 chasis later. Well when I got the case I was surprised to see it was much larger that I pictured and the real plus to this case is the options for various different fan and radiator configuration possibilities. Ans also the options for mounting drives. I must give Thermaltake some kudos here for giving me a pretty good building block with a good frame and side pannel skins. With that said, pretty much everything I will discuss here will be about what I did to my case as far as improving and enhancing it to how I want to use it. Some things you will see right off as things that make alot of sence, or to add functionallity to the original design. My next posts I will be breaking down different aspects to where the case needed improvements at least for my useage. I may sound critical over some issuse as to what the #### was Thermaltake thinking but it's all constructive and I would hope Thermaltake can learn how to better it's products to even a higher level. I encourage others to please comment or add there ideas into this topic and share thoughts and how you modded out your system.
-
Anyone finding Issues or Making Improvements on the Core W100 & W200 Cases? Please Post Your Comments Here for Discussion I bought a Core W100 a couple months ago and found much room for improvement I will post a series of issues I had and how I resolved them. Please feel free to comment and post your concerns or how you improved or resolved your issues. About Me: I am kinda new on this forum but I have a lot of background in Mechanical, Electro Mechanical, Manufacturing Engineering. I have worked in Hardware Engineering, Product Developement, R&D Labs, Fabrication Labs & Model Shop. I have been building custom to order PCs, Servers, & Workstations since 1985 I don't claim to know everything
-
I hate to be negative but because Thermaltake likes to brag about how great their products are, I would like to mention some of the downsides that they could have put a bit more thought to before popping out a new case of this caliber. 1. Let's talk about the removeable drive carriers and dual drive carriers support brackets. I have never in my life seen a slide out or what we know as a "Hot Swappable" drive configuration that has no connectorized backplane. Like #### were they thinking of? So you got to open the side door and pull off and on the cables to swap out a drive. The engineer on this must have been high on some real good s**t, ya know what I'm talkin bout? When they go as far as to give you a drive tray, they forgot to put the connectors on the carrier support brackets and maybe have included an adaptor for 2.5"... So hunting I did go.. I found these connectors online: http://www.aliexpress.com/item/22-Pin-SATA-6Gb-s-Male-to-Female-Right-angle-adapter-7-15PIN-SATA-III-3/32508248071.html?spm=2114.01010208.3.181.1fQ9Ke&ws_ab_test=searchweb201556_9,searchweb201602_2_10017_10005_10006_10034_10021_507_10022_508_10020_10018_10019,searchweb201603_1&btsid=81b734d8-9447-4a03-8d2a-85558ff543ee Looks like these will do the job and prefer a straight version instead of right angle. 2. Which leads me to a related issue. focusing again on the dual drive support brackets again. Problem is that the bottom rear edge of the bracket extends out to far to plug in angled down connector cabling. I had to cut out notches to make angled connectors fit. I like to use angled connectors because you can stack the ribbon cables and they dress into my cable management system. back to the drawing board..
-
When I bought mine white was not an option I am doing Hydrographics on my outerskins Also regarding the LED pannel behind the door. yes you can change the LEDs to red, I did. just take the assemb ly apart and swap out the LEDs I also put all my drives old school style behind the front pannel and need to try and get one more hanging bracket from Thermaltake I have on top slot is my ASUS Overclock Remote Pannel with display. Below that is the I/O w100 pannel. I sleaved all the wires on the I/O pannel as one bundle and used a cable retractor on the ASUS Remote so I got it so I can pop it out the front 5.25 shell that it sits in and flip it up onto the top of the case. I had to recess both those items back half way into the case becase I add 1/4" plexiglass window in front on the front pannel and made holes and slots to get to everything throught the pannel and remove all those front air filter things. I also moved that light panel to the front pannel because I put cabinet hinges on that side of the front pannel so now it''s a third door and its loaded to spring out when opening and has a damper to close itself. I also need one of those handles like that are on the side pannels for the front door and two more of their hinges for the top pannel to make all the pannels into doors I don't like front pnl rads nor fans on the bottom. I will be mounting 2 560 rads 30mm thick with 8 140 fans 15mm thick on the side behind the MOBO. yep you right about being tight back there but I am going to use sheet metal to seal off the top of the MOBO plate so the backside is independant from the rest of the case and pull air in from the top pnl for the rads will always get clean cool air. OK Papa's gonna shut up now.. haha
-
OK here is something I would highly recomend to Mod. I have a big issue over the cheap wheels Tt supplies with this case. They give you these little cheap plastic casters. Tell me why build a nice hi-end system with thousands of dollars worth of components, water cooling, etc.? The cabinet is huge and can alot of hardware, and lots of hardware equals lots of weight, and that weight may not be distributed equally nor have a low center of gravity, making this very unstable. For example they show a configuration showing you how to mount your HDDs to the backside of the pannel the supports you MOBO. Do this and you system will become side heavy. If you were to roll your system in that direction, the wheels will pivot in under the case and shift the center of gravity so most of this weight is positioned outside of the casters. At this point all bets are off. Also say you have carpet under those wheels too. You investment could land flat on it's face. The possibilities of dammage makes my head spin, especially if the system is up and running. Add a set of radiators and fans on that side and get the same senario. The best insurance would be to through away those casters, I did. Matter of fact, that was the first thing I modded on my build. I found me a set of nice casters down at Home Depot: 3 in. Polyurethane Caster with Brake $8.98 ea. Everbilt Model # 4120545EB Internet # 203672194 Store SKU # 194726Hope it's ok to post a link here?http://www.homedepot.com/p/Everbilt-3-in-Polyurethane-Caster-with-Brake-4120545EB/203672194 What is really cool about these casters is the swivel and brake. When you lock the brake it also locks the caster from pivoting. If I want 100% stability, I just lock all four wheels out facing away from the side pannels making it virtually tip proof. I also painted the metal to match my theme. I also used a thin sticky backed sheet of dense foam rubber between the mount plate and bottom plate of W100 to help isolate noise and vibrations. I really love how these wheels look on this case. I will be back to discuse a drive mounting issue next. Papa's Outa Here....
-
Thank you LSDeep, you hit the nail on the head. I bet I wasn't the only one who made that booboo. haha Folks hope you read these before you assemble your case, it will save you about 5 or 10 minutes scratching your head figuring out #### you did wrong, and another 1/2 hour of cussing and taking apart what you just put together. It is easy to miss on the figures in the guide.
-
First thing I did was to through away the User Manual.. haha just kidding.. If you are new to this, you need to pay extreemly close attention to what the manual shows as there are no written instructions, just as what LSDeep said about having problems with the screws, I had no problems. However you have to know things about mechanical assembly and how to be skilled at navigating through common manufacturing issues. These skills come with experiance and I will say that having people, friends, coworkers that share tips, tricks, and in this case, mechanical / electro-mechanical skills with whoever is new to assembling computer cases from a kit, to building custom cable harnesses, as well as to lay out and plumb an efficiant water cooling system. Oh I made a pun "in this case". I always use a screwdriver that locks into the phillips head so I don't slip off the screw. (There are actually 2 basic cuts to types of phillips screws) I go through my bits until I find one that locks good to the screw and holds it, That said I always just start all the screws on a pannel and then run them down. If I feel any resistance, I back it out a couple turns and run it back in. Often this happens due to paint in the threads on the pannel and when you back the screw out you pull the paint out of the thread. Don't have to torque these screws too tight. Usually once the scew is lightly hand tight I will add about another quarter to half turn and not strip the threads. Another tip is to absolutly make sure that the four long frame bars are in the correct orientation as the drawing shows. Look att all the holes, not just the ones that the screws go in. All those hole need to be in the right directions when you mount the front and back pannel. This will save you time and not have to dissassemble your work when you find that you messed up. I just got a w100 for a new build and love it. You will hear negative comments from me but they are constructive critisism. I always find ways to enhance any case cause that's what I do "MOD"..


