SIA Tech Mods Posted November 2, 2018 Report Share Posted November 2, 2018 Hello, so somehow this novice of a modder has been chosen to be one of the five competitors in this years Thermaltake Modding Trophy! Words cannot describe how much this means to me nor could I tell you the challenge ahead this brings to me as newcomer on the modding scene, I sure feel like I have a lot to prove! My design of course got me in to the competition and that is what I call '20th Century TT' so let me tell you where the idea came from although it's pretty obvious to most. As soon as I heard the competition was Thermaltake's 20th anniversary the 20th Century Fox movie studios came right to me, I thought it was a good idea and what do you know, apparently it is and I can finally show you all the design that got me here. I'm proud to be in this position and to show you all what I can do! The Main Hardware 1 x Thermaltake Level 20 XT chassis 1 x Thermaltake M360 Plus water-cooling kit 1 x Thermaltake 850W Toughpower ‘SYNC’ Edition PSU 1 x Asus Socket AM4 Motherboard (model TBC) 1 x Asus Nvidia-based graphics card (model TBC) 1 x AMD Ryzen 7 2700X CPU 1 x Adata SX600 128GB M.2 SSD 1 x Adata M.2 RGB heatsink 1 x Adata Spectrix D41 3,000MHz 16GB (2 x 8GB) DDR4 At the moment I'm still gathering a few items that I will need and soon discovered that some of the items I originally planned are no longer available so will have to search elsewhere, which isn't as easy as it sounds but not to worry. I'll update again once I have more on the way so this post may be quiet for a week or so, I just wanted to get my head in the door and say hello. First package for the build, we got this on the 28th of September for the opening ceremony at Scan HQ and what an awesome day that was all round! Second delivery was two packages, we got them last week and oh my where am I suppose to put all of this? And what a beautiful case it is! Sorry for stock photo I got excited and couldn't keep it in one piece long enough for a photo. Here's a little progress I've made over the past day, I've taken every piece of metal that isn't riveted away from the chassis and plan to paint it antique gold to help keep in with the theme, I've of course added some glitter to the two large front plastic columns, I couldn't help myself with that! I somewhat feel like it is a part of me now, I've used it on all my builds but none was as over the top as the first but that was for my daughter so was to be expected, anyhow I certainly feel it got my name out there, so less about me and more about the build in question. Not only did I paint all the metal removable but also the dust filters! Albeit a couple of them are on the bottom of the case and won't be seen but I didn't see no reason not to do them, it'll please me at the very least. I''ll have to re-do the motherboard tray as too much spraying has really buggered my wrist, from an old injury so that'll be on hold for the next few days at least, in the meantime I do plan on finding somewhere somewhat local that can supply me some acrylics, it's harder than you think to find antique gold vinyl! I'll also update with some more of the pictures from the work on the filters and such when I get around to finishing the motherboard tray so stay tuned and thanks for looking! Some more stuff came for the build and I managed to finish the motherboard tray this time around but I also had to do the redo the front columns due to an issue with the glitter I was using. Thermaltake M360 water cooling kit & Pacific W4 Plus CPU water block. Thermaltake Pacific PR22-D5 Pump & res combo. Some Thermaltake tubing, liquid, fittings and pipe bending kit, despite this will be my first time water cooling I think I have everything I need. Thermaltake ToughPower Grand RGB 850 Thermaltake Pacific Rad Plus LED Panel & Lumi Plus Oh the glorious Thermaltake Riing Plus fans! Oh what is this... It only the Thermaltake Pacific V-RTX Plus! Last and not least the motherboard tray fitted in the chassis, looking very gold at this moment indeed and there is more to come... I may need to think about how I go about this as it's very reflective. No update just yet but we do have some shots of the beautiful Thermaltake Pacific V-RTX Plus GPU block! Sadly I had to change the colour scheme slightly due to not being able to source any more antique gold acrylic, so now it's just gold! I've also done a little progress too, tomorrow I should get around to putting the block on the GPU! (Should be fun). Anyways hope you like what you see because there's even more incoming, for some it may be a little too much but right now I think it's going to look better than I expected! I got the GPU block on, no issues other than my heart rate was double of what it should of been during the process. Some of you may of noticed the little detailing I've done on the GPU backplate, I'm glad I didn't do more than that, I think it's a nice subtle touch, anything more would of been over the top... If it's not already. Forgot to add an image of the side panel that will be used for the left side of the case and starts to set off the theme I have for this build. Quote Link to comment Share on other sites More sharing options...
SIA Tech Mods Posted November 12, 2018 Author Report Share Posted November 12, 2018 So.... The whole water cooling thing started to worry me, more than it should of done really. First time doing a loop of any nature and this build just got bigger and bigger each time I thought about looping it up, after a few days I came to realisation that I just need to step up and crack on with it! I've now got all the loop done and ready to leak test... However I'm waiting on some cables from Thermaltake before I put it together properly and do the leak test (if there is no leaks the first time around I don't want to take it apart again just to re route some custom cables), I'm actually really pleased with the layout of the loop and although you cant see it complete it any photo yet you can see each piece... I'd like your opinions please, good or bad. Also here's some vinyl I've designed for the top of the case (mind the odd bubble, this is before I worked out any issues in them). Quote Link to comment Share on other sites More sharing options...
SIA Tech Mods Posted November 17, 2018 Author Report Share Posted November 17, 2018 Just a small update for tonight... Got around to making the silver accents on the RAM gold, was never going to work using the silver in this build. Quote Link to comment Share on other sites More sharing options...
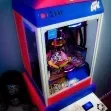
SIA Tech Mods Posted December 8, 2018 Author Report Share Posted December 8, 2018 So... I've been rather quiet, not going to bore you all with the details too much but I have a few health problems, fibromyalgia, shoulder impingement and a wrist injury from a dog bite, sometimes too much work and stress can cause the biggest of downfalls for me personally, anyways I'm back and super close to finishing now! Here's the progress so far. I paid a rather lot for some custom cine reel vinyls to be designed and printed, which initially I was super happy with and couldn't wait to get them applied (not a great idea when your still recovering from being a little ill), got the first one applied and noticed I should of started from the bottom as the way it's printed mean't that certain letters was always going to peel away from the glass and stick to the application paper... So that failed, I though okay, I can just get a replacement so I started applying the second one from the bottom.... This also failed, the vinyl somehow ripped and was not happy with it. Here you see the start of removing the crappy vinyl, I hate the idea now and why I went with it in the first place is beyond me, it wasn't even in my original design in this form. Gone back to my original idea of using real reels! Here's one painted! Also just today I've been to fetch my 3D prints! I'm pleased with them but wow, do they cost a lot... Next time I'll be investing in my own 3D printer for sure! Not forgetting the clapperboard! Some shots of it coming together Yup, it's super late, I've just spent the past three hours in between taking photos and looking after my youngest who is full of cold at the moment but I've finished! Right, a little bit of a speech now, and I mean little, it's late. Firstly this has been an amazing experience to compete in Thermaltake's 20th Anniversary competition along side these four other modders, who I must say have all done outstanding work, all our rigs have turned out very different, there's a rig to suite everyone's taste. I truly cannot thank each of the sponsors enough for making my dream become reality and the hardware and also support I've had during this build is in a class of it's own, (I only hope I have done you all well on my build). Now, the tools and experience I've gained a long the way will be put to good use in the future and let me tell you there was plenty of mishaps to to learn from... No more vinyl is on the top of that list. The workspace I've had to work in on such a huge project was tiny, so much so all my previous photos show the limited space I was working in (yes, there was no more space for me than what was squeezed into the images), I hope you all can appreciate what I had to deal with and are also happy with my build, I know I am. Find all the final images below, thank you for looking! Quote Link to comment Share on other sites More sharing options...
Recommended Posts
Join the conversation
You can post now and register later. If you have an account, sign in now to post with your account.