-
Forum Statistics
93.2k
Total Topics114.3k
Total Posts -
Member Statistics
173,077
Total Members16,800
Most Online


Tt Leo
-
Posts
101 -
Joined
-
Last visited
-
Days Won
9
Content Type
Profiles
Forums
Downloads
Events
Gallery
Blogs
Posts posted by Tt Leo
-
-
Welcome to the forum,
View 27 is compatible with 120mm based radiator we have specially designed the enlongated holes to work with other brands on the market, below is a image for you to reference.

The only thing you will need to pretty much consider is the tube length of H220 x2, View 27 works with our Water 3.0 which has a tube length of 326mm, so anything shorter than this may have issue reach from the front to the CPU location on the motherboard.
-
Hi Eve,
Please contact our US customer service, they can get you extra HDD cages for your need.
Thermaltake USA Customer Service
Email: ttsupport@thermaltakeusa.com
Toll Free: 1-800-988-1088 M-F 9:00AM~5:30PM (P.S.T)
-
Welcome to the forum,
Since the front panel is completely sealed so there is no 5.25" design for the case. The only way for optical disc is to get an external device via USB.
-
Hi Jeffery,
Welcome to the forum.
There is no trick on removing the front panel of View 27,
1. Place the case in front of you with the front panel facing you.
2. Find the grip below the front panel and slide one of your hand into it and get a firm grip
3. Hold the case body with your other hand, then pull the front panel toward you
Now you should have the front panel removed.
One thing to be careful about is the cable for the USB is attached to the front panel, so when you are trying to remove the front panel, please be careful on not to pull it too far away from the body.
Below is an online video review of the case where they have demonstrated on how to remove the front panel starting from 3:48 and ends at 3:55
-
Hi Gecg,
Welcome to the forum, you could replace the USB/Audio jack module without the need of replacing the entire front panel, please contact our US customer service for further support.
Here is the contact details
Thermaltake USA Customer Service
Email: ttsupport@thermaltakeusa.com
Toll Free: 1-800-988-1088 M-F 9:00AM~5:30PM (P.S.T)
-
Welcome to the community,
there are three factors in your question we need to consider, which are motherboard, case and the CPU cooler
you have listed two but still missing the motherboard, so it is a bit difficult for me to judge whether or not it would fit.
could you please also list the motherboard you are planning to build with, so I can give you a much clear answer.
-
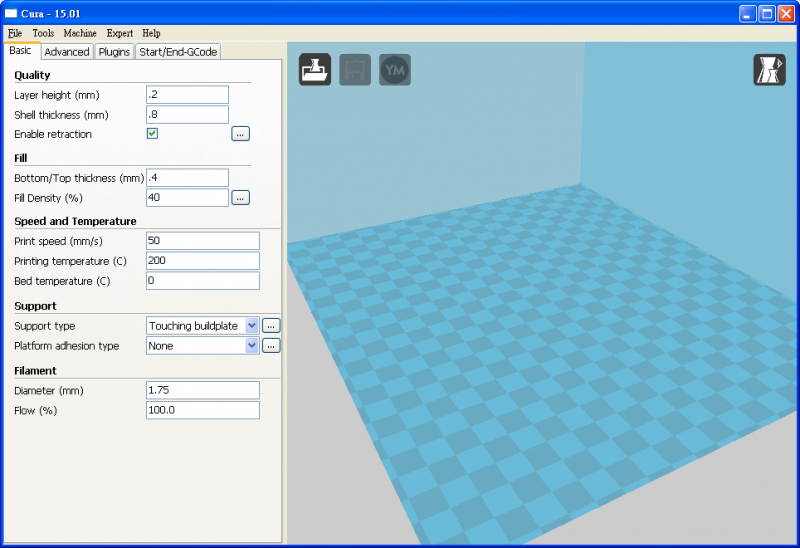
Hi BartofBorg,
Not too sure if is the setting of the printing program. We have printed numerous times under Cura without any issue, it is a free program you can try it out. I have attached some setting under Cura for your reference.
below are the setting under Cura (sorry, our engineer use the language which he is more familiar with, so I have included another setting environment picture for you to refer to)
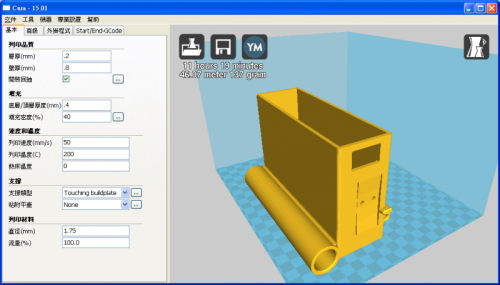
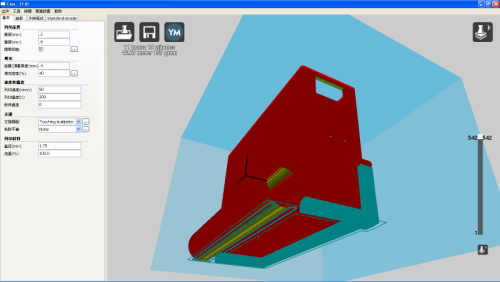
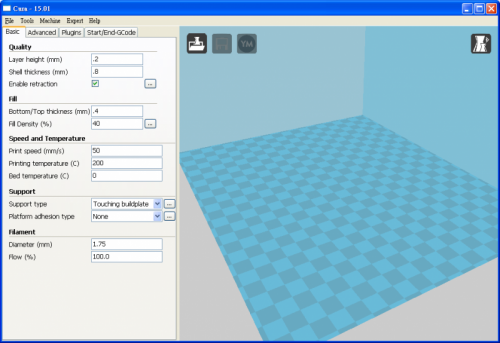
Let me know if you get any question.
-
Hi Balubish Tech,
My suggestion is to visit Amazon.EU and check which hub will provide the best shipping deal for you, because Core X71 is available on Amazon.
-
No need to keep RMAing good cables that work fine unless there is a stressful bend put on the cable after being mounted onto the GPU plate. I have spent hours testing with four different ribbon cables & found they will not work in a multi gpu configuration at the shorter length.
Hi broken_pixel,
I am not too sure on what may be the cause of your problem, but to physic and electronic, the longer the cable is, it will provide more resistance to the current, which mean you will most likely to get more deficiency to longer cables.
By the way:
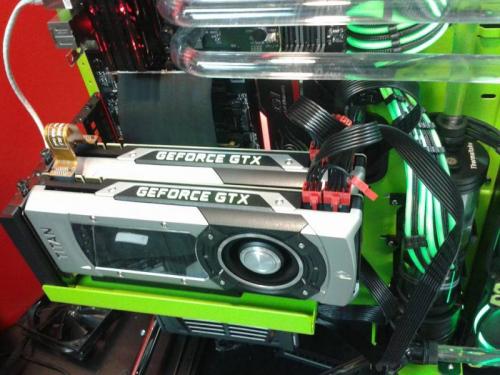
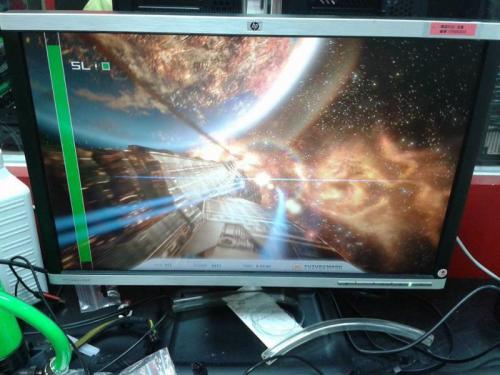
We have tested our riser cable with our new cable under SLI configuration, using GAX99-Gaming 5P with dual GTX TITAN
Here is the 3Dmark figures:
when plugged GPU directly on the board: H48107
when using a riser cable we offered: H46637~H48032
below are the proven pictures when we tested it
-
Hi there,
As this is a model over 10 years which we no longer offer, you will not be able to find it on our website.
I have dug out a manual from our system, not too sure if it is the same version you have on hand.
please take a took, check if it will help you.
-
Hi there,
Before answering your question here is something you need to know:
E-ATX is aimed toward consumer end type of product and SSI EEB is aimed toward server type of product so the function, feature, connection/ports and etc. design and setup are totally different, therefore the cable management pass through that are design on the MB tray will not be the same.
going back to your question
Yes, you could mount a SSI EEB onto the V51 mobo tray, since all motherboard has standardized the screw point and the size of a SSI EEB is the same as an E-ATX board.
No, since the board of SSI EEB feature/connection/port are different to E-ATX, the cable routing/management pass through are not compatible.
-
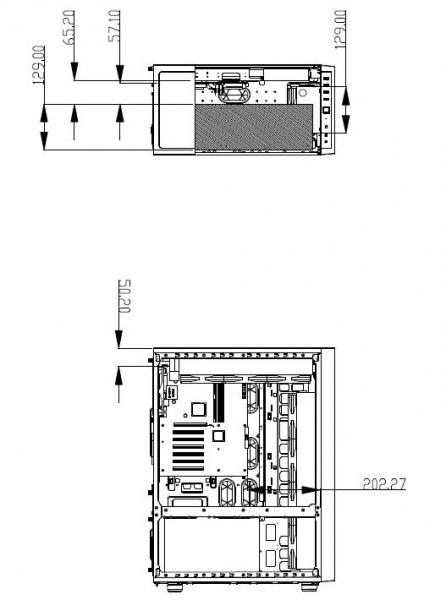
Hi guys,
here is the measurement in mm for your builds.
Upper chamber
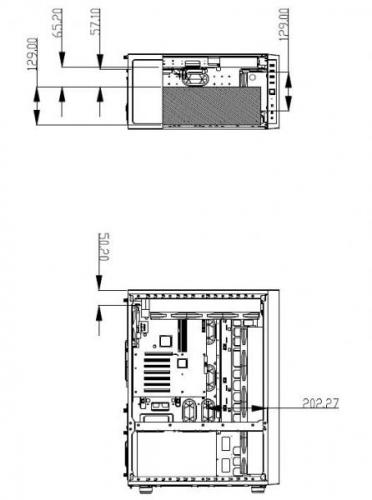
Lower chamber
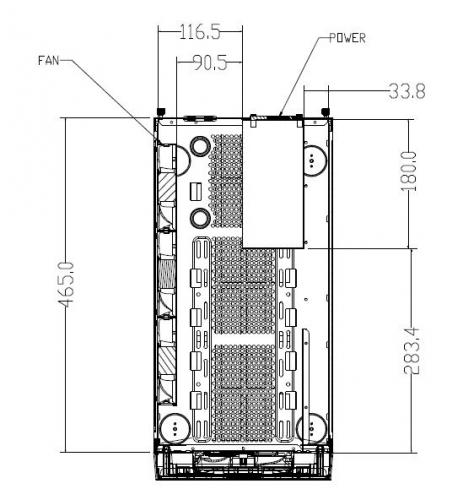
Hope this will help your planning.
-
-
Welcome to the forum, the fans are designed to installed on the filer instead of the chassis frame
Therefore you are require to removed the filer first than clip the fans onto the inner side of the filter
where you can install up to two 120mm fans.
below are pictures for your reference.


-
The board is an ATX board where it measures,
Form Factor (ATX):
- 8,9 polegadas x 6,8 polegadas (22,6 centÃmetros x 17,3 cm)and the Versa H15 is a m-ATX case, where the biggest board it could support is 9.6†x 9.6†(Micro ATX),
-
-
A single X9 will do the job without connecting two together, as X9 has two PSU location at the rear bottom where you can actually fit in a E-ATX board along with 2 PSU.
Simply remove the PSU cover and the HDD cage.
please refer to the rear view of X9 gallery
http://www.thermaltake.com/Chassis/Cube_Case_/Core/C_00002562/Core_X9/Gallery.htm
-
Hi All,
I am new to the forum.
I received an Amor Revor Snow case today.
I however noticed only only two Fans are connected to the Controller ie the Front and Top Fans.
There are no extra connectors to connect the Side Fan and rear Fan to the controller.
I also noticed that the Side Fan and Rear Fan are a two wire Fans while the others are not.
I would like to connect these Fans to the controller?
Will they respond to speed control?
Will they run at the same speed as the other fans?
Is this normal for this Chassis?
All the reviews I read point to the fact that the 4 fans are connected to the speed controller
and can be speed controlled.
That the speed controller can support up to five Fans.
How can I access the controller to wire in these two extra Fans.
I purchased the Chasis fro REBEL TECH in Johabesburg.
Thanks in advance
Regards
Ike
Hi there,
the 200mm side fan is already connected to the speed control panel via a little touch connection at the bottom of the panel, please refer to the picture below for reference.

so with that said, the control panel is currently controlling three fans in the chassis, which are top, front and side.
back to your question:
I would like to connect these Fans to the controller?
You may with "fan connector splitter," but not recommended because our controller is design with LED control with our special LED fans,
you will not be able to control other LED fans in the market, with wrong installation it may cause damage to the controller.
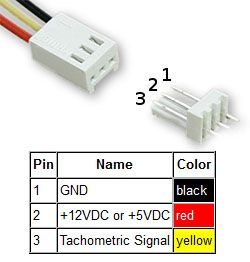
if you wish to do it, please avoid on connecting the 3rd pin which is the Tachnometric signal pin that is use to provide power and control on the LED
and is not compatible with any other LED beside the one that comes with the chassis.
Will they respond to speed control?
Yes, if you only connect 1 (black cable) & 2 (red cable) pin via splitter it will respond to the speed control.
I think the fan controller is design to support up to 2A, so as long as you don't exceed 2 amp you will be fine.
Will they run at the same speed as the other fans?
The fan controller only provides an increase and decrease in voltage to the fan, if you connect the controller with 3 different rpm type of fans,
they will not spin in the same speed, but if you connect all the same type of fan, they will then spin in the same speed.
I guess i have pretty much cover all your concerns, let us know if you need any more help.
-
Just received my x9 today and wandering how can I get the second PSU support bracket? It isn't listed in Tt store.
You can contact our customer support, they should be able to help you out.
Thermaltake USA Customer Service
Email: ttsupport@thermaltakeusa.com
Toll Free: 1-800-988-1088 M-F 9:00AM~5:30PM (P.S.T)
-
Hello there,
I have a question regarding the Core X2:
Is it possible to fit a 240mm next to a 360mm rad (both in the bottom) in front of a 140mm long PSU?
That's the only concern I have with this case
 if its possible, I would be able to fit 3x 360mm and 1x 240mm rads in a matx build lol
Regarding to your question:
It is possible to fit a 240mm rad in front of a 140mm PSU next to a 360mm rad.
for more details you can refer to the first post, under "Workable Dimension for Planning Your Build:"
you should get most of the dimension on the Core X2.
-
Hi,
I received this case and finished my build around 5 days ago, but I am having trouble with the 3 case fans when using the control panel on the top. I just cant get the fans to work when they are plugged into the top control panel. I have unplugged them, and plugged them directly into my motherboard and they work perfectly fine. Am I doing something wrong when they are plugged into the control panel, or do you think there is something wrong with the connections on the panel? The reset button and the HDD led work fine on that portion though, if that helps at all.\
Any help would be greatly appreciated, thank you.
The fan speed and light controller are only compatible with built in 200mm LED fans. If you are having issue on our built in fan with the controller, please contact our customer support.
Thermaltake USA Customer Service
Email: ttsupport@thermaltakeusa.com
Toll Free: 1-800-988-1088 M-F 9:00AM~5:30PM (P.S.T)
-
Hi everyone
Loving the Core V71, So big and moves so much air.
Just a question is there enough space to put an X61 AIO water cooler with push/pull on the top of the case with both 200mm fans up there as well?
i was thinking of putting one there with 4 Thermaltake Riing fans above the motherboard and leaving the 2 200mm fans in the top
is this possible?
thanks
Micheal
Welcome to the community of Core V71.
to answer your question:
Core V71 has a 42mm distance from the edge of MB tray to the inside of top panel, and with X61 that has a thickness of 27mm without the fans. It would not be possible to do a push and pull when the fan has a thickness of 25mm. You may get by with either push or pull and still keeps the 200mm on top, but it really depends on the motherboard you are using.
-
a7mag3ddon,
the fan size on the Element S is a 230mm but it has a 200mm size screw pitches, so it's compatible with any 200mm fan out there in the market.
-
Hi, had this case for about 5 months now and still loving it, its a very hot 30c+ New Zealand summer here and its doing a fantastic job of cooling my 2x780s and Asus Rampage IV Black Edition motherboard well worth the cost compared to the more expensive brands that cant compete in the air-cooling area, believe me i have tried a fair view cases in the past few years and this case is perfect for me

But unfortunately today i was cleaning the dust from the front filter and with my clumsy man hands i put a hole in the mesh, would it be possible to get a replacement front dust filter?
Zimzoid,
Please contact your local distributor they should be able to help you get a replacement, or you can contact our customer service, there will be people helping you out directly.
Here is the website for our customer service: http://my.thermaltake.com/csWarranty.aspx
Please let me know if you have any problem on getting the replacement.


P3 rubber washers??? Psu??
in Chassis
Posted
welcome to the forum,
the pillar is use to support the PCI-E bracket on top of PSU, and the rubber is use in between the PSU bracket and the PSU from preventing the screw of the pillar damaging the PSU. below is an image for you to refer to, if you find it too small to see it clearly, please visit our office product website for much clear image.
Hope this answered your question, please don't hesitate to let us know if you have any further question, thanks.