Search the Community
Showing results for tags 'threadripper'.
Found 6 results
-
Hey guys. This is something I've been planning to do for nearly two years now, and it's finally coming to a head. As some of you may have seen, I recently put together a custom reservoir to sit in the window of a Thermaltake Core P5. You can find the thread detailing how that all happened here . So after much debate between choosing X299 or X399, I eventually opted for Threadripper. I wanted a build I was sure would continue to be supported for years to come, and I didn't feel that I could get that out of Intel (Plus I didn't want to delid). So here are the parts! I ordered these during one of Ebay's 20% off sales, so most of them were a pretty good deal. The parts are as follows: Threadripper 1950x Asus ROG Zenith Extreme Strix GTX 1080ti Gaming TeamGroup Vulcan ram (64gb 3000mhz) Samsung 250gb Evo M.2 SSD Thermaltake 850w DPS Titanium (Only PSU with theRiing fan and two EPS outlets) Some Riing fans for the radiator And of course, the Core P5. I'll be using some HDD's from my current computer when it's time to migrate to this one. The first thing I did was put everything together and test the system. I decided to shove the 1080ti straight into my current build and pull the R9 290x out of that one so I could enjoy those high refresh rates straight away. We have ignition! Windows was successfully installed! It was time to focus on the more aesthetic side of things. I figured, if I was going to put this much effort into this build, I may as well have a symbol/logo done up to match the PC's name. I contacted a graphic designer located in Queensland called Sam Johnston (He has a business page if anyone's interested. Would recommend). Within a week I had a fully-fledged logo! I'm lucky that at work we have a laser cutter on hand. Here I am testing a few different power levels before etching the window. And here's the real deal. I decided to etch it backwards so that it would retain the gloss from the front side of the window. And not long after. Here it is after a quick cleanup. And finally after a polish. Not long after this, my water cooling equipment arrived from Bitspower. All bar the pump mount, which I unfortunately forgot. Hello extra $35 shipping. I tell you what, I feel that Bitspowerdon't get the recognition they deserve. Look at the quality of these blocks. Opps, forgot to take a photo of these ones with the wrapping off. While the waterblocks were great, I did have an issue with the radiator. I find it unfortunate that Bitspower stopped producing the single-sided version of the 480 radiator, and have opted for a double-sided model only. This produced a problem when mounting it to the P5 as I'm sure you can clearly see here. The Core P5 is flat on the side I need to mount the radiator to. But I had a solution in mind. Little bit of silicone and they were sitting pretty. Just shove em in. And wipe the excess away! Now I do love Bitspower, but one thing that irks me about them is the fact that all their plexi products have a frosted finish. I much prefer how EK does this with their crystal clear blocks. Thankfully, polishing acrylic isn't something that's particularly difficult. Before: And after: Before: And after: Before: And after: This was by far the worst part. I forgot to take photos of the ram blocks, but I did get a few before and after shots of the ram sticks themselves. At this stage, I ordered some cables fromCablemod. I quite like the scheme I came up with. They arrived not long after. Shortly thereafter, my pumps and liquid metal arrived. Naan Bread always looks at me like I've just asked her to hang out the washing.Unfortunately I didn't order enough sleeving. I sleeved up one of the pumps, but had to order more sleeving for the other. I couldn't find anyone selling Alphacord in Australia, so I opted for a knock-off vinyl sleeve from eBay. It was not good. I'll post photos of that later, but it looks like I'll have to order more Alphacord from overseas. Money money Next up was attaching the monoblock to the motherboard. Not a bad idea, Asus. Liquid metal is awfully pretty. And hard to figure out how to apply for someone who's never used it before. I got there eventually. And that's where I'm up to for now! Looks pretty good I reckon. I've got a few more parts on the way. Not much more I can do for now until they arrive.
-
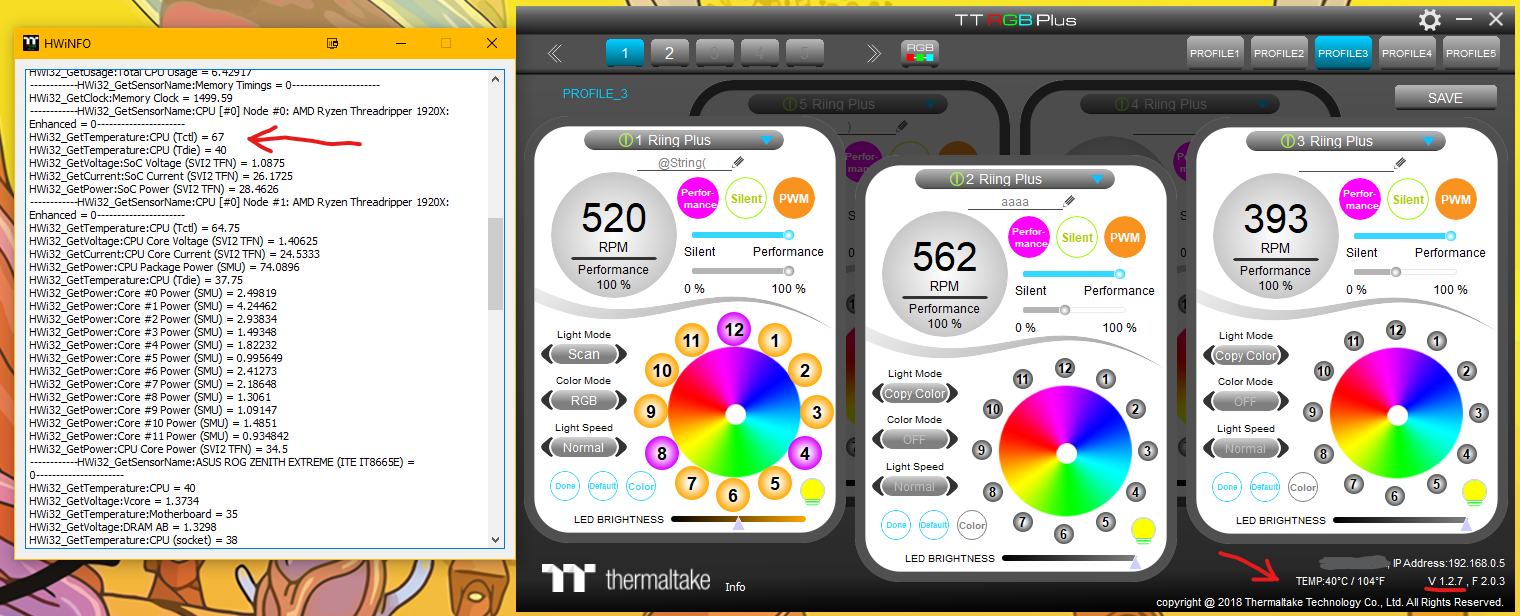
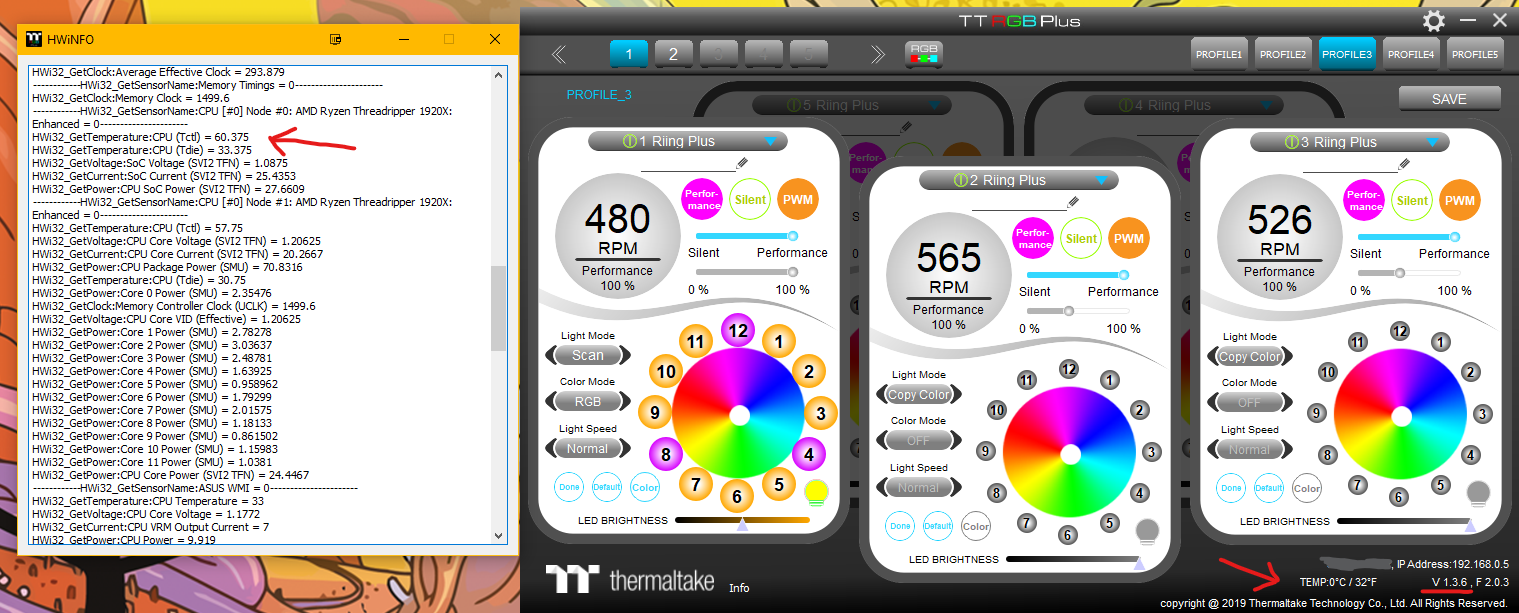
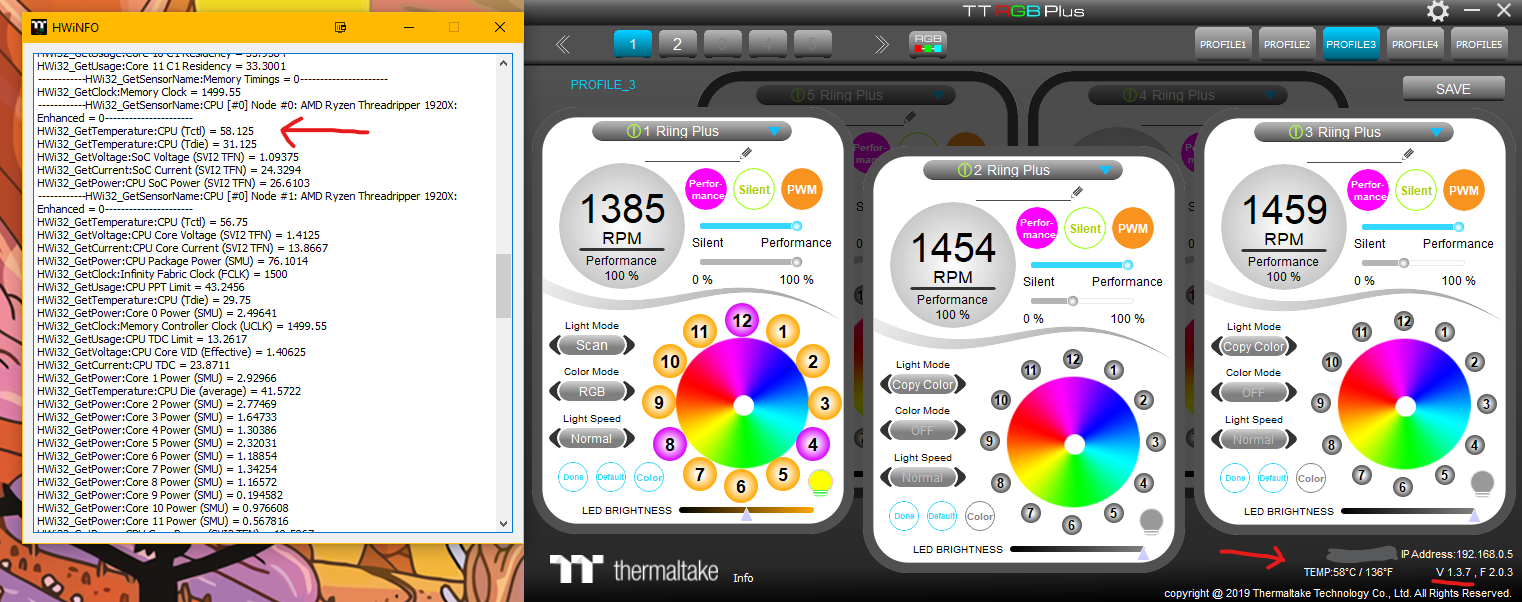
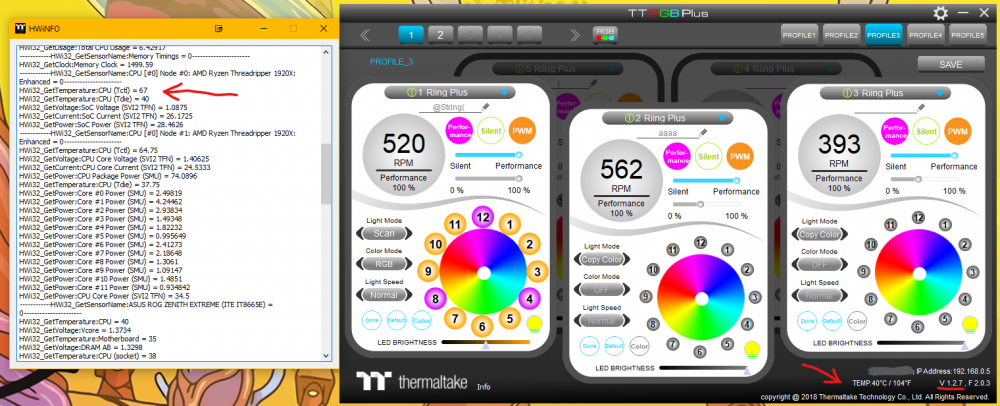
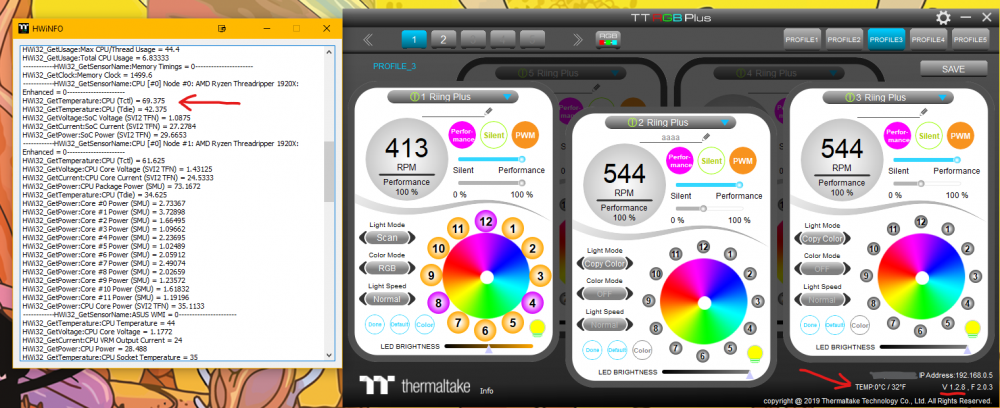
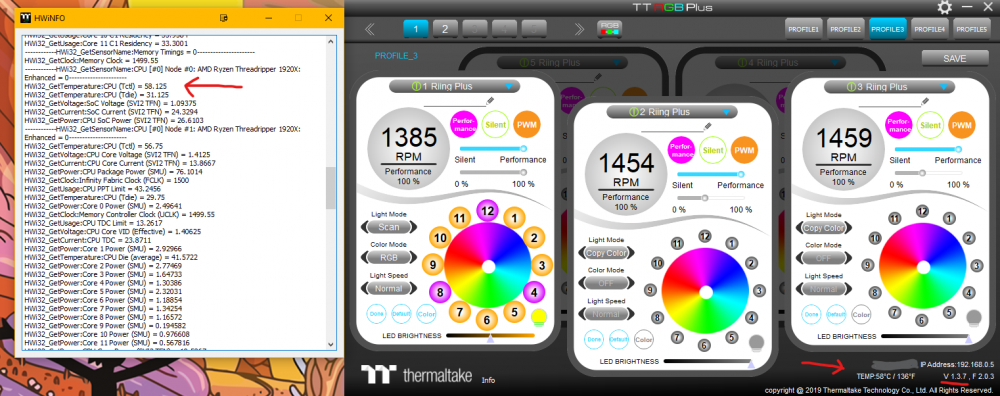
A while ago I was using TT RGB Plus 1.3.1 or 3.2 (not sure which) with no problems. I then updated my motherboard bios. I am using the ASUS ROG Zenith Extreme(original). I believe I upgraded from BIOS ver 1701 to 2001. In the change log for the bios on ASUS's website it says ROG ZENITH EXTREME BIOS 1901 Improve hardware monitoring compatibility with 3rd party applications. Fixed a boot issue when using a Quadro K6000 GPU. " Before running the USB BIOS Flashback tool, please rename the BIOS file (ZE.CAP) using BIOSRenamer.'' Ver 2001 would have the same improvements + more. Ever since updating, every version of TT RGB Plus from 1.2.8 (64 bit update) onward i have been getting a 0°C reading on TT RGB plus on my Threadripper system. Version 1.2.7 still works for me and I have been using that since, hoping a future update would help. This bios update also changed my other system monitoring software, in particular interest HWINFO64, which I believe TT RGB Plus uses a plugin to get temps from. HWINFO64 continued to work, however the reporting of ASUS MB values had changed title to asus wmi, along with other changes, like readouts being renamed, e.g EXT Tsensor1 changed to Tsensor 1 Temperature. There may have been more changes, I don't know. Im guessing a name change or something similar is the problem. Today I tried TT RGB Plus 1.3.7 because something caught my eye 2.Fixed AMD CPU temperature issue. Something different has happened. I got a temperature other than 0°C. 😀The problem is it is the Tctl temp and not the tdie temp.🙁 Which of course means ttrgb thinks my cpu temp is 65°C instead of it's actual 40°C, so my fans are going close to full speed now. At least they are cooling the system, 0°C put them on idle🤔 I'll add a couple pictures which are hopefully straight forward, basically just diferent TT RGB versions and what the plugin is reading and what the program is reading on my PC. CPU is generally around 40°C idle. I do now believe this problem is fixable but possibly only through a software update. I'm basically reaching out to any TTstaff that could possibly help. I know that a bios downgrade might work, but the new versions do have a few QOL improvements eg. mem stability etc. so would prefer not to. If anyone else has any ideas as to what else could be the cause please let me know. I have been thinking this will probably never be fixed but this new update has given me hope. Any help from anyone would be much appreciated. Thanks😀 EDIT: Sorry just found this thread :

-
 Hi, I have a system with 23 Riing trio radiator fans, but the TT RGB plus software can't read my system / processor temperature. The 6 controllers working good. I can set the color and the speed manually. But i woluld like to set PWM with auto fan speed... Motherboard: Asus zenith extreme Processor: AMD Ryzen Threadripper 2950X OS: Windows 10 Pro 64 TT RGB PLUS version: 1.3.3 I had run the TTRGB PLUS by system admin. HWINFO output (I see my processor temperature in the HWINFO): ------------HWi32_GetSensorName:System = 6.95148e-310---------------------- ------------HWi32_GetSensorName:CPU [#0]: AMD Ryzen Threadripper 2950X = 0---------------------- HWi32_GetVoltage:Core 0 VID = 1.3125 HWi32_GetClock:Core 0 Clock = 4116.08 HWi32_GetUsage:Core 0 T0 Usage = 20 HWi32_GetVoltage:Core 1 VID = 1.425 HWi32_GetClock:Core 1 Clock = 4116.08 HWi32_GetVoltage:Core 2 VID = 1.425 HWi32_GetClock:Core 2 Clock = 4190.92 HWi32_GetUsage:Core 1 T0 Usage = 10 HWi32_GetVoltage:Core 3 VID = 1.3875 HWi32_GetClock:Core 3 Clock = 4190.92 HWi32_GetVoltage:Core 4 VID = 1.38125 HWi32_GetClock:Core 4 Clock = 4091.14 HWi32_GetUsage:Core 2 T0 Usage = 10 HWi32_GetVoltage:Core 5 VID = 1.43125 HWi32_GetClock:Core 5 Clock = 4091.14 HWi32_GetVoltage:Core 6 VID = 1.43125 HWi32_GetClock:Core 6 Clock = 4165.97 HWi32_GetVoltage:Core 7 VID = 1.44375 HWi32_GetClock:Core 7 Clock = 4116.08 HWi32_GetVoltage:Core 8 VID = 1.45 HWi32_GetClock:Core 8 Clock = 2993.51 HWi32_GetVoltage:Core 9 VID = 1.44375 HWi32_GetClock:Core 9 Clock = 2993.51 HWi32_GetVoltage:Core 10 VID = 1.46875 HWi32_GetClock:Core 10 Clock = 2744.05 HWi32_GetVoltage:Core 11 VID = 1.45 HWi32_GetClock:Core 11 Clock = 4116.08 HWi32_GetVoltage:Core 12 VID = 1.45 HWi32_GetClock:Core 12 Clock = 2993.51 HWi32_GetUsage:Core 6 T0 Usage = 40 HWi32_GetVoltage:Core 13 VID = 1.45 HWi32_GetClock:Core 13 Clock = 4116.08 HWi32_GetVoltage:Core 14 VID = 1.44375 HWi32_GetClock:Core 14 Clock = 2760.68 HWi32_GetVoltage:Core 15 VID = 1.4375 HWi32_GetClock:Core 15 Clock = 4116.08 HWi32_GetUsage:Core 7 T1 Usage = 10 HWi32_GetClock:Bus Clock = 99.7838 HWi32_GetUsage:Core 9 T1 Usage = 10 HWi32_GetUsage:Core 10 T0 Usage = 10 HWi32_GetUsage:Core 11 T0 Usage = 10 HWi32_GetClock:Core 0 T0 Effective Clock = 266.646 HWi32_GetUsage:Core 13 T0 Usage = 30 HWi32_GetClock:Core 0 T1 Effective Clock = 79.6988 HWi32_GetClock:Core 1 T0 Effective Clock = 191.631 HWi32_GetClock:Core 1 T1 Effective Clock = 176.67 HWi32_GetClock:Core 2 T0 Effective Clock = 392.364 HWi32_GetClock:Core 2 T1 Effective Clock = 27.7474 HWi32_GetClock:Core 3 T0 Effective Clock = 292.171 HWi32_GetUsage:Max CPU/Thread Usage = 40 HWi32_GetClock:Core 3 T1 Effective Clock = 65.7851 HWi32_GetUsage:Total CPU Usage = 4.6875 HWi32_GetClock:Core 4 T0 Effective Clock = 141.335 HWi32_GetClock:Core 4 T1 Effective Clock = 20.2848 HWi32_GetClock:Core 5 T0 Effective Clock = 90.5325 HWi32_GetClock:Core 5 T1 Effective Clock = 30.0429 HWi32_GetClock:Core 6 T0 Effective Clock = 1576.87 HWi32_GetClock:Core 6 T1 Effective Clock = 12.7494 HWi32_GetClock:Core 7 T0 Effective Clock = 69.497 HWi32_GetClock:Core 7 T1 Effective Clock = 113.659 HWi32_GetClock:Core 8 T0 Effective Clock = 24.9393 HWi32_GetClock:Core 8 T1 Effective Clock = 1.50633 HWi32_GetClock:Core 9 T0 Effective Clock = 47.9095 HWi32_GetClock:Core 9 T1 Effective Clock = 52.4736 HWi32_GetClock:Core 10 T0 Effective Clock = 31.8203 HWi32_GetClock:Core 10 T1 Effective Clock = 1.93067 HWi32_GetClock:Core 11 T0 Effective Clock = 40.53 HWi32_GetClock:Core 11 T1 Effective Clock = 55.027 HWi32_GetClock:Core 12 T0 Effective Clock = 66.4707 HWi32_GetClock:Core 12 T1 Effective Clock = 23.3705 HWi32_GetClock:Core 13 T0 Effective Clock = 1739.25 HWi32_GetClock:Core 13 T1 Effective Clock = 7.21509 HWi32_GetClock:Core 14 T0 Effective Clock = 340.901 HWi32_GetClock:Core 14 T1 Effective Clock = 8.69661 HWi32_GetClock:Core 15 T0 Effective Clock = 50.3515 HWi32_GetClock:Core 15 T1 Effective Clock = 22.9879 HWi32_GetClock:Average Effective Clock = 189.471 ------------HWi32_GetSensorName:Memory Timings = 0---------------------- HWi32_GetClock:Memory Clock = 1064.36 ------------HWi32_GetSensorName:CPU [#0] Node #0: AMD Ryzen Threadripper 2950X: Enhanced = 0---------------------- HWi32_GetTemperature:CPU (Tctl) = 59.375 HWi32_GetTemperature:CPU (Tdie) = 32.375 HWi32_GetVoltage:SoC Voltage (SVI2 TFN) = 0.825 HWi32_GetCurrent:SoC Current (SVI2 TFN) = 15.851 HWi32_GetPower:SoC Power (SVI2 TFN) = 13.0771 ------------HWi32_GetSensorName:CPU [#0] Node #1: AMD Ryzen Threadripper 2950X: Enhanced = 0---------------------- HWi32_GetTemperature:CPU (Tctl) = 59.375 HWi32_GetVoltage:CPU Core Voltage (SVI2 TFN) = 1.29375 HWi32_GetCurrent:CPU Core Current (SVI2 TFN) = 33.0667 HWi32_GetPower:CPU Package Power (SMU) = 47.0834 HWi32_GetTemperature:CPU (Tdie) = 32.375 HWi32_GetPower:Core 0 Power (SMU) = 1.53457 HWi32_GetClock:Memory Controller Clock (UCLK) = 1064.36 HWi32_GetPower:Core 1 Power (SMU) = 1.92335 HWi32_GetPower:Core 2 Power (SMU) = 1.65709 HWi32_GetPower:Core 3 Power (SMU) = 1.5879 HWi32_GetPower:Core 4 Power (SMU) = 0.758437 HWi32_GetPower:Core 5 Power (SMU) = 0.61 HWi32_GetPower:Core 6 Power (SMU) = 2.86871 HWi32_GetPower:Core 7 Power (SMU) = 0.747103 HWi32_GetPower:Core 8 Power (SMU) = 0.258131 HWi32_GetPower:Core 9 Power (SMU) = 0.731898 HWi32_GetPower:Core 10 Power (SMU) = 0.265751 HWi32_GetPower:Core 11 Power (SMU) = 0.7372 HWi32_GetPower:Core 12 Power (SMU) = 0.674353 HWi32_GetPower:Core 13 Power (SMU) = 4.27411 HWi32_GetPower:Core 14 Power (SMU) = 0.837431 HWi32_GetPower:Core 15 Power (SMU) = 0.546986 HWi32_GetPower:CPU Core Power (SVI2 TFN) = 42.78 ------------HWi32_GetSensorName:ASUS WMI = 0---------------------- HWi32_GetTemperature:CPU Temperature = 27 HWi32_GetVoltage:CPU Core Voltage = 1.4388 HWi32_GetCurrent:CPU VRM Output Current = 14 HWi32_GetPower:CPU Power = 18.396 HWi32_GetTemperature:CPU Socket Temperature = 28 HWi32_GetVoltage:CPU SOC Voltage = 0.872 HWi32_GetTemperature:Motherboard Temperature = 30 HWi32_GetVoltage:DRAM AB Voltage = 1.2208 HWi32_GetTemperature:Chipset Temperature = 52 HWi32_GetVoltage:DRAM CD Voltage = 1.2208 HWi32_GetVoltage:1.8V PLL Voltage = 1.8312 HWi32_GetFan:Water Pump 1 = 2636 HWi32_GetTemperature:CPU VRM Temperature = 36 HWi32_GetVoltage:+12V Voltage = 12.099 HWi32_GetTemperature:Water In = 25 HWi32_GetVoltage:+5V Voltage = 4.93225 HWi32_GetTemperature:Water Out = 25 HWi32_GetVoltage:3VSB Voltage = 3.3354 HWi32_GetVoltage:VBAT Voltage = 3.0302 HWi32_GetVoltage:AVCC3 Voltage = 3.3572 HWi32_GetVoltage:SB 1.05V Voltage = 1.04375 HWi32_GetVoltage:CPU Core Voltage (VRM) = 1.314 HWi32_GetVoltage:CPU SOC Voltage (VRM) = 0.824 HWi32_GetVoltage:DRAM AB Voltage (VRM) = 1.2 HWi32_GetVoltage:DRAM CD Voltage (VRM) = 1.2 ------------HWi32_GetSensorName:DIMM Temperature Sensor = 0---------------------- HWi32_GetTemperature:DIMM[0] Temperature = 35.5 HWi32_GetTemperature:DIMM[1] Temperature = 37 HWi32_GetTemperature:DIMM[2] Temperature = 38 HWi32_GetTemperature:DIMM[3] Temperature = 38 HWi32_GetTemperature:DIMM[4] Temperature = 33.75 HWi32_GetTemperature:DIMM[5] Temperature = 35.25 HWi32_GetTemperature:DIMM[6] Temperature = 36.25 HWi32_GetTemperature:DIMM[7] Temperature = 36.25 ------------HWi32_GetSensorName:S.M.A.R.T.: Samsung SSD 970 PRO 1TB (S462NF0M316868X) = 0---------------------- HWi32_GetTemperature:Drive Temperature = 41 HWi32_GetUsage:Drive Remaining Life = 100 HWi32_GetTemperature:Drive Temperature 2 = 50 ------------HWi32_GetSensorName:S.M.A.R.T.: Samsung SSD 970 PRO 1TB (S462NF0M800553P) = 0---------------------- HWi32_GetTemperature:Drive Temperature = 38 HWi32_GetUsage:Drive Remaining Life = 100 HWi32_GetTemperature:Drive Temperature 2 = 42 ------------HWi32_GetSensorName:S.M.A.R.T.: Samsung SSD 970 PRO 1TB (S462NF0M316898Z) = 0---------------------- HWi32_GetTemperature:Drive Temperature = 36 HWi32_GetUsage:Drive Remaining Life = 100 HWi32_GetTemperature:Drive Temperature 2 = 39 ------------HWi32_GetSensorName:Drive: Samsung SSD 970 PRO 1TB (S462NF0M316868X) = 0---------------------- HWi32_GetUsage:Write Activity = 0.16 HWi32_GetUsage:Total Activity = 0.16 ------------HWi32_GetSensorName:Drive: Samsung SSD 970 PRO 1TB (S462NF0M800553P) = 0---------------------- ------------HWi32_GetSensorName:Drive: Samsung SSD 970 PRO 1TB (S462NF0M316898Z) = 0---------------------- ------------HWi32_GetSensorName:GPU [#0]: NVIDIA GeForce RTX 2080 Ti: = 0---------------------- HWi32_GetTemperature:GPU Temperature = 28 HWi32_GetVoltage:GPU Core Voltage = 0.725 HWi32_GetPower:GPU Power = 55.011 HWi32_GetClock:GPU Clock = 1140 HWi32_GetUsage:GPU Core Load = 1 HWi32_GetUsage:GPU Memory Controller Load = 1 HWi32_GetClock:GPU Memory Clock = 7000 HWi32_GetClock:GPU Video Clock = 1050 HWi32_GetUsage:GPU Memory Usage = 11.0349 HWi32_GetUsage:GPU D3D Usage = 0.3268 ------------HWi32_GetSensorName:GPU [#1]: NVIDIA GeForce RTX 2080 Ti: = 0---------------------- HWi32_GetTemperature:GPU Temperature = 27 HWi32_GetVoltage:GPU Core Voltage = 0.725 HWi32_GetPower:GPU Power = 21.511 HWi32_GetClock:GPU Clock = 300 HWi32_GetClock:GPU Memory Clock = 405 HWi32_GetClock:GPU Video Clock = 540 HWi32_GetUsage:GPU Memory Usage = 1.90874 ------------HWi32_GetSensorName:Network: Atheros/Qualcomm QCA6174 802.11ac Wireless Network Adapter = 0---------------------- ------------HWi32_GetSensorName:Network: Intel I211AT Copper (Pearsonville) Network Adapter = 0---------------------- ------------HWi32_GetSensorName:Windows Hardware Errors (WHEA) = 0---------------------- Please help me, how can i use this software with PWM function?! Why the software can't see the temp if it is in the HWINFO??? Thank you, P
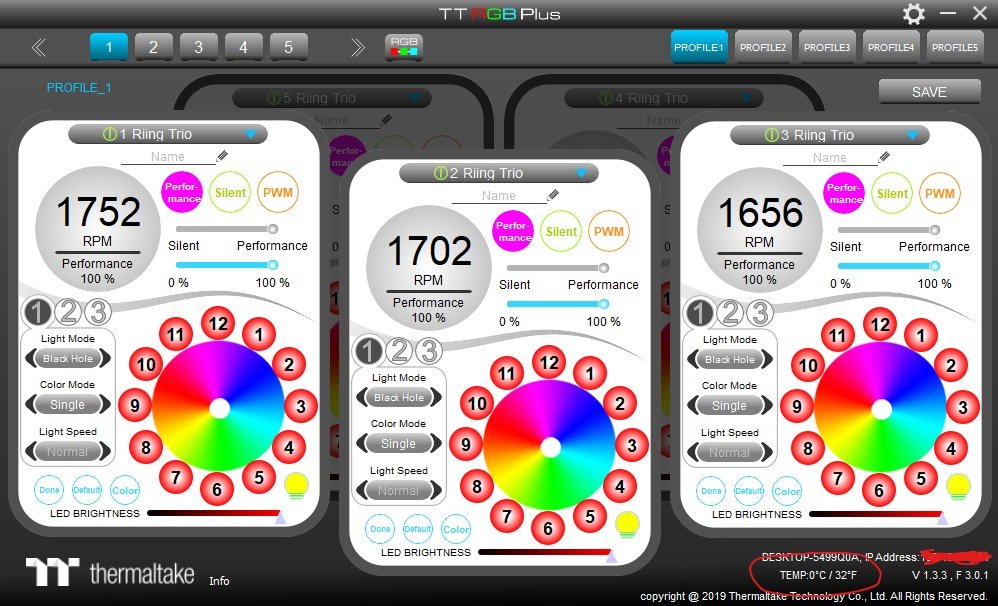
-
Hi Team, I've noticed that the newly installed AIO is not reading my cpu temp regardless of me putting the pin to CPU_fan or Pump_fan. It is constantly displaying as 0C in the TT rgb software. I have the latest version of the software. i can detect my cpu temps on bios,ryzen master software and hwinfo app.It just doesnt show up on the cooler. The fans, rgb and pump are working tho, just that im unsure if failing to detect the temps will cause any colling performance issue or not. I've set the fans to be operating under performance mode just so they are spinning 1600++ rpm, but i am unsure if the cooler is working when my pc is under load. Please advice or let me know if there is a workaround to this. Thanks in advance Regards, Michael
-
 Hey guys, I recently put together my Ryzen Threadripper build and i'm using the Gigabyte X399 Gaming 7 motherboard has stated in the title however, I can't get the software to launch on this platform. It's installed properly but when I go to launch it nothing happens. I've tried to run it without the fan hubs connected but it still won't work. Any ideas would be greatly appreciated or maybe its something that TT need to fix in the software....
 -
 Hey TT-Community, Problem: The FloeRiingPlus Software reads the temp including the 27°C Offset of Threadripper -> fans spinning at higher RPMs -> higher noise Solution: 1. Uninstall your current Riing Plus RGB Software. 2a. Download the older Version of the Software (It's V1.0.0 = http://www.thermaltake.com/db/support/software/RiingPlusRGBTtPremiumEdition_Setup.rar ) and install it. 2b. Or just download the two .dll files I attached to this Post. Continue with step 5. (HWiNFO32.dll and HWiNFO64.dll) 3. After you installed V1.0.0 go into the install directory (C:\Program Files (x86)\Tt\Riing Plus RGB Tt Premium Edition), then copy HWiNFO32.dll and HWiNFO64.dll onto your Desktop. 4. Now uninstall the Software again, and install the new one (currently V1.1.4 = http://www.thermaltake.com/db/support/software/Riing_Plus_RGB_Tt_Premium_Edition_Setup_1.1.4_x86.zip ) 5. After you installed the new version, close it, and go into install directory again (C:\Program Files (x86)\Tt\Riing Plus RGB Tt Premium Edition), and copy HWiNFO32.dll and HWiNFO64.dll into this folder. 6. Click replace and continue (if necessary) 7. Now it should work. @Thermaltake @Thermaltake Admin @ThermalMike Maybe you can look into this, I think it's just the wrong Version of HWiNFO. The new Version worked for me when I updated to it, but not when I clean install the software. HWiNFO32.dll HWiNFO64.dll