Search the Community
Showing results for tags 'LCS'.
Found 9 results
-
55 Ace game Customer care Helpline number♻️8158052312√•√8296663142 ..।55 Ace game Customer care Helpline number♻️8158052312√•√8296663142 ..।55 Ace game Customer care Helpline number♻️8158052312√•√8296663142 ..।

-
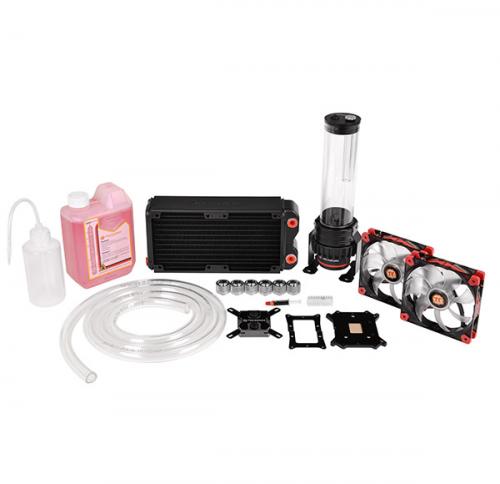
This week for #CES2015 we have announced the Pacific Series DIY LCS (Liquid Cooling System) Components. We have a TON of new stuff coming, this is just the start! Pacific RL240 DIY LCS Kit: (CES Exclusive Launch) Buy Now: http://www.newegg.com/Product/Product.aspx?Item=N82E16835106254 We will continue to update on the full line of Pacific Series DIY LCS Components as they become available! For more information on our Pacific Series Components including, CPU Block, Pump, Radiator and accessories visit our website: http://www.thermaltakeusa.com/cooler.aspx
- 13 replies
-
- 3
-

-
- DIY
- Watercooling
- (and 3 more)
-
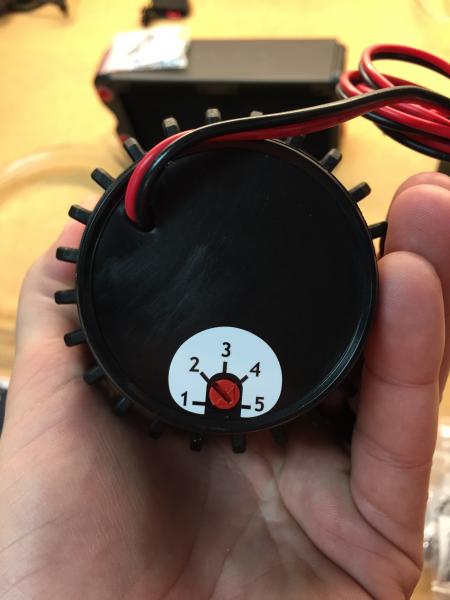
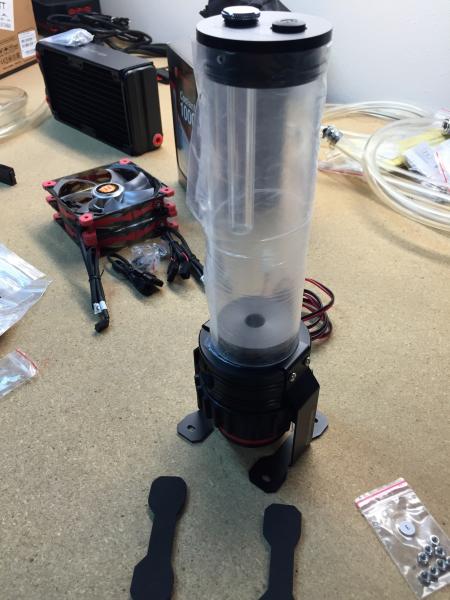
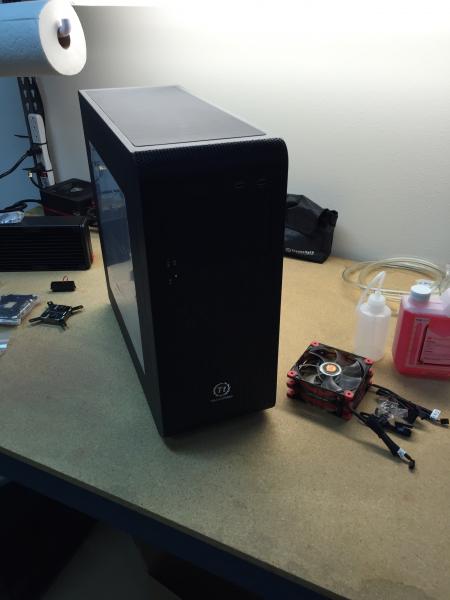
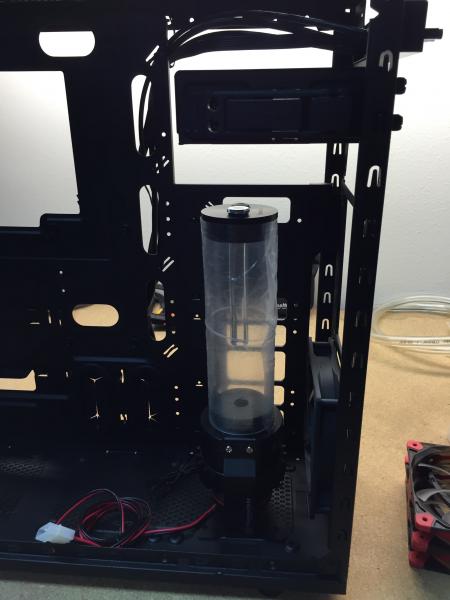
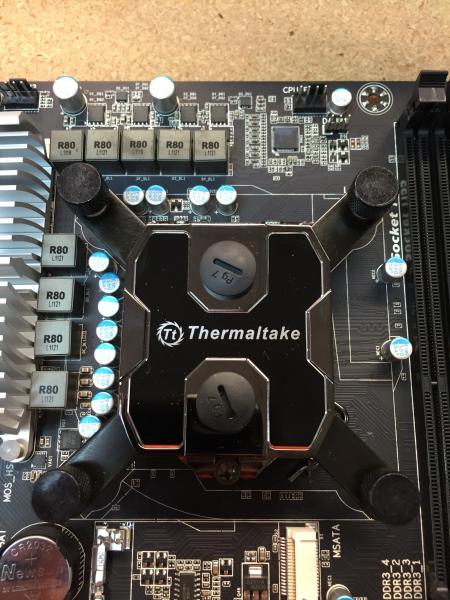
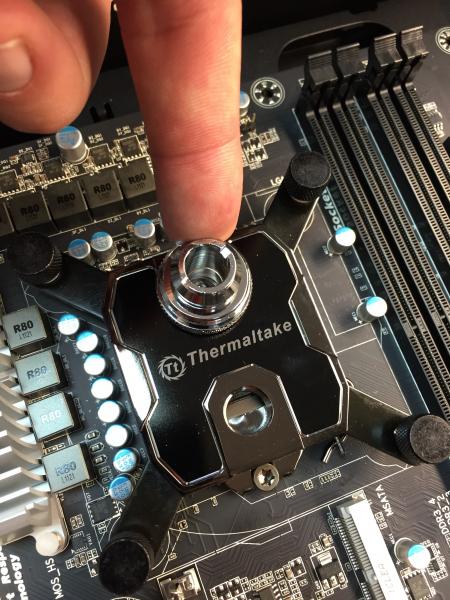
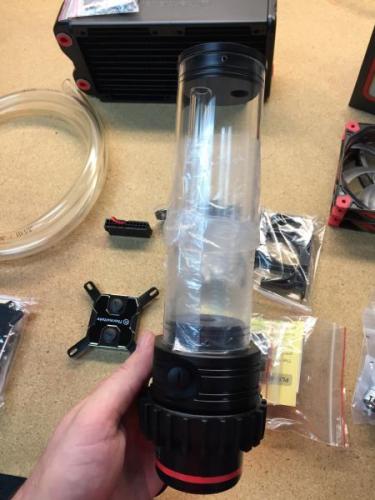
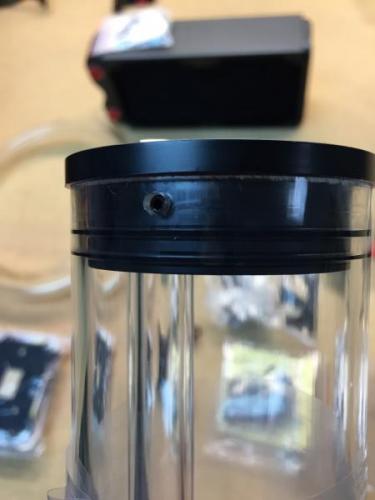
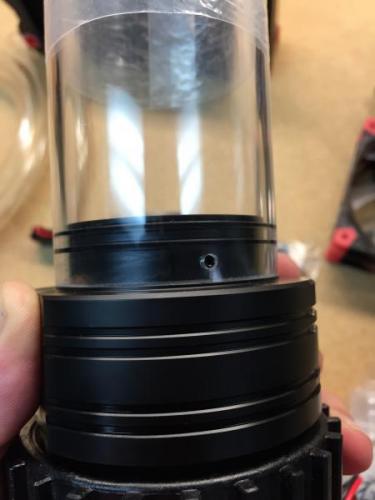
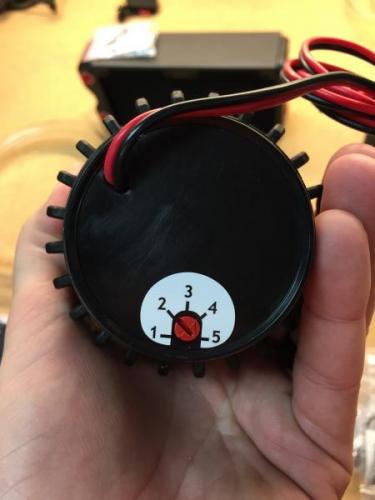
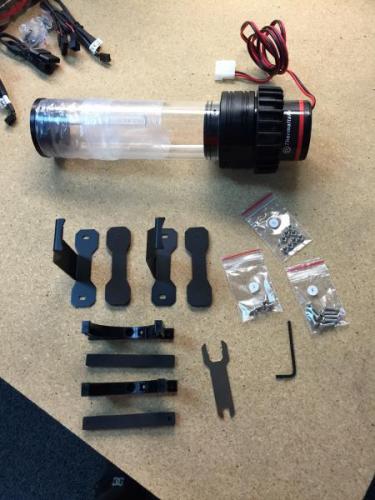
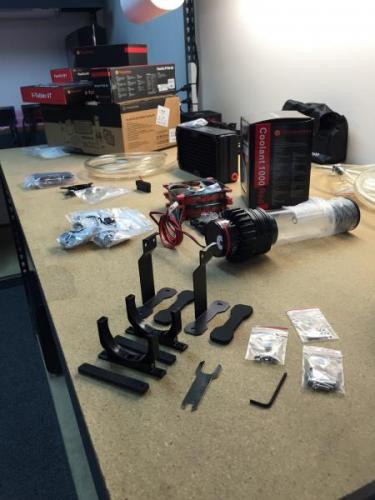
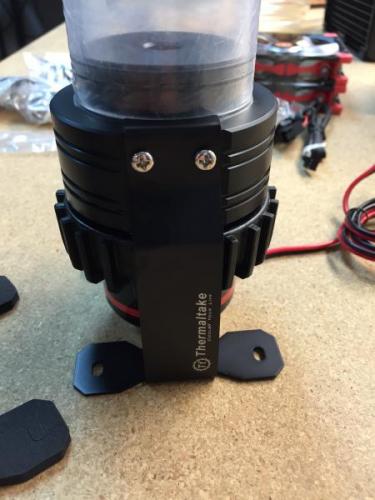
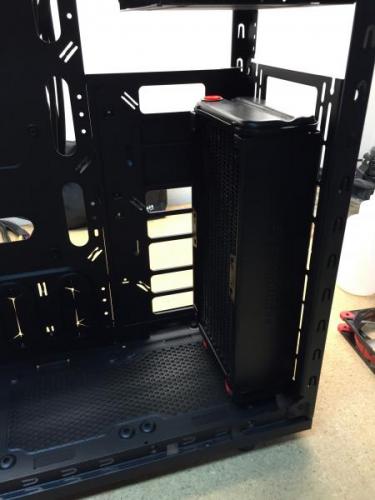
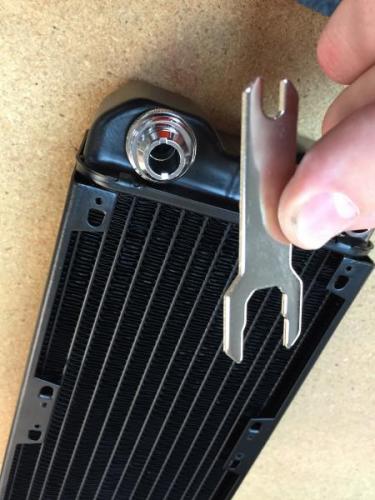
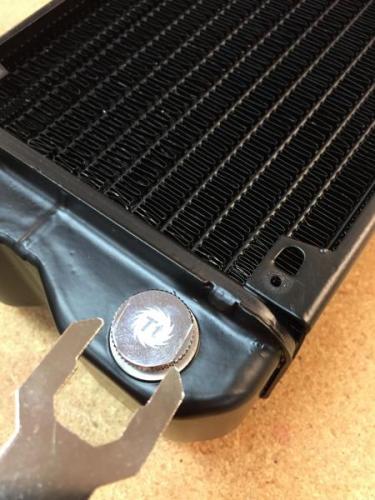
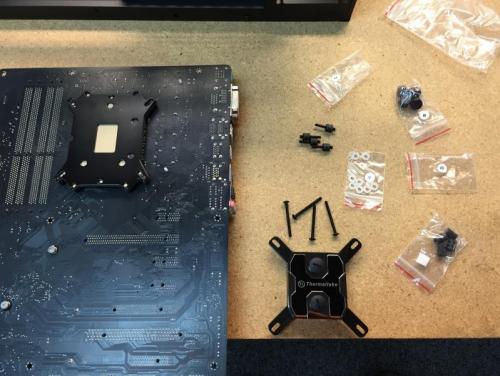
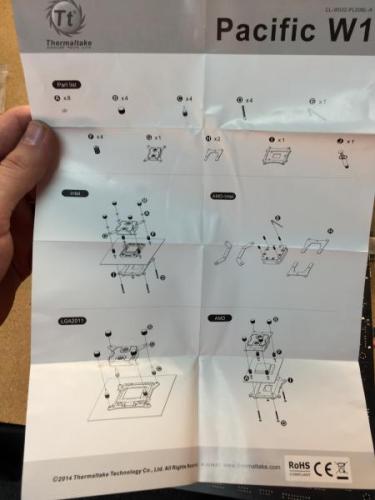
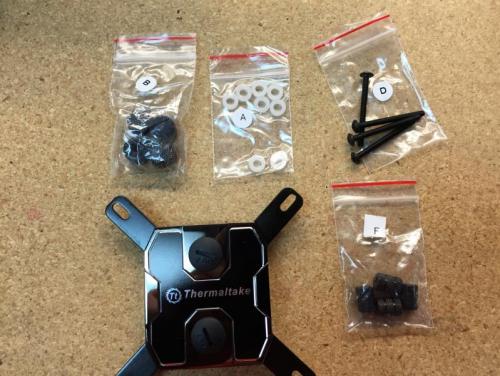
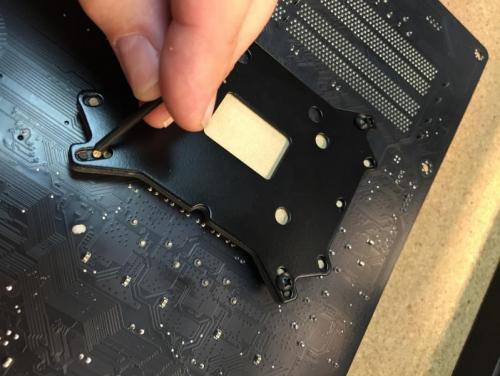
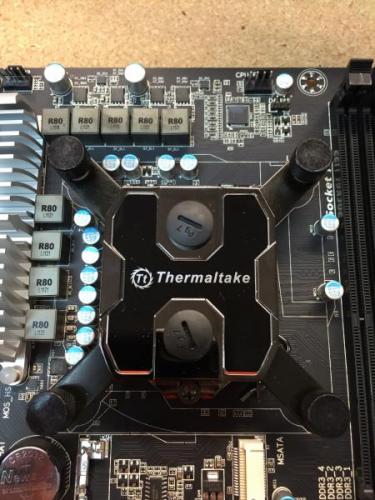
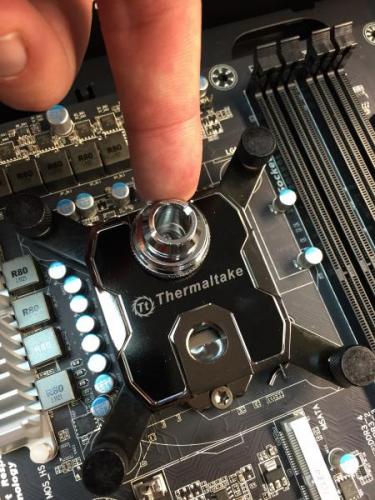
Hi everyone, With the release of our Pacific DIY components and Kits, I wanted to provide a guide focused on the RL240 kit and take you through the installation process to give users an idea of what you will get: RL240 Kit: What you get: - (1) RL240 Radiator 240x120x64mm - (1) PT40-D5 Reservoir + Pump Combo (Includes Hardware) - (1) W1 CPU Water block (Includes Hardware + Thermal Paste) - (1) 4T 1/2" Tubing (6.5ft) - (1) Coolant 1000ml (Red) + Filler Bottle - (6) 1/2" ID 3/4" OD Compression Fittings - (2) Luna 12 Red LED Fans - (1) 24-pin PSU Jumper Here is everything out of the box: Here is the PT40-D5 Reservoir + Pump: When you open the PT40-D5 packaging you will have all the accessories in bags including the mounting hardware. The brackets included allow you to mount the PT40 vertically or horizontally depending on the configuration you want to do. **VERY IMPORTANT** There are set screws on both ends of the reservoir that are to secure the Tube to both ends, these screw do not need to be tightened. Also take note, if you plan to clean your reservoir later, make sure to remove the set screws (Both sides Top/Bottom) prior to removing to avoid causing any stress to the tube when separating. Also take care of the O-rings on both sides to make sure they are in the correct place when putting back together. On the bottom you have the pump speed adjustment that should be set in the "2" position by default. I recommend leaving the speed adjustment alone until you have the system up and running to make any adjustments later. Turing the speed up is only needed when necessary, with the setting of "2" should be enough to support the default kit configuration. Here is all the included brackets and hardware for the PT40-D5 Since I am installing this in our Core V31, I plan to mount this vertically so I have installed the mounting brackets to the pump housing to secure into the chassis floor. Here is a quick look at the Core V31 that we will be installing the RL240 kit Getting ideas on how to place the PT40-D5. (Removed the HDD trays and the bottom ODD for clearance) Now for the (240mm) radiator placement and overview. First you need to remove the orange plastic plugs that came pre-installed. Give the radiator a quick look and make sure everything is ok. Here is the accessories that come included, you get mounting screws for the radiator and for the fans as well as (3) G1/4 port plugs and a wrench tool for easy installation. Before you go through installing everything on the radiator, check the location where you plan to place it and make sure it will work out with the entire system including the water loop to make sure all your fittings and tubing will have proper clearance and your tubing will have proper flow to avoid the tube from pinching around a tight space. It is also a good idea before installation of your radiator to fill the radiator with distilled water and give it a good shake to remove anything left over from the manufacturing process. Fee free to repeat this step as many times as you want until you are satisfied. You can setup the porting anyway you like, for this example I will use the (2) bottom ports on one side for my IN & Out and plug the other (2) bottom ports on the other side with the last plug for the top. Note: Do not tighten the top plug port just yet, you may need to use it for a breather port when filling The wrench is a great tool to use for tightening the ports on your components as the fittings have "slots" on the top so you can use the wrench to tighten and avoid scratching the component or fitting using a standard pair of pliers. The wrench also is designed to help secure the plug ports nicely. Remember, DO NOT over tighten, you will just damage the O-Rings if you gorilla grip the fittings into place. A snug fit is fine. Now we take a look at the W1 CPU block to prepare it for installation to the motherboard. You will get a simple installation guide showing how to install for Intel or AMD type CPU's. Take note of the accessories labeled for each Intel/AMD. Now install the back plate to your motherboard and punch out the foam holes for your CPU Socket type to install the mounting screws to. Once the back plate is installed and the mounting screws are through the motherboard, secure the CPU in place and apply thermal paste. Then seat the W1 CPU block onto your CPU first and make sure everything lines up correctly. When ready set the (4) plastic washers after placing the CPU block. Then install the (4) screw caps and tighten them in the "X" pattern to apply appropriate pressure evenly as you secure the block. These only need to be hand tight and you should be able to tell when each one is secure very easily. Now you can install the fittings on both ports, don't forget to use your wrench!


- 22 replies
-
- 2
-
-
- Watercooling
- RL240
- (and 4 more)
-
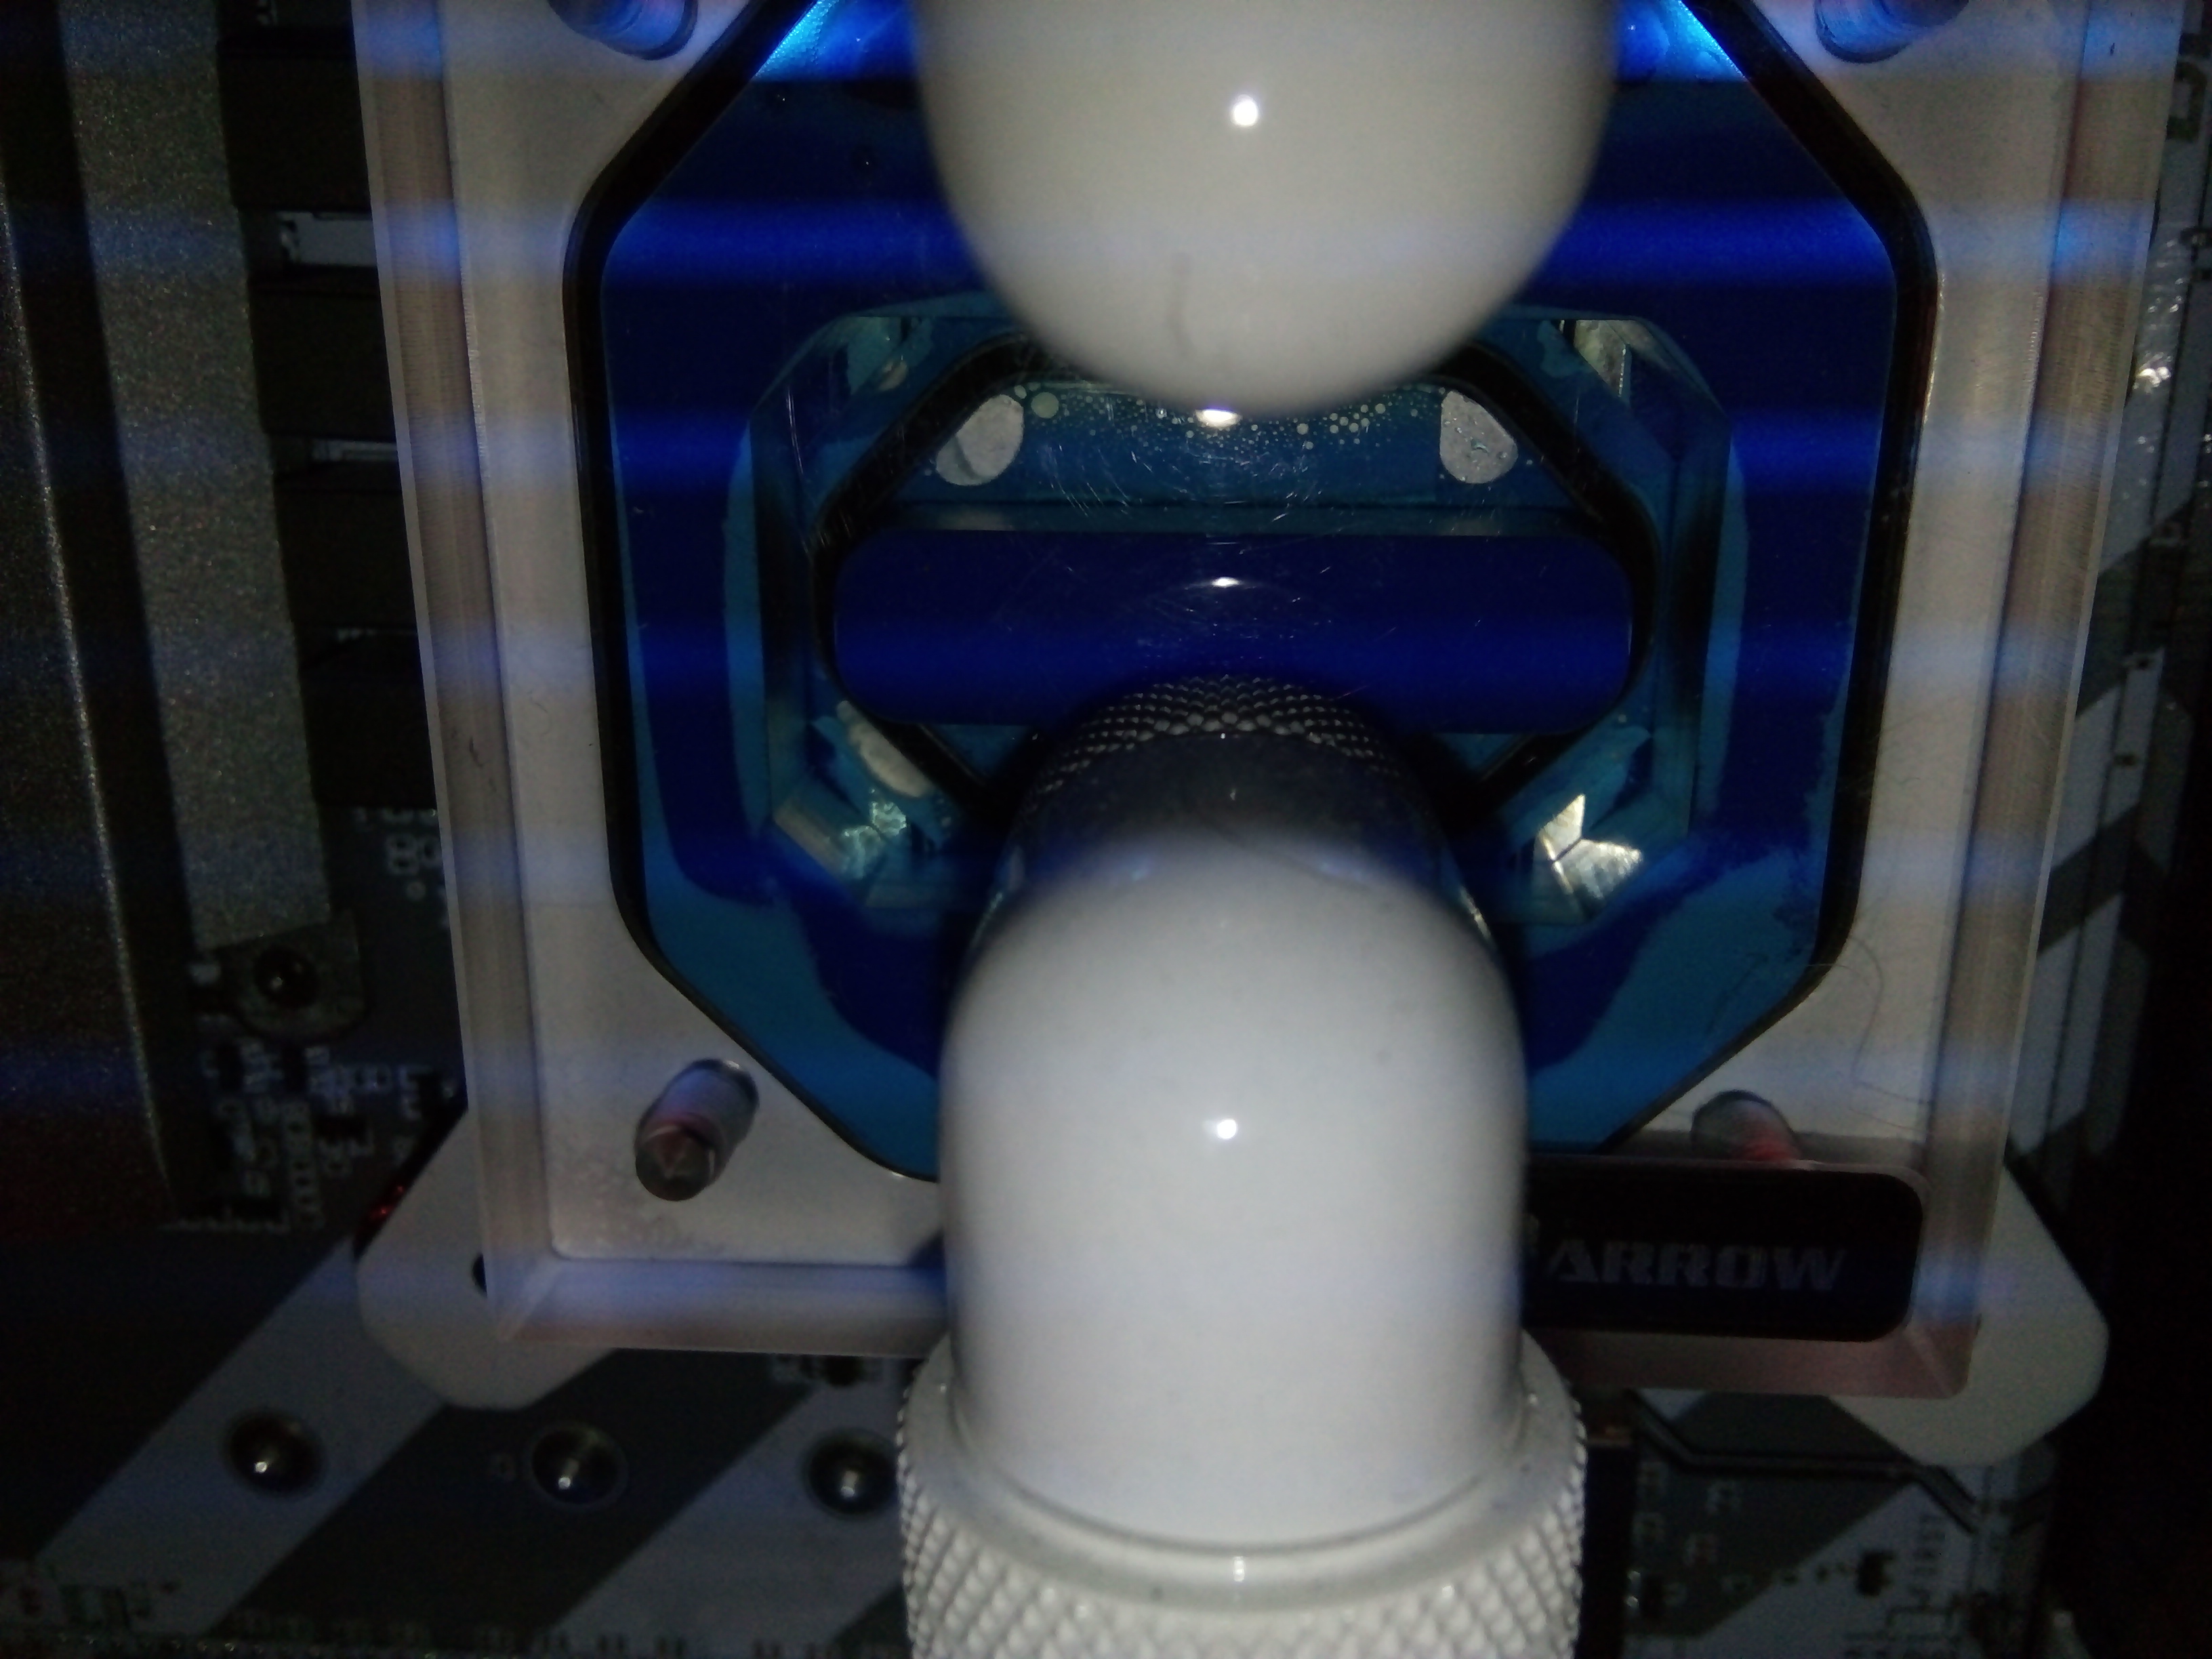
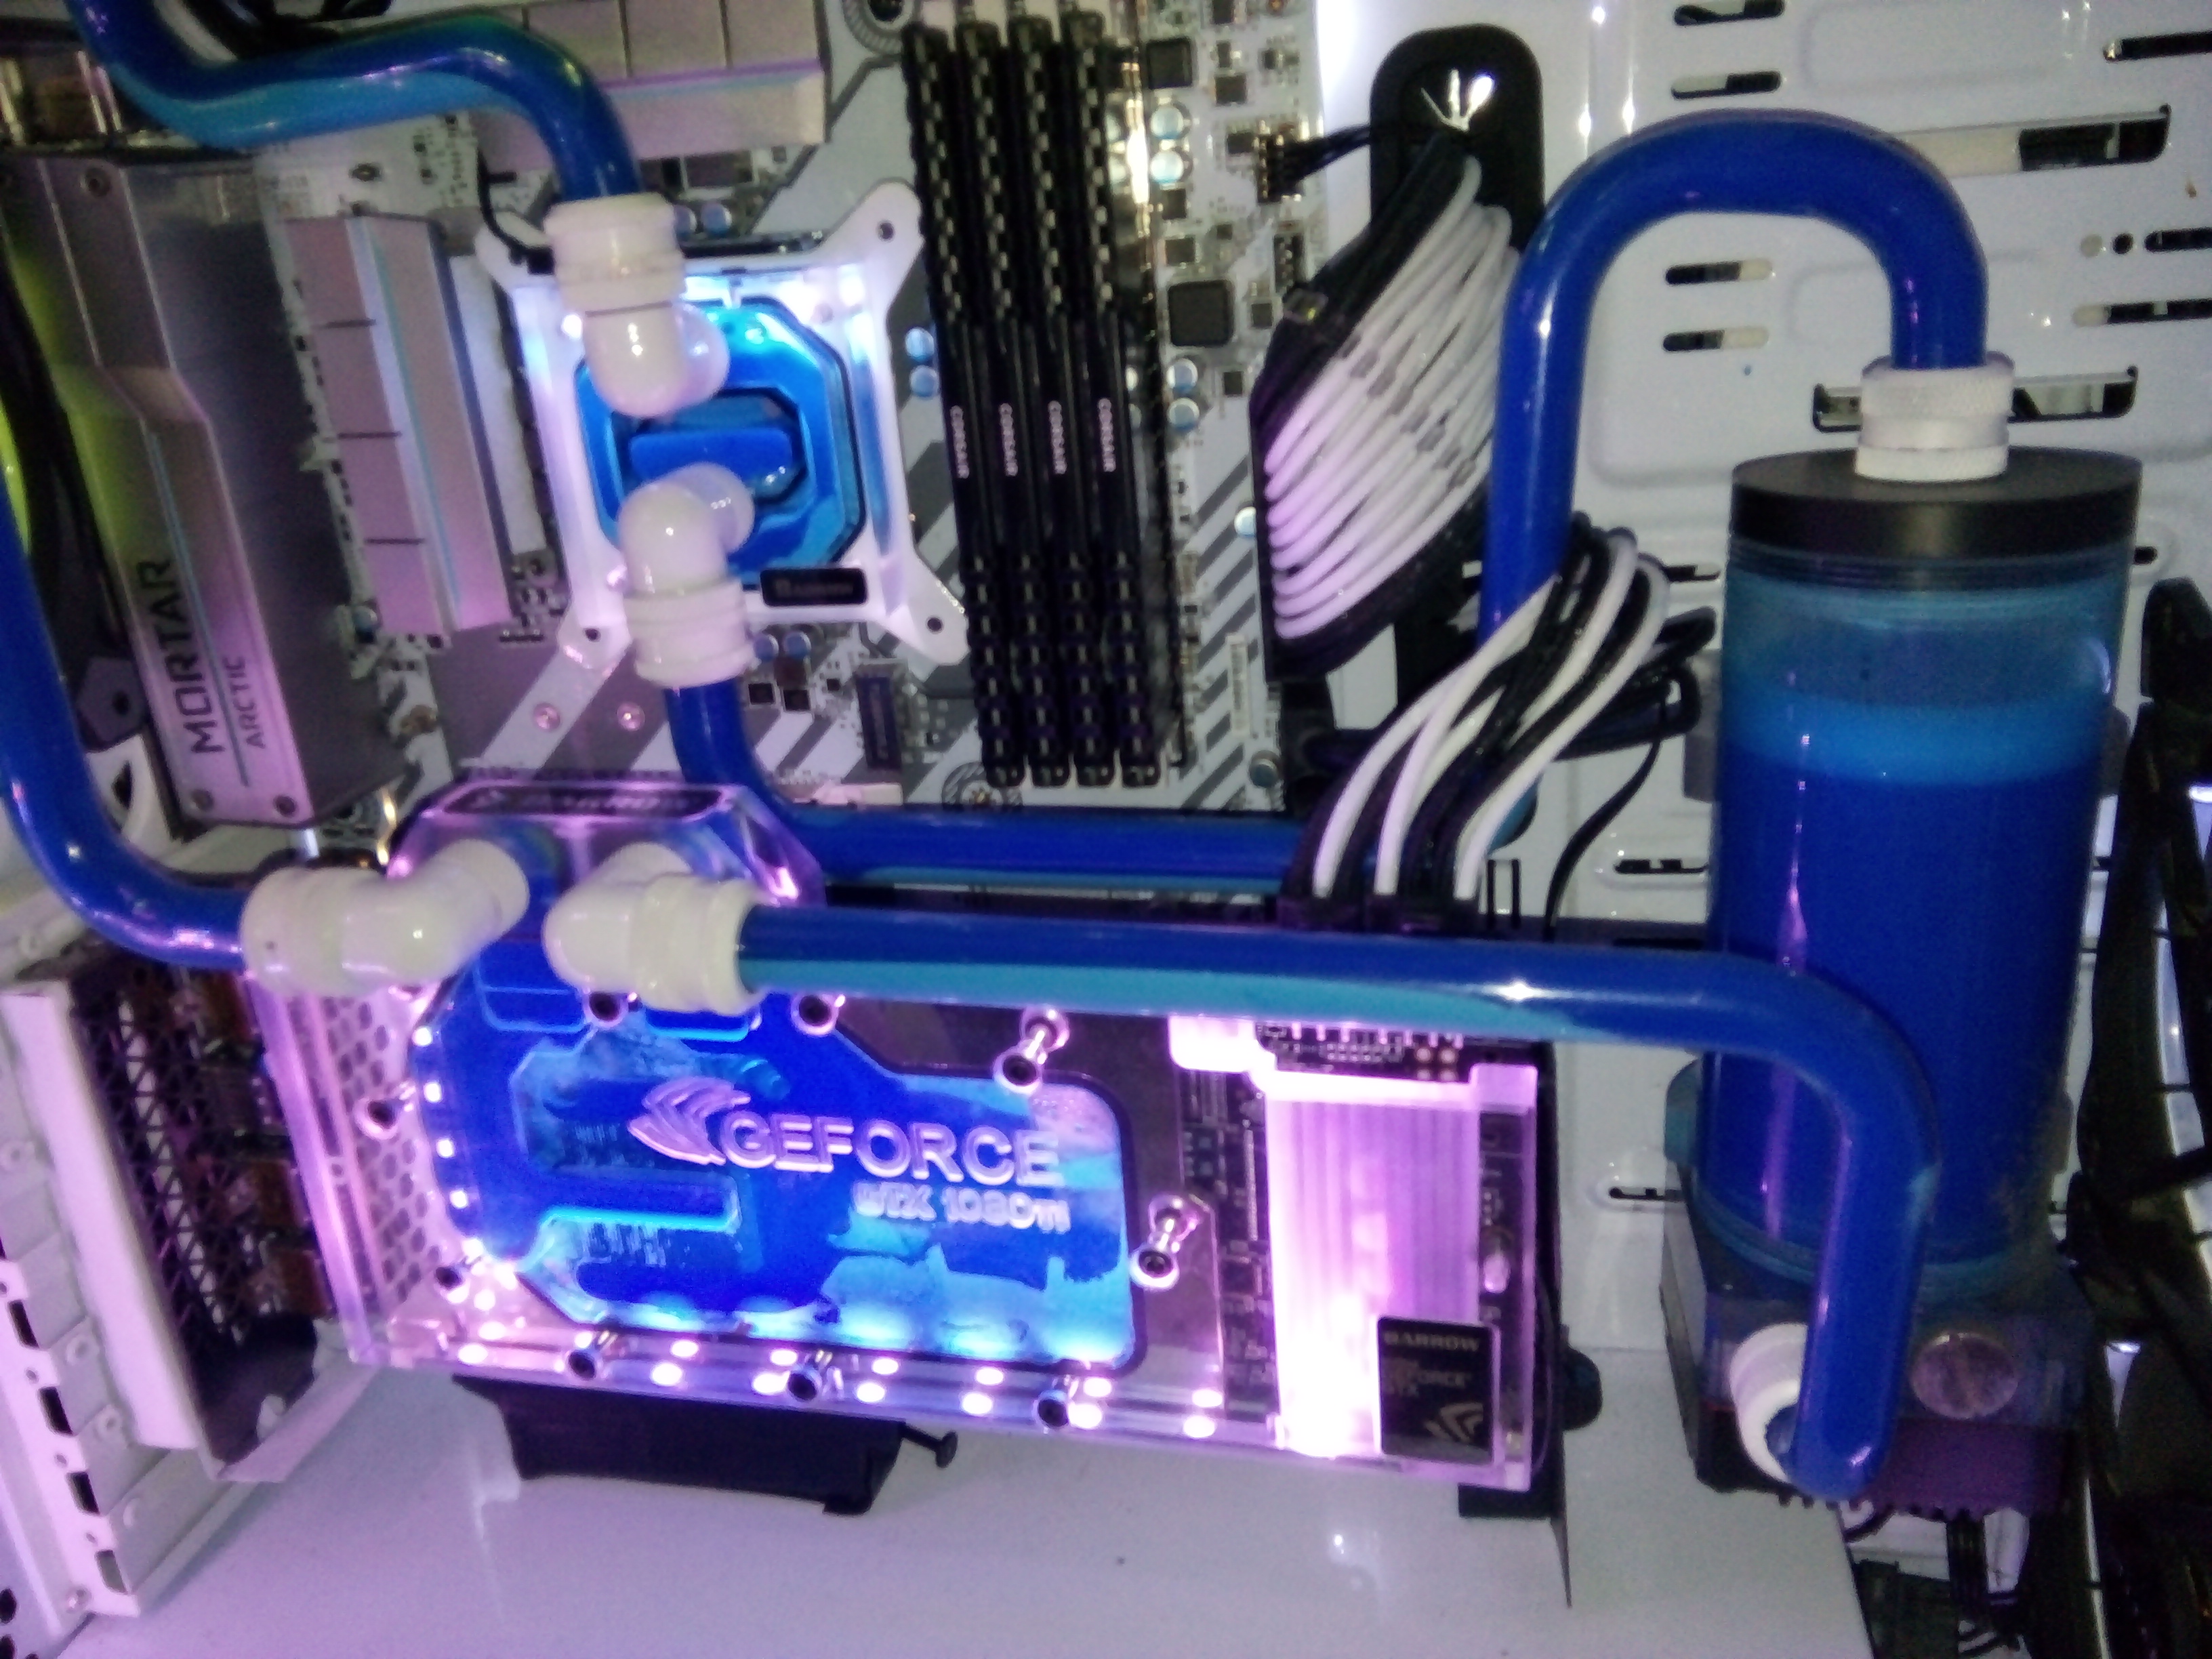
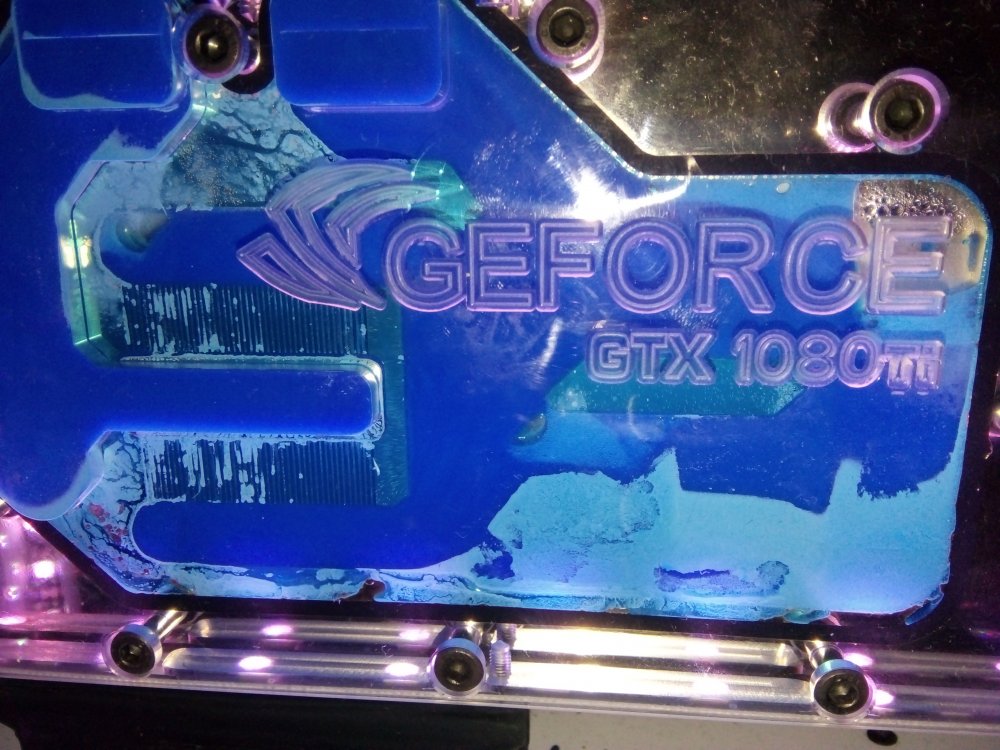
 So I built my first gaming PC with LCS(hard tubing) after 1 and half year of saving. so the BIG problem was the TT C1000 Blue Opaque Coolant slowly messing up the cpu and gpu block and petg tubes. ruining my dream gaming rig. In which average Temperatures slowly climbing. it was leaving visible residue(i dont know if its solidifying or not) on the tubes and cpu and gpu blocks especially the gpu block, clogging up the channels. in which average temps are slowly climbing overtime i brought the coolant a month ago along with the water cooling parts i cleaned all parts with distilled water and were drained properly im still too busy to take out the whole thing, open and clean the blocks(if it's possible) and risking scrapping the insides especially the plexi glass and voiding the warranty on the blocks after googling, turns out, dozens of people also suffer from this problem and i feel sorry for those who owned non clear waterblocks because they cant see the real damage of the coolant to the water blocks


-
I'm wondering - and I think the answer is probably no - if it would be possible to mount a small radiator/fan assembly on the top of the core X71 when I already have the 360 Riing radiator mounted on the top. There is room left at the top but I don't the mounting points exist for the screws. The reason is I'm curious if I get a GTX1080 with a prebuilt LCS - like the MSI Sea Hawk, if it would even be possible to mount. Unfortunately, I had to use the top bay to mount my power supply because for some reason it won't fit in the bottom - although I could probably move the power supply down and find a way to mount it there and then definitely be able to use the rear plate for the fan/radiator. Alternatively I could remove the 140mm fan that is included on the back of the chassis and mount the LCS radiatior there, I guess? I don't want to move that fan but it may be the only convenient option.
-
Hi everyone. Its time for a new project. And this time, no more scratch build. This will be my first tower mod. Hope everything goes well. I saw the trailer of deadpool movie and its a comedy action which i like. So for this build, i thought of making deadpool as the theme. First of all, I would like to say thanks to Thermaltake for giving me such opportunity to mod a Suppressor F51 no window (which i choose). I forgot to take photos of the case when it is still in "one piece" coz, I'll be honest, I was so excited to mod the case. The case it self has lots of potential. Lots of space for custom LCS, sound absorbing material, well lets just say that it is a "feature rich" tower case. For more info on this case, check out this link: - http://www.thermaltake.com/Chassis/Mid_Tower_/Suppressor/C_00002676/F51_No_Window/design.htm Table of Contents: Hardware List - http://community.thermaltake.com/index.php?/topic/2095-project-deadpool/?p=13569 Sketch/Plan - http://community.thermaltake.com/index.php?/topic/2095-project-deadpool/?p=13570 Mod - http://community.thermaltake.com/index.php?/topic/2095-project-deadpool/?p=13571
- 13 replies
-
- 5
-
-
- firstTowerMod
- avexir
- (and 6 more)
-
Hello All, I was wondering if it is possible to use two pumps/reservoirs on the Pacific LCS RL120 Kit. It seems that the biggest risk of LCS's is the pump failing, so would it be possible to use two PT20 Pump/reservoirs in a push/pull configuration? Thanks, GC
-
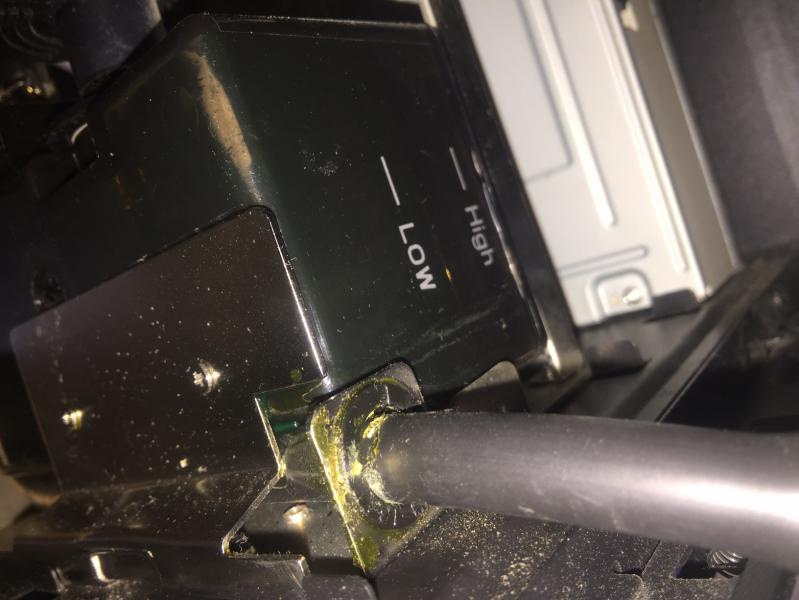
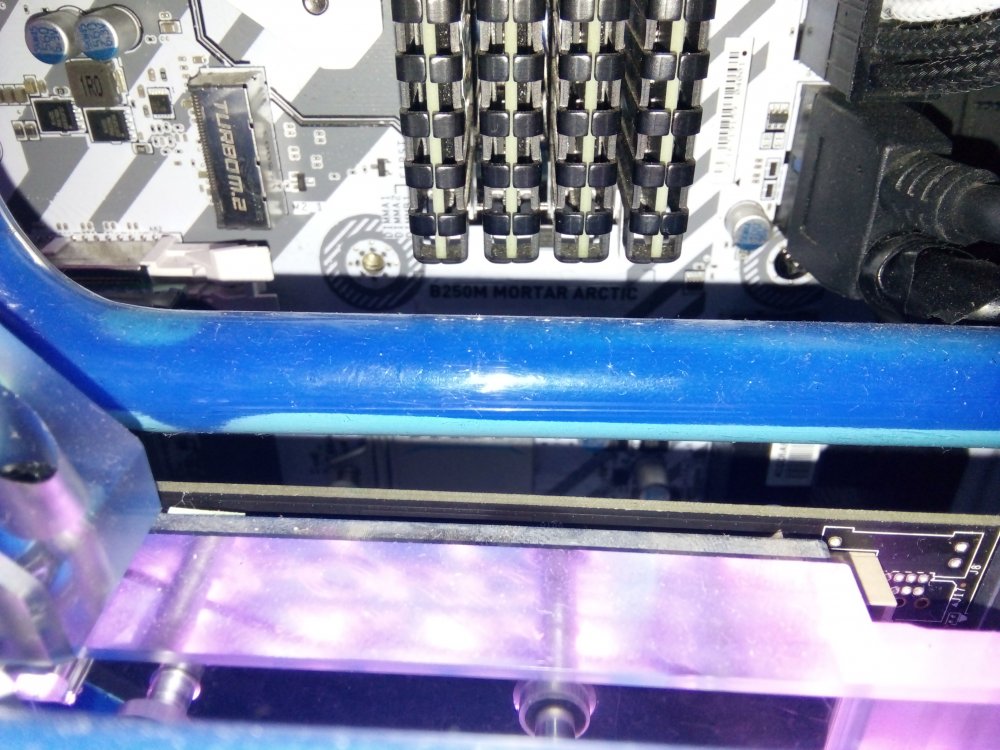
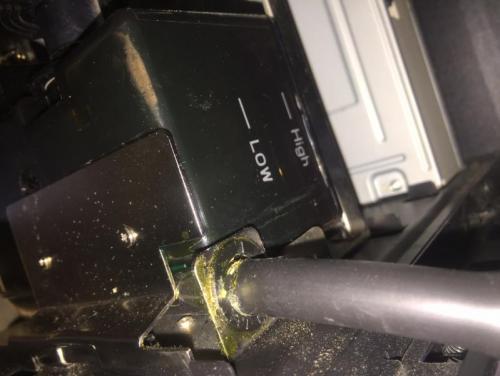
Hello everyone, I have a leak on the return hose, as shown on the picture. You can feel the small hole on the hose with the finger too..I think this was caused by more vibrations on the LCS since I've lost the rear fan. Anyone had this problem happening? Any advice for a solution or a proceedure would be greatly appreciated thank you!
-
Thermaltake Pacific Series DIY LCS Now available @Newegg
ThermalMike posted a topic in Liquid Cooler
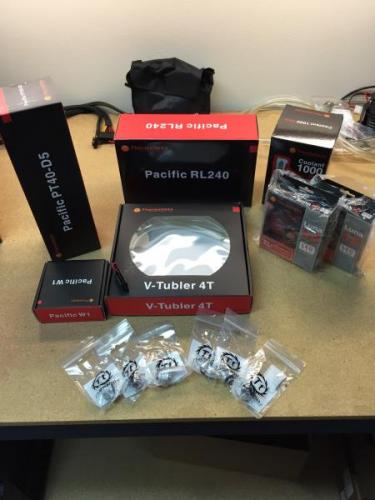
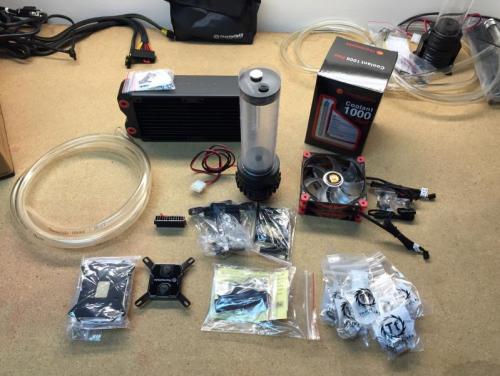
Hey Everyone! The Pacific Series DIY LCS Components are now available @Newegg! Newegg - http://goo.gl/RYG0cJ You can also search Newegg's NEW Category "DIY Cooling" to easily find Thermaltake as the Primary NEW DIY supplier! Built-to-Order your very own DIY Liquid Cooling System Today! Pacific P1 (D5) Pump - http://goo.gl/Deif3y Pacific Radiators - http://goo.gl/LnkDZz Pacific PT40 Pump + Reservoirs- http://goo.gl/uOQRvR Pacific W1 Waterblock Intel/AMD - http://goo.gl/vLfYk5 Coolant - http://goo.gl/m2dPth Tube - http://goo.gl/lh2jgS Fittings (Compression, Bard, Fill, Plugs, Extensions) Colors: Chrome or Black http://goo.gl/HhoMDQ We want your feedback and your questions! Feel free to contact anyone from Thermaltake for assistance.- 5 replies
-
- 1
-
-
- Pacific
- Thermaltake
- (and 5 more)