-
Forum Statistics
9.1k
Total Topics56.1k
Total Posts -
Member Statistics
137,096
Total Members16,800
Most Online


Stefan Ulrich
-
Posts
42 -
Joined
-
Last visited
-
Days Won
6
Reputation Activity
-

 Stefan Ulrich got a reaction from daryl040287 in [Germany] Stefan Ulrich
Hi there,
its Stefan also known as RandomDesign. This season I will be the representative for Germany.
Currently, I am working on the fine tuning of my concept. Still need to figure out some measurements.
But, I already have a little teaser for you. I will try to make this worklog as rich with pictures and descriptions as possible.
So have fun
If you want to know more about my work you can visit my homepage or follow me on facebook and youtube.
http://random2k4design.com
https://www.facebook.com/random2k4design/
https://www.youtube.com/user/random2k4design
-
 Stefan Ulrich got a reaction from LiquidAtoR in [Germany] Stefan Ulrich
Thanks all.
Sleep and food are for the weak
To see he inside of the mid section, I needed to cut the glasfibre body in three pieces.
To make them fit together after cutting, I wraped on side in masking tape and used bodyfiller to hide the Cutting line.
That way you will not see a bit gap when this section is closed.
Then, I primed the parts to check if some areas need more sanding or more filler.
While the primer dried, I took the time to paint the doors and the bottom of the base section black.
This will function as another layer of primer. I used dispersion paint because its cheaper than spray paint and
with some care the results are the same.
For some more details on the bottom edge, I drilled holes and installed some bolts.
Then the edges were painted in a silver tone.
And then back to the mid section. For the opening, I used the same mechanism as for the doors.
-
Stefan Ulrich got a reaction from LiquidAtoR in [Germany] Stefan Ulrich
To achieve more stability, I glued small wooden beams on the side of the mid construction.
Then, I needed to make an inner construction were the top part can rest on.
I cut some plywood into shape and screwed it into place.
For an easier access while working on this part, and so save some weight, I cut away the unnecessary
material. I also added the holes for the watercooling.
Next, I figured out were to put the small water tanks for this section.
I built a mountingsystem for them and attached it to the bottom plate.
I marked the outline for the tubes and added a small wooden box. You will see later for what it will be used
And here is a picture of the water cooling layout in this area.
-
Stefan Ulrich got a reaction from LiquidAtoR in [Germany] Stefan Ulrich
I added a second layer of black primer to the bulbs and rings.
Now I have to wait until my orderd color will arrive.
Then, I started working on the mid section. I cut polystyrene sheets into shape.
Because I had to use multiple layers, I sanded down the rough surface to make them fit perfectly on each other.
I cut every layer into the same shape as the bottom plate of the mid section.
Then, I simply tagged them together with double sticky tape.
The position for the next section was marked on top. Then I started to roughly trim down the edges.
You will get a lot of polystyrene flakes
To get the construction in its final shape, I used a rasp to remove the material.
I continiued the work and added all the detail lines and edges.
Then, I made a short test if the mid section fits the rest of the mod so far.
For stability, I applied multiple layers of glasfiber. I used a very light variation so I did not
lost the details.
After the galasfiber dried the fun part of applying body filler and sanding began.
Lastely, I removed the polystyrene from the inside. Pretty happy with the result. It still needs a little more sanding.
Also the inside looks a little rough but I will take care of it later.
-
Stefan Ulrich got a reaction from LiquidAtoR in [Germany] Stefan Ulrich
So this weekend, I worked a bit on the light system for this section.
I planned to build a running light effect here.
I sorted all the necessary parts ans soldered the circut.
To place the LEDs more inpedendently I already solderd all the resistors.
There is some space left in the top right. Here I will ad another LED effect later.
Speaking of LEDs, for this particular effect, I need 32 LEDs, so I attachd cables to every singel one.
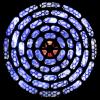
Then, I cut the acrylic parts for the light. Because every LED will be lighten up one section, I needed also 32 acrylic parts.
After cutting all the parts were sanded down to refract the light later on.
Then I glued the LEDs into place and made a first test if it fit.
Also the running light was tested.
-
 Stefan Ulrich got a reaction from hotcoolman in [Germany] Stefan Ulrich
Thank all for the amazing feedback. Will try to do my best for this mod
I am kind of a night person so I dont need that much sleep *lol*
As a next step, I started to work on the little highlight for the mid section.
What makes a Dalek a real Dalek. Sure a Dalek
I modeled a rought shape from newspaper and fixed it with masking tape.
Then I tried out the positioning on the inside.
A selfmade eye was also included.
To get everything into shape, I used a very simple and cheap technique. Paper maché.
I applied multiple layers to hide the structure of the newspaper. When it dried the entire
model will be very strong but also light weight.
In the mean time, I started the next section.
First, I cut a round piece of wood and made a template for the structure, that should hold the round wooden beams on the outside
and the acrylic glass pieces on the inside.
Because I did not have wood in the right thickness on hand, I glued two pieces together.
Than it was attached to the round plate. In addition, I cut out the top of the construction and installed
the roound wood beams on the outside. Smaller gaps were filled with wood filler.
I 3d printed small details, that I glued into place.
For a more industrial kind of look, I used some screws.
Next up will be the light system for this part and than I will make the basic structure of the "head"
-
Stefan Ulrich got a reaction from LiquidAtoR in [Germany] Stefan Ulrich
Thanks to all!
Here is another update.
Next up, I made the basic construction of the top part.
I took half of a styrofoam bowl and covered it with some glasfiber.
There are some detail lines on this part in the original that I also wanted to reproduce. Therefore, I cut small stripes
from craft foam and glued it into place. Then the hole body was covered with body filler.
Then, I removed the craft foam. I got some nice looking and straight lines.
The styrofoam was removed with some aceton.
To make the top part holding to the part below, I glued round guiding rails inside the the bowl and ontop of the mid section.
Now I can rotate the top part, but it will not fall down. I also will build and automatic rotation system later.
I, put the parts together to see the final dimensions of the mod. It is about 1,15 meters high.
Next up, I will work my way back from top to bottom. I will add all the details and moveable parts and make it ready for painting.
-
 Stefan Ulrich got a reaction from AlexTt in [Germany] Stefan Ulrich
So this weekend, I worked a bit on the light system for this section.
I planned to build a running light effect here.
I sorted all the necessary parts ans soldered the circut.
To place the LEDs more inpedendently I already solderd all the resistors.
There is some space left in the top right. Here I will ad another LED effect later.
Speaking of LEDs, for this particular effect, I need 32 LEDs, so I attachd cables to every singel one.
Then, I cut the acrylic parts for the light. Because every LED will be lighten up one section, I needed also 32 acrylic parts.
After cutting all the parts were sanded down to refract the light later on.
Then I glued the LEDs into place and made a first test if it fit.
Also the running light was tested.
-
Stefan Ulrich got a reaction from LiquidAtoR in [Germany] Stefan Ulrich
Thank all for the amazing feedback. Will try to do my best for this mod
I am kind of a night person so I dont need that much sleep *lol*
As a next step, I started to work on the little highlight for the mid section.
What makes a Dalek a real Dalek. Sure a Dalek
I modeled a rought shape from newspaper and fixed it with masking tape.
Then I tried out the positioning on the inside.
A selfmade eye was also included.
To get everything into shape, I used a very simple and cheap technique. Paper maché.
I applied multiple layers to hide the structure of the newspaper. When it dried the entire
model will be very strong but also light weight.
In the mean time, I started the next section.
First, I cut a round piece of wood and made a template for the structure, that should hold the round wooden beams on the outside
and the acrylic glass pieces on the inside.
Because I did not have wood in the right thickness on hand, I glued two pieces together.
Than it was attached to the round plate. In addition, I cut out the top of the construction and installed
the roound wood beams on the outside. Smaller gaps were filled with wood filler.
I 3d printed small details, that I glued into place.
For a more industrial kind of look, I used some screws.
Next up will be the light system for this part and than I will make the basic structure of the "head"
-
Stefan Ulrich got a reaction from AlexTt in [Germany] Stefan Ulrich
Thanks all.
Sleep and food are for the weak
To see he inside of the mid section, I needed to cut the glasfibre body in three pieces.
To make them fit together after cutting, I wraped on side in masking tape and used bodyfiller to hide the Cutting line.
That way you will not see a bit gap when this section is closed.
Then, I primed the parts to check if some areas need more sanding or more filler.
While the primer dried, I took the time to paint the doors and the bottom of the base section black.
This will function as another layer of primer. I used dispersion paint because its cheaper than spray paint and
with some care the results are the same.
For some more details on the bottom edge, I drilled holes and installed some bolts.
Then the edges were painted in a silver tone.
And then back to the mid section. For the opening, I used the same mechanism as for the doors.
-

-
Stefan Ulrich reacted to SCUMbh3rg in [Germany] Stefan Ulrich
Hands down! You're the best man! Stefan!
-
Stefan Ulrich reacted to Acojonancio in [Germany] Stefan Ulrich
####! It looks really cool! Hope you win.
-
Stefan Ulrich reacted to Jos214demi in [Germany] Stefan Ulrich
Woah!!! ahahaha I am really proud that I predicted you to win! This is gonna be great! <3
-
 Stefan Ulrich got a reaction from Alexander Chirila in [Germany] Stefan Ulrich
To achieve more stability, I glued small wooden beams on the side of the mid construction.
Then, I needed to make an inner construction were the top part can rest on.
I cut some plywood into shape and screwed it into place.
For an easier access while working on this part, and so save some weight, I cut away the unnecessary
material. I also added the holes for the watercooling.
Next, I figured out were to put the small water tanks for this section.
I built a mountingsystem for them and attached it to the bottom plate.
I marked the outline for the tubes and added a small wooden box. You will see later for what it will be used
And here is a picture of the water cooling layout in this area.
-
Stefan Ulrich got a reaction from AlexTt in [Germany] Stefan Ulrich
To achieve more stability, I glued small wooden beams on the side of the mid construction.
Then, I needed to make an inner construction were the top part can rest on.
I cut some plywood into shape and screwed it into place.
For an easier access while working on this part, and so save some weight, I cut away the unnecessary
material. I also added the holes for the watercooling.
Next, I figured out were to put the small water tanks for this section.
I built a mountingsystem for them and attached it to the bottom plate.
I marked the outline for the tubes and added a small wooden box. You will see later for what it will be used
And here is a picture of the water cooling layout in this area.
-
Stefan Ulrich reacted to Nomirod in [Ended] Pre Event Predictions (September 26th ~ October 21st)
It's a beast!
-
-
Stefan Ulrich got a reaction from hotcoolman in [Germany] Stefan Ulrich
Next up, I designed the details for the doors.
The outer rings were 3D printed to make sure I get the needed shape.
For the bulb in the middle, I simply bought decoration spheres.
Both part fit perfect together.
I sanded all the spheres down and filled them with expanding foam to make them more rigid.
Then everything was primed with plastic primer.
In the meantime all the rings were printed, they also got a first layer of primer.
-
Stefan Ulrich got a reaction from LiquidAtoR in [Germany] Stefan Ulrich
Hi there,
its Stefan also known as RandomDesign. This season I will be the representative for Germany.
Currently, I am working on the fine tuning of my concept. Still need to figure out some measurements.
But, I already have a little teaser for you. I will try to make this worklog as rich with pictures and descriptions as possible.
So have fun
If you want to know more about my work you can visit my homepage or follow me on facebook and youtube.
http://random2k4design.com
https://www.facebook.com/random2k4design/
https://www.youtube.com/user/random2k4design
-
 Stefan Ulrich got a reaction from Maciel Barreto in [Germany] Stefan Ulrich
Before building the door mount, I needed to make sure it will always close at the same position.
So I installed small wooden panels that should stop the doors at the bottom part.
Then, I cut all the neccesary parts for the door ount from aluminum.
It took some time to figure out the exact positions but it turned out very good I think.
And here are picture in closed and opend position.
-
Stefan Ulrich reacted to Jos214demi in [Germany] Stefan Ulrich
Hahaha Yeah!!!! Just as I thought!!! same like Ali Abbas of Germany, this guys is also awesome!!!! I love your concept man!!! Much Respect! I will be following this log! Yeah! I am so excited!!!
-
Stefan Ulrich got a reaction from LiquidAtoR in [Germany] Stefan Ulrich
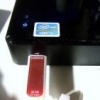
And there was a bunch of hardware arriving today.
Still missing some more fittings, But the essential parts are here. So Lets begin the work!
http://random2k4design.com
https://www.facebook.com/random2k4design/
https://www.youtube.com/user/random2k4design
-
Stefan Ulrich got a reaction from AlexTt in [Germany] Stefan Ulrich
Hi there,
its Stefan also known as RandomDesign. This season I will be the representative for Germany.
Currently, I am working on the fine tuning of my concept. Still need to figure out some measurements.
But, I already have a little teaser for you. I will try to make this worklog as rich with pictures and descriptions as possible.
So have fun
If you want to know more about my work you can visit my homepage or follow me on facebook and youtube.
http://random2k4design.com
https://www.facebook.com/random2k4design/
https://www.youtube.com/user/random2k4design