Search the Community
Showing results for tags 'Core X9'.
Found 11 results
-
Hey hey guys and girls. We have another awesome themed mod coming your way. This one is based off of one of my favorite comic strips growing up as a kid. Spy vs Spy The Following was obtained from the History section of the Spy vs Spy Headquarters. http://www.spyvsspyhq.com/history.html Simple yet meaningful is one way to describe the wordless black and white comic strip that makes up Spy vs. Spy. The cartoon created in 1960 by Antonio ProhÃas, depicts the antics of two distinctly different yet similar spies who try to get the best of each other with clever yet strange schemes of espionage and deception. Published in Mad magazine since 1961, ProhÃas began working on Spy vs. Spy in Cuban, but fled to the United States in 1960 just days before Fidel Castro took over the last Cuban free press. When ProhÃas came to the United States he knew almost no English, but Mad magazine readers and editors quick accepted him and loved his work. Before he got the job at Mad, he worked in Queens at a clothing factory by day and drew by night in his cramped apartment. His earlier works “Erizo,†“Oveja Negra,†“El Hombre Siniestro,†and “Tovarich†would not work in his new country where the idea of communism was not as prevalent or well taken by pleasure readers. In Cuba if you were not a supporter of Castro you were considered a spy, and this is where he got the idea. ProhÃas considered himself a spy and thus the idea was born. ProhÃas submitted his rough pencil concept and design sketches to MAD’s editors on normal 8.5 x 11 paper and would latter redraw the entire carton twice the size for reproduction in the magazine. He would go through the comic strip with pain staking detail and make sure all edges and lines were detailed in his dark bold pen and would almost never ink over his pencil drawings. Spy vs. Spy is now a national icon, symbolic of the Cold War representing good and evil and the struggle for equilibrium. ProhÃas would stealthily sign each of his Spy vs. Spy cartoons under the title panel, in Morse code, which spelled out the words "by prohias." This is one of the most overlooked details in his work. -••• -•-- •--• •-• --- •••• •• •- ••• Antonio ProhÃas passed away February 24, 1998. His masterpiece concept of the two spies battling it out lives on in the continuing work done by his successor Peter Kuper. This project is sponsored by the good folks at. http://www.thermaltake.com/home.aspx and http://www.evga.com/ Also brought to you by http://www.v1tech.com/ Specs: Case - Thermaltake Core X9 x 2 Motherboard - EVGA Z97 Classified (Gaming System), MSi Z87 Mpower (Server) CPU - Intel i5 4670K (Gaming), Intel G3258 (Server) Ram - 4 x 4Gb G.Skill Ripjaws (8Gb per system) PSU - 1 x 550w DPS G Modular PSU, 1 x 750w DPS G Modular PSU GPU - 2 x ASUS Strix GTX 970 SSD - 2 x 240 Gb Crucial M500 240Gb HDD - 4 x 500 Gb in Raid 0 CPU Block - Pacific W1 x 2 GPU Block - Pacific Strix Water block x 2 Radiator - Pacific RL 480 x 4 Pump - Pacific P1 D5 Pump /w Silent Kit x 3 Reservoir - Pacific T33 x 4 Cables - 2 sets of Red Tt Sleeved Cables LEDs - BSMods 5050 RGB LED 16.5ft Strip /w wireless remote. The whole idea is to put two complete systems in here all cooled with one large liquid cooling system. The first shipment of parts has arrived. 2 x Core X9 Cases, 2 x Commander FX 10 port fan hub, 1 x 550w DPS G Modular PSU and 1 x 750w DPS G Modular PSU. To give you an idea of the size of the double stacked X9. On the left of this pic is the chassis from a Thermaltake A-71 Full Tower. Each Core X9 is 1 inch taller and twice as wide. Here we have One intact X9 and one completely disassembled. The Core X9 has this built in plate that can be removed from the bottom panel so you can install a massive radiator in push/pull. However this is not going to work for what I have planned. For what I want to do the entire floor has to be cut out.
-
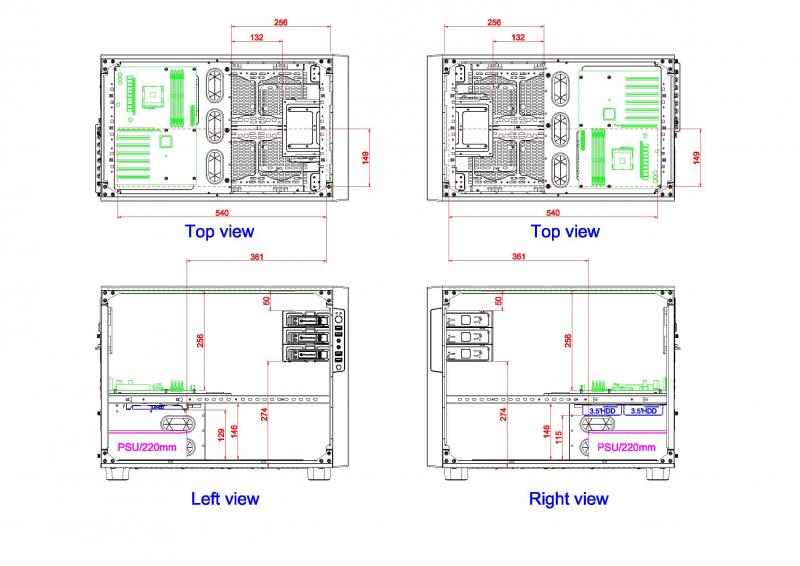
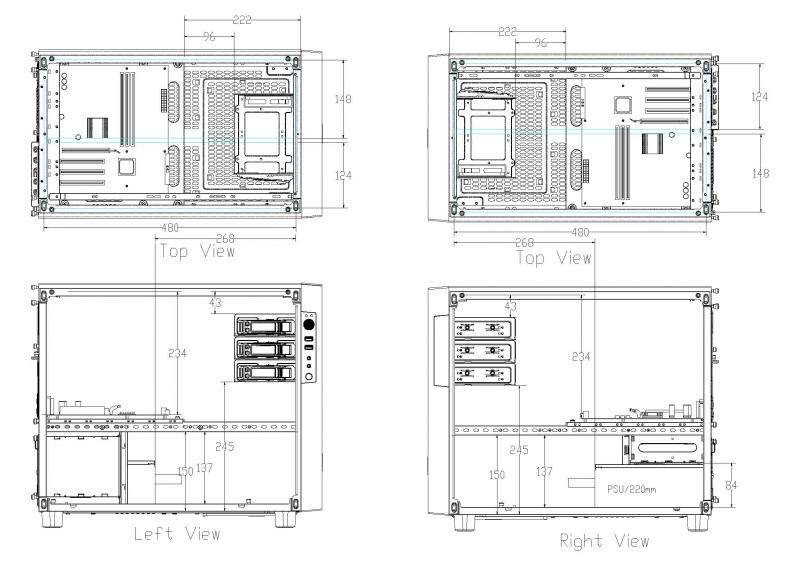
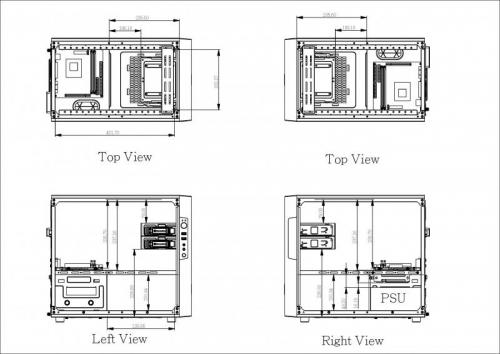
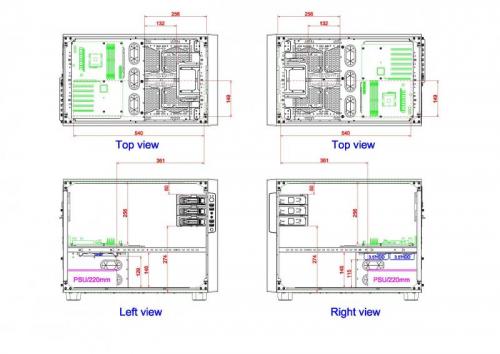
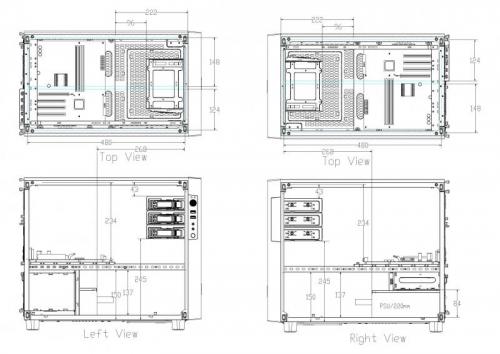
Come take a look at our new enthusiast level product line the "Core X series" and join the discussion with us! Core X Series is a cube style case offering endless stackable options and expandability for enthusiasts to create massive liquid cooling systems, file server or dual systems. The X series delivers outstanding cooling performance with compatibility for extensive DIY/AIO LCS and overclocking components, further enhancing the reputation that the air-cooling units of this series has become renowned for. Core X9 - The first E-ATX enthusiast level cube case Product Website: http://www.thermaltake.com/Chassis/Mini_Case_Cube_Case_/Core/C_00002562/Core_X9/design.htm Review: TweakTown Editor's Choice Award and scored 99% overall TweakTown Rating http://www.tweaktown.com/reviews/6912/thermaltake-core-x9-atx-cube-chassis-review/index.html Hardwareluxx Excellent Hardware Award http://www.hardwareluxx.com/index.php/reviews/hardware/cases/34017-reviewed-thermaltake-core-x9-e-atx-case.html Overclockers Club Editor's Choice Award http://www.overclockersclub.com/reviews/thermaltake_core_x9/ Others: Core X9 Modular Part Application http://community.thermaltake.com/index.php?/files/file/7-core-x9-parts-application/ Core X9 Snow Product Website: http://www.thermaltake.com/Chassis/Cube_Case_/Core/C_00002661/Core_X9_Snow_Edition/design.htm Core X2 - The first mATX enthusiast level cube case Product Website: http://www.thermaltake.com/Chassis/Cube_Case_/Core/C_00002563/Core_X2/design.htm Review: Pure Overclock Editor's Choice Award http://www.pureoverclock.com/Review-detail/thermaltake-core-x2-chassis-review/ Hard OCP Gold Award http://www.hardocp.com/article/2015/02/05/thermaltake_core_x2_matx_cube_chassis_case_review#.VNltceaUcpy Core X1 Product Website: http://www.thermaltake.com/Chassis/Cube_Case_/Core/C_00002576/Core_X1/design.htm Review: ThinkComputers gives the Thermaltake Core X1 Case a 9 out of 10 score http://www.thinkcomputers.org/thermaltake-core-x1-mini-itx-case-review/ TechwareLabs Editor's Choice Award http://www.techwarelabs.com/thermaltake-core-x1-itx-case-review/ Bit-Tech Approved Award http://www.bit-tech.net/hardware/2015/02/05/thermaltake-core-x1-review/1 Video: Tt LCS Certified is a Thermaltake exclusive certification applied to only products that pass the design and hardcore enthusiasts standards that a true LCS chassis should be held to. The Tt LCS certification was created so that we at Thermaltake can designate to all power users which chassis have been tested to be best compatible with extreme liquid cooling configurations to ensure you get the best performance from the best features and fitment. Check out Tt-LCS video here: Join the discussion with the rest of us who are interested in this new design and feel free to leave your comment, thought, question or concern to let us know what you think so we can improve upon our design to best fit your need in the future. Workable Dimension for Planning Your Build: Core X9 Core X2 Core X1
- 81 replies
-
- 13
-

-
Thermaltake Core X9 E-ATX Cube Chassis supports a motherboard Z370 GODLIKE GAMING E-ATX Form Facto 12 in. x 10.7 in. (30.5 cm x 27.2 cm)?
-
Okay I need to keep the front Optical bays so top mounting is out. I want to mount a single 480 on the left side of the bottom I want to use the AlphaCool NexXxoS Monsta which is 86MM thick with push pull SP 120 Fans which are 25Mm thick can anyone tell me if there is enough room for that? with the fans or do I need to switch to just push or get a thinner radiator? It looks like I could get a 120x2 on the front panel and still keep the Optical bays can anyone confirm that?
-
Hello, I'll buy a chassis core x9 , I wonder if there is a way to buy more window to have one on each side ! How should I do it ? Thank you
-
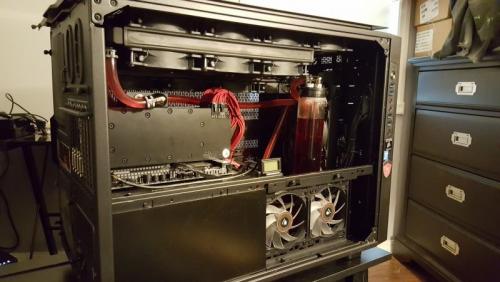
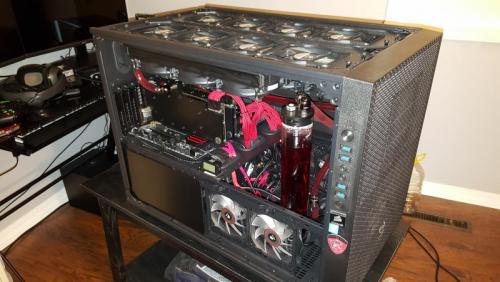
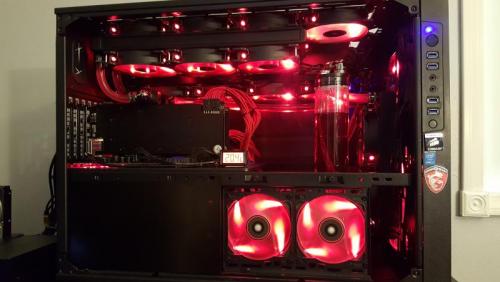
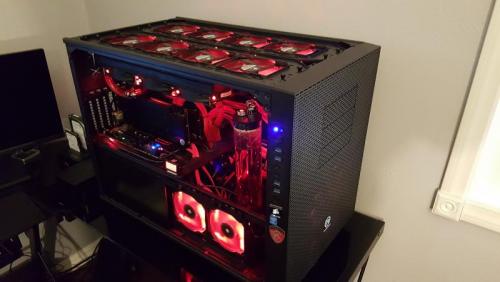
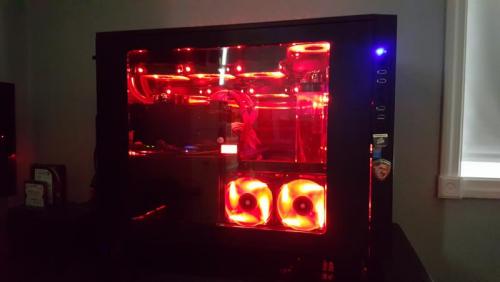
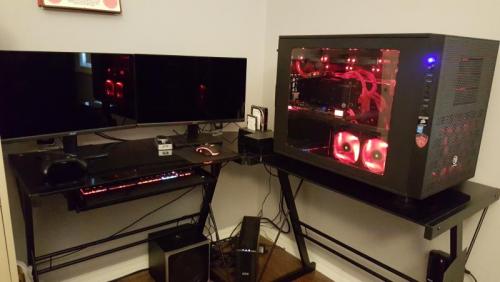
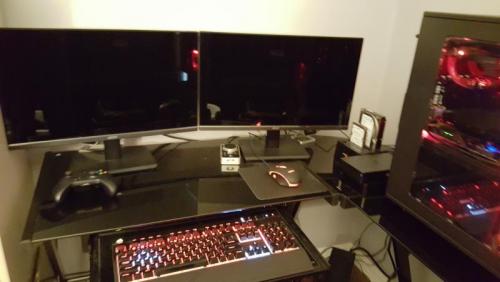
I am new to the forum sorta been reading but I haven't actually posted. Wanted to start by sharing my rig. Here is a build log video you can skip to 2:45 to ignore me talking haha it has come a long way if you wanted to check out the rest of the videos I have posted on my channel hope you guys like it Thermaltake Core X9 i7 5820k OC 4.6 MSI X99A Gaming 7 Motherboard 32Gbs Corsair DDR4 LPX ram 2 x EVGA GTX 780sc 6Gb cards Corsair HX1050 PSU SanDisk Ultra 480 SSD PNY 240 SSD SanDisk 240 SSD Cooling Thermaltake PT 60 Pump/Res Combo Thermaltake 480 x 64mm Rad Hardwarelabs 360 x 30mm Rad XSPC 240 x 30mm Rad XSPC Fittings and Coolent 18 x Corsair SP 120 Red LED Fans 8 x Corsair AF 120 Red LED Fans 2 x Corsair AF 140 Red LED Fans 1 X Cooler Master 200mm Red LED Fan

-
Build log introduction About the modder and build. Welcome, my name is Ian Duncanson i am a 26 year old modder from victoria Australia i have been building and working on computers since i was 15. This is my third fully custom pc and one i wish to showcase, so lets begin. The concept - Simply with the age of ikea and the ability to customise along side the rise of the desk builds i have decided to design and build a desk based upon one of my favorite cases the thermaltake core x9. Now having built a previous desk before i know to an extent whats needed (my original build was a rush job so i had somewhere to play games and best utilise the limited space i had). The necessary goals to a great desk concept are outlined below and are my goals for this build. Another note about me, im not the best when i comes to 3d drawing and renders so i do the majority by hand its never great but it give me what i need to work with. this space is reserved for our sponsors starting with: Thermaltake, without the faith that quite a few of their staff have put in me none of this would be possible. they have and will be supplying me with cases fans/controllers and watercooling gear Goals: - Fully modular desk solution - core values (moddable, versatile, astetically pleaseing) -light weight but strong. Design- The design is simple, 5 modules (2 x core x9 cases with 3 custom modules forming a desktop) the desk will be constructed out of aluminium and parts of a (few) damaged core x9's the custom parts will he powdercoated white to closely match the original cases. Heres a couple of those sketchy drawings i mentioned disregard the measurements these changed many times upon realising i had inadvertantly rushed my measurements. So we will be begining the construction and finalise the design on the fly. An old war saying is that every plan is a good one till the first bullet flies. But first a very big thank you to some of my friends for the community, the support you have shown even at the early stages has been phenomenal and for that i thank you. My first order arrived from thermaltake australia the other day i posted an unboxing ceremony on my facebook page (http://facebook.com/ianduncansoncomputermods) So i will skip this one as im sure you have all seen this beautiful case before. Ok so maybe one or 2 photos Now as much as i love the front grill design for what im doing its too hard to have replicated locally i was quoted over 300 dollars for material and cutting for a full sheet and i only need less than half of one :/ So another popular idea occured i will still have the front panel as a whole just not the mesh... so instead i have started to organise some dark tint perspex to be delivered for the build. But im getting ahead of myself.. but more to come soon
- 4 replies
-
- 6
-
-
- desk build
- modular
- (and 2 more)
-
Hello, Making my debut into modding. I've always wanted to take on a project like this where I spend my time on a build and create/mod something that is living room center piece worthy. I don't have a project name yet but I've got a build plan and am going full steam ahead. It is a learning experience as much as it is fun so please excuse my mess and mistakes. I also started a blog at www.omidmods.com but I wanted to post here because the build is focused around these great new Core X9 cases. I have been waiting for sooooo long for cases like this and now that I have the means and the time to do case modding...... I couldn't wait to start! Without further delay.... here is what I have done so far: System Specs: Intel Core i7 5820K Asus X99 Deluxe 16GB Corsair DDR4 LPX 2666Mhz 2x eVGA GTX 980 SC 250GB Samsung 840 Pro 120GB Samsung 850 EVO 2x Thermaltake Core X9 Corsair RM1000 PSU Watercooling Parts (so far): 2x Alphacool D5 Pumps 2x EK CSQ Tops 2x Primochill 240MM CTR Phase II Reservoirs EK Supremacy EVO EK Asus X99 Motherboard Block 8x EK Passthrough fittings 2x HardwareLabs Black ICE Nemesis GTX 480 radiators Hardline Tubing Fittings??? Fans??? Fan Controller??? Lots left to get and decide on Pictures: Also started a build blog: Thats all for now! I'll Post updates as I complete things.
-
I am new to this forum but far from new to PC building and Mods. I don't say this to give away my age, though I know it will...I remember when moding consisted of pulling apart the old beige cream colored cases, which powered those lovely green CRT monitors, maybe adding a fan or spray painting bits and pieces. Today, that old way of doing things is out the window. No longer is a bit of spray paint or a case fan (or dare I say...an upgrade to a 56k modem.) Gone are those simplicities and though I miss them some days, I absolutely love the attention to detail that goes into new builds. Coming out of the garage of todays builders, are the Ferrari of computers. Beasts that conquer the bench tests and frag any off the self pc no matter what brand is printed on the box. It is these type of builds that have kept me intrigued over all these years. I can not count the number of PC's under my belt anymore but I do recall the feelings I had the very first time I tore a system down and by some miracle, managed to get it back together. It is the same feeling I still get when I open up a new motherboard or graphics card and smell that unique fragrance that only new electronic components can claim. I took a short break, (2 years) which in this 'game' can be an eternity. I still followed many other builders online, in awe, of most of the things these people where doing to their rigs. I have since put a lot of thought into my next build. The problem I kept running into was, "What case am I going to use?" I have, in the past had this same problem as I am sure many builders have found themselves in. Typically I would pick a case make some heavy changes such as rotating the motherboard tray 180 degrees. For this new build however, I wanted to start with a case I loved, unlike those in the past I only liked. I found the perfect one (actually two in a stacked configuration) in the Core X9. This is the first build I have ever followed in a video documentary as well. I know a million videos are out there of unboxing, building, finished products, but I wanted to do things a bit differently and not only show all those things but cover the 'whys' for my components, explore alternatives for those wanting to spend less money, and generally offer some advice that has come with the wisdom only the experience of time can find. I am here to see what others are doing to their Core X9 boxes too. Most of the info out there consist of CES Thermaltake images or videos. (Which are excellent) I just feel like this is such a versatile chassis that I would love to see all the combinations others can come up with. Good luck with all your builds... Arial
-
So this is my finished build in a Core x9. Specs: CPU: 4790k @4.6GHz - 1.25V GPU: 2x 290's @1150MHz core Mobo: Asus Sabertooth z97 Mk-1 Rads: 2x 480mm Hardware Labs BlackIce GTS CPU Block: EK Supremacy Evo EK GPU blocks and backplates EK res and dual d5 pump setup Feel free to ask any questions i may not have covered. Bonus points if you can guess my favorite musician.
-
As you can tell from the titel, this will be a black themed water cooling build, where noice is not dealt with (in terms of parts selected). - - - Status right now: Done building, for this round. - - - Case: Thermaltake Core X9 PC Hardware: MB: MSI X99S GAMING 9 AC, Socket-2011-3 CPU: Intel Core i7-5930K, Socket-LGA2011-3 GPU: MSI GeForce GTX 970 Gaming 4GB PhysX SLI RAM: Crucial DDR4 2133MHz 32GB (8x4GB) Storage: Crucial MX100 SSD 512GB, WD AV-GP 4TB PSU: Cooler Master V1000, 1000W PSU Cooling parts: EK-CoolStream RAD XTX 480 EK-CoolStream RAD XTX 480 EK-CoolStream PE 480 Radiator EK-Supremacy EVO Acetal+Nickel EK-FC970 GTX TF5 Acetal+Nickel EK-FC970 GTX TF5 Acetal+Nickel EK-FC970 GTX TF5 Backplate EK-FC970 GTX TF5 Backplate EK-FC TRIPLE Serial Terminal EK-XRES 140 D5 Vario (incl. pump) Fans: Lamptron CF525 Fan Controller (5 channels, max. 60 W per channel) Scythe Slip Stream Slim (120x120x12mm) (2000 rpm) (4 fans for the PE Rad, push +case fans) Scythe Ultra Kaze (120x120x38mm) (3000rpm) (8 fans for XTX Rads, push) Other cooling stuff: PrimoChill PrimoFlex Onyx Black 12,7mm (1/2") / 19,1mm (3/4") EK-Ekoolant CLEAR EK-12mm (1/2") High-Flow Fitting EK-AF Angled 45° G1/4 EK-AF Angled 90° G1/4 EK-CSQ Plug G1/4 GELID GC-Extreme thermal compound Arctic Silver Arcticlean (to get rid of old thermal compound) Mayhems 5 Ltr Ultra Pure H20 (for cleaning and testing)