-
Forum Statistics
9k
Total Topics55.3k
Total Posts -
Member Statistics
136,656
Total Members16,800
Most Online.thumb.png.0a8c1a75f064d6e32fbd023f5a2d9bbf.png)
-
Popular Now
-
~Free> Monopoly Go Dice Hack: Roll For Unlimited Fun! Generator Tool *Working> snm
By powbiv, in General Discussion
- 9 replies
- 6 views
-


ThermalMike
-
Posts
1,020 -
Joined
-
Last visited
-
Days Won
46
Reputation Activity
-

 ThermalMike reacted to Tt Andy in Core V51 Replacement Front Bezel
Hello Alander3,
Sorry for any inconvenience this may have caused
Regards to the replacement panel, please give our customer support a call they should be able to help you with finding a replacement.
USA / Canada : By Email: ttsupport@thermaltakeusa.com By Phone: Toll-Free 800-988-1088 FREE M-F 9:00AM – 5:30PM (P.S.T) -
ThermalMike reacted to Tte Martin in Core V71 owner, Need New Top/Front USB 2/3 Headphone/mic Panel
Please check with our customer service department in Germany at support@thermaltake.de if the spare part is available.
-
 ThermalMike got a reaction from Hukkel in Insomnia I55 Thermaltake project - finished photos daylight
really like the layout and how you used the P1 standalone pump with the 2 res's.
Came out great man!
-
ThermalMike reacted to LetsGetIt1220 in Riing 12/14 Orange Now in stock @Amazon!
Still looking at these for my next build! I'm already a sucker for LED's, but these look superb! Just a matter of deciding on what color
-
ThermalMike reacted to Hukkel in Insomnia I55 Thermaltake project - finished photos daylight
Then it was time to fill the loop and leaktest it
-
ThermalMike reacted to Hukkel in Insomnia I55 Thermaltake project - finished photos daylight
This delivery I received later. The waterblock to use and fittings for 16mm hardline tubing and about 6 meters of Thermaltakes own 16/12 mm PETG tubing.
I am arriving at the point where I can finally start fitting some hardware.
Thanks Martin for the emergency package.
-
ThermalMike reacted to Hukkel in Insomnia I55 Thermaltake project - finished photos daylight
Herroooooo everyone. It is almost time for Insomnia I55 in august 2015 and before Computex 2015 I have been asked by Thermaltake Europe if I was interested in doing a project for them to put on display. :thumb:
Of course my ego was all over the place and I was hovering 50cm above the ground as I love doing these projects and I love being asked by brands so I said F**K YEAH!
The project was quite straight forward: we use the new Suppressor case, add all parts Thermaltake does like fans, PSU and all of their watercooling equipment and make something that is worth looking at.
Perfect assignment for men. Keep it simple. I can understand this.
I still had some hardware at home and for other stuff I contacted a few people I worked with before. And before I knew it this thing was on a roll.
I need to finish this project like 2 weeks from now. So I figured I should start a log about what I have been doing for the last couple of weeks since I have everything.
This will be a short log I think with rather large photo updates. I hope you will enjoy.
First of all I want to thank Thermaltake and Martin in particular for the opportunity.
I have a bunch of photos of the unboxing of the new case ending in a photo of the front panel being taken apart both with the screwdriver and a saw to create something I will show you later on
Don't worry there will be a LOT of modding involved in updates coming later on.
OUT!!! All of you!!!
I have a rather cool (I hope) idea for the front end. I want to keep the lining and shape of the original case intact but still make its appearance different.
-
 ThermalMike got a reaction from avarros in (SOLVED) Proud owner of V71, but the fan controller issue is chipping on the satisfaction
Avarros,
Welcome to the Tt Community!
Quick question, did you plug in the 4-pin molex connection to the PSU?
-
ThermalMike reacted to JAC in Thermaltake - Poseidon Z RGB
Thanks Mike!
I went to BestBuy and bought the blue switch version. I'll probably return it since the browns are coming in the next month or two. Thanks for your help and feedback man.
-
 ThermalMike got a reaction from IngCr3at1on in Thermaltake - Poseidon Z RGB
Hey and another thing..
Welcome to the Tt Community Forums!
:D :D :D :D
-
ThermalMike got a reaction from IngCr3at1on in Thermaltake - Poseidon Z RGB
JAC,
Only the Blue Switch has been released in the USA as of now. The brown switch is coming, I am very excited too for Brown Switch
You should see brown switch version showing up mid Sept
Dimensions are on the website:
Dimension 440 x 133 x 37 mm
17.3" x 5.23" x 1.45
-
-
ThermalMike reacted to ShadoWx3Sandy in Project Kallax Casemod
today i will upload my last update Photo for the next time. i need to stop working on it until we changed our apartement, no time for modding until now, cause i have to much things to do and so much to arrange for the change =D
so stay tuned
-
ThermalMike reacted to ShadoWx3Sandy in Project Kallax Casemod
the first steps are done today. now we have a 2 hrs time of beeing silence so i needed to stop working
but i have changed a first thing on the Kallax Casemod. I have made my own Motherboard tray some other things i will update today after the 2 hrs break.
also i received on friday my first package from Thermaltake =)
nice stuff so far
-
ThermalMike reacted to AlShuryan in Project Kallax Casemod
Better each time... Good timing with Thermaltake announcing the Hardline PETG tubing and fittings...
-
 ThermalMike got a reaction from eunoia in Project SunkisTt - Chrome Frame, Candy Paint (Completed)
When I started my first modding project with Thermaltake, I was not really sure what I wanted to achieve with this build. How to make it a part of what I do, taking into account what I have done for several years with my car hobby and paint hobby and bring it into full throttle for a unique system, a Thermaltake system that I am proud to say is my own.
Project SunkisTt
Parts List:
Case: Thermaltake Core V71
CPU: Intel Core i7 4770K
Motherboard: EVGA Z97 Classified
RAM: Avexir Core Series 4GB x4 DDR3-1600 C9
PSU: Thermaltake Toughpower Grand Platinum 1200W
GPU: ASUS Strix GTX 970's (2x)
SSD: Samsung Evo 256GB (2x) -RAID 0
CPU Waterblock: Thermaltake Pacific W2
GPU Waterblock: Thermaltake Pacific ASUS Strix GPU Block (2x)
Radiator: Thermaltake Pacific RL 280 (2x)
Pump/Res: Thermaltake Pacific PT40-D5 w/ Mod Kit
Fans: Riing 140mm White (7x) - LED modded Orange
Coolant: Mayhems Aurora 2 (Custom Orange/Red)
Tubing: Thermaltake Pacific PETG 16mm
Fittings: (Chrome)
Thermaltake Pacific G 1/4 PETG 16mm (9x)
Thermaltake Pacific G 1/4 Stop Plug (8x)
Thermaltake Pacific G 1/4 90 Degree (1x)
Sponsors
Thermaltake
Avexir
BS Mods
Mayhems
The Build
First Step was to take the chassis completely apart and send off the frame to get it chromed. This process took about a month and required sandblasting off the stock finish, while going through the process of being copper plated, polished, nickel plating, then chrome plating and finally polished.
The end result looks like this:
Now before we get started, here is the color I chose for the body panels. This is HoC (House of Color) Candy Tangerine Orange "UK08-BC02" - http://www.houseofkolor.com/speedshapes/speedshapes_urethanes.jsp
Now back to the Chrome... Here is some of the pictures I took in the office to show my friends of the first big step I took into this build!
-
 ThermalMike got a reaction from AlShuryan in Project SunkisTt - Chrome Frame, Candy Paint (Completed)
Thanks AL!
The holes are dimple die'd, you run the panel through a punch or cut out the hole first, then you put it on a press with another die and press it down to give it the dimple effect.
I have a car buddy that has the machine and it was just a friendly visit to hang out and then do the work.
The Rads have been stripped, sanded and then polished on a wheel to get them where they are in the photos.
I still have some polishing to finish, once I get the remaining parts for final photos.
Been gaming on it in the meantime XD
-
ThermalMike reacted to AlShuryan in Project SunkisTt - Chrome Frame, Candy Paint (Completed)
Really dig the mod and can tell we have a car enthusiast working on this...
I would like to know the process of counter sinking the vent holes in the side panel.
Are the RADS polished to get the look?
-
 ThermalMike got a reaction from jtheater in Project SunkisTt - Chrome Frame, Candy Paint (Completed)
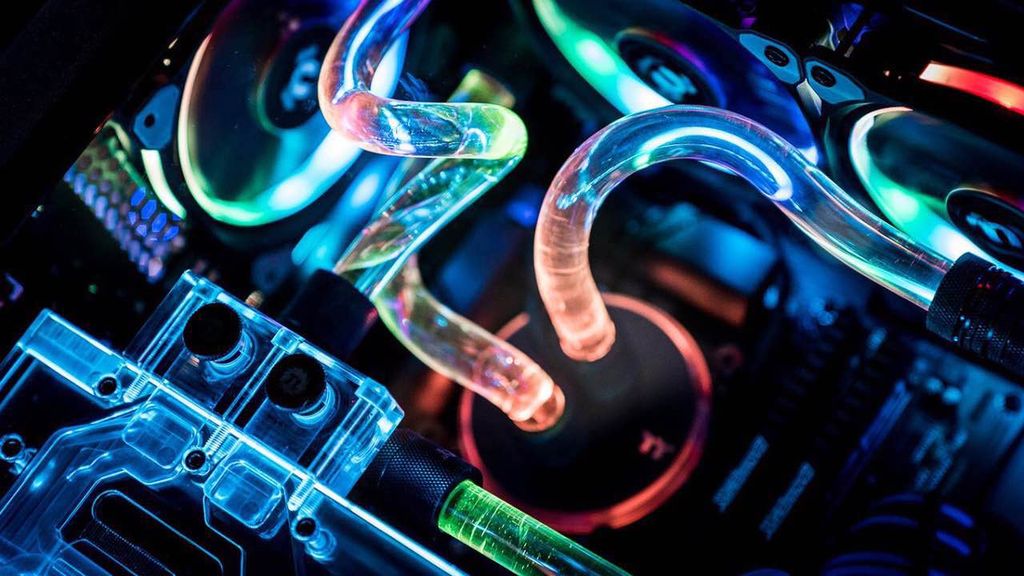
Now for the fun part of this build, Tube Bending!!!
I would recommend to look into making a jig for your 45/90/180 bends if this is the road you want to take to get a good bend out of your tubing.
Expect to not be perfect every time, here is one of my goofs
For each end, you want to make sure to finish the ends properly by reaming and lightly sanding the ends. You do not want to damage your O-rings.
Adding the first pieces
Finishing up with the rest of the bends, we move on to leak testing.
Here is a top shot of the tubing installed with the mirrors now exposed to give the infinity look for the interior components. This turned out just as I expected it to, was very hard on my part to not peel this off sooner!
Here is the shorted SATA cable that will power my Commander FX 10-port fan hub. (I also made a custom cable for the SSD's that changed the connector locations on to fit the placement of the (2) SSD's and my optical drive on top)
Removed the 6+2 extra connections and shortened the cables
Here are some dark shots
Wrapping up the bending process and cables, very close now and I can do some "testing" haha Gaming on it now!
I left the protecting plastic on for a special guest that is coming by the office soon. HE is the boss after all..
-
ThermalMike got a reaction from jtheater in Project SunkisTt - Chrome Frame, Candy Paint (Completed)
Now that the cards are ready to go in we can set them and get the the water block bridge installed. I am very lucky to have these blocks!
-
ThermalMike got a reaction from jtheater in Project SunkisTt - Chrome Frame, Candy Paint (Completed)
To get this all together I know the right people to get a motherboard from very well so I got the EVGA Z97 Classy to use with my 4770K CPU i have had which has been a nice overclocker for me already with my Z87 I kept it for this.
I then took the system and set it up with a Tt Water 3.0 for some burn in testing and to you know.. GAME ON IT FOR A LITTLE BIT XD
Started to unpack the W2 CPU block and get it prep'd
Moving forward to the VGA block now I took stock coolers off and cleaned up the GPU and installed the waterblocks on each card
Some Ram pics!
Now I start getting the motherboard installed, PSU back in and cables connected up to see how they fit. Also working on the fitment of the acrylic mirror floor with the reservoir to get that mounted and set.
Here is a quick look at what it is starting to look like with the door installed and what we have done so far and to show off the modded Orange LED Riing White fans color!
-
ThermalMike reacted to adjago in Project SunkisTt - Chrome Frame, Candy Paint (Completed)
hoooo nice mod waiting for final pic
-
 ThermalMike got a reaction from JeremybbDon in Dreamscope Your PC!
Hey everyone,
Working on my new system and ran across this app.
https://dreamscopeapp.com
Thought it would be cool to see everyone's system dreamscoped!
Here's Mine:
Here is mine with the new coolant that I just received
-
ThermalMike reacted in POSEIDON Z RGB Owner's Club
Look at the stunning colors! Don't you just love this?
-
ThermalMike reacted to ShadoWx3Sandy in Project Kallax Casemod
some new pictures =D the next few weeks i can't do so much, cause we have a much to do with our upcoming apartment change
stay tuned.