-
Forum Statistics
93.2k
Total Topics114.3k
Total Posts -
Member Statistics
173,097
Total Members16,800
Most Online


Sarge
-
Posts
44 -
Joined
-
Last visited
-
Days Won
3
Reputation Activity
-

 Sarge got a reaction from MP_customized in [Belgium] Mike Petereyns
Looking really good with that color... 208 is awesome Shame you ran out of time and couldn't get to use the custom channel window, but I'm sure it's still going to be a great build
-
 Sarge got a reaction from L3p in [Netherlands] Peter Brands
Great job Peter ! Glad to see you finished in time - Loving how you made that mousepad
And yes, please make an awesome video showcasing the build
-
 Sarge reacted to L3p in [Netherlands] Peter Brands
Finally the last fittings also arrived.
So I could finish the last part of the loop.
And testing if everything still works ..
Time to fill it up
Always exciting
Not a single leak
Next thing is also very exciting ... is the hardware still working?
Awesome when you see on first boot "CPU Fan speed error detected"
That's good
And so the glass panel goes up
Chair also fits perfectly
One last small update and then ... final pics!
-
Sarge reacted to Designs By IFR in [Australia] Corey Gregory
Lots of progress here guys! Some custom reservoirs, starting the details of the build, priming the build and working on the wings.
To kick things off, i measured up the mesh and used some painters tape to mark my cuts out for the wings
This is only one layer of mesh, there will be one layer on the inside and on the outside
Welded some legs to the steel rods inside the ball. The core P5 feet are made from steel so then have been welded to the legs and the plastic core p5 feet slide right over them
Starting to put a couple layers of prime on
Had an old reservoir so i decided to create two of my own custom reservoirs out of it. Removed the threaded part, sanded it down, and cut the tube in half.
I then cut out a bottom section for the two halves.
Time to Tap a G1/4 threading through the acrylic panels.
And now for the end caps, I also put a threaded hole in the end caps for an easy fill port.
Time to mend it all together and clean it up
Now what would a TIE Advanced be without Darth Vader himself? So I decided to vinyl our reservoirs
The vinyl will be getting peeled off later on. Time to prime the reservoirs!
A really old dead motherboard comes in handy for some detail parts, I have sourced all kinds of junk from the shed to use for details.
As you can see, by sanding the motherboard a tad, it reviles the copper circuit inside, i think its a nice touch to that inside area, also got some small pipes to add in.
Printed out an image of a TIE Advanced to i can circle the detail bits i have complete as i progress through.
Working on some of the ball detail so i need to get that curved shape into the detail so it sits flush with the ball.
Lots of hours later and we have some details all glued and ready to go. I used a few old capacitors/caps for some of the details.
Time to work on the top section of the ball. Measured out where i want my cuts to go.
Some more details heated up and formed into the dome shape, that mould i kept really comes in handy.
A bit of acrylic cement and this becomes a permanent fixture =)
The glue marks will not matter as this will all be painted =)
Added a couple more details so fill in the empty gaps.
And taped some mesh down to show you guys what i want to do tomorrow.
This mesh will be glued in place with a strong adhesive.
I hope you all enjoyed the progress.
-
Sarge reacted to MP_customized in [Belgium] Mike Petereyns
UPDATE !!
Time for another update folks, if been extremely busy so I apologia for the slow rate of update's...the End is near so the updates will come fast now! To start with I will show you some acrylic illustrating clips where you can see the making off the CPU mounting covers and some other panels you'll come across later on...
After the parts where laser I glued them together with Acryfix and this is the result
-
 Sarge got a reaction from Designs By IFR in [Australia] Corey Gregory
Corey is here. The Force is with him
Looking great so far!
-
Sarge got a reaction from MP_customized in [Belgium] Mike Petereyns
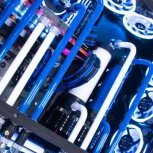
This definitely looks interesting - really nice design! Reminds me a bit of the Win98 3D Pipes Screensaver
-
Sarge got a reaction from L3p in [Netherlands] Peter Brands
Looking great so far Peter, can't wait to see the finished result!
-
Sarge reacted to Tt Andy in [Closed] Tt Community Launch Giveaway [Week 3] 9/2 ~ 9/9
Please answer the following question on this thread to be in the draw to win a Water 3.0 Ultimate!
Week 3: 9/2 ~ 9/9
Question 3: What is the length of the radiator on Water 3.0 Ultimate?