Search the Community
Showing results for tags 'EVGA'.
Found 6 results
-
 Manjira Cash loan app CustOmer care helpline number_))+91-)9621011914_))O962×lOll×9l4_)) call meManjira Cash loan app CustOmer care helpline number_))+91-)9621011914_))O962×lOll×9l4_)) call meManjira Cash loan app CustOmer care helpline number_))+91-)9621011914_))O962×lOll×9l4_)) call meManjira Cash loan app CustOmer care helpline number_))+91-)9621011914_))O962×lOll×9l4_)) call meManjira Cash loan app CustOmer care helpline number_))+91-)9621011914_))O962×lOll×9l4_)) call meManjira Cash loan app CustOmer care helpline number_))+91-)9621011914_))O962×lOll×9l4_)) call meManjira Cash loan app CustOmer care helpline number_))+91-)9621011914_))O962×lOll×9l4_)) call meManjira Cash loan app CustOmer care helpline number_))+91-)9621011914_))O962×lOll×9l4_)) call meJghiijh
 -
Hey hey guys and girls. We have another awesome themed mod coming your way. This one is based off of one of my favorite comic strips growing up as a kid. Spy vs Spy The Following was obtained from the History section of the Spy vs Spy Headquarters. http://www.spyvsspyhq.com/history.html Simple yet meaningful is one way to describe the wordless black and white comic strip that makes up Spy vs. Spy. The cartoon created in 1960 by Antonio ProhÃas, depicts the antics of two distinctly different yet similar spies who try to get the best of each other with clever yet strange schemes of espionage and deception. Published in Mad magazine since 1961, ProhÃas began working on Spy vs. Spy in Cuban, but fled to the United States in 1960 just days before Fidel Castro took over the last Cuban free press. When ProhÃas came to the United States he knew almost no English, but Mad magazine readers and editors quick accepted him and loved his work. Before he got the job at Mad, he worked in Queens at a clothing factory by day and drew by night in his cramped apartment. His earlier works “Erizo,†“Oveja Negra,†“El Hombre Siniestro,†and “Tovarich†would not work in his new country where the idea of communism was not as prevalent or well taken by pleasure readers. In Cuba if you were not a supporter of Castro you were considered a spy, and this is where he got the idea. ProhÃas considered himself a spy and thus the idea was born. ProhÃas submitted his rough pencil concept and design sketches to MAD’s editors on normal 8.5 x 11 paper and would latter redraw the entire carton twice the size for reproduction in the magazine. He would go through the comic strip with pain staking detail and make sure all edges and lines were detailed in his dark bold pen and would almost never ink over his pencil drawings. Spy vs. Spy is now a national icon, symbolic of the Cold War representing good and evil and the struggle for equilibrium. ProhÃas would stealthily sign each of his Spy vs. Spy cartoons under the title panel, in Morse code, which spelled out the words "by prohias." This is one of the most overlooked details in his work. -••• -•-- •--• •-• --- •••• •• •- ••• Antonio ProhÃas passed away February 24, 1998. His masterpiece concept of the two spies battling it out lives on in the continuing work done by his successor Peter Kuper. This project is sponsored by the good folks at. http://www.thermaltake.com/home.aspx and http://www.evga.com/ Also brought to you by http://www.v1tech.com/ Specs: Case - Thermaltake Core X9 x 2 Motherboard - EVGA Z97 Classified (Gaming System), MSi Z87 Mpower (Server) CPU - Intel i5 4670K (Gaming), Intel G3258 (Server) Ram - 4 x 4Gb G.Skill Ripjaws (8Gb per system) PSU - 1 x 550w DPS G Modular PSU, 1 x 750w DPS G Modular PSU GPU - 2 x ASUS Strix GTX 970 SSD - 2 x 240 Gb Crucial M500 240Gb HDD - 4 x 500 Gb in Raid 0 CPU Block - Pacific W1 x 2 GPU Block - Pacific Strix Water block x 2 Radiator - Pacific RL 480 x 4 Pump - Pacific P1 D5 Pump /w Silent Kit x 3 Reservoir - Pacific T33 x 4 Cables - 2 sets of Red Tt Sleeved Cables LEDs - BSMods 5050 RGB LED 16.5ft Strip /w wireless remote. The whole idea is to put two complete systems in here all cooled with one large liquid cooling system. The first shipment of parts has arrived. 2 x Core X9 Cases, 2 x Commander FX 10 port fan hub, 1 x 550w DPS G Modular PSU and 1 x 750w DPS G Modular PSU. To give you an idea of the size of the double stacked X9. On the left of this pic is the chassis from a Thermaltake A-71 Full Tower. Each Core X9 is 1 inch taller and twice as wide. Here we have One intact X9 and one completely disassembled. The Core X9 has this built in plate that can be removed from the bottom panel so you can install a massive radiator in push/pull. However this is not going to work for what I have planned. For what I want to do the entire floor has to be cut out.
-
Hey guys! I'm back with another sponsored project! EVGA was generous enough (as always) to send me some of their awesome hardware. This is another EVGA and Thermaltake sponsored project, and I named it "HoloView". Thermaltake was awesome enough (as always) to send me their View 27 chassis and some of their water cooling components. This will be a quick (hopefully) and simple project but will add a special feature to it (hopefully I could pull it off properly). A huge shout out to the sponsors! Here's some of the components that will go in to this project. Yesterday I was able to test fit some components and tear the View 27 down to confirm some measurements and some possible radiator placements. The plan was to rotate the computer case 90 degree so the front panel will be the bottom of the case and the top will be the front panel. Here was my plan, either I will have the 360mm radiator in front and have the 240mm radiator at the bottom or the opposite way around. Originally, I thought I could use the area below the power supply for mounting a 240mm radiator but the power supply that I will be using is a bit long and will have some interference once the power cables are connected. So instead of doing that, I will mount a 140mm fan below the power supply as intake. Now that I have a rough idea of where and what components for water cooling are going to fit in, next will be taking measurements for the custom side panel, cutting out the 140mm fan mount on the back and making the custom front panel for the 240mm radiator. But that will be for the next update. That's it for this first update for the HoloView project. Thank you EVGA and Thermaltake, as always, for giving another opportunity to me for this project! See you in the next one! Ciao!
-
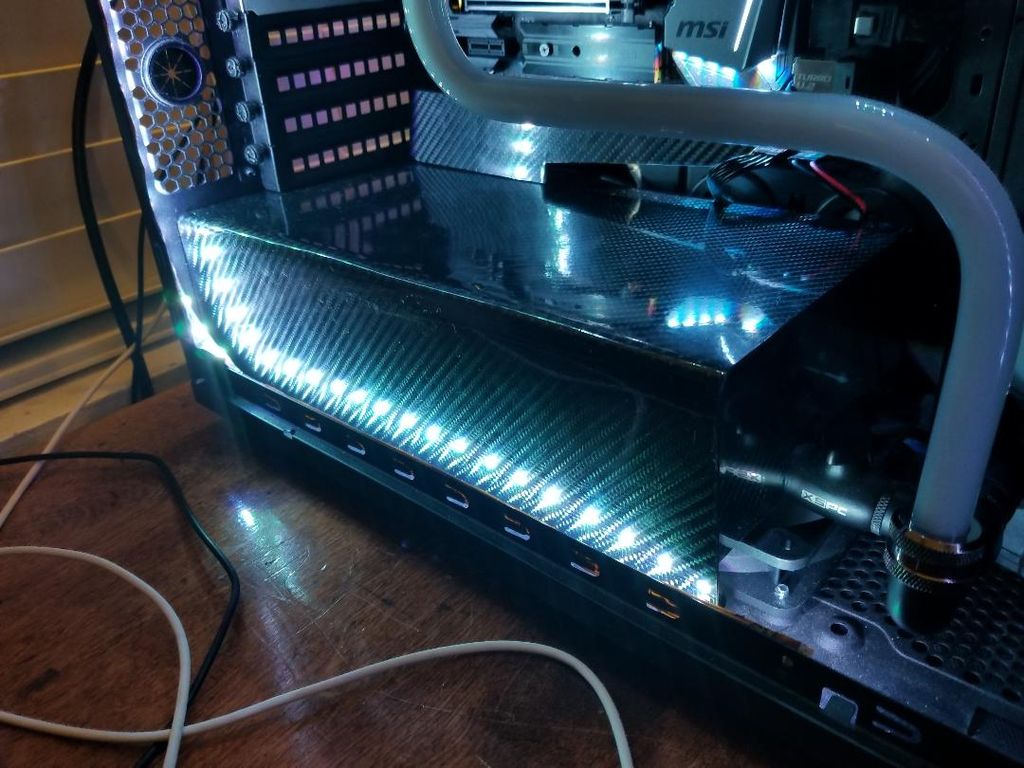
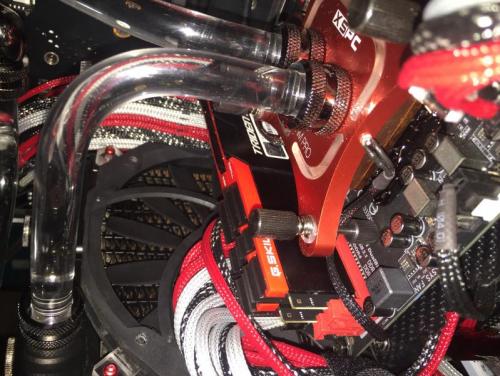
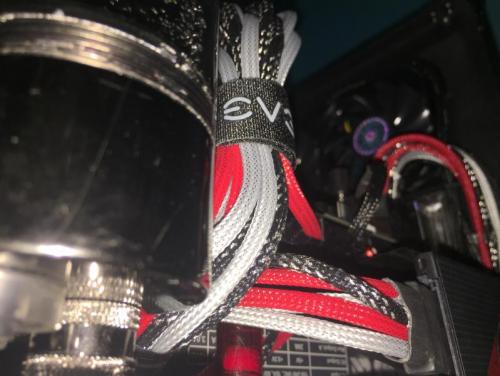
Just wanted to show off my new custom loop I just finished Building. Core V31 Case, MSI Gaming M5 Mobo, I7-7700k Overclocked to 5.3 GHZ, 8GBx2 Hyper X Savage DDR4 Ram overclocked to 3000MHZ, EVGA GTX 1080 SC2 with EKWB Waterblock, Raystorm Pro CPU waterblock, ThermalTake Pump and reservoir combo, a 280mm Radiator and a 360mm Radiator with Corsair Fans, custom RGB LED setup. Also I made that custom RGB GPU backplate with 6661 in it. A BlueRay DVDRW Drive, SSD and SSHD Drive. Random Carbon Fiber pieces. Hard Tubing and random XSPC triple seal Fittings. About to try and start my next build for the University Of Alabama's 2017 National Championship Win. Thinking of going for "The Case 900" with the MSI gaming M7 motherboard, Hard Tubing, 2 Thermaltake d5 pump reservoir combos, my gtx 1080 with a custom LED backplate of some style to represent The University Of Alabama. A black Supremacy EVO waterblock. Still Gonna use hard tubing but thinking of going with a grey and red coolant color scheme.
.thumb.jpg.5bfdeccd04ef368e5e59e14606cd21d6.jpg)
.thumb.jpg.ff382dacb812f81b5a53877b31a5f5a8.jpg)
.thumb.jpg.1e95a41a938cab3fef009ba1c0e0e8f6.jpg)
.thumb.jpg.7bd0de0a27a07a4b0792005f8246faaf.jpg)
.thumb.jpg.2c670b2d651e21ef860d87517dc741e3.jpg)

-
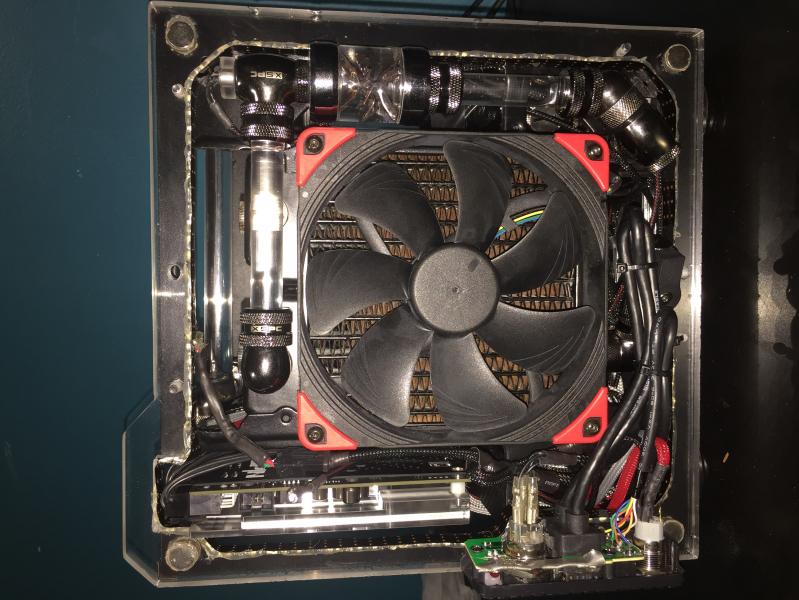
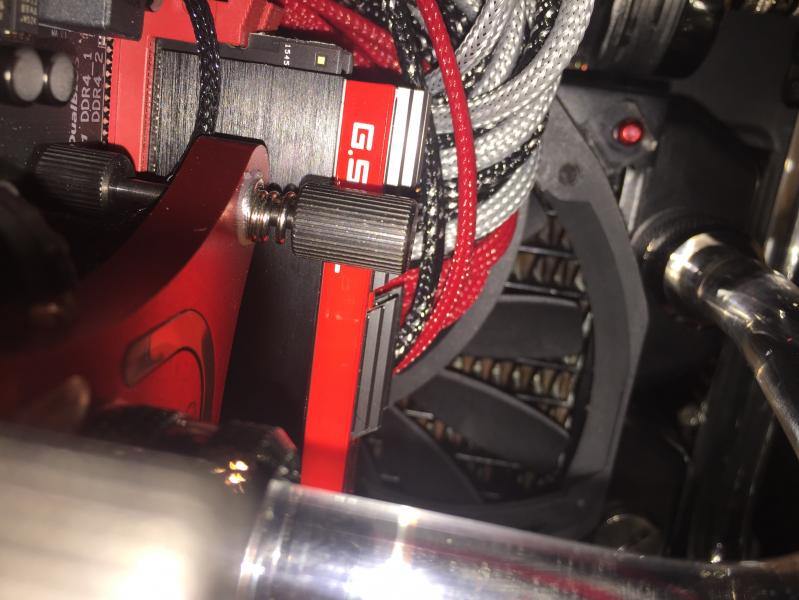
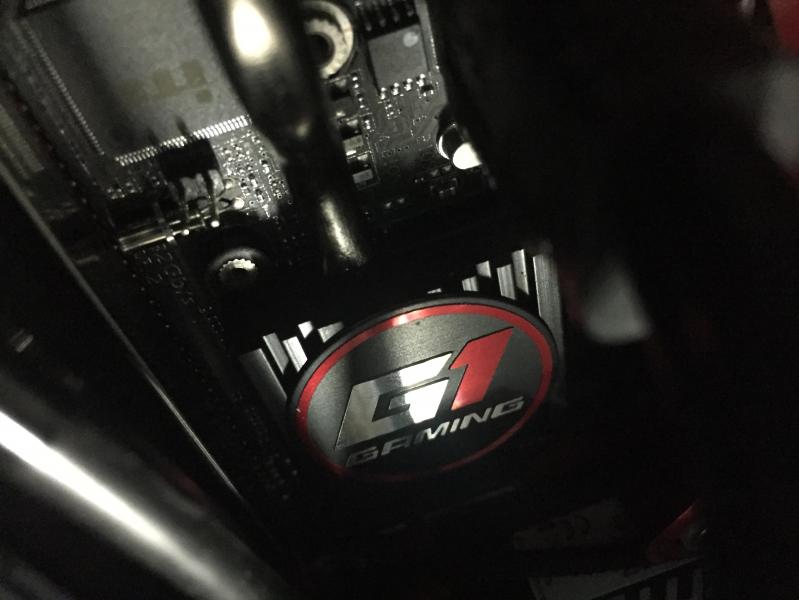
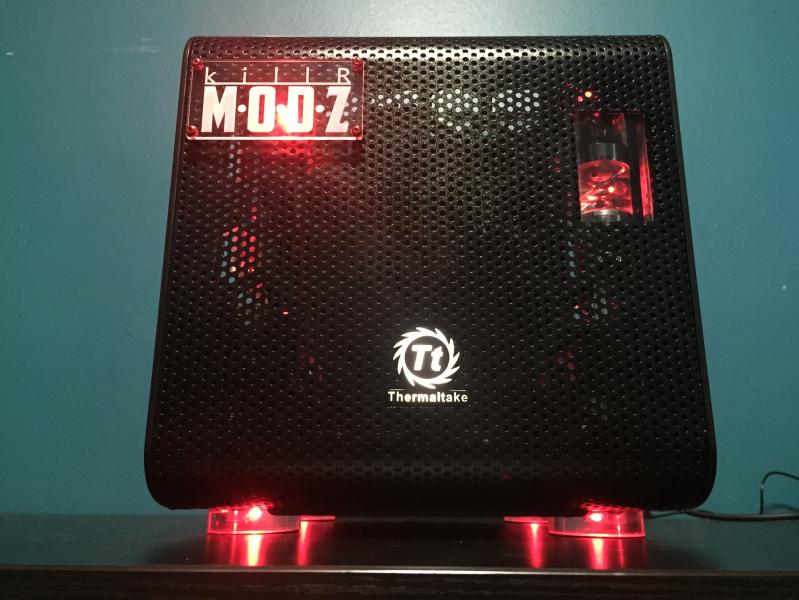
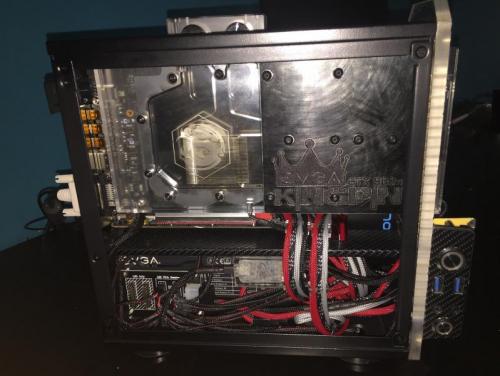
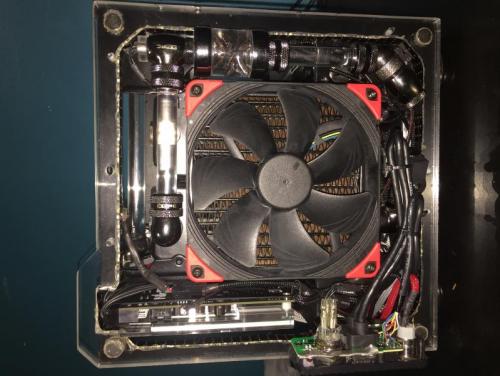
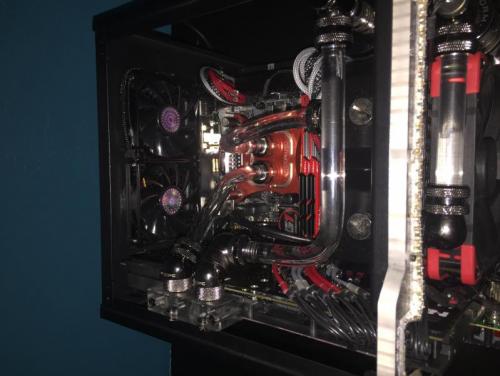
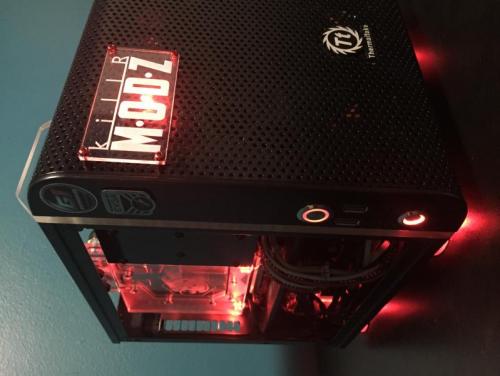
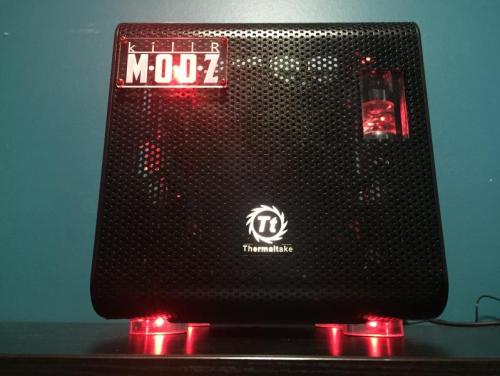
So here we go... Good day modder’s, PC artists, overclockers and fellow PC enthusiasts. I would like introduce to you my build… a day dream come true. I call it, the Core V1 Mini k|ngp|n Edition. There isn’t that much back story to this build. It goes like this. I haven’t built myself a PC since 2010. It was bonus time at my company and I was like, what the ####… let’s do it. I muddled around trying to be frugal, but decided to invest into this build a bit. The processor choice bounced around from AMD FX to a core i5. I never really built an Intel machine just because of the cost. This time around, I just went HAM as I’ll future proof this build quite a bit. I wasn’t really looking to water cool it nor was I really expecting the modding bug to bite me so hard in the ####… but it did. And did it put me on a mission. I’ll let the following parts like explain the outcome… LOL Enjoy the build, though I wish I had taken more pics and videos because this case has been modified extensively to make everything work… better than I expected might I add. Along with all of the other one-offs I put into this… So in the end this bug, you know that left me in a state of needing to build build build, also led to me creating a brand that I call… killRMODZ. One thing that I would like to note about my build ethic is that I’m very fond of small form factor builds. Why might you ask? Well because one, it’s a challenge. Two, I don’t like my system to occupy a lot of space… though to each their own. Three… did I mention they are a challenge? LOL My build ethic also includes taking something factory and modify it into something aesthetically pleasing but not to a point where someone cannot reproduce it themselves or for me to create a custom one-off for them. I do have a brand so I apologize if it seems like a sales pitch as that is not my intention. Though I do think there are some mods here that fellow enthusiasts wouldn’t mind getting their hands on. But let us see what the future holds for me. Lastly, I know there are blemishes. You may not see them but I know where they are. I wish I had a CNC Machine and other precision equipment. Also, this is my first time sleeving cable and water cooling. I learn very quickly and thank youtuber’s for their instructional(s)!!! So be gentle with my humble build. A very special thanks to Orlando Laser Engraving (Joseph Visser) for my killRMODZ placards. Site: http://www.orlandolaserengraving.com/ A very special thanks to Kevin MacLeod for the use of his beat “Ice Flow†for my promo video. And I have to especially give thanks to the merchants and vendors from which I was able to obtain my parts for outstanding prices. Access to the vendor’s stores will be under the designated parts… Build: Case: Thermaltake Core V1 Mini http://www.amazon.com/Thermaltake-Core-Gaming-Computer-CA-1B8-00S1WN-00/dp/B00M2UKGSM?ie=UTF8&psc=1&redirect=true&ref_=od_aui_detailpages00 MB: Gigabyte-Z170N Gaming 5 http://www.amazon.com/Gigabyte-LGA1151-Mini-ITX-Motherboards-GA-Z170N-Gaming/dp/B014W2000Q?ie=UTF8&psc=1&redirect=true&ref_=oh_aui_detailpage_o08_s00 CPU: Intel i7 6700K http://www.amazon.com/Intel-Boxed-I7-6700K-Processor-BX80662I76700K/dp/B012M8LXQW?ie=UTF8&psc=1&redirect=true&ref_=oh_aui_detailpage_o02_s00 MEM: G.Skill TRIDENTZ DDR4-3200 PC4-25600 http://www.newegg.com/Product/Product.aspx?Item=N82E16820232205 GPU: EVGA 980 Ti k|ngp|n… yep, that’s right because I can!! LOL http://www.amazon.com/EVGA-Multi-Color-Customized-Overclocking-06G-P4-5998-KR/dp/B016703RXS?ie=UTF8&psc=1&redirect=true&ref_=oh_aui_detailpage_o02_s01 PSU: EVGA GQ 750 80+ Gold http://www.amazon.com/EVGA-Modular-Crossfire-Warranty-210-GQ-0750-V1/dp/B017HA3RGE?ie=UTF8&psc=1&redirect=true&ref_=oh_aui_detailpage_o07_s00 CPUWB: XSPC PRO Red http://www.performance-pcs.com/ GPUWB: BitsPower http://www.performance-pcs.com/ SSD: PNY 240GB 2.5 CS2211 http://www.amazon.com/PNY-CS2211-Internal-Solid-SSD7CS2211-240-RB/dp/B019H3B32E?ie=UTF8&psc=1&redirect=true&ref_=oh_aui_detailpage_o04_s00 PUMP: Swiftech MCP35X http://www.amazon.com/Swiftech-MCP35X-12-VDC-Pump/dp/B004XM5TK2?ie=UTF8&psc=1&redirect=true&ref_=oh_aui_detailpage_o07_s00 RAD: AlphaCool NexXxos UT60 140mm http://www.amazon.com/Alphacool-NexXxoS-Copper-Radiator-Single/dp/B007R74DKM?ie=UTF8&psc=1&redirect=true&ref_=oh_aui_detailpage_o05_s00 RES: Phobya Balancer 150 Black Nickel http://www.amazon.com/Phobya-Balancer-150-Reservoir-Nickel/dp/B003TWFBSC?ie=UTF8&psc=1&redirect=true&ref_=oh_aui_detailpage_o01_s00 Turbine Flow Meter by Nhowe http://www.amazon.com/Nhowe-Silvery-Cooling-Indicator-Computer/dp/B0197SD6M4?ie=UTF8&psc=1&redirect=true&ref_=oh_aui_detailpage_o03_s00 FAN: Noctua NF-A14 industrialPPC-3000 PWM x 1 (PUSH) http://www.amazon.com/Noctua-NF-A14-industrialPPC-3000-140x140x25mm-3000rpm/dp/B00KESS5L4?ie=UTF8&psc=1&redirect=true&ref_=oh_aui_detailpage_o06_s00 FAN: RAIJNTEK Aeolus PWM 140mm 13mm slim type x 1 (PULL) http://www.newegg.com/Product/Product.aspx?Item=9SIA66Z28S3552&cm_re=raijintek-_-9SIA66Z28S3552-_-Product FANS (will be replaced): CoolerMaster 80mm slim fan PWM x 2 (EXHAUST) http://www.amazon.com/Cooler-Master-Bearing-Computer-Coolers/dp/B005C31GIA?ie=UTF8&psc=1&redirect=true&ref_=oh_aui_detailpage_o06_s00 FANS (new): Bgears 80 mm 2 Ball Bearing High Speed High Performance Fan http://www.amazon.com/Bgears-Performance-Black-b-PWM-2Ball/dp/B00UTIB994?ie=UTF8&psc=1&redirect=true&ref_=oh_aui_detailpage_o00_s00 Fittings: XSPC Black Chrome http://www.performance-pcs.com/ Tubing: XSPC PETG 14/10mm http://www.performance-pcs.com/ Alphacool 2-way Ball Valve G1/4 - Black Nickel http://www.performance-pcs.com/ Tube Cutting Kit http://www.amazon.com/XSPC-PETG-Easy-Bend-Toolkit/dp/B016B29V4G?ie=UTF8&psc=1&redirect=true&ref_=oh_aui_detailpage_o07_s00 Coolant: Distilled H2O Publix… LOL SilverCoil http://www.amazon.com/Silver-Coils-Antimicrobial-999-Strip/dp/B00A66HMRC?ie=UTF8&psc=1&redirect=true&ref_=oh_aui_detailpage_o07_s01 Thermal Grizzley Kryonaut http://www.amazon.com/Thermal-Grizzly-Kryonaut-Grease-Paste/dp/B011F7W3LU?ie=UTF8&psc=1&redirect=true&ref_=oh_aui_detailpage_o03_s00 Extras: MB Screws (Black) http://www.amazon.com/6-32-Computer-Screw-10-Pack/dp/B00KJ0UC5O?ie=UTF8&psc=1&redirect=true&ref_=oh_aui_detailpage_o05_s00 Sleeving from MODDIY http://www.moddiy.com 1/8th sleeving for LED wiring http://www.amazon.com/PET-Expandable-Braided-Sleeving-Black/dp/B017OF6V2Y?ie=UTF8&psc=1&redirect=true&ref_=oh_aui_detailpage_o03_s00 ATX pins for reducing length of PSU 24pin MB cable http://www.moddiy.com SilverStone PWM Distribution block http://www.amazon.com/SilverStone-System-Cables-Black-CPF04/dp/B00VNW556I?ie=UTF8&psc=1&redirect=true&ref_=oh_aui_detailpage_o09_s00 BitsPower LED Distribution block http://www.performance-pcs.com/ Leds 5mm http://www.amazon.com/20-Pack-Pre-Wired-Bright-Light-Bulbs/dp/B01BI45D58?ie=UTF8&psc=1&redirect=true&ref_=oh_aui_detailpage_o08_s01 Leds 3mm http://www.amazon.com/StarSide-Lights-wired-volt-leds/dp/B01AFJZFQY?ie=UTF8&psc=1&redirect=true&ref_=oh_aui_detailpage_o00_s00 2 Pin headers for Leds http://www.amazon.com/Female-Connector-Single-Jumper-10-inch/dp/B00NQ4QA2Y?ie=UTF8&psc=1&redirect=true&ref_=oh_aui_detailpage_o08_s00 FADECANDY – This requires a special recognition to Micah aka. ScanLime Scott and ADAFRUIT http://scanlime.org/ https://twitter.com/scanlime?ref_src=twsrc%5Egoogle%7Ctwcamp%5Eserp%7Ctwgr%5Eauthor http://www.misc.name/ https://www.adafruit.com/ http://www.amazon.com/Adafruit-FadeCandy-Dithering-USB-Controlled-NeoPixels/dp/B00JHJJF9W?ie=UTF8&psc=1&redirect=true&ref_=oh_aui_detailpage_o07_s00 PCB Headers for FadeCandy http://www.amazon.com/uxcell-2-54mm-Pitch-Double-Headers/dp/B00899WPZW?ie=UTF8&psc=1&redirect=true&ref_=oh_aui_detailpage_o01_s00 WS2812B Led strip http://www.amazon.com/szminiled-WS2812-Waterproof-Individually-Addressable/dp/B00MINT8R8?ie=UTF8&psc=1&redirect=true&ref_=oh_aui_detailpage_o08_s00 12v>5v Buck converter for LED’s/Fadecandy implementation http://www.amazon.com/Nextrox%C2%AE-Display-Supply-Converter-Module/dp/B00CBCGAL8?ie=UTF8&psc=1&redirect=true&ref_=oh_aui_detailpage_o05_s00 Acrylic 3/8 sheet for killRMODZ Case Bezel < Patent will be pending http://www.amazon.com/Acrylic-Transparent-Standard-Tolerance-Thickness/dp/B0062R45HY?ie=UTF8&psc=1&redirect=true&ref_=oh_aui_detailpage_o05_s01 Acrylic 3/8 sheet for killRMODZ 120mm>140mm fan adapters < Patent will be pending http://www.amazon.com/Acrylic-Transparent-Standard-Tolerance-Thickness/dp/B0062R45HY?ie=UTF8&psc=1&redirect=true&ref_=oh_aui_detailpage_o05_s01 RED Acrylic Cylinder (for water diffuser, pressure reducer, and MB and GPU stands) http://www.amazon.com/Acrylic-Round-Translucent-Diameter-Length/dp/B00EVBTMIU?ie=UTF8&psc=1&redirect=true&ref_=oh_aui_detailpage_o06_s00 2inch diameter acrylic rod for killRMODZ Case Feet < Patent will be pending http://www.amazon.com/Acrylic-Round-Transparent-Diameter-Length/dp/B00EVBIS2Q?ie=UTF8&psc=1&redirect=true&ref_=oh_aui_detailpage_o06_s00 Anodized m3 bolts http://www.AerialPixels.com Noctua Chromax Anti Vibration Pads – Red http://www.performance-pcs.com/ 19mm Push Button Momentary Switch http://www.amazon.com/Support-Light-Button-Switch-Socket/dp/B00WSJ6L4A?ie=UTF8&psc=1&redirect=true&ref_=oh_aui_detailpage_o02_s00 16mm Push Button Latching Switch http://www.amazon.com/Support-Light-Button-Switch-Socket/dp/B00YS2583A?ie=UTF8&psc=1&redirect=true&ref_=oh_aui_detailpage_o04_s00 Stainless Mesh for Vents http://www.ebay.com/itm/Stainless-Steel-304-Mesh-30-012-Wire-Cloth-Screen-12-x12-/121902069033? Side Panel windows for Thermaltake Core V1 Mini https://store.thermaltakeusa.com/inside03.php?s=44&k=204&a=1932 Black Chrome Paint By Duplicolor Black Satin Paint By VHT Full Build Log here: http://www.modders-inc.com/forums/showthread.php/4751-Core-V1-Mini-k-ngp-n-Edition

- 2 replies
-
- 1
-

-
- evga
- core v1 mini
- (and 3 more)
-
Hey Everyone! Wanted to share a V1 mini build that i'm starting. This build was just supposed to be a basic build but has morphed into something that I have become extremely passionate about. And that is the artistic value achieved with modding PC with custom water cooling setups. My schtick is that I want to stay with either a mini itx or micro atx platform. ATX boxes are common. But the smaller platforms with custom water cooling you don't see often. So where to begin. Well, I feel in love with the V1 mini a while ago. Did some youtube research and found some very nice builds. So I pulled the trigger and got the black one. From that point, everything focused around that case... the build that is. So why k|ngp|n you asked?? Well, just because... LOL I want to make it fit and work and look gorgeous to the eyes. I know it will perform, but that is not the main point of my build. So on to the parts list: Core Parts- Core V1 mini Case 'black' 6700K i7 skylake 3200 Trident Z xmp 2.0 compliant EVGA 980 Ti k|ngp|n 750 EVGA PSU PNY SSD 250gb Modding Parts- XSPC Water block for i7. The new 'RED' edition BitsPower water block for k|ngp|n video card alpha cool radiator phobya reservoir MP35x Swiftech pump XSPC black chrome fittings off brand flow meter custom sleaving custom led with remote color scheme: black, black chrome, red, carbon fiber custom power switch assembly and a custom made piece that I'm not ready to show right now until i'm complete with the build. There is quite a bit more but I will be take pictures as much as I can though I starte modding the case a few weeks ago. But here are some pictures of the modified bitspower water block that I've done for this build. *Note - everything here has been done by hand with no machined parts. If I had access to cnc or laser etching things would be a lot crisper. But I think that will take away from the character this build will have. Thanks!!!


.jpg.29090ecc6fae9e23eef6d022befb8459.jpg)
.jpg.af96568195d0d4430c0cc59982bd029d.jpg)
.jpg.4d900bd1837767415184fa9ad00ec8d6.jpg)
.jpg.7d94863e2d7760a13a07f91e5ff19121.jpg)
.jpg.93e1355b36e6f9cfc51baaa0a56ef324.jpg)