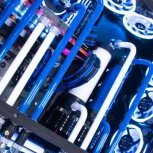
Designs By IFR Posted August 27, 2014 Report Share Posted August 27, 2014 WATERCOOLED PC DESK MOD WITH CAR SOUND SYSTEM Hey guys, Below are links to all of my Pages. Most YouTube footage will not be up until the desk mod is complete so please stay tuned. Visit my Facebook page for more pictures at higher quality. Facebook: https://www.facebook.com/Imfacerollgaming Email: ImfacerollGaming@gmail.com YouTube: https://www.youtube.com/user/ImfacerollPCGaming I would first like to start off by saying this build cost me a total of $22000 AUD and took around 6 months to build. I have chosen to include an inbuilt car audio system to do something different and save some space. This is my very first build and two weeks prior to building this i had no idea how to put a computer together or even what parts to buy, it took me a solid week of studying up on computers so that i was confident enough to attempt this build, so please enjoy. Please forgive me for image quality. I was researching the internet one night for a new computer because my laptop just wasn't up to scratch anymore and it couldn't even run battlefield. I knew nothing about computers however i was interested in trying to put together a build. Luckily my mate knew about computers and he helped me put together a neat build. Components include: Windows 8.1, 4770k i7 processor, Asrock extreme 4 motherboard, 850watt cool master PSU, 16gb Rip jaws RAM, Nvidia GTX 780 GPU, 2tb Western Digital HDD and a 120gb Samsung SSD. Putting this build together got me more interested in computers so i decided to look up other builds on the net and came across some awesome computer mods, one that caught my eye was a computer within a desk, I WANTED TO MAKE MY OWN. Starting in January 2014, i did two full days of research on computers, components, how to videos and reviews because i knew absolutly nothing about them. Two days passed and i decided to drawn up some plans for the desk. With the desk drawn up i made a list of components that i would need to purchase, the main computer specs included: Windows 8.1, i7 4770k processor, Asus maximus VI formula motherboard, two 1000watt corsair gold RM series PSU's, 32gb of corsair dominator platinum RAM, two nvidia GTX 780Ti GPU's in SLI, 4Tb western digital HDD + three 1Tb western digital HDD, two 250gb samsung SSD's + two 120gb samsung SSD's, Asus xonar essence stx soundcard and Asus xonar phoebus soundcard. I will also be watercooling everything, running tripple 27inch monitors and setting up a full car sound system within the desk. Since this build was going to be a long and expensive project i went all out on components to make a beast. Just a few photos of some parts used in the build: Moving on to the desk, the wood used to make the desk is 18mm thick and the legs were made thicker for extra support. Iv also included a back board for extra support and stability. The top of the desk is routed out to fit a sheet of 6mm thick hardened glass. A few pictures of the desk being built: I also made some fake elevated bottom platforms to hide wires and make wire management as clean as i can. I wrapped the platforms in a carbon fibre vinyl which turned out amazing. Elevated Platforms: Once i had all of my cutouts done to size i decided to test fit some components and also see how much space would be available for cable routing, lighting and running tubing to watercool all of the components. Test Fitting: Components fit well and i am happy with how the desk is shaping up. I decided it would be a good idea to test out the computer with its stock coolers before i install the waterblocks to make sure everything worked correctly. I also ran some performance comparisons with my 780Ti superclocked GPU's. The results i obtained are with no overclock, everything will be overclocked when the build is complete. One 780Ti GPU on ultra settings. Two 780Ti GPU's in SLI configuration. The desk is now ready to be painted. I decided to go with a nice gloss black on the outside and the raised platform in the desk. The inside walls of the desk are being wrapped in carbon fibre vinyl. Desk Painted: Now that i have built the desk and painted it, i started installing some components such as fans, speakers, amplifier and i also installed my water blocks onto the computer components. Since installing a lot of my components i have made some real progress with the desk. I have installed 2/3 of my tubing and now im just waiting for some extension cables to come in the mail before the desk can be finished. Progress pictures: Now that the desk is around 2/3 built i decided to add some LED light strips to illuminate all of the components. I wired all of the LED strips up to switches and i put some perspex under my amplifier, HDD's and SSD's to create a green illuminated boarder around them. There are LED strips under the perspex to illuminate it even further. This is an image for anyone who would like to know how to wire your LED lights to a switch/dimmer. After wiring up all of my LED lights to switches and dimmers i wanted to test the lights to make sure everything is working as planned. http://i.imgur.com/bjDDJQJ.jpg http://i.imgur.com/Z46XRPw.jpg http://i.imgur.com/BpfD8FP.jpg http://i.imgur.com/dtwiTLw.jpg http://i.imgur.com/F2jvoyu.jpg http://i.imgur.com/UzJKqS2.jpg http://i.imgur.com/aYUNGNi.jpg http://i.imgur.com/77K5axX.jpg http://i.imgur.com/Z8gbUVf.jpg http://i.imgur.com/Pf8HKHF.jpg http://i.imgur.com/tnNKTQI.jpg http://i.imgur.com/tUo4tw2.jpg http://i.imgur.com/8JtV1T6.jpg http://i.imgur.com/kR5MvlD.jpg http://i.imgur.com/x7XhshY.jpg http://i.imgur.com/fRRZFYN.jpg http://i.imgur.com/vRN8eD2.jpg This is my build as of the 12/06/2014. I am currently waiting for some extension cables in the mail so i am able to put the motherboard side in the desk and work on some nice cable management. Hopefully i should receive the goods next week. Please stay tuned and ill upload more progress photos as i continue with the build. JustinMern 1 Quote Link to comment Share on other sites More sharing options...
Designs By IFR Posted August 27, 2014 Author Report Share Posted August 27, 2014 So, i have received my last parcel in the mail and i have put the PC inside the desk and wired everything up. I am so happy with how it looks. I still have to wait till tomorrow for the glass top of the desk and i will also be putting the UV green Mayhem's dye in, so hopefully i can post some more progress shots within the next few days. After all of that is done i can get the monitors going and turn the computer on after 24 hours of leak testing. Once 100% complete i will post a load of images on here for all to see, cheers Progress shots: These two shots are of how messy the cables were before i put the elevated platform in the desk. These pictures are of the desk as it stands today. Iv also taken some pictures under the different lighting options and i am very happy with the look of the desk. Dont mind the mess under the desk, that will be cleaned tomorrow before the glass guys get here. Quote Link to comment Share on other sites More sharing options...
Designs By IFR Posted August 27, 2014 Author Report Share Posted August 27, 2014 So.. I managed to fill the loop yesterday and ran into some problems. I filled the loop and had it running for around 2 hours when i noticed liquid all over the motherboard. Straight away i turned the pumps off and had to take everything apart to clean the motherboard and dry it off. I drained the loop to do just that. When everything was taken out of the desk i took apart the Asus maximus VI formula motherboard to dry it out and observe where the source of the leak had occurred. This is what i found.. As you can see in the image above, the motherboard water block looks as if the coolant has leaked through the seal, so i decided instead of returning the product for a new one, i might try tighten the seal and dry out the motherboard. The picture above is of the motherboard with the back plate and thermal armor removed as well as all of the thermal blocks and the CPU. It was essential that all of the liquid was dried and removed so it was necessary to remove all of these components to prevent a short circuit when i powered the PC on. I wired up a fan to a small 12v power adapter and placed it over the CPU and RAM slots to dry out any liquid that found its way into the gaps. I also borrowed my sisters hair drier to speed up the drying process. Above is testing the components to see if they all still work after letting everything dry for 8 hours or so. I had removed the CPU water block to let the CPU slot dry so when it came to testing whether the components worked or not i had to reinstall some thermal grease on my delidded CPU and on the thermal copper plate and use the stock air cooler. The PC powered up fine and everything worked. While i had the computer on i decided to check the CPU temperatures because i had delidded the CPU and put my own thermal grease on. Previous core temperatures ranged from 34-37 degrees Celsius, the new temperatures ranged from 18-21 degrees Celsius with the stock cooler, so i was very happy with them results. The picture above is of the refill and previous leak area, so far so good. Another possible cause of the leakage around that area is where the fittings screw into the motherboard water block. I have since installed some extender fittings into the motherboard and then screwed the compression fittings into those. The reason for this is the compression fittings are a lot wider and i believe that the design of the motherboard water block was preventing them from #### down all the way, therefore creating a leakage area. I have highlighted the problem areas below. These areas are sticking up preventing the compression fitting from #### in all the way. As of this moment i have put everything back into the desk and i am leak testing overnight, so far the problem areas have been fixed. I will be uploading more progress very shortly. Quote Link to comment Share on other sites More sharing options...
Designs By IFR Posted August 27, 2014 Author Report Share Posted August 27, 2014 So, progress has been made with the desk. A few days have past, i have my 24 hour leak test complete and so far no dramas. Next phase of the build is to put the three 27 inch monitors up on the monitor stand i purchased from USA. I open the monitor stand box only to find that the wrong stand had been sent out to me. Instead of a free standing stand that i ordered, i received a stand with a clamp screw to hold the monitor mount onto the desk, which is a bit of a problem... The clamp cannot open wide enough to fit the thickness of my desk due to the desk being a hollow box roughly 200mm thick. Thoughts.... I came up with a solution that only Albert Einstein himself would think of, okay that's a lie it didn't take much to come up with the idea. I had to create a wooden stand that the monitor mounting stand could clamp onto and the stand had to screw into the back section of the desk, pretty simple... Went to Bunnings warehouse and scored myself three 1m lengths of wood for free (who would have thought..). I cut each length down to 800x150mm and cut a small piece to screw on top of the three side pieces. This top piece acted as the base for which the monitor mount would clamp on to. By creating the stand it also relieves the desk of all weight and prevents any possible bowing of the wood. The stand turned out well as you can see. I covered it in some left over carbon fibre wrap and now i can attach all three of my monitors and run either a nvidia surround setup or run with the 3 seperate screens with the two gtx 780 ti GPU's in SLI mode. Also by having only the 3 sides and an open back it acts as a place to hide cables which makes everything look neater and well managed. My desk is up and running now so updates will be posted very shortly within the next few days. Again, please help me out by liking my Facebook page, subscribe to my YouTube where i will be posting regular videos of game footage and desk mods. It would really help me out, i appreciate the support Cheers. YouTube: https://www.youtube.com/user/ImfacerollPCGaming Facebook: https://www.facebook.com/Imfacerollgaming Quote Link to comment Share on other sites More sharing options...
Designs By IFR Posted August 27, 2014 Author Report Share Posted August 27, 2014 After the major accident involving the leakage on the motherboard i finally got to refill the desk. The liquid coolant i am using is distilled water with some mayhems UV green dye. Please enjoy. Please visit my facebook page to see more photos at a higher quality and chuck me a like, it would really help me out. https://www.facebook.com/imfacerollgaming This is the distilled water i picked up from Big W. I had a fair amount of trouble trying to find distilled water because most places were either sold out or only had deionized/demineralised water. When filling the loop i always had some cloth/towels near by incase of a possible spill/leak. I used a funnel with a drink bottle to fill the loop. It made the process much faster and easier which saved a lot of time. I started adding the Mayhems UV green dye to the distilled water one drop at a time until i achieved the look i was after. The loop was filled so i had to start leak testing for 24 hours. Always make sure to put some cloth/towels/paper towel to prevent possible fluid leaks from getting onto components. I always checked how the leak test was going every so often.. Here are a few images after the leak test Please visit my facebook page to see more photos at a higher quality and chuck me a like, it would really help me out. https://www.facebook.com/imfacerollgaming Also visit my YouTube channel where i will be posting three new Desk mod videos and help me out by subscribing. Thank you =) https://www.youtube.com/user/imfacerollPCGaming More progress/final photos shortly, Thanks Quote Link to comment Share on other sites More sharing options...
Designs By IFR Posted August 27, 2014 Author Report Share Posted August 27, 2014 So i have finally finished the desk and the leak testing is over. I plan to over clock the CPU and GPU but i will do that at a later date and share the results with you guys. The x99 series motherboards, DDR4 RAM and new GPU's are coming out so i am most likely going to upgrade the desk when these items are out on the market. Here are some final photos, please enjoy and remember you can watch my full build log series at: http://www.youtube.com/user/imfacerollpcgaming and you can view more photos of the desk build, my upcoming cabinet build and some awesome modifications at my facebook page: http://www.facebook.com/imfacerollgaming please enjoy. That is my water cooled PC desk modification with built in car audio system, Please note the audio system works well but there are obviously better audio systems out there, the car audio was used purely so do something different, to save room and because the green and black suits the theme. Once again please show your support by checking out my youtube and facebook page for more photos/build log videos and game footage. I am about to start my liquid cooled PC cabinet mod which will be a red and black theme so check out my pages to follow that build which is being sponsored, Cheers. Quote Link to comment Share on other sites More sharing options...
Tt Marco Posted August 27, 2014 Report Share Posted August 27, 2014 Hi iamfaceroll, So...surprise me how a water cooling system can mixes up with car audio system... end up with a fantastic pc desk mod. Excellent job Quote Link to comment Share on other sites More sharing options...
dO_ob Posted August 28, 2014 Report Share Posted August 28, 2014 Thats a crazy build mate! i love it! it cost you 22k AUD to build? #### that's crazy! Quote Link to comment Share on other sites More sharing options...
CyberDustin777 Posted August 28, 2014 Report Share Posted August 28, 2014 Nice build!!! Way over my budget but hey, you did an awesome job!!! Quote Link to comment Share on other sites More sharing options...
Designs By IFR Posted October 10, 2015 Author Report Share Posted October 10, 2015 Hi everyone, I have not posted in a long time and over the last few weeks i have upgraded my desk PC. The upgrades include new hardware, new liquid cooling gear and new custom platforms to house all of the components. SPECS: I7 5960x Asus Rampage VI Extreme Motherboard X99 Asus RaidR Express SSD PCIe Asus Xonar Essence one External DAC Soundcard 740gb Samsung EVO PRO SSD storage 17tb Western Digital HDD storage 32gb Kingston HyperX Predator 3000mhz RAM This upgraded system would not have been possible without the help of our sponsors: who helped to supply me with the gorgeous hardware below. Quote Link to comment Share on other sites More sharing options...
Designs By IFR Posted October 10, 2015 Author Report Share Posted October 10, 2015 All components have been installed onto the new platforms and the new water blocks have been added. I decided to use distilled water with some mayhems UV green dye to fill the loop and I added some additives to prevent anything growing in the loop as well as a silver kill coil which acts as a natural biocide. Below is a video that i made which features the filling and adding of the dye process. Thank you for your support. Quote Link to comment Share on other sites More sharing options...
Designs By IFR Posted October 10, 2015 Author Report Share Posted October 10, 2015 Hey everyone thank you for following this build log, I am excited to share these final photos with you all so i hope you all enjoy. Once again thank you to our sponsors. I do not want to do too much talking, i will just let you all check out the photos and hopefully you all enjoy them. Check out the video below to see the desk up and running. I have plenty more photos of the desk, they will all be on my facebook page http://www.facebook.com/imfacerollgaming. Here are the photos of the full desk. Thank you for all of your support guys =) Quote Link to comment Share on other sites More sharing options...
Recommended Posts
Join the conversation
You can post now and register later. If you have an account, sign in now to post with your account.