Search the Community
Showing results for tags 'Riing'.
-
Hello! I want to buy two Riing Quad 12 piece by piece and I understood that for their operation I need a proprietary controller, which I do not have. At the same time, the fan is connected by a simple USB 2.0 9 pin wire. So: can I just connect these fans directly to the motherboard in a 9 pin USB port and will they work, and the backlight will be adjusted?
-
Hello there, I noticed that there is a lot of discussion about the noise level an aio pump creates. And i´ve done now a few days of research about my problem. About a month ago i bought my AIO and after installing it had no problems. Now a few days ago, my pump started to make a high pitch noise and a lower frequency rattling noise. I made an video of it for you to listen. The level varies from 52 to 60dB. And yes i tried everything, from books under the front and back of my case, moving the case, lay it on it´s side, and letting it stay for a few hours. Everything done while the pump was running. The pump runs as always on about 1825 rpm. The aio is top mounted. Today there has come up a few times an error message "Warning controller number 1", don´t know if it is related to the pump noise. But on the software is installed correctly, and the empty slot is deactivated. Like i said there was no problem before, and as the problems started, there happened nothing special. So what i wanted to know is if there is something else i could do, or is the pump going to fail? Should i replace the AIO? Here is the link to the video: Thank you very much for your help
-
Hello, As a title I would like the software to open in the background (only on the taskbar) when start windows. This software is needed to manage the fans speed but I find invasive the window at every boot. Does anyone know how to do it? Thanks.
- 4 replies
-
- 1
-

-
- task bar
- background
- (and 3 more)
-
Basically the setup I have is 4 x 120mm riing fans and 2 controllers. Each controller has 2 riing fans plugged into it. The controllers are then plugged into 2 separate 4-pin chassis fan connectors on the motherboard (Asus Gene VIII). I boot up and set the fans to a specific colour via the controllers, but next time I boot ,the LED's don't turn on. I have to manually go and set them again. I have made sure all my connections are OK, tried a CMOS reset, updated the BIOS, uninstalled all of the bundled Asus software, yet it still won't behave as expected. So I'm not sure if its an issue with the MB, or my fan controllers?
-
So i spend $100+ on the Riing Plus RGB premium edition just to find out the software is a pain to use, no fan curve, no GPU temp and the modes are not drop down menus so you have to cycle through everything to find your favourite ones. But those are luxury options, WHICH I EXPECTED ON A PREMIUM PRODUCT, but it doesn't bother me that much. But every time my PC wake up from sleep, the RGB fans basically reset to their default lighting mode and becomes unresponsive to the software changes. WHAT. To make the software and RGB fans in sync again, you need to close to software and restart it. This step may sounds simple and it is, but it's just shouldn't be there for a premium product and it annoys the crap out of me. I searched the forum saw these posts: basically the admin says: yeah it's not our problem it's the hardware's limitation. LOL and one of the guy even shows the admin a way possibly and easily to implement a 'reboot' into the software and here i am 1 years later on V1.2.2 nothing changed. What A Joke. Anyway, if anyone else want to solve this problem, i solved it by taking the long route of using AHK and windows 10's task scheduler: 1. download AHK and create a AHK script with following in it: Sleep, 3000 Process, Close, TT RGB Plus.exe Sleep, 2000 Run C:\Program Files (x86)\Tt\TT RGB Plus\TT RGB Plus.exe Sleep, 15000 Process, Close, TT RGB Plus.exe 2. open Task Scheduler -> create basic task -> change trigger to "when i log on" -> start a program -> navigate to your AHK script -> Finish. 3. now find your task in the among the list, double click it, go to triggers, delete the existing ones, click new choose at log on for any user, uncheck all box except for first and last, change delay task to 5 seconds, click ok. 4. click new again, this time choose on workstation unlock for any user, and same check box and timer as previous one, click ok. 5. finally in the settings, the last drop down menu should be stop the existing instance. Now to software should automatically reboot after wake/sign in. Those are just the option worked for me, feel free to improvise as the options are pretty simple to understand. Now thermaltake please fix this problem on your software, is not that hard to implement a reboot sequence. Right now my solution is like i'm taking a crap and realise there are no toilet paper, so i have to get up and grab some from the living room and then wipe my but.
- 47 replies
-
- 2
-
-

-
- tt rgb plus
- rgb
- (and 1 more)
-
Thermaltake this is to you, and I am sure I am not alone in this ask. Please make the software for your fan controllers have a fan curve. I am tired of my PC spooling up and sounding like its going to fly off my desk when my PC briefly hits 60 degrees. I know that there are options to adjust the fan speed in conjunction with the PWM setting but, I don't want to have to create 3 different profiles just for cooling scenarios. I feel that you got so caught up on the RGB portion of the fan you forgot what its main function is...to cool my PC components. I feel that the profiles should be for RGB elements of the fans but there should be separate menu to have the fan curve adjustments with a few presets thrown in the mix (ie. normal, silent, performance, and custom) custom should allow for at least 5 points of adjustment on a simple linear graph chart each point should reflect CPU temp to fan speed and for those of us (me included) have a separate linear graph chart for GPU temps as well. I know it sounds like I am asking a lot but since you have taken the MOBO WPM connections out of the picture fine tuning a cooling preset has become lacking. If you really feel like being over achievers (and I know you do) allow us to put fans into zones 3 is fine more is better but this will allow us to make only the fans that need to spool up while the others remain quiet. A perfect example for this would be if you had a dual or triple radiator setup (I have a dual). Most enthusiast PC builds (don't kid yourself if you paid $100 for 3 fans you are an enthusiast) like mine will have a radiator for their GPU and one for their CPU, so the zones would allow the fans to spool up only on the associated radiator to the component that needs the cooling. This would also help those that have AIO coolers, and standard heat sinks. So I am asking you Thermaltake to please make a change on how you customize these fans and make your software more intuitive. You are asking a premium price for these fans but are not delivering to the premium PC owners. I also ask you, the community to chime in and add anything I missed or just agree so Thermaltake knows that these features are what we want.
-
Today Thermaltake release Neon maker v1.0.3 On Werb site written changelog - 1.Increase the editing time to 60 seconds. 2.Fixed the crash caused by function and archives. 3.Bug fixed and system performance. This is mistake 1. It now supports TOUGHRAM 2. Riing TRio 20. 3. Bug fixes.
-
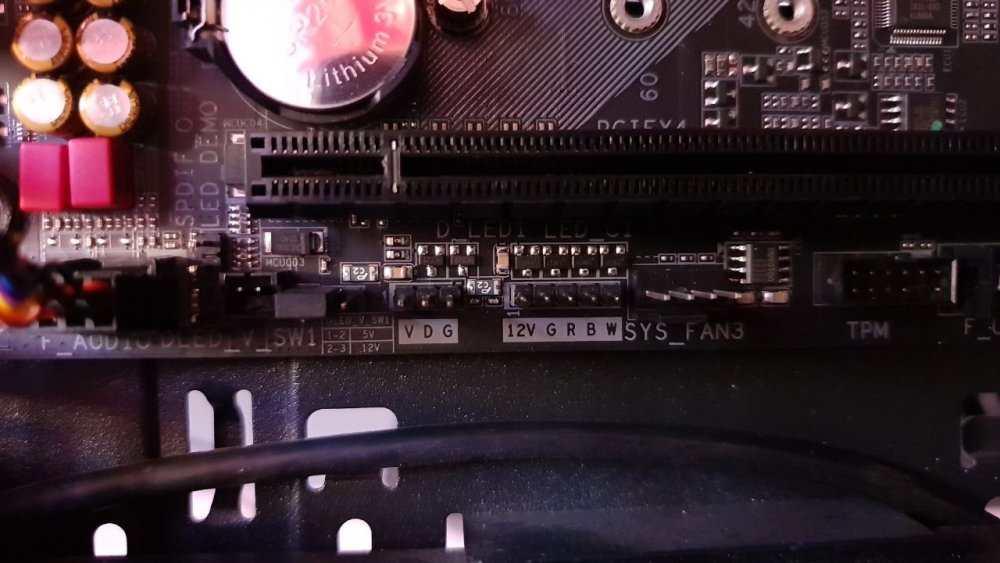
Hi! Months ago I've bought a case Thermaltake View 31 RBG Edition, that includes a kit of 3 Thermaltake Ring 14 RGB fans + controller, and it's working fine. Now, I've just updated my computer with a Gigabyte Motherboard that has RGB Fusion 2.0. My question is if I can controll the leds from Ring 14 from the motherboard. I've seen that the Ring 14 controller has a 4 pins connection that I supose that is to connect to the motherboard 4 pins RBG connection, but, on the support manual of the Ring 14 doesn't say anything about it. Could you confirm that I can do this? If I can do it, where do I find the connexion cable between the modo and the thermaltake controller? Thanks!

-
Hey guys just today I got 5 of the Riiing Plus 12 Premium Edition Fans installed and all the fans work and run the default lightning and the software detects the fans and shows their temp etc but it also gives the Could Not Find Fan Controller, please check the Fan Controller is connected (Error Code:H_0x0001) message and I can not control the fans in any way with that up. My system specs are as follows. Windows 7 Pro 64bit Intel Core i7 3770K Corsair Vengeance Pro CMY32GX3M4A1600C9R 32GB (4x8GB) DDR3 ASRock Z77 PRO4-M Motherboard GTX960 4GB Would I need to request a controller replacement like I have read others have done or is there any way I can fix this? because like I said it all the fans work and are detected it's just I get that error in the software. I have downloaded the latest version of Riing Plus RGB Tt Premium Edition V1.1.4 Any help greatly appreciated. Edit - Ok I solved the above issue (turns out the USB was just loose but now I have another with sound mode. when ever i go to either of the 3 sound control options on any of the fans it gives me a message saying "the audio source output could not be received, Please check the audio source output whether is occupied" not sure how to solve this one any ideas?
-
 Hello everyone, I've just finished my latest project of fixing the old Thermaltake Riing RGB Fans, because I was quite unsatisfied with them out of the box, not remembering the color settings. So I have decided to create an software controlled solution for them using basic components, which were quite cheap. If you want to see how it looks, check out this Video, where I have started and stopped the controlling software, loading the settings from the config file: YouTube Video Note: I am not responsible for breaking any of your parts if you try to rebuild this neither for guranteeing its going to work. This is a quite uncomplete Guide at the Moment and will get expanded if there is an demand. To fix that I've got an GPIO Breakout by Adafruit for USB and attached the Riing RGB Controllers to it using the Extension Port using these JST Cables from Ebay. I was pretty quick at reverse engineering their protocol, which isn't more than applying voltage to trigger a button press, in the case the state LOW on the GPIOs. If you get the exact same cables, then the wiring is the following: White Wire - Mode Switch Red Wire - Start/Stop Switch Black Wire - Speed Switch Hooking them up to the GPIO Breakout is quite easy, but the C3 pin didnt work well for me on my 4th Controller, as it seemed to be LOW from the start. On the software side I have used the python libraries by Adafruit for making an simple wrapper for triggering the buttons by pin id. I have coded an NodeJS Service for controlling the Colors after that, which is quite basic at the moment and doesn't features an user interface yet. The settings are stored in a config file and loaded on boot and stored on shutdown/reboot. If you are interested in obtaining the software, feel free to drop me an PM and I will give you instructions on how to install it. spyfly
 -
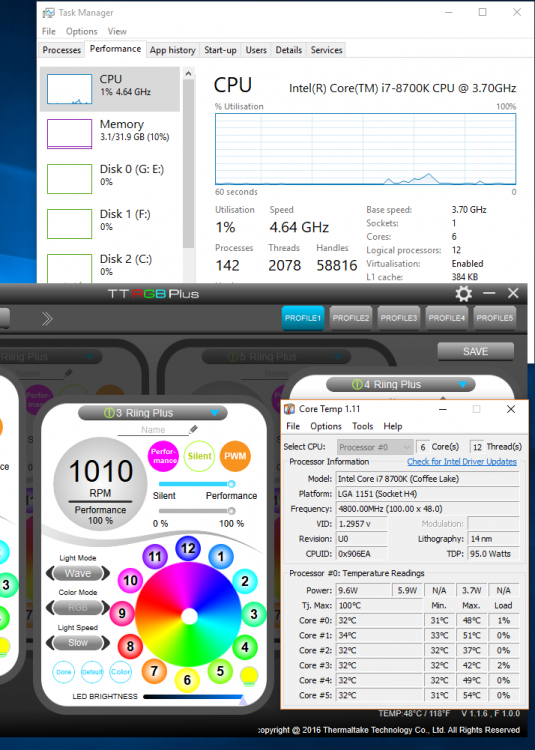
ThermalTake Currently incase customers didn't know, the Riing Plus software looks at the system temperatures for it's PWM feature of it's fans and it looks like it takes an average and uses that for it's PWM feature Therefore clearly they only intended them to be used for case fans rather than CPU cooling fans on Radiators or heatpipe blocks Annoyingly there the best fans on the market and consumers are not aware of this when making their purchase, for me personally i based it on the fans trait on high static pressure which are used for radiators. My case will never reach 50c inside the case, it's an open case for a start, my gpu and cpu are on water my computer room is 21c or less in the UK currently as it's winter Please ThermalTake Either change your software so we get the option of using the CPU temperature for your fans, or edit the HWiNFO32.dll to point at the CPU temp only. my cpu is sitting at 30ish c at idle but your software thinks the system is at 48c when i just turned the computer on and haven't done anything intensive. It's just annoying because the fans spin up when it gets to 50c without the cpu even having to work hard at all. I'm sure other customers will back me up and agree that case fans are usually set at a static rpm range, my setup uses 2 360 rads with 6 of these fans on them and they do get loud for no reason, i cant turn them down because i want my cpu and gpu to use PWM fans as their attached to the raditors Thanks a lot rant over here is the hardware monitor ------------HWi32_GetSensorName:System: GIGABYTE Z370 AORUS Gaming 7 = 8.48798e-314---------------------- ------------HWi32_GetSensorName:CPU [#0]: Intel Core-4800 = 0---------------------- HWi32_GetVoltage:Core #0 VID = 1.30457 HWi32_GetClock:Core #0 Clock = 4800 HWi32_GetUsage:Core #0 Thread #0 Usage = 6.4 HWi32_GetVoltage:Core #1 VID = 0.662598 HWi32_GetClock:Core #1 Clock = 800 HWi32_GetUsage:Core #0 Thread #1 Usage = 0.4 HWi32_GetVoltage:Core #2 VID = 1.26111 HWi32_GetClock:Core #2 Clock = 4800 HWi32_GetUsage:Core #1 Thread #0 Usage = 0.8 HWi32_GetVoltage:Core #3 VID = 1.27209 HWi32_GetClock:Core #3 Clock = 4800 HWi32_GetVoltage:Core #4 VID = 1.27942 HWi32_GetClock:Core #4 Clock = 4800 HWi32_GetUsage:Core #2 Thread #0 Usage = 1.2 HWi32_GetVoltage:Core #5 VID = 1.22571 HWi32_GetClock:Core #5 Clock = 4800 HWi32_GetClock:Bus Clock = 100 HWi32_GetUsage:Core #3 Thread #0 Usage = 4.3 HWi32_GetClock:Ring Clock = 3700 HWi32_GetUsage:Core #4 Thread #0 Usage = 0.8 HWi32_GetUsage:Core #4 Thread #1 Usage = 0.8 HWi32_GetUsage:Core #5 Thread #0 Usage = 0.4 HWi32_GetUsage:Core #5 Thread #1 Usage = 0.4 HWi32_GetUsage:Max CPU/Thread Usage = 6.4 HWi32_GetUsage:Total CPU Usage = 1.29167 HWi32_GetUsage:On-Demand Clock Modulation = 100 ------------HWi32_GetSensorName:CPU [#0]: Intel Core-4800: DTS = 0---------------------- HWi32_GetTemperature:Core #0 = 32 HWi32_GetTemperature:Core #1 = 35 HWi32_GetTemperature:Core #2 = 32 HWi32_GetTemperature:Core #3 = 32 HWi32_GetTemperature:Core #4 = 33 HWi32_GetTemperature:Core #5 = 32 HWi32_GetTemperature:Core #0 Distance to TjMAX = 68 HWi32_GetTemperature:Core #1 Distance to TjMAX = 65 HWi32_GetTemperature:Core #2 Distance to TjMAX = 68 HWi32_GetTemperature:Core #3 Distance to TjMAX = 68 HWi32_GetTemperature:Core #4 Distance to TjMAX = 67 HWi32_GetTemperature:Core #5 Distance to TjMAX = 68 ------------HWi32_GetSensorName:CPU [#0]: Intel Core-4800 = 0---------------------- HWi32_GetPower:CPU Package Power = 10.3531 HWi32_GetPower:IA Cores Power = 6.8651 ------------HWi32_GetSensorName:Memory Timings = 0---------------------- ------------HWi32_GetSensorName:CPU [#0]: Intel Core-4800: Performance Limit Reasons = 0---------------------- ------------HWi32_GetSensorName:GIGABYTE Z370 AORUS Gaming 7 (SiS 950/ITE IT8705F) = 0---------------------- HWi32_GetTemperature:Temperature 1 = 39 HWi32_GetVoltage:Vccp1 = 1.744 HWi32_GetFan:Chassis = 168750 HWi32_GetTemperature:Temperature 2 = 47 HWi32_GetVoltage:Vccp2 = 2.704 HWi32_GetTemperature:Temperature 3 = 24 HWi32_GetVoltage:+3.3V = 2.704 HWi32_GetVoltage:+5V = 4.54272 HWi32_GetVoltage:-12V = -5.63014 HWi32_GetVoltage:-5V = -2.712 HWi32_GetVoltage:5VSB = 3.81696 HWi32_GetVoltage:VBAT = 2.128 ------------HWi32_GetSensorName:GIGABYTE Z370 AORUS Gaming 7 (ITE IT8733) = 0---------------------- HWi32_GetTemperature:Temperature 1 = 36 HWi32_GetVoltage:Vcore = 0.7194 HWi32_GetVoltage:Vccp2 = 0.6649 HWi32_GetTemperature:Temperature 3 = 34 HWi32_GetVoltage:+3.3V = 1.0355 HWi32_GetVoltage:AVCC3 = 3.379 HWi32_GetVoltage:+12V = 4.7088 HWi32_GetVoltage:VIN5 = 1.5151 HWi32_GetVoltage:3VSB = 3.3572 HWi32_GetVoltage:VBAT = 3.27 ------------HWi32_GetSensorName:S.M.A.R.T.: SanDisk SDSSDHII960G (155000402147) = 0---------------------- HWi32_GetTemperature:Drive Temperature = 30 HWi32_GetUsage:Drive Remaining Life = 100 ------------HWi32_GetSensorName:S.M.A.R.T.: WDC WD2002FAEX-007BA0 (WD-WMAY03613367) = 0---------------------- HWi32_GetTemperature:Drive Temperature = 34 ------------HWi32_GetSensorName:S.M.A.R.T.: Samsung SSD 960 PRO 512GB (S3EWNWAJ401017J) = 0---------------------- HWi32_GetTemperature:Drive Temperature = 43 HWi32_GetUsage:Drive Remaining Life = 99 ------------HWi32_GetSensorName:Drive: SanDisk SDSSDHII960G = 0---------------------- ------------HWi32_GetSensorName:Drive: WDC WD2002FAEX-007BA0 = 0---------------------- ------------HWi32_GetSensorName:Drive: Samsung SSD 960 PRO 512GB = 0---------------------- HWi32_GetUsage:Read Activity = 0.028 HWi32_GetUsage:Write Activity = 0.199 HWi32_GetUsage:Total Activity = 0.227 ------------HWi32_GetSensorName:GPU [#0]: NVIDIA GeForce GTX TITAN X: = 0---------------------- HWi32_GetTemperature:GPU Temperature = 31 HWi32_GetVoltage:GPU Core Voltage = 1.043 HWi32_GetClock:GPU Clock = 810.316 HWi32_GetUsage:GPU Core Load = 1 HWi32_GetUsage:GPU Memory Controller Load = 1 HWi32_GetTemperature:GPU Temperature (HW) = 31 HWi32_GetClock:GPU Memory Clock = 1752.75 HWi32_GetClock:GPU Video Clock = 746.052 HWi32_GetUsage:GPU Memory Usage = 3.21684 HWi32_GetUsage:GPU D3D Usage = 0.210234 ------------HWi32_GetSensorName:Network: Intel Ethernet Connection I219-V = 8---------------------- ------------HWi32_GetSensorName:Network: Qualcomm/Atheros, Device ID: E0B1 = 0---------------------- ------------HWi32_GetSensorName:Windows Hardware Errors (WHEA) = 0----------------------
-
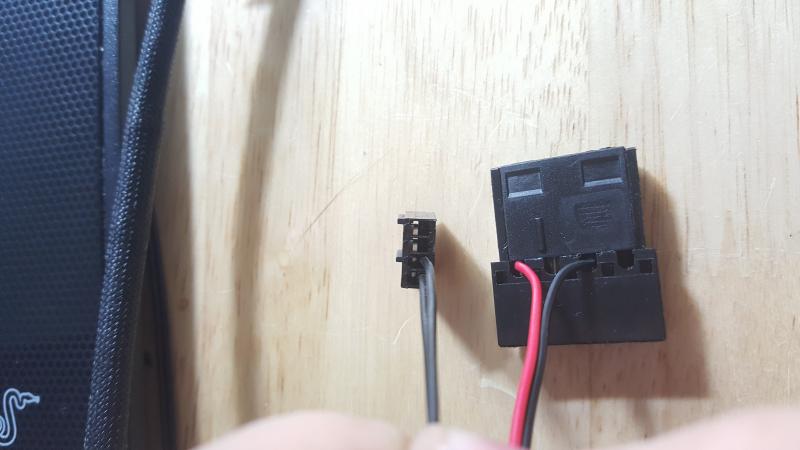
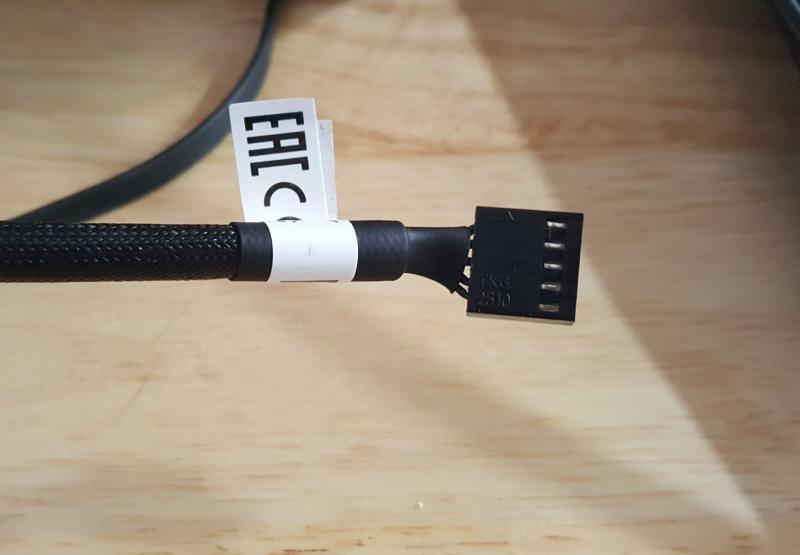
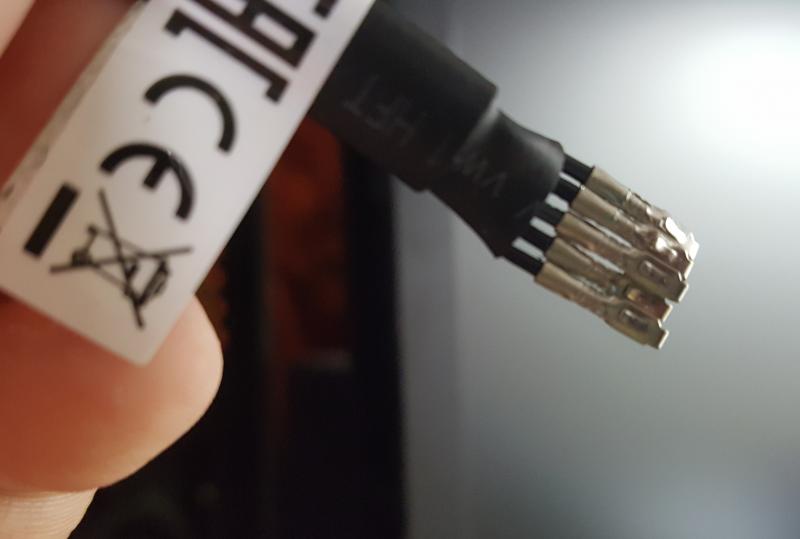
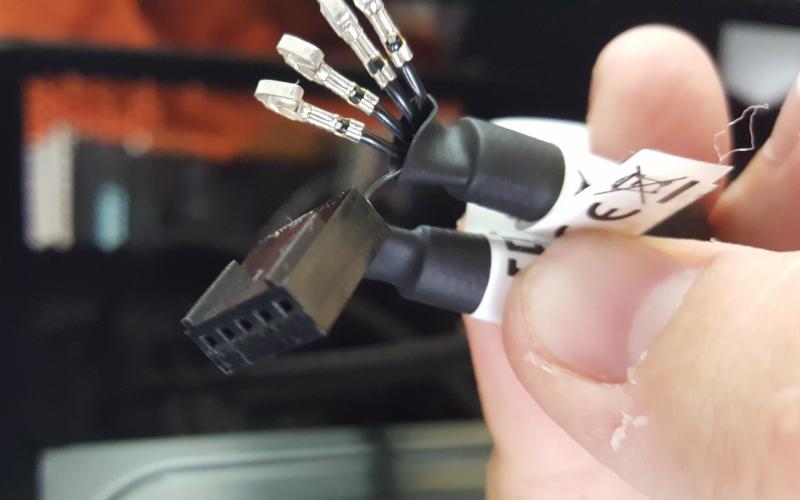
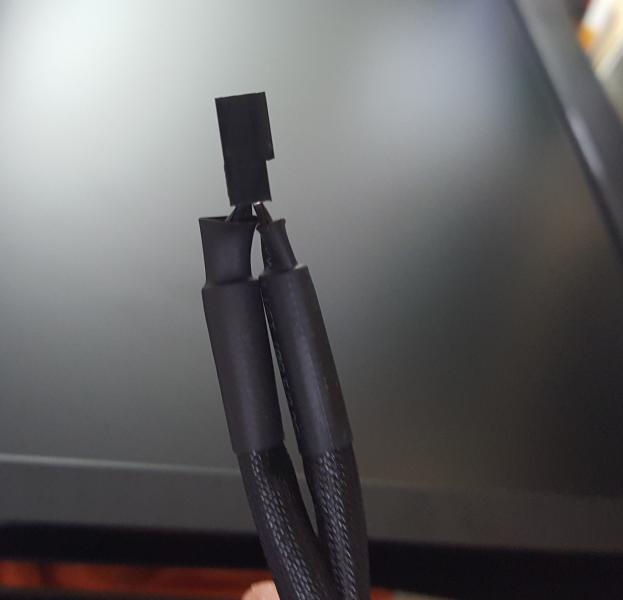
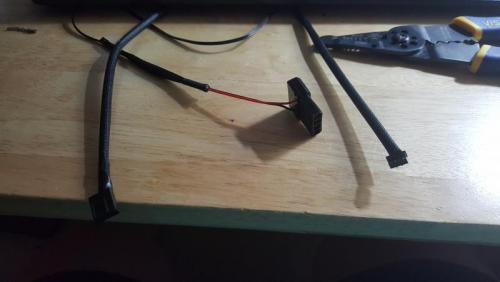
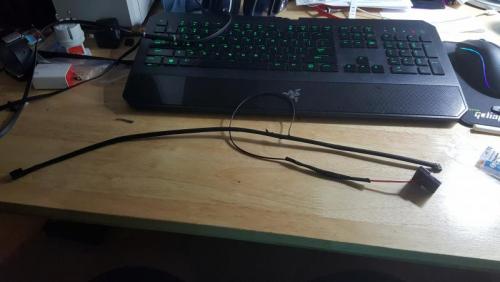
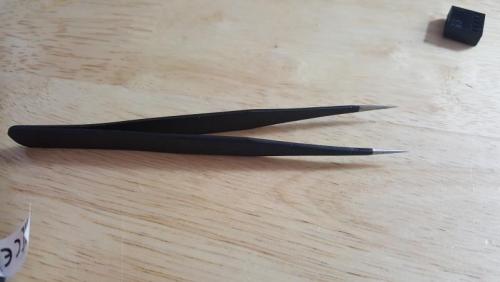
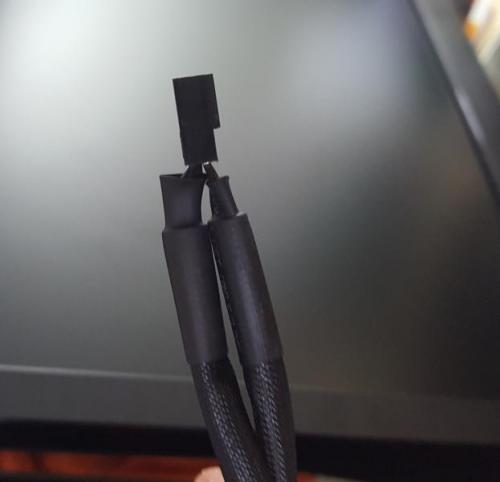
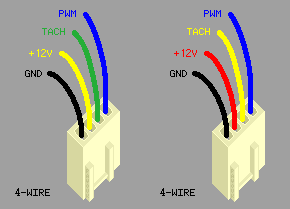
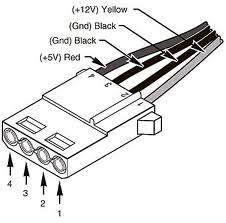
Good Time of the day everyone! I would like to share my own experience of connecting Riing RGB fans together in 1 controller. This guide will divide in two parts: One of them is how to connect 4 fans in 1 controller, using only your hands and pin extractor (or any thin tools like needle). Second part will be about connecting up to 6 fans using same tools as in first case plus 4-pin Molex cable and electric tape (or shrinking tube or soldering iron + tape). A little Preface: Why I decided to divide in two parts? The answer is very simple. MB in most cases provides 12V @1Amp. Usually it will run up to 3 fans at max speed without any drawback (loosing RPM). However in some cases you can connect 4-th and you won't notice any difference. Firstly, (too obvious) power off your PC. (Don't forget that you are doing at your own risk, this is not official Thermaltake guide) We need tool to extract pins from the head. You can use basically anything thin enough to fit a little hole on top of the head. I used this tool: The idea is very simple, we need to extract pins from one head and insert them into another head, so there will be two fans goes into 1 4-pin head. There is enough room to fit 2 wires in 1 head slot. See little holes? Press on them and pull wires. Very simple. Do you see that there is enough space in the socket? We need to insert each extracted wire into proper slot. It would go snug and fit secure. At the end we will get this: Done! Just plug it back to controller and you are good to go! Video to demonstrate: https://youtu.be/jn-x7rH3Pwg Second part! Connecting up to 6 fans. We have to follow same process as before, BUT the big difference is that we need 4-pin molex cable. How it works: 4-pin PWM MB port has 4 pins (oh man, thanks Cap. Obvious!) You can see pinout below: We will utilize power from Molex cable (it's peripheral cable goes directly in PSU) and PWM signal from Motherboard. From the power cable, which goes with fans, you need to extract only two pins +12V and GND .Other 2 leave in the head. Extracted pins you need to connect to molex +12V and GND correspondingly. Here is pinout: Just in case: MOLEX has 2 grounds and it doesn't matter which to connect. What we'll get at the end: Just plug PWM to 4-pin MB fan port and Molex ... to molex, lol. No video yet, but it works If you'll have questions, don't hesitate to ask. Maybe I just forgot to mention something... Cheers!


-
 Hello, I had considered buying a Floe Riing RGB 360 TT Premium Edition and I was just wondering if it's possible to set up a push/pull fan configuration for it? That's kind of all there is to my question. I had considered buying an extra Riing Plus 12 LED RGB Radiator fan TT Premium Edition 3-pack for it. But I'm a little unsure. Someone recommended I do a push/pull config for my case, but with three fans on one side and three fans on the other, well, that's a lot of fans. And possibly two fan controllers to keep tack of, if I'm not mistaken? I'm having second thoughts and wondering if this is a good idea? The case I'm trying to fit it all in is an NZXT H440. I was told the case gets a bit hot on the inside but I wanna stick with it because it looks good and has all the functions I want. EDIT: Unrelated question, but does this AIO cooler come with thermal paste or do I need to buy it separately?
 -
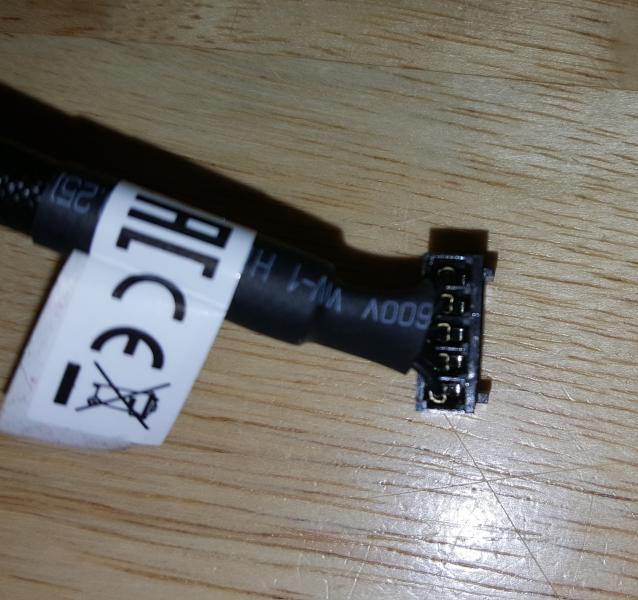
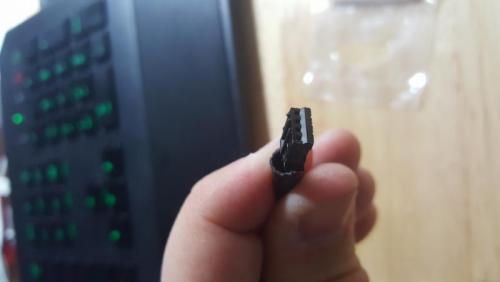
 I can't get my thermaltake riing plus 14 to connect to the software. I think it's my fan controller but thermaltake won't get back to me. The controller and fans came with my veiw 37 and tt riing plus RGB software won't recognize the fan controller. Please help. I attached a picture of the exact fan control I have. My set up is Msi gaming plus x470 motherboard Ryzen 5 2600x
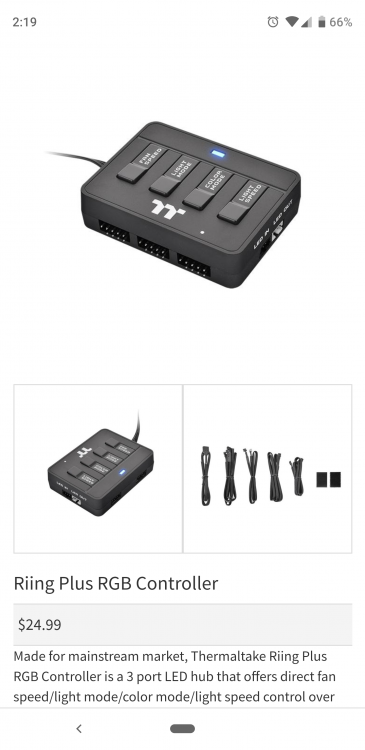
-
 Hey guys, I recently put together my Ryzen Threadripper build and i'm using the Gigabyte X399 Gaming 7 motherboard has stated in the title however, I can't get the software to launch on this platform. It's installed properly but when I go to launch it nothing happens. I've tried to run it without the fan hubs connected but it still won't work. Any ideas would be greatly appreciated or maybe its something that TT need to fix in the software....
 -
Hey all, I'm new to Thermaltake products, but I was very impressed with them in my last build for a friend, and I would like to use them for my next personal build. We did run into some confusion when connecting 13 Riing Plus Premium fans (10 case fans, and three on the Floe 360). We ended up just connecting the three included controllers together, but we really wanted to use the Commander FT to control fan speed. Can you control Riing speed with the Commander FT, while still using the RGB software? If so, how??
-
Hello, Recently built a new rig with the Riing premium 5pack. The software controlled everything perfectly with no hiccups. After a couple weeks I bought and installed the Floe aio CPU 240. It went great, the software recognized the second controller and I went to customizing the rad fans and CPU block. On my next startup the fans started in the default mode instead of my profile. When I tried to open the software the busy pointer ran for ~1 second and nothing happened. Now the fans are all in default, and the software won't start. I tried running in admin mode, I tried installing older versions, re installing the latest version. Please help! I love these fans but I want to be able to control the rgb! I can still manually control them through bios and MSI afterburner, but it still sucks I can't change the colors. Does anyone know if I can control the RGB with Asus Aura? So far I haven't been able to do so. My build, for reference: TT Core v21 Asus TUF B450m-plus Gaming Ryzen 2700 Asus ROG 1080ti OC 4*8 (32GB) Gskill TridentZ rgb 3200 cas16 Riing 5pack, Floe aio CPU 240, 2 controllers using the Riing5x provides double uUSB plugged into internal USB2.0
-
 Hey TT-Community, Problem: The FloeRiingPlus Software reads the temp including the 27°C Offset of Threadripper -> fans spinning at higher RPMs -> higher noise Solution: 1. Uninstall your current Riing Plus RGB Software. 2a. Download the older Version of the Software (It's V1.0.0 = http://www.thermaltake.com/db/support/software/RiingPlusRGBTtPremiumEdition_Setup.rar ) and install it. 2b. Or just download the two .dll files I attached to this Post. Continue with step 5. (HWiNFO32.dll and HWiNFO64.dll) 3. After you installed V1.0.0 go into the install directory (C:\Program Files (x86)\Tt\Riing Plus RGB Tt Premium Edition), then copy HWiNFO32.dll and HWiNFO64.dll onto your Desktop. 4. Now uninstall the Software again, and install the new one (currently V1.1.4 = http://www.thermaltake.com/db/support/software/Riing_Plus_RGB_Tt_Premium_Edition_Setup_1.1.4_x86.zip ) 5. After you installed the new version, close it, and go into install directory again (C:\Program Files (x86)\Tt\Riing Plus RGB Tt Premium Edition), and copy HWiNFO32.dll and HWiNFO64.dll into this folder. 6. Click replace and continue (if necessary) 7. Now it should work. @Thermaltake @Thermaltake Admin @ThermalMike Maybe you can look into this, I think it's just the wrong Version of HWiNFO. The new Version worked for me when I updated to it, but not when I clean install the software. HWiNFO32.dll HWiNFO64.dll
 -
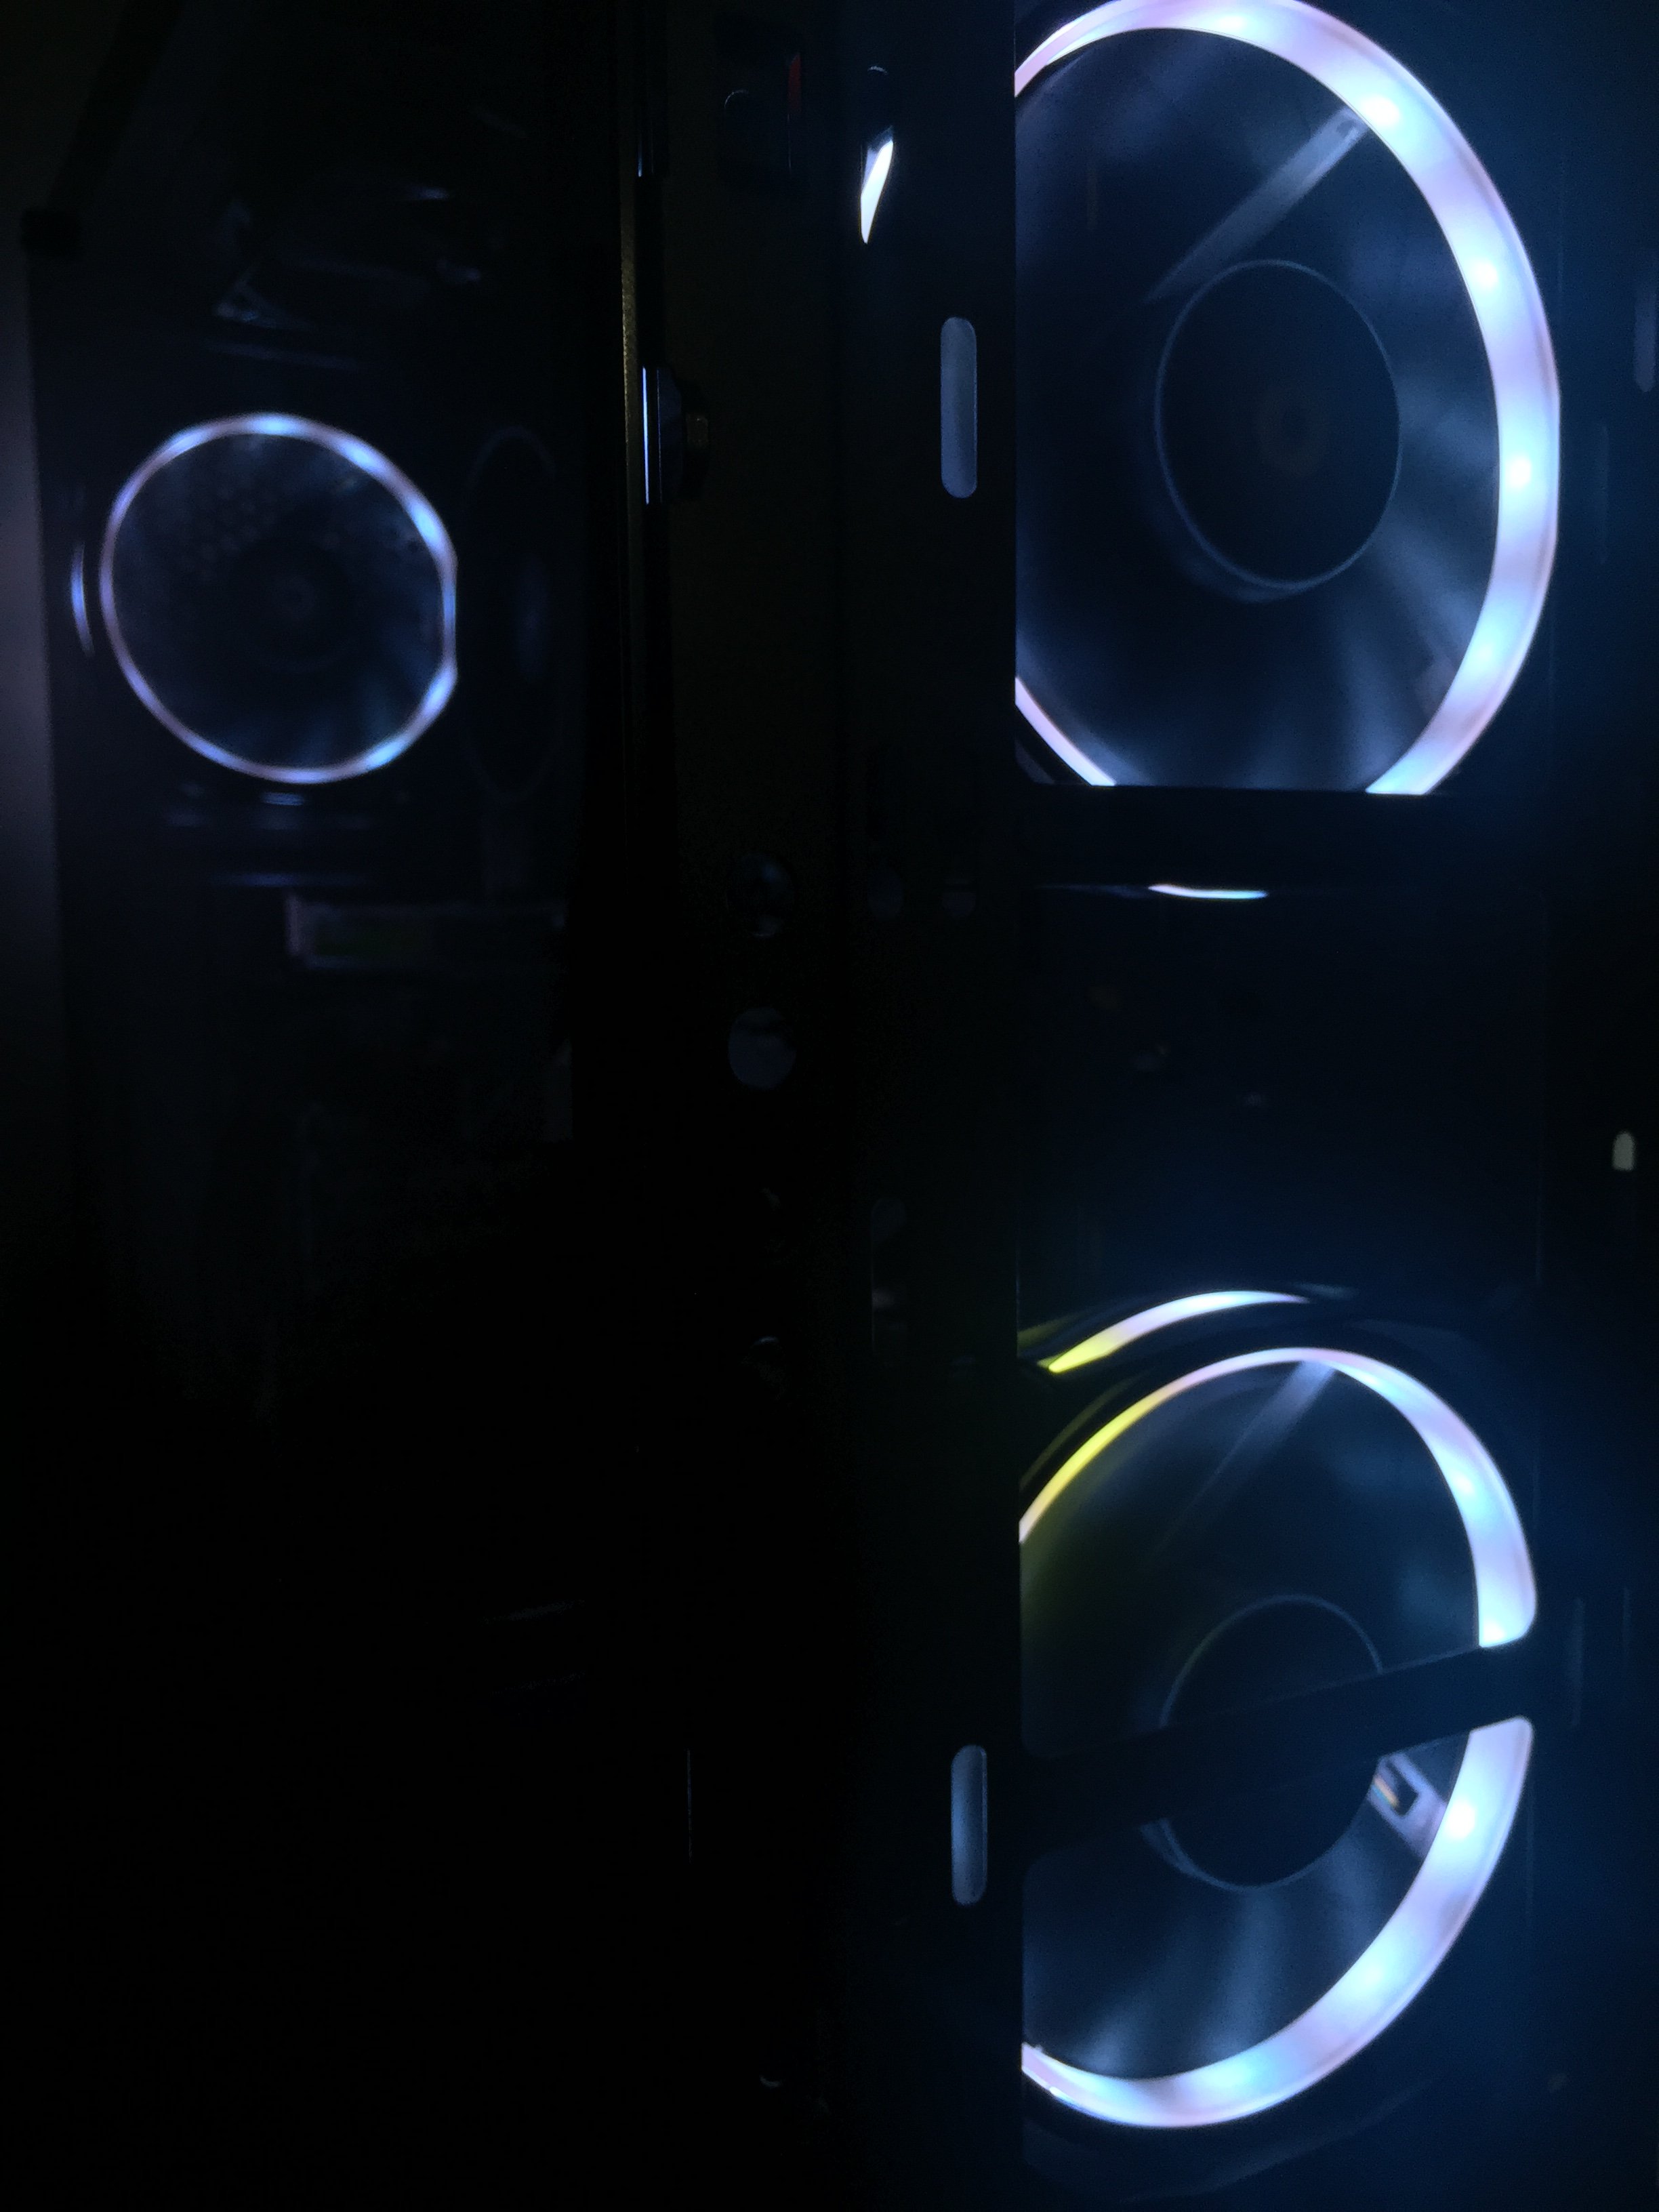
Hello everyone, I have just made an account to discuss my issue. I turned on my computer, admiring the way the lights looked until I realized that the bottom fan in the front of my case had an LED that was a different color than the rest. I tried looking around to see if anything was unplugged or not connected all the way. That wasn't the case (pun intended), so I decided to reinstall the software to see if that was an issue. No luck. I just bought these fans a couple weeks ago and they have been great so far. I'm hoping that somebody knows what I can do to fix the problem. Thanks and have a great day!

-

Floe Riing RGB 240 TT Premium Edition sync with Mystic Light
vodozhaba posted a topic in Accessories
TT Sync controller seems to support this and it would be extremely lame if the controller which comes with the Floe Riing RGB 240 TT Premium Edition (oh, that's a long name) didn't. TT Riing Plus RGB sees it and controls the fans, the pump and the LEDs ok, however, none of that is recognized by MSI Mystic Light software. So is it actually possible to control this cooler's RGB with Mystic Light? -
Hello, I have 2 Controllers with 4 Thermaltake Riing Plus 12 fans, 3 Thermaltake Riing Plus 14 fans and a Pacific plus d5 pump. I set the first controller and second controller with the DIP switches. On the first controller I have 5 RBG plus components installed and on the second one 3. Now when I start the RGB Plus programm, there is an error called: "H_0x0001". Now I've tried some fixes found on the internet, but nothing helped. So now to my question: What could the problem be?
-
I was drawn in by the shiny lights and bright colors. I should have known better. TT Floe Riing 240 does not work with Ryzen CPUs and TT will not tell anyone this until after you buy it. The software is a mess and there is no fix in sight. Whenever I try to use the software my PC fans rev up full blast and my PC shuts down. I talked with tech support about this and they know about the issue!@@####. I am returning my unit and suggest anyone with a Ryzen CPU do the same!
-
Just put my Thermaltake View 71 RGB Edition case together, but replaced the stock Riing fans with the Riing Plus Premium fans. When I powered up my maching, I got a message "USB device over current status detected will shut down in 15 secons..." and couldn't get past that. When I disconnect the fan controller from the motherboard, everything starts up fine, the fans run, etc. Would this indicate a bad controller, or did I plug it into the wrong USB on the motherboard?
-
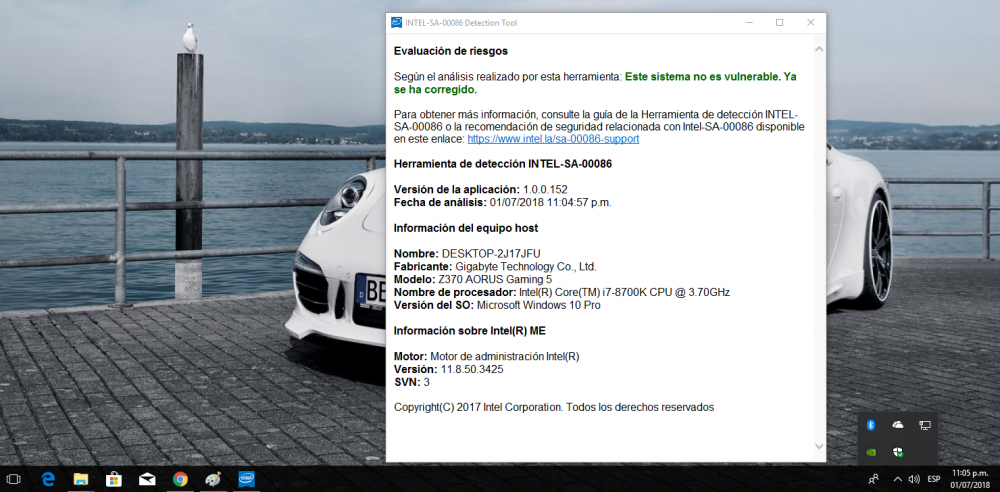
I have the riing plus RGB software installed in my pc, using it and running the intel-SA-00086-GUI (check the vulnerability of my i7) it say that my system is vunerable, when I close the riing RGB plus software and run the intel-SA-00086-GUI my system is ok. So the riing plus rgb software have problem?

-
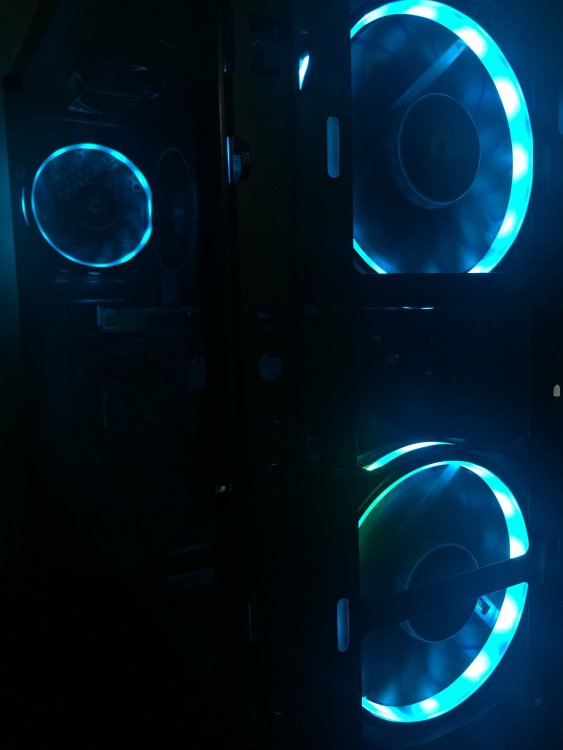
I have 2 sets of the Riing Plus fans and absolutely love them. Look amazing! However, one of my six fans looks slow. Under light I can see shadow of fans spinning whereas the others I cant' tell that there is blades spinning. (does that make sense?) The software says it is running at 80% speed, like all the others, but why does it look different? I'm wondering if I can replace one fan? I spent $35/fan and don't want to have a faulty one in the system. Any feedback would help. btw, they are spinning at ~1250rpm so I can't take a photo to show you. But with human eye I can see the shadow of blades and it drives me nuts.