Search the Community
Showing results for tags 'help'.
-
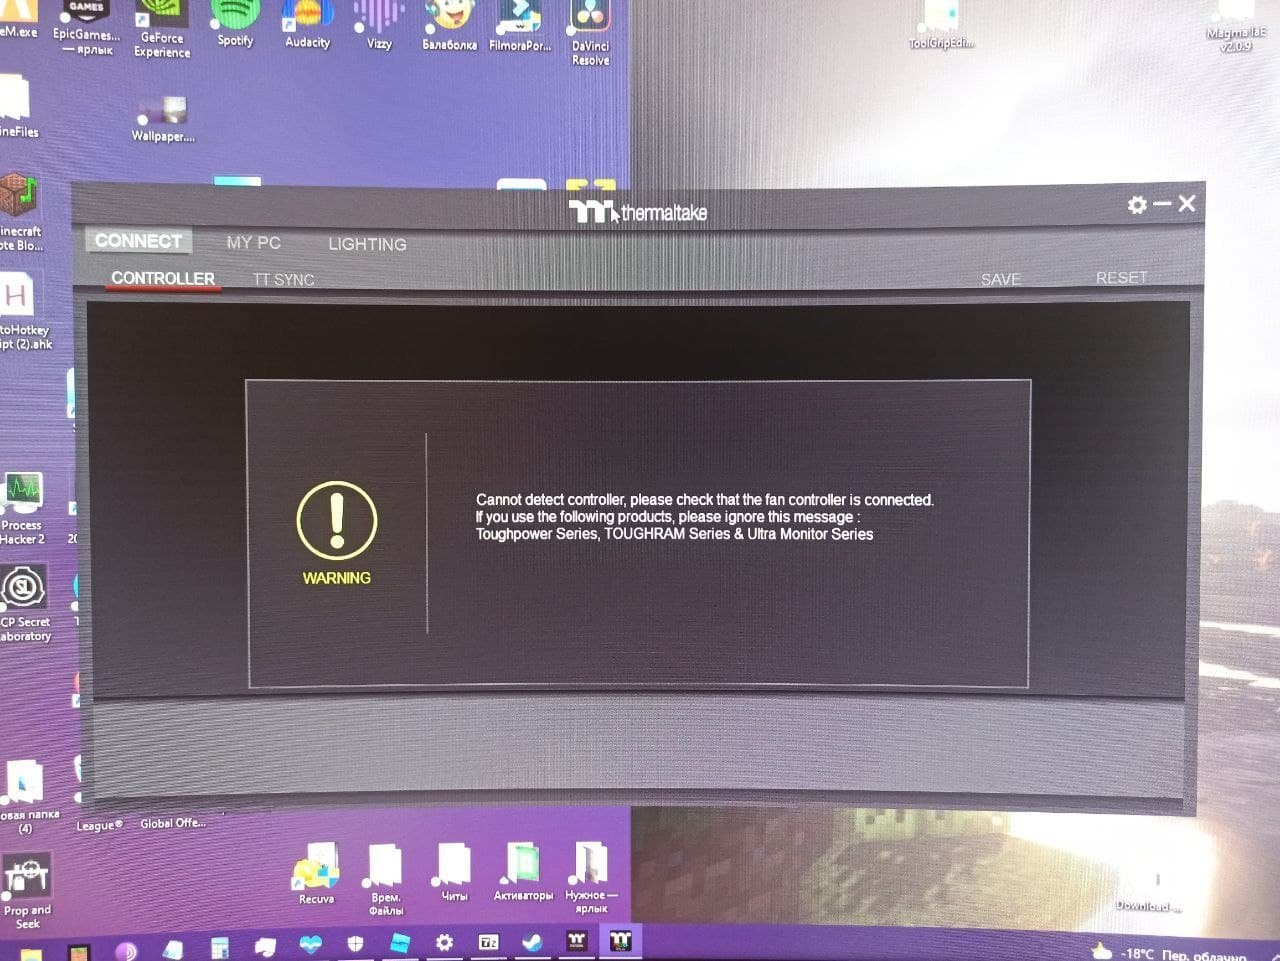
 TT RGB Plus V2 Error: "Can not detect controller, please check that the fan controller is connected." How can i fix that? Previously, the program worked, but now it suddenly stopped. Fans work, RGB work, but program does not work...

-
The problem with my mouse is that it would sometimes randomly double click the right click whenever I am in a game and use the right click. Is there anyway that I can turn off or get rid of this?

-
What do I do if I didn't receive any verification or reset email? Can’t find the verification or reset email? Here are some easy ways to help you find it. 1. Search for the email We send the email from the address "Thermaltake" so you can do a quick search for it in your email search tab. If it’s not located in your inbox, please check your folders. If a spam filter or email rule moved it, you might find it in the Spam, Junk, Trash, Deleted Items, or Archive folders. 2. Are you checking the correct account? If you're looking for a password reset email, make sure you're checking the correct email inbox. If you're looking for a verification email, please review all the email addresses you have on file, including the one that you're trying to verify. 3. Resend the email To resend a reset your email, Click on I've forgotten my password then follow the steps to reset your password. 4. Make sure that you are receiving email If you're not receiving any email, you might need to contact your email service provider for assistance. 5. Contact us for help Please drop an email to ttcommunity@thermaltake.com with your registered username/email.
-
This thread is dedicated to answer your questions regarding Tt Community forums, if you have any problems registering or posting you can read the guide below. if the problem persists please feel free to contact an Administrator or Moderator. How to Register How to register and the added benefits of being a registered member. Help Topic: How to Register To be able to enjoy all of the features available to the community, you will need to sign up for a member account. Registration is easy and only takes a moment to complete. To sign up, click the "Create Account" link at the top of any page. You can then provide your email address and password to complete the registration process. Some communities may have an easier way to register without filling out the registration form. If enabled, you will see a Facebook or Twitter icon next to the Create Account button. If you use these services, you can use your existing login information from those services to link your account. Registration via this method takes only 3 clicks and will return you back to the forum after you authorize it. You may be registered and logged straight in, or you may have to verify your email address by clicking a link in an email that we will send you. If this is the case, a screen will appear with further instructions. You will receive a confirmation of your membership as an email. Logging In and Out How to log in and out from the board, how to remain anonymous and not be shown on the active users list and what to do if you forget your password. Help Topic: Logging In and Out Logging In Once you have signed up for an account, you can log in by pressing the "Sign In" button at the top of any page. From here, you should enter your username or email address, and the password you used when you registered. If you tick the "Remember Me" box you will not have to sign in when you visit the community in future. This ability can be very useful, but should not be used if other people have access to your computer or if you are using a public computer. You may also be able to hide your username from the online list by checking the "Sign in anonymously" box. Administrators will still be able to see you online if you do so, however other members will not be able to. When you are ready, click Sign In. Once logged in, you should be taken back to whatever page you were previously viewing. You may also see additional log in options such as Twitter or Facebook Connect. If these features are available and you would prefer to use one of these options to log in, click on the appropriate button and follow the on-screen instructions. Forgotten your password If you have forgotten your password, you can click the "I've forgotten my password" link on the sign in page below the password box. This will take you to a page where you can enter your username or email address, and we will then either email you a new password that you can use or a link for you to reset your password. Note that if you locked your account by typing in the wrong password too many times, you will still need to unlock your account before you can use your new password. Please contact an administrator for assistance if you encounter trouble with a locked account. Logging Out To log out click the "Sign Out" link at the top of the screen from any page. Your Settings Editing contact information, personal information, signatures, board settings, languages and style choices. Help Topic: Your Settings You can access your settings from any page by selecting your name at the top of the screen and then selecting "My Settings". There are several tabs on the side of the page, which allow you to configure and update different board settings: Profile Settings From the Profile Settings area of your UserCP, you can configure various aspects of your profile, including: Profile Picture: This is the photo used to identify you throughtout the community. Timezome Allow Comments: If checked, other forum members can leave comments on your profile. Friends Edit your "About Me" information Change your Member Title Update your Birthday Add profile information, such as interests Share contact information such as AIM usernames. Profile Customization From the Profile Customization tab of your UserCP, you can setup a custom profile background, change the colors of your profile, and perform other ways to customize the look and feel of your profile. Email & Password The Email & Password area allows you to update the password or email address associated with your account. Display Name The Display Name page allows you to change the name that is shown to members throughout the community. The board administrator limits the number of times you can change your display name, so make changes wisely. Signature The signature page allows you to modify the custom signature that is shown below all of your posts. Ignore The "ignore" tab allows you to configure your Ignore settings - you can choose to hide individual member's posts, signatures, chats, status updates, or other aspects of a member that you wish to hide. Manage Facebook/Twitter If you have connected your forum profile to Facebook or Twitter, you can manage your connection here, including settings on importing status updates, linking your user photo, and more. Manage Attachments This page will display all attachments that you have uploaded to the forum. If you are running close to your global attachment limit, you can delete attachments from this area. Notification Options The Notification Options page allows you to configure how you should be notified of certain events, such as a reply to a topic, a private message, or a new topic. You can configure how you would like to receive these notifications as well, such as via the mobile application, email, or inline notifications. Your Notifications This tab will display the most recent notifications that you have received. Topics and Forums A guide to forums, topics, posts and polls. Help Topic: Topics and Forums Viewing The Board Index When visiting the board, you will be presented with a list of categories and forums in those categories. This page is called the Board Index, and it lists all of the forums. Forums are split into categories. You can choose to hide any category by pressing the "-" button on the right-hand side above the list of forums, and the "+" button to make them visible again. If hidden, such categories, and the forums inside them, will be collapsed and no longer shown to you when visiting the board index. When viewing the forums, there are icons shown next to them which indicate the status of a forum, and if it has unread posts or not. Red dot indicates that there are posts which you have not read contained inside this forum, or one of it's sub forums. Grey dot indicates that all of the posts contained in this forum and it's sub forums have been read. Red dot with white arrow means redirect forum, when you enter this forum you will be redirected elsewhere. To add a new topic, press the Start new Topic button. This may not be available for all forums. In forums where you cannot create a topic you will see "You cannot start a new topic" in place of the button. To enter a any topic, click on its name. Sorting Options To customize the way topics are displayed, you can use the sorting options found at the top of the forum. Show type - this allows you to only display certain types of topics such as polls or topics that you have posted in. Sort by - this allows you to change the way topics are ordered. By default topics are ordered with the topics that have most recently had replies first, but you can choose to sort by other factors such as the number of replies or alphabetically. Sort direction - this allows you to set which way you want to sort for the setting above. For example if you set "Sort by" to be "Replies", choosing "A-Z" for this setting will show the topics that have no replies first, whereas choosing "Z-A" will show the topics with the most replies first. Time frame - this allows you to limit the topics that are shown to only topics that have been made within a certain amount of time. There may be more than one page of topics, if this is the case, you will see an option to "Load More Topics" at the bottom of the list of topics. There will also be page numbers to the left of this button. Viewing Posts To the side of each post there will be information about the user. To view a user's profile information at a glance, simply hover your mouse over their username. Their profile card will display, showing you various profile information without having to leave the topic. From their profile card, you can send them a message quickly, without having to leave the topic. If you wish to view their full profile page, simply click on their user name. On their member card, you can also click on several options to view that user's content. Below this there are several more buttons: the icon adds the user as a friend, allows you to read their blog, and will take you to their gallery. Below their username you will see their photo, member title and pips or group image. Reputation If enabled, you will see reputation options in the corner below each post. You may see an icon representing the reputation other members have given for that post, along with icons to give reputation. To give the post a positive reputation, click the plus icon or to give the post a negative reputation, click the minus icon. On some boards, you may see a button to Like content, such as this: If you choose to do this, it will show that you "Like" a certain post, and will also add a reputation point to that post. You may only be able to give positive or negative reputation, and for some users you may not be able to give reputation at all. Replying To add a post to the topic, simply scroll to the bottom of the page, and start typing in the reply box. To quote another post in your reply, you can either click the Quote button beneath a post, or use the multiquote feature. Multiquote is used when you want to quote more than one post in your reply. Select the Multiquote button underneath the posts you want to quote, and you will notice that the button will change color. At the bottom of the page, you will notice an informational box appear with the total number of posts you have added to multiquote. You can multiquote from different pages in a topic, or even different topics in the forum. When you are ready to post a reply with the posts you have quoted, simply click the "Quote Posts Add Reply" button. Post Options Next to the reply and multiquote buttons you may also see " Edit" and " Delete" buttons for your own posts. If so, you can use these buttons to edit or delete your posts. Note that these options may not be available after a certain amount of time. Sharing Topics At the bottom of each topic you will see "Share this topic" followed by a number of links that allow you to email the topic to someone else, share a topic on Twitter, post it to Facebook, print the topic, or download and save the topic. Simply press the appropriate link and follow the on-screen instructions. Polls Some topic may have polls attached to them. If you can vote in the poll, you will see the questions and the options for voting. Once you have selected your options, press Vote! to add your vote. Once voted, you will see the results and a icon besides the options you voted for. You may be able to change your vote. If so, you will see Delete My Vote. To change your vote, press this and then vote again. To see the results of the poll without voting, press Show Results. If the poll is a public poll, you can see who voted for which option by pressing the "View" link next to any option. Notifications You may want to subscribe to your favorite forums or topics so that when a new topic or reply is added you will be notified. To subscribe to a topic or forum, go to that area and click the Follow button. You will them be prompted with how often you wish to be notified. To the right of this button, it shows how many other people are watching the topic. There are several types of notification, and you will be asked to choose one of these options: Instantly: You will be notified instantly when a reply is made, via the method specified in your notification preferences. Only When Not Online: This option will send out a notification if a reply has been posted and you're not active on the board. Daily: This option will send out a daily digest of updates. Weekly: This option will send out a weekly digest of updates. If you wish to automatically subscribe to every topic you reply to, you can configure this from your control panel. Simply select the "Auto follow topics I reply to" option. You can remove a subscription from your settings, or by going back to the area you are subscribed to and pressing the " Stop Watching" button. Posting A guide to the features available when posting or sending messages. Including the post editor, polls and attachments. Help Topic: Posting The Post Editor There are two versions of the post editor: the standard editor and the rich text editor. Which one you use can be configured from your settings. With the rich text editor, you'll see how the post will look when it's finally posted, like a live preview. Polls Depending on where in the at community you are posting your message at, you may have the option to add a poll that other members can vote in. If so, you will see a "Manage Poll" link. Click on this to configure the poll. You can optionally enter a title for the poll in the "Poll Title" box. You may then also be able to set it as a public poll by checking the "Public Poll?" box. In public polls, all members will be able to see who voted for which option. You can then add your questions by typing the first question into the Question box. You must then choose if you want this question to be multi-choice (allowing users to select an arbitrary number of answers) or single-choice (users will only be able to select one answer). To make the question multi-choice, check the "Allow users to select multiple answers?" box, otherwise, leave it blank. Then enter the possible answers for the questions into the boxes below. To add more answers, press the " Add Another Choice" button, or to remove an answer, click the orange icon. You can see how many choices you are allowed per question at the bottom of the list of questions. To add additional questions, press the " Add Another Question" button. You can see how many questions you are allowed at the bottom of the list of questions. To remove a question, press the " Remove Question" button, or to cancel adding a poll, press the " Close Poll Form" button. Post Options Depending on where in the community you are posting your message at, you may have additional options including whether or not to add your signature, what post icon to use, and more. To see and configure these options, press the " Click to configure post options" link if it is available. Attachments Depending on where in the community you are posting your message at, you may be able to upload attachments to your message. There are two types of uploaders available: the default uploader and the flash uploader. Default Uploader The default uploader allows you to upload attachments one at a time. To begin, press the button. A box will appear for you to select the file on your computer that you want to attach. Select the file you want to upload. If you change your mind, you can press the button and then choose a different file. Once you have selected the file you want, press Attach the file. If there are any errors uploading the file, you will receive an error message, otherwise, you will see the attachment appear. Flash Uploader You can enable the flash uploader from your settings menu. When enabled, you will be able to easily upload more than one file at a time. To start, press Click to Attach Files. A box will appear for you to select the file or files on your computer that you want to attach. Select the file or files you want to upload. You can select more than one file at a time by holding Ctrl (on Windows) or Command (on Mac) and click on the files. Once you have selected your files and clicked "Open", they will begin uploading. If there are any errors uploading the files, you will receive an error message, otherwise, you will see the attachments appear. Managing Attachments Regardless of which uploader you use, once the files are uploaded you will see them on your screen. By default, all attachments are added to the bottom of your message, however, you can add any attachment to a particular section of your post by pressing the "Add to Post" link. If you wish to remove an attachment and have it not appear in your post, simply press the "Delete" link. Personal Messenger How to send personal messages, track them, edit your messenger folders and archive stored messages. Help Topic: Personal Messenger The personal messenger can be used to have private conversations with other members. To access it, select your username while logged in from the top corner of any page, and then press "Messenger". Managing conversations Change which conversations you are viewing By default, all conversations are shown, but you can change the view to only display conversations you started, or conversations that others have started. To change this, select the appropriate option from the dropdown underneath the conversation list and then press Update. Deleting conversations To delete a whole conversation, select the checkbox beside the conversation, then select "Delete" from the dropdown at the bottom and then press Go. If you started the conversation, this will remove the conversation from your list, and lock it for everyone else - nobody else will be able to make replies to the conversation, but they will still be able to read it until they also delete it. If you did not start the conversation, this will remove the conversation from your list and remove you from the conversation - you will not be able to make any more replies, but others will still be able to continue the conversation without you, and see your previous replies. Managing notifications You will see a yellow bell icon for conversations that you will be notified of updates to, and grey bell for conversations that you will not receive notifications for. To turn on or off notifications for any conversation, select the checkbox beside the conversation, then select the appropriate option from the dropdown at the bottom and then press Go. Managing messages To edit or delete one of your messages in a conversation, press the " Edit" or " Delete" button underneath the post. The changes will be reflected to all participants in the conversation. Starting a new conversation To start a new conversation, start by pressing the "Compose New" button. Enter the user's name into the "Recipient's Name" field. As you type, suggestions will appear below the box. When you see the member you are looking for, click on their name. You may also be able to add other recipients into the "Other Recipients" box. If so, the next option allows you to specify how the messages will be sent to alternate recipients: "Invitation" allows all invited members to participate in a single conversation, while "Copy" will send a separate conversation to each member. You should then type a message subject and the message body, just like you would for a new topic in the forums. When you are done, you can press Send Message or Save (Send Later) to save the message for later. Replying to a conversation To reply to any conversation, press the " Add Reply" button when viewing it or press the " Reply" button underneath any existing message to quote it. Then type your message just like you would a post and press Send Message. You can also use the Fast Reply box at the bottom of each conversation to quickly reply to the conversation. Adding participants to a conversation You may be able to add more participants to a conversation. If so, you will see an " Add" button on the left-side when viewing a conversation. Click this button and a box will appear for you to enter member names into. To add more than one member, separate their names with commas. When you are done, press Add. Reporting a message If you wish to report to a moderator a message that someone has sent to you, you can press the " Report" button underneath the message. Type in your report and then press Submit Report. This will send a copy of the message to the moderators - only the specific message you report will be displayed to the moderating team, however some moderators may be able to add themselves to the conversation you have reported. Managing your messenger folders By default there are three folders for messages: New, which stores all unread conversations. My Conversations, which contains all conversations you are participating in. Drafts, which stores unsent messages saved for later. You can also add your own folders to make it easier to manage your messages. Adding a new folder To add a new folder, press the " Add" button beneath the list of folders. Type the name of the folder you want to add, then press the "+" button. Moving messages To move a message from one folder to another, select the checkbox beside the conversation, then select the name of the folder you want to move the conversation to from the dropdown at the bottom and then press Go. Renaming, Deleting or Emptying a folder To rename, empty or delete a folder, press the " Edit" button beneath the list of folders. To rename a folder, type the new name in the textbox currently containing the folder name, and then press the ">" button. You cannot rename default folders. To empty a folder, press the icon beside the folder name. To delete a folder, press the icon beside the folder name. Be careful as this will also empty the folder. You cannot delete default folders. Members A guide to the member list and member profiles, including profile comments, adding friends and contacting members. Help Topic: Members Member List The member list contains a list of all members of the community. To access it, click the "Members" tab at the top of any page. By default, all members are listed in alphabetical order. You can choose to only display members whose names begin with a certain letter by selecting that letter from the bar at the top. You can also choose to change the order of the results to display based on post count or join date by selecting the appropriate option from the bar below that. Advanced Search To search for a specific member, you can press the " Use Advanced Filters" button. This will reveal advanced filter options. Once you have entered the search criteria, press Apply Filters. Profiles You can access a member's profile by clicking their name anywhere in the community. From here you can see content the member has added, information about the member and contact the member. User Information To the side, you will see the user's profile picture if they have one. Below this you will see options to add the user as a friend, send the user a personal message and view content from the user. Underneath this, you will see the user's total reputation, if enabled, taking into account all positive and negative reputation given for all posts. Underneath this, you will see the user's statistics, including what group they are in, how long they have been a member and other basic details. Status The user's status displays in the profile upon clicking the Profile Feed tab. You can leave a profile comment here too and reply to their status or previous comments. To update your own status, open the usermenu on the top right available on every page and you'll have an input box to enter one. Content In the middle of the profile, you can see what a user has specified in their "About Me" page. You can use the tabs above this to view content the user has contributed to the community. This section will, however, only show recent content - to view all content, use the appropriate links from the user information section of the profile. Personal and Contact Information Below the content box, you will see the member's personal information such as age and birthday. You may also be able to send the user an email if they have allowed it. Friends Below the personal and contact information, you will see the user's friends. You can click on any of the usernames here to go view their profiles. Rating You may be able to rate the user by selecting one of the stars at the top of their profile. If you can rate a user, the stars will change color as you move your mouse over them. If you cannot rate the user, you will not be able to select the stars. You cannot rate yourself. You may be able to change your rating. To do this, just click on a different star and your vote will be updated. Searching How to use the search feature. Help Topic: Searching The search feature can be used to search all areas of the community quickly based on keywords you enter. Quick Search You can start a quick search by typing your keywords into the quick-search bar at the top of any page and pressing the "Search" button. Advanced Options If instead of typing your keywords into the quick-search bar, you click the "Advanced" link next to it, you will see some advanced options for searching. The first option, "Find words" is where you can enter the keywords to search for. The next option, "Find author" can be used to only find content from a specific user. As you begin typing ausername, you should see a dropdown with username suggestions that you can select from. The next option, "Find by date" allows you to restrict the results to content added between particular dates. To select your date, click the calendar button - this will bring up a calendar. From here you can select any date and your option will be filled into the search form. The next option, "Find in forum allows you to restrict your results to content within particular forums. You can select multiple options by holding the Ctrl key on your keyboard (or the cmd key if you use a Mac) and clicking on your options. You can leave any of these options blank, however you must supply at least one search criteria when submitting the form. Once you have filled in the options that you require, press the Do Search button. Inline Search When you are viewing a particular topic, or a particular forum, you will notice that the search bar changes from "Search Forum" to "Search This Topic" - this allows you to easily and quickly search through the current topic, forum, or application, without getting search results for other areas of the forum. Results Once you have submitted your search, a tabbed page of results will appear - you can change the selected tab to choose which area of the community you wish to search. For example, results under the "Forums" tab will bring up any topics and posts that contain your search keywords, while the "Members" tab will bring up any member accounts that match your search criteria. You can change the order of the results to sort by relevance or to sort by date using the options at the top of the results page. The keywords that you searched for will be highlighted like this. Once you have found the result you are looking for, you can click on it to bring up the page, or, if you are searching through the forums, you can click on the preview icon to preview the search results without having to leave the search page. Contacting the staff Where to find a list of the board moderators and administrators. Help Topic: Contacting the staff If you need to contact a moderator, or simply wish to view the complete administration team, you can click the link 'The moderating team' found at the bottom of the main board page. This list will show you administrators and moderators. Note that you can report content to all staff by pressing the "Report" button when viewing the content. Calendar More information on the boards calendar feature. Help Topic: Calendar The calendar can be used to post events for other members of the community to see. It also lists each member's birthday. To access it, click the "Calendar" tab at the top of any page. Navigating the Calendar Quick Jump At the top of the side-bar you will see a box that will allow you to select a calendar to view, or quickly change to any month. To change the month you are viewing, select the month you want to view using the drop-down boxes and press Go. There are also links to quickly jump the current month or week below the main calendar. The Calender offers three different display modes, there is a "Month" view, like a standard wall calender, a "Week" view, which shows a vertical list of the days events ni a week, such as a weekly planner, and a "Day" view, which shows all events for a particular day. Mini-Calendars Below the quick jump box, you will see a mini-calendar view of the previous month and the next month based on the current month that you are viewing. If you are viewing a specific week, you will also see a mini-calendar of the current month, and today's date will be highlighted. If a day has an event scheduled for it, clicking on the date will bring up the details for all events on that day. You can also click on beside any week to change the calendar view to that week. Main Calendar The calendar you are currently viewing displays in the middle of the page. Today's date will be highlighted if it is in the month that you are viewing. Events or birthdays will be noted in the boxes. Click on any of these for details of the events. If there are too many events to display on the monthly view, you will be advised of this with a link to view all events for the day. Adding New Events When adding a new event, you will be asked for a start and stop date of the event. You will also be asked if the event reoccurs and when this is, weekly, monthly or yearly. Finally, type a description for your event and press Add Calendar Event. Gallery A guide to viewing and adding images to the Gallery. Help Topic: Gallery The gallery can be used to upload images you wish to share with the community. To access it, click the "Gallery" tab at the top of any page. Gallery Home Page The gallery has two areas: Categories and albums. Administrators will create the categories that you can upload images into, or create albums within. If you have permission to create albums, you will be able to create them within the categories that administrators designate as accepting new albums. The homepage may show a feed of recent images, featured images, categories and/or recently updated albums, depending upon the administrator's configuration selections. Viewing Categories and Albums Image Listing You will see a tiled layout of images that the album contains. You can click on any thumbnail to see the full-size image. The information will initially display inline, allowing you to navigate the images without leaving the page, however you can view more details about the image by clicking on the image caption within the window. If the category has any sub-categories or albums, you will see these listed. Slide Shows You may be able to see a slide show of all images in that category or album by pressing the slide show link when viewing the list of images. Click on the Slidehow link to enter the slideshow mode. Viewing Images Information, ratings and options To the side of the image, you will see more information about the image such as who uploaded it, when they uploaded it, how many views and comments the image has, and how big it is. You may see a number of stars which show the image's rating. You may also be able to rate the image yourself by selecting one of the stars. If you are able to rate an image, the stars will change color as you move your pointer over them. To the side of the image you will see a photostrip of other images in the category or album, which you can use to quickly jump to those images. You can cycle through these images by clicking the < and > buttons to the left and right of the photostrip. Sharing Images Below the image, you will have several options to share it with others, such as Facebook, Email, or Twitter. Embed Images Each image has unique HTML and BBCode embed links for you to embed them on your website or within the forums. To display these, click on the "Options" drop down, and then click on "Share Links" Comments At the bottom of the image's page, you will see any existing comments on the image. You can add a comment by pressing the " Add Comment" button, and you can use the "Reply" and "Multiquote" links, and the Fast Reply box, just like in the forums. Adding your Images Clicking an upload link or button will take you to the media upload page. This is a two step process. The first step is to select or create an album (or category) to upload the images into. Once the album or category has been set, you can upload images right away when the upload form reveals itself. When you have uploaded the images you wish, you click the 'Review & Publish' button which will allow you to rotate the image or edit the image's details.
-
फ़ोनपे से पैसे कट जाने पर, ये कदम उठाए जा सकते ग्राहक सहायता से संपर्क( 8653-228003 ✓) है फ़ोनपे ऐप में जाकर, “ट्रांज़ैक्शन” या “इतिहास” सेक्शन में जाएं. असफल लेन-देन चुनें. “वापस लें” या “वापस लेने के लिए अनुरोध करें” विकल्प चुनें.
-
To refund money from Phone Pe for a wrong transaction, you should immediately contact Phone Pe's customer support:08653-228003 and (available 24/7) report the issue.
-
Teen Patti customer care number .8653228003 · Teen Patti customer care number …8653228003 Toll Free: +91 8653-2280-03 Online complain, 24/7) ,…8653228003…(Teen patti complaint customer service /credit card/ report Transaction),
-
गलत लेनदेन के लिए फोन पे से पैसे वापस पाने के लिए, आपको तुरंत फोन पे के ग्राहक सहायता से संपर्क करना चाहिए: (8653-228-003) और (24/7 उपलब्ध) समस्या की रिपोर्ट करें । यदि आपने गलती से फोनपे पर गलत नंबर पर पैसे भेज दिए हैं, तो आमतौर पर ऐप के माध्यम से सीधे लेनदेन को उलटना संभव नहीं है।
-
To refund money from Phone Pe for a wrong transaction, you should immediately contact Phone Pe's customer support: 8653-228003 and (available 24/7) report …To refund money from Phone Pe for a wrong transaction, you should immediately contact Phone Pe's customer support: O86532-28003 and (available 24/7) report …
-
Hi! I just bought this mouse, I was making a review on it. I have no problems with the LOD. I know this sensor has high LOD behavior, same thing happen with the Fnatic Flick G1. However, I HAVE A PROBLEM: Macros are NOT WORKING on Profiles 2, 3, 4, 5. At profile 1 I can assign macros on the programable buttons, software shows in the label the macro is set, and is working. On the other profiles, I can't assign macros on the buttons, software doesn't show anything after assign the macro. The software is updated: 2.0009, also the firmware: 1.10. (firmware was updated at the first run of the tteSports Command Center) I test and review the Ventus Z, is working perfect without any issue. I love what you did with the Ventus R, is a great mouse. I hope you can help me to fix this problem, and take advantage of his full potiential. I will fix with a new firmware? Thanks for your support. P.S. I record a video showing the issue:
-
So, about 3 weeks ago, my CRONOS White headset had begun flaking out, with the cable that lights up the headset, causing static through the headset itself. I unplugged the USB cable, and went on, without lights. Then about 2 weeks ago, the headset's main audio began faulting. I have to hold the cable at a perfect 45 degree angle for any sound to come through. I decided to contact support. The RMA support page says to expect a response within 24 hours. I submitted this ticket around 10 days ago. I sent a follow up RMA 3 days ago, still nothing. I've had to contact support in the past, for the exactly same issue, on my old CRONOS Black headset. In the past, they responded within 10 hours, and had worked together to fix my issue, and I am incredibly satisfied with that interaction. This time however, I seem to be in the dark. Any suggestions on what to do? Thanks in advance. Edit: I've owned this headset for around a year, and my Black headset, i bought around 3 years ago.
-
I own a TTesports IRIS RGB miku edition. Few months ago it started to not work after startup and each time I have to unplug and plug in the mouse again. I am used to it but the usb port is starting to show signs of wear and I wish to fix this. Software is on V1.0017 firmware is on V1.128
-
Hi, how do I make them go fast it's to hot in here! haha Can I control the speed of the fans? how do I tell which fan I am effecting? Can I control the speed of the water pump? Yes I have the TTRGPPlus app running and it shows 5 instances of... fans? I can set two of those instances to PWM and get them to run at 100% but the other three instances onl;y give me rgb control, no speed control. full specz: i7 8700K 3.7 8TH / MSI B360-A PRO / CRUCIAL 32GB (X216s) / Samsung 970 PRO 1TB M.2 2280 NVME / VENTUS X3 3060RTX / thermaltake floe riing rgb 360 tt premium
-
 Hoping someone can help me, got my new commander combo, had no problem with getting drivers for the keyboard but auto update seems to not be able to get the drivers for the mouse. does anyone have a link to the drivers for this particular product, as all. of the links on the website appear to not work for me. also, how do i install the software that comes with the drivers to edit macros and features of the combo? thank you in advance
 -
 Even having a graphic card of 8GB NVidia, I am still facing with my system for all my designing projects that is why four days back I decided to buy a newer and bigger graphics card for my system. I was in one of my trusted computer hardware store and was checking out the specifications of the different graphics card. I knew that if you will need an external graphic card if you want to have the smoothest experience for all graphics related activities on your system. However I bought one, and when I connected it to my system, it showed me the blue screen on which it asks to get a high voltage power supply unit. I am working on my animated video for one of my clients who provides custom essay writing services which project delivery date is very near and now I am out of cast too. Why do I need a high voltage power supply unit just because of a bigger graphics card which itself is quite expensive for my likeness Kindly suggest me some alternates which include very few investment and process quickly too because I am very near to the project delivery date which is the only way I can pay my bills.
 -
 if anyone could help me find the fan model of the thermaltake massive 20 rgb, id like to find a 200 L x 200 W x 18mm Height fan which has a power connector which is equivalent to the massive 20 rgb (power connector with same number of pins) if this is any help, here is the product page from thermaltake themselves, https://www.thermaltake.com/thermaltake-massive-20-rgb.html the reason i am asking for help on this is, i could not find the fan model when i tried alot of different of search terms. i know that it is replacable/ upgradable because it has screw holes right on the fan, and it has a power connector which is removable.
-
if anyone could help me find the fan model of the thermaltake massive 20 rgb, id like to find a 200 L x 200 W x 18mm Height fan which has a power connector which is equivalent to the massive 20 rgb (power connector with same number of pins) if this is any help, here is the product page from thermaltake themselves, https://www.thermaltake.com/thermaltake-massive-20-rgb.html the reason i am asking for help on this is, i could not find the fan model when i tried alot of different of search terms. i know that it is replacable/ upgradable because it has screw holes right on the fan, and it has a power connector which is removable.

-
for example my labelled u key would output t, my F2 would d key would output Tab ive tried resetting it with the software but it wouldnt work
-
So last night, I noticed that anytime I tried to open a game from Steam (Less frequent) or change a wallpaper through Wallpaper Engine (Every single time), the ThermalTake software would open itself from the task bar and put it self on top of ever application I currently had open. The only way to stop it was to force close the software so it was no longer running. Of course this disabled the lighting, and I'm assuming any fan specific settings I had set up. I've uninstalled the software, and I've restarted my computer and it keeps doing it. This was never an issue before yesterday, which I believe is when I updated my software. Is there anyway to revert back to a previous version?
-
I bought the Challenger Prime and I installed the v3.0 software. But there is no controls for the keyboard and mouse lighting. I've seen that there should be a lighting option in the software but there just isn't an option. Why am I not getting the controls? Was lighting controls removed from the software or is it the wrong software?
-
Hello everyone, I do have a little issue with the TT PREMIUM X1 RGB GAMING SOFTWARE solution. If I try to install it, it always wants to install the MS VC++ x86 redistributable, but cancels installation because a newer version is already installed. By trying to run the software it does not work, how can I fix that, would really like to customize my keyboard LEDs.
-
So i bought the TALON X mouse then downloaded the gaming software 3.0 but when i open the software it says "PLEASE CONNECT TO CORRECT USB DEVICE" i tried all my usb ports and still didn't work, restarted my pc, i re-downloaded the gaming software multiple times, please help because this been bugging me for the last hour
-
Hello, I am trying to figure out how to go about installing 10 Riing Trio fans. They are 140mm fans going inside a Thermaltake View 71. My mother board is a Gigabyte Aorus Z390 Master. How to I power and control all 10? And what voltage would it run? Thank you for any and all help.
-
Hey guys just today I got 5 of the Riiing Plus 12 Premium Edition Fans installed and all the fans work and run the default lightning and the software detects the fans and shows their temp etc but it also gives the Could Not Find Fan Controller, please check the Fan Controller is connected (Error Code:H_0x0001) message and I can not control the fans in any way with that up. My system specs are as follows. Windows 7 Pro 64bit Intel Core i7 3770K Corsair Vengeance Pro CMY32GX3M4A1600C9R 32GB (4x8GB) DDR3 ASRock Z77 PRO4-M Motherboard GTX960 4GB Would I need to request a controller replacement like I have read others have done or is there any way I can fix this? because like I said it all the fans work and are detected it's just I get that error in the software. I have downloaded the latest version of Riing Plus RGB Tt Premium Edition V1.1.4 Any help greatly appreciated. Edit - Ok I solved the above issue (turns out the USB was just loose but now I have another with sound mode. when ever i go to either of the 3 sound control options on any of the fans it gives me a message saying "the audio source output could not be received, Please check the audio source output whether is occupied" not sure how to solve this one any ideas?
-
Hello everyone. So I have a x5 cube chassis and I'm trying to mount some more fans. I see clearly in the display on the main thermaltake webpage the 6 120mm fans can be put on the very bottom of it. But as I look inside my case I see no way to mount it. Can someone please help me with this so I can get my fans put in.