Search the Community
Showing results for tags 'watercooling'.
Found 22 results
-
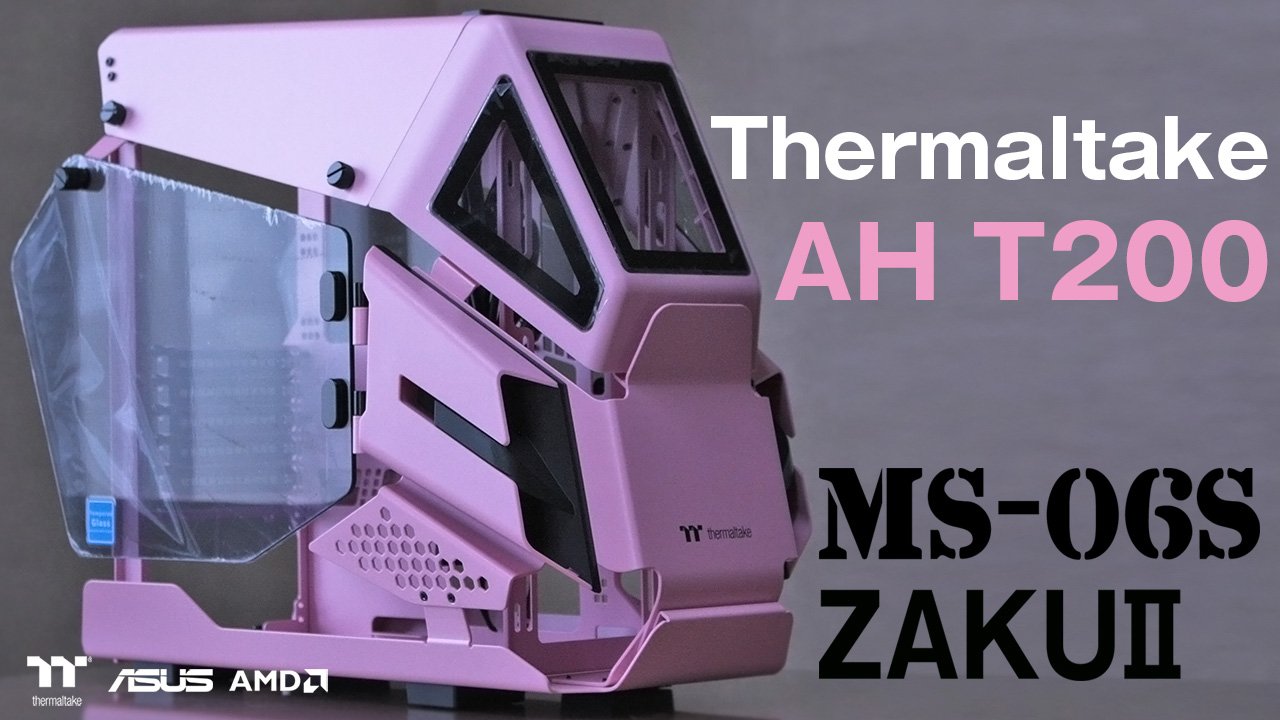
Hello All! 😃 This is a "ZAKU II ザクII " theme custom PC and case mod. and


-
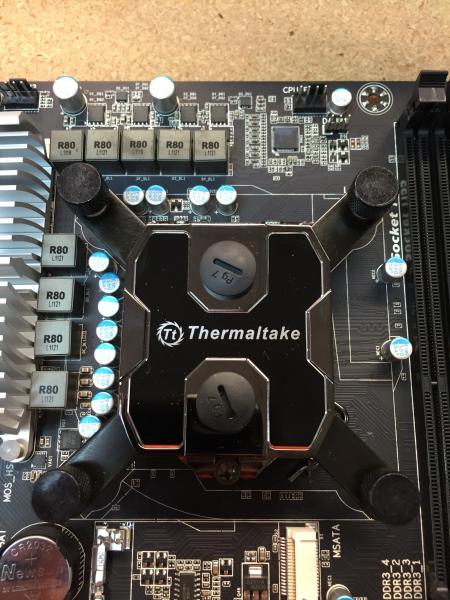
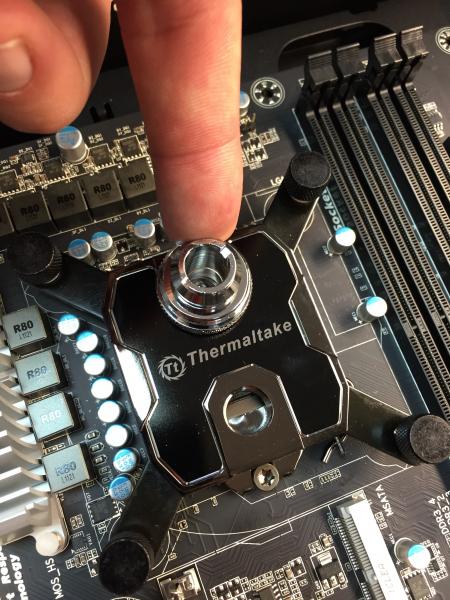
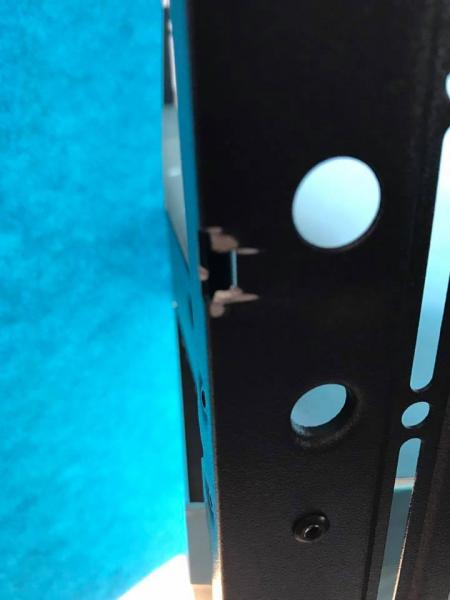
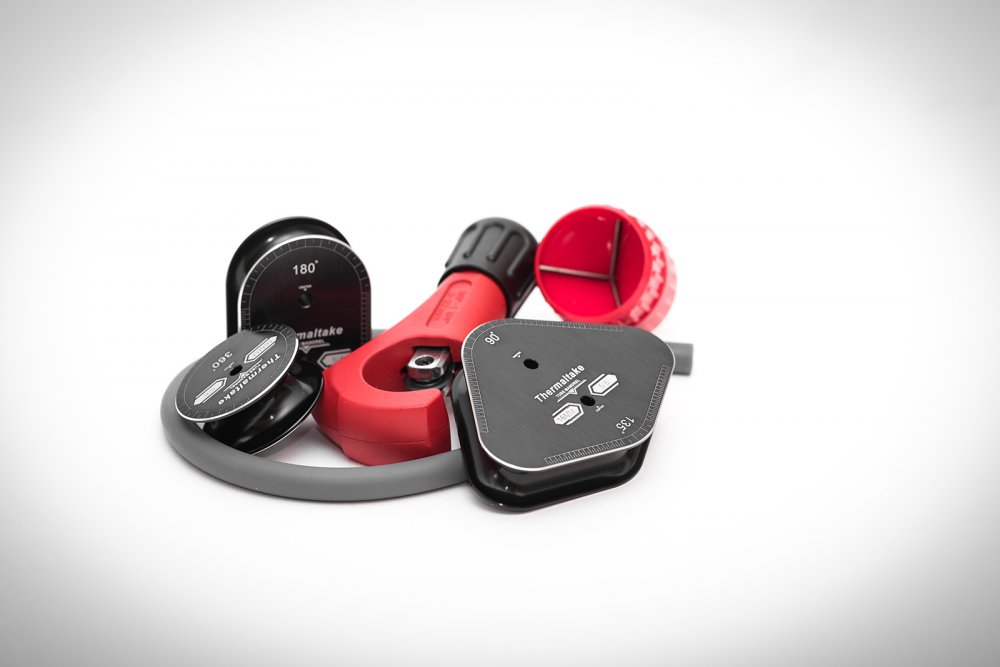
Hi everyone, I have some problems with the MX2 Waterblock display (and R2 Monitor). I had to build the MX2 upside down for this built (rebuild of GFF Events), so whenever Windows is not on (RGB Plus Software running) the display shows liquid temperature upside down. The R2 shows data vertically, while the monitor is installed horizontally. My questions are: - how can I permanently flip the MX diaplay (as I had to install it upside down - see picture) and not only through the RGB Plus software, because when I turn off the computer it still shows liquid temperature but upside down (see picture)? - how can I rotate the R2 image to horizontal permanently as I build it in horizontal and not only in the RGB Plus software, because when I shut off the computer it still displays temperature when all RGB components are down, but it is rotated by 90 degrees (vertical image) - can I preset the components controlled by the motherboard (MX2, R2, 4x Toughram DDR5) and the ones controlled by the RGB controller (3x Toughfan 12 RGB, DP100-D5 Distroplate) so that the RGB is shut off when I start the computer and then only start coloring when RGB Plus Software kicks in? - how can I make sure that the MX2 and R2 are shut off when the computer has shut down? Currently they are still showing liquid temperature even though the other RGB components are down? Thanks for you help
-
So what is the deal with the cool drain that is shown in the store but there is no add to cart button? Im telling you this drain valve design is way above what all other ball valves have show in cleanliness. I mean having an inline valve without a handle is freaking amazing. Thermalmike hook this up quick. BTW im new to watercooling and am still picking out my parts for my first custom loop build Im putting it into a view 31 case. It is a small case but im looking to put 2 R360 rads in it with petg tubing. It seems like a heavy task but ill be able to make it work. Ill post in the future. but really i need to know about the drain i want one bad
-
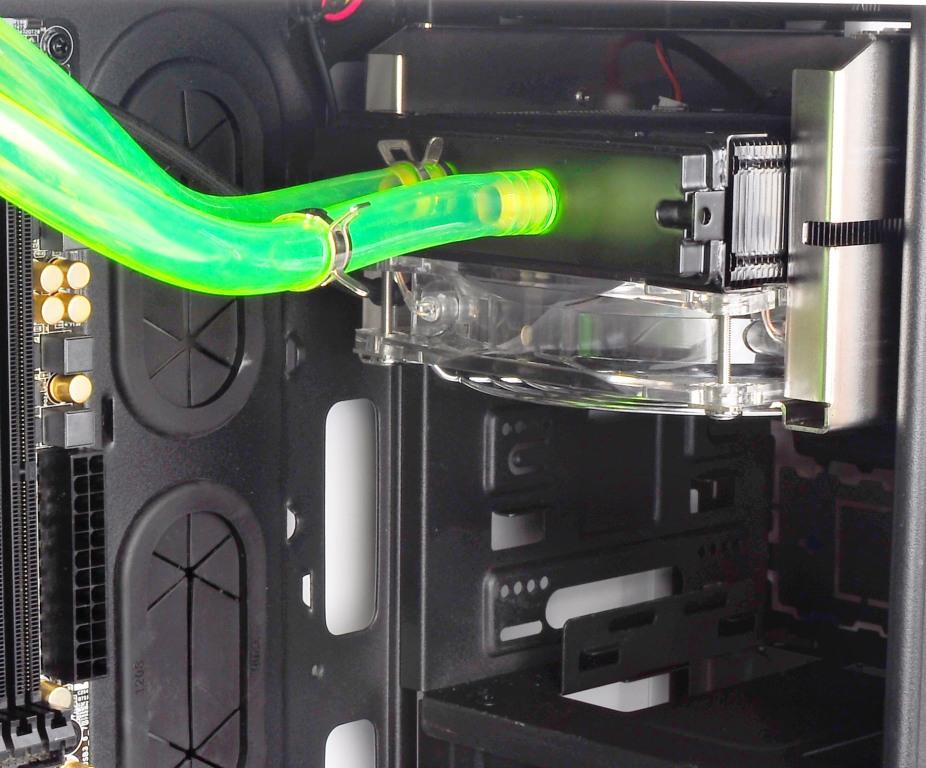
Hello together, i have a distro plate build and I filled it last night. The circle shall go from right to left, put the pump is not pumping the cooling liquid in the right direction. The liquid is not reaching above to the the cpu. Is the pump broken? Please ignore the loose tube, I just tried to release air pressure. It seems that the pump is creating pressure, but just on the left side and high enough to loosen a tube and repainting the room...I am frustrated and I don’t get it

-
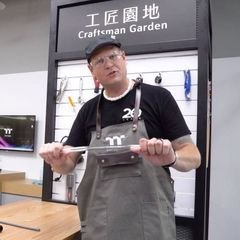
This week for #CES2015 we have announced the Pacific Series DIY LCS (Liquid Cooling System) Components. We have a TON of new stuff coming, this is just the start! Pacific RL240 DIY LCS Kit: (CES Exclusive Launch) Buy Now: http://www.newegg.com/Product/Product.aspx?Item=N82E16835106254 We will continue to update on the full line of Pacific Series DIY LCS Components as they become available! For more information on our Pacific Series Components including, CPU Block, Pump, Radiator and accessories visit our website: http://www.thermaltakeusa.com/cooler.aspx
- 13 replies
-
- 3
-

-
- Pacific
- Thermaltake
- (and 3 more)
-
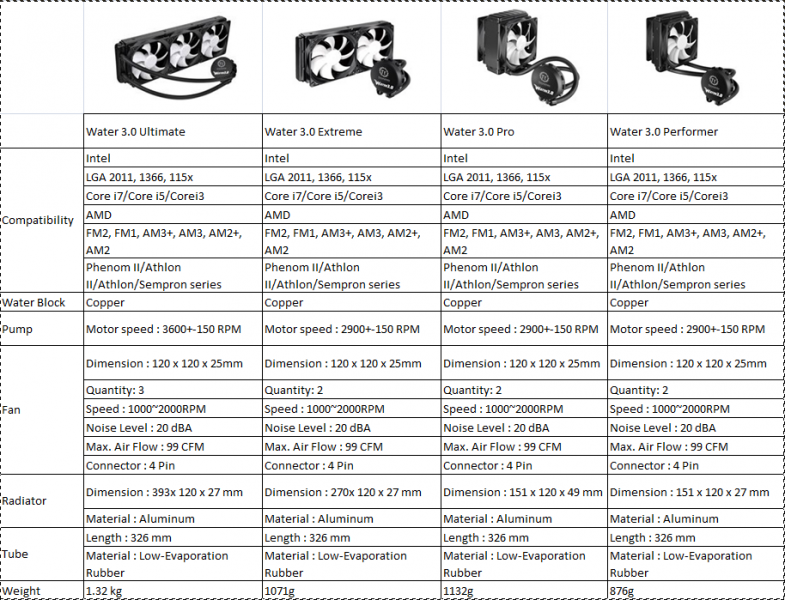
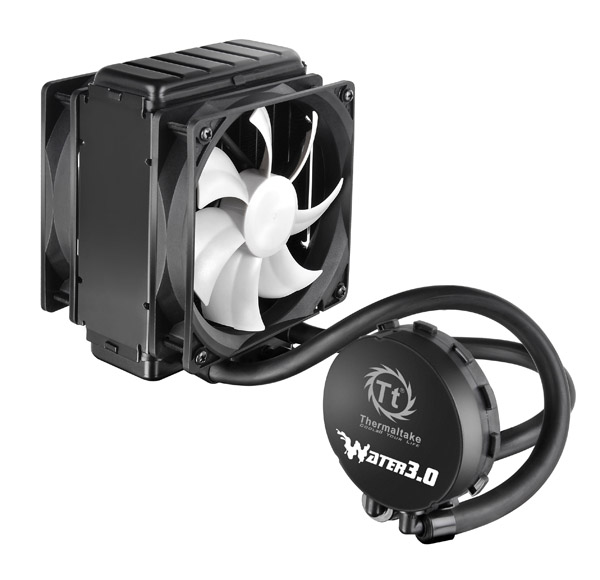
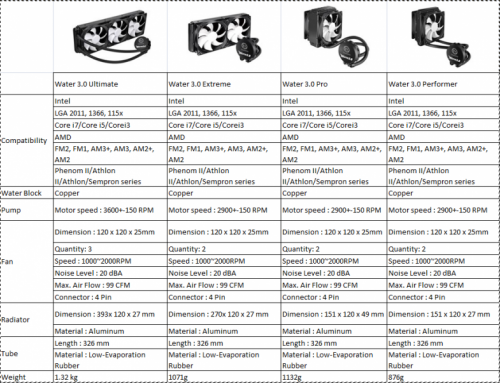
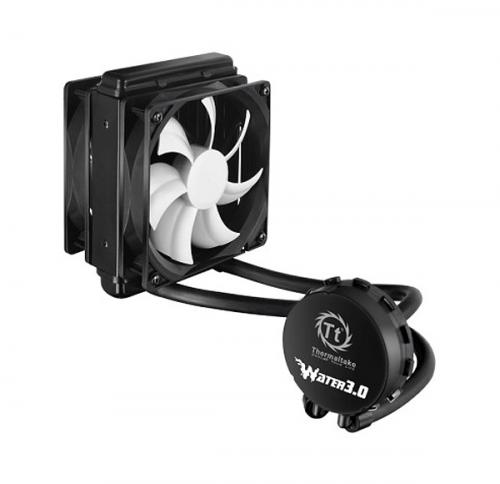
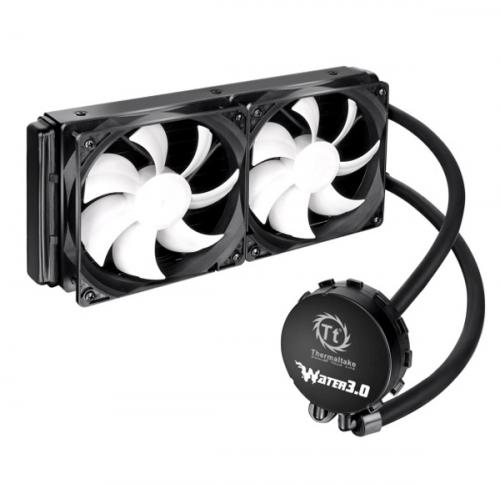
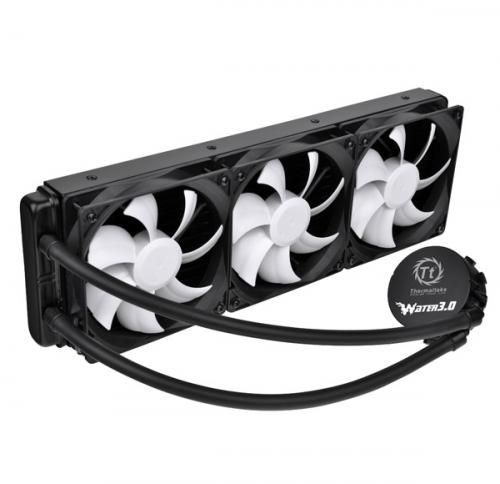
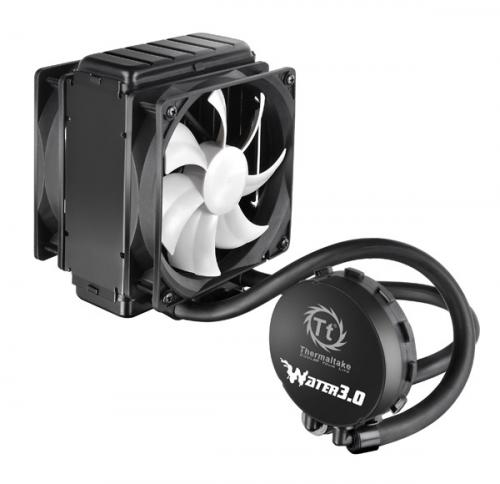
The All-In-One LCS Water 3.0 Series is designed to exceed user expectations. It is easy installation, clean and low-maintenace, one simple upgrade allows users to enjoy better cooling performance with superior CPU protection. Official webpage http://www.thermaltake.com/cooler.aspx Water 3.0 Ultimate Water 3.0 Extreme Water 3.0 Pro Water 3.0 Performer Water 3.0 Series video Review Tweaktwon -- Water 3.0 Ultimate http://www.tweaktown.com/reviews/6553/thermaltake-water-3-0-ultimate-360mm-aio-cpu-cooler-review/index.html NikkTech -- Water 3.0 extreme http://www.nikktech.com/main/articles/pc-hardware/cpu-cooling/liquid-cpu-coolers/3889-thermaltake-water-3-0-extreme-liquid-cpu-cooler-review?showall&limitstart Hitech Legion -- Water 3.0 ultimate http://www.hitechlegion.com/reviews/cooling/liquid/41520-thermaltake-water-3-0-ultimate-360mm-liquid-cpu-cooler-review?showall=& Techgage -- Water 3.0 ultimate http://techgage.com/article/thermaltake-water-3-0-ultimate-review-keepin-it-cool/2/ Techwarelabs -- Water 3.0 ultimate http://www.techwarelabs.com/thermaltake-water-3-0-ultimate-cpu-cooler-review/ Pureoverclock -- Water 3.0 ultimate http://www.pureoverclock.com/Review-detail/thermaltake-water-3-0-ultimate-360mm-lcs-review/7/ Thinkcomputers -- Water 3.0 Ultimate http://www.thinkcomputers.org/thermaltake-water-3-0-ultimate-water-cooling-system-review/5/ Futurelooks -- Water 3.0 Ultimate http://www.futurelooks.com/thermaltake-water-3-0-ultimate-liquid-cooling-system-review/3/
-
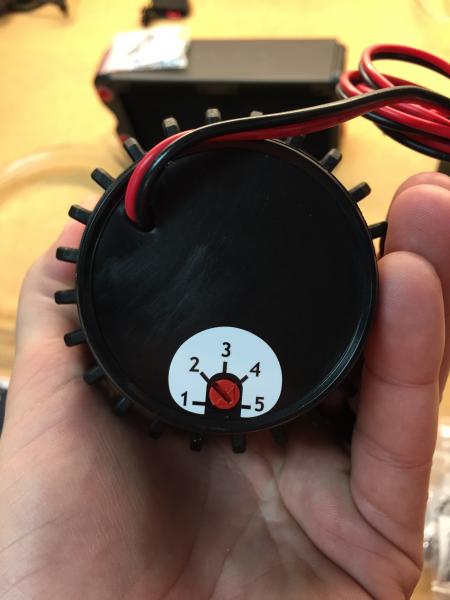
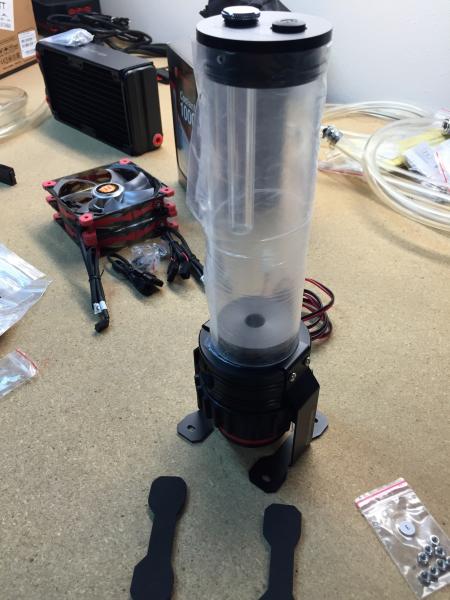
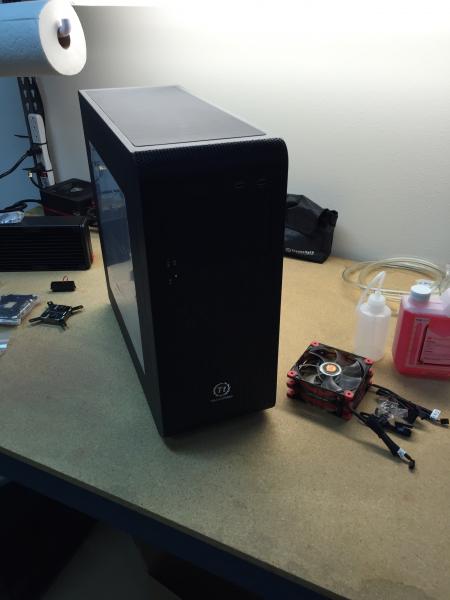
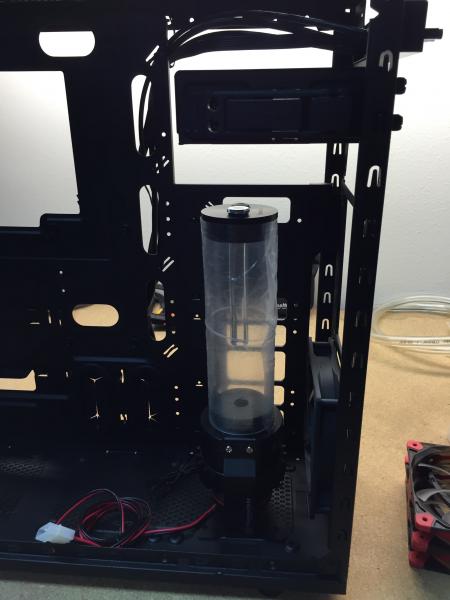
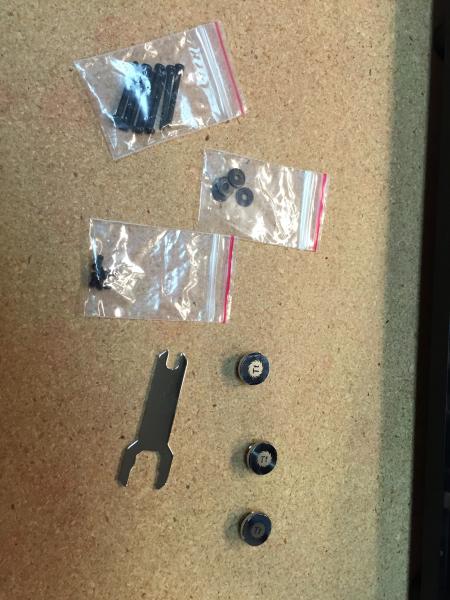
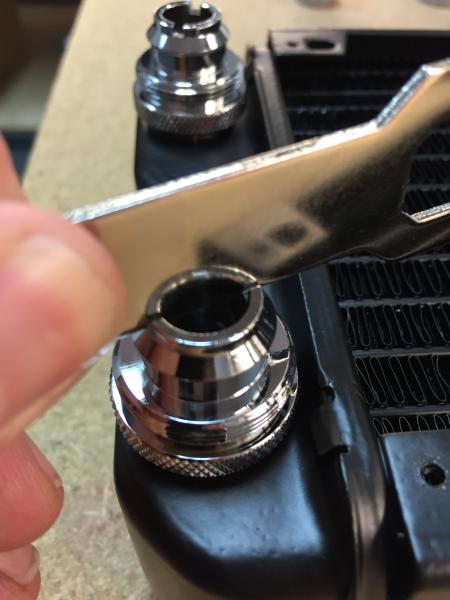
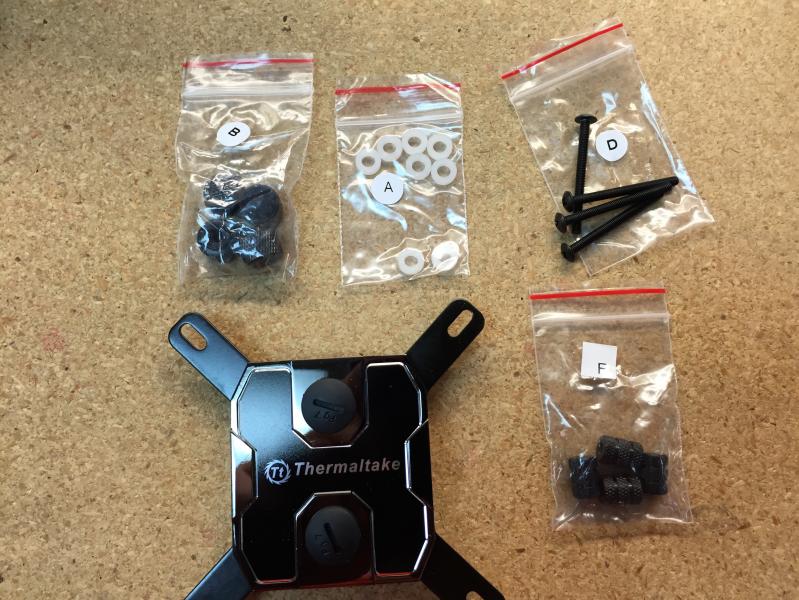
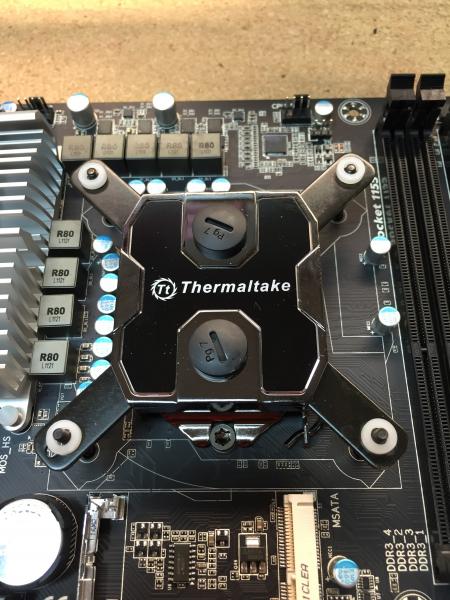
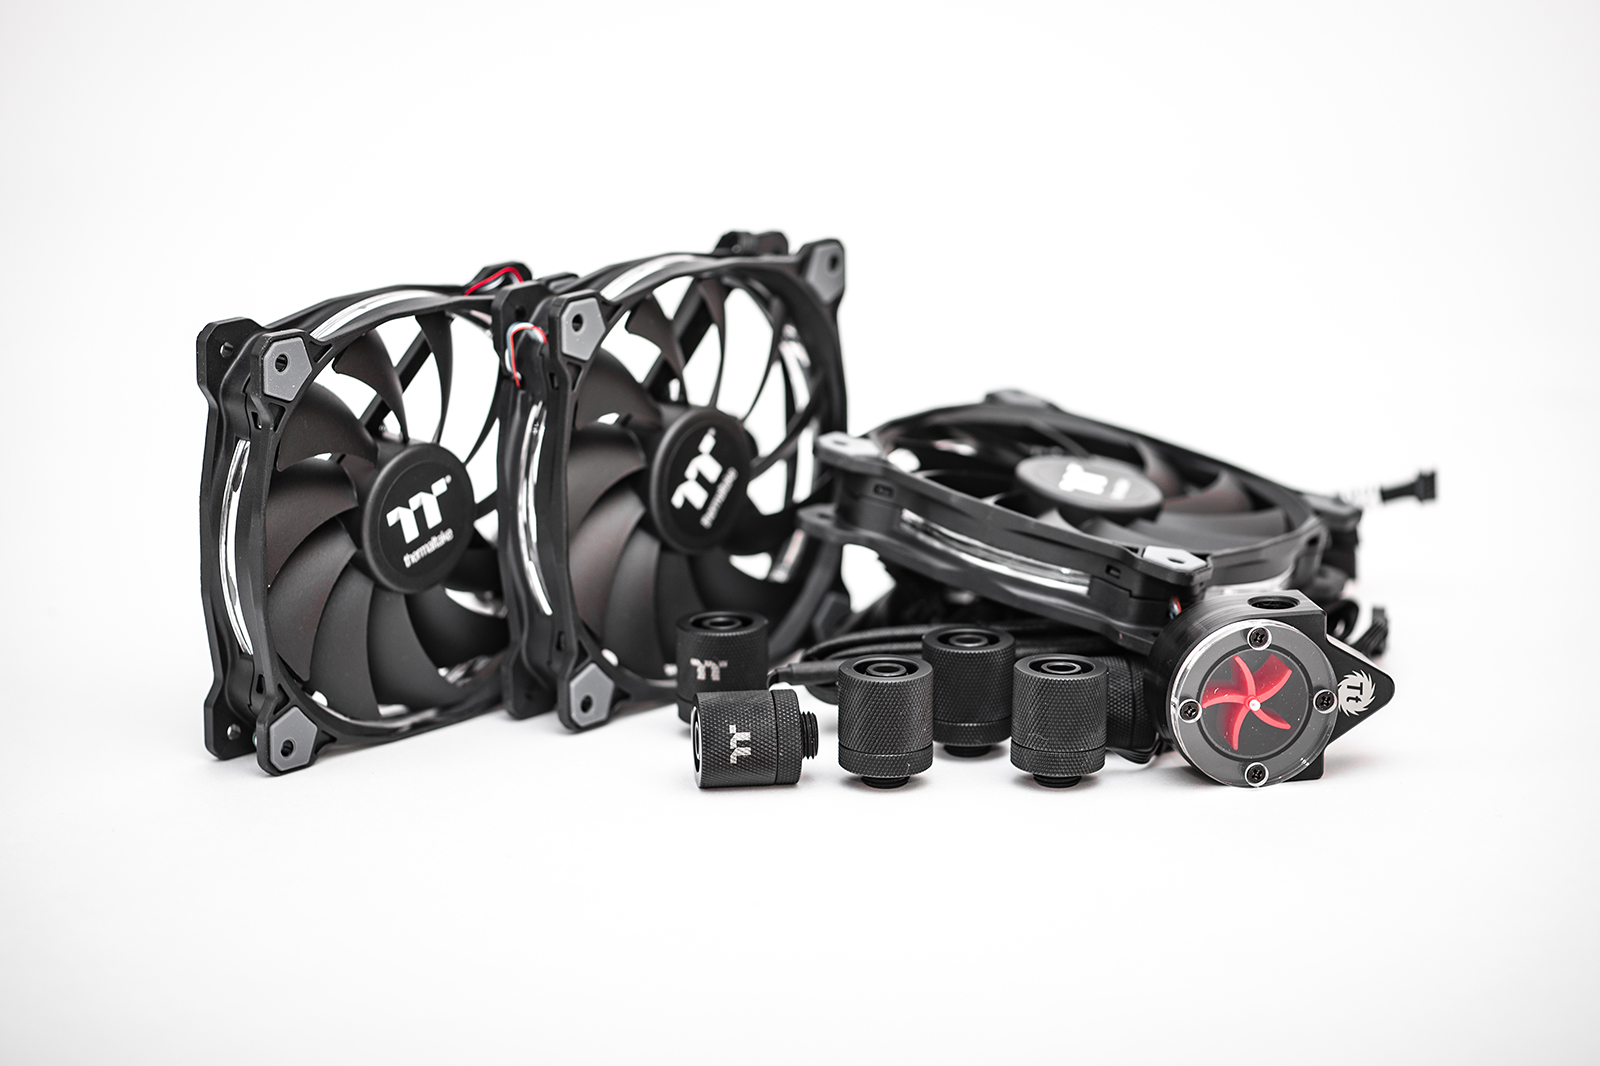
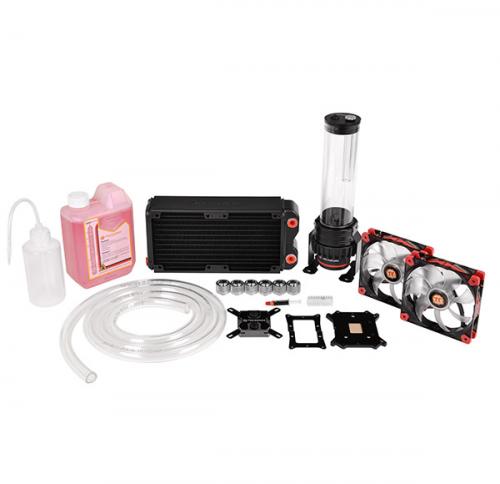
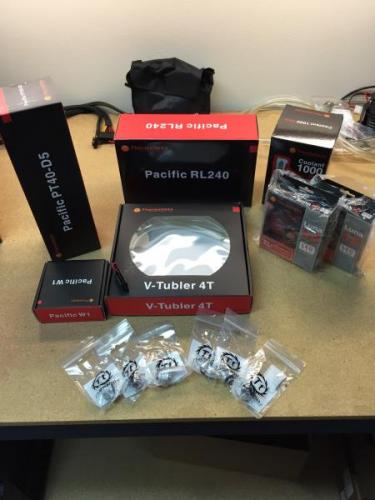
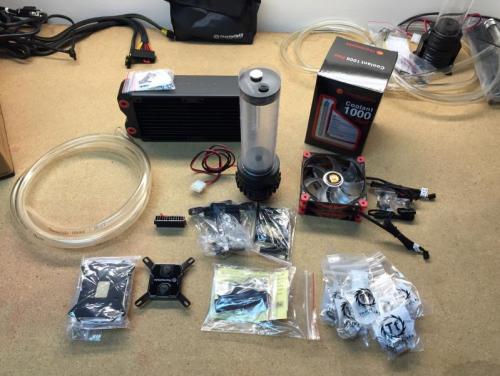
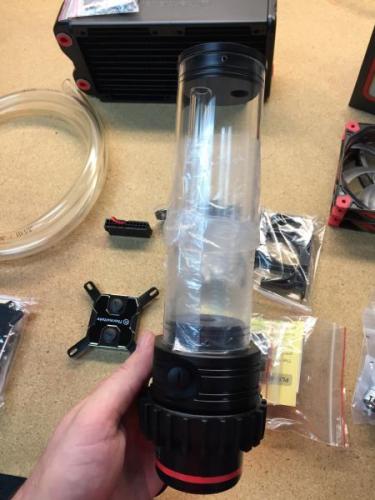
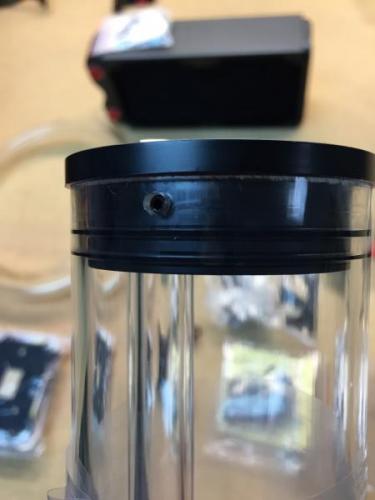
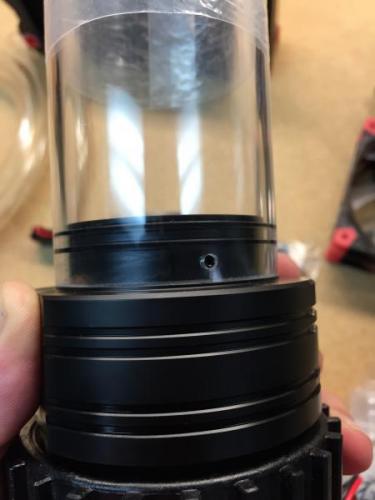
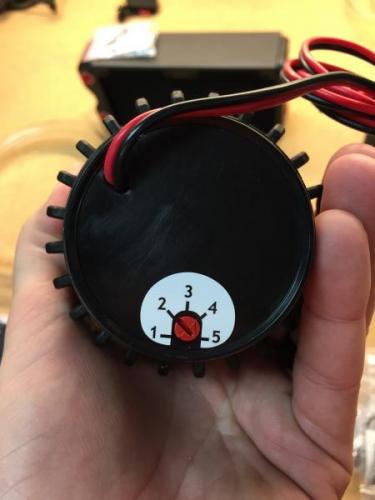
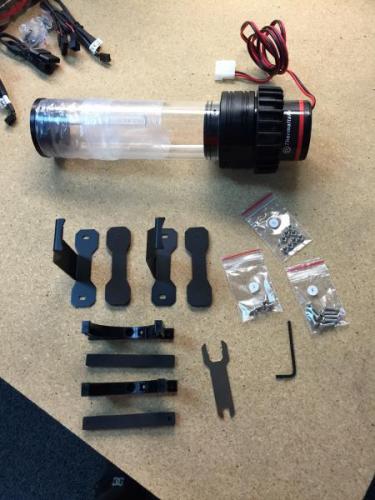
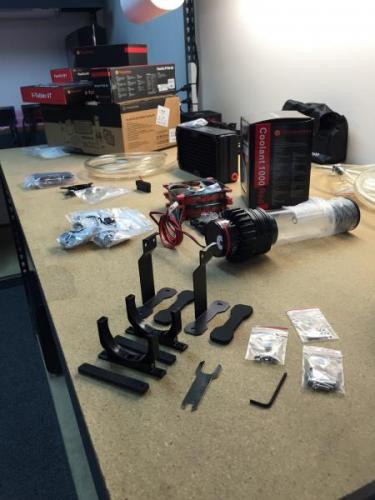
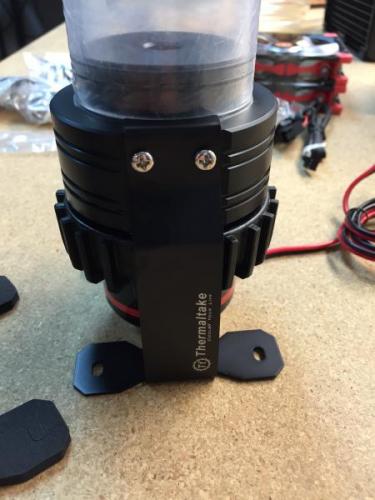
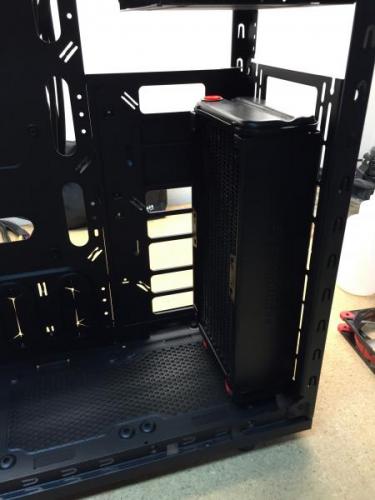
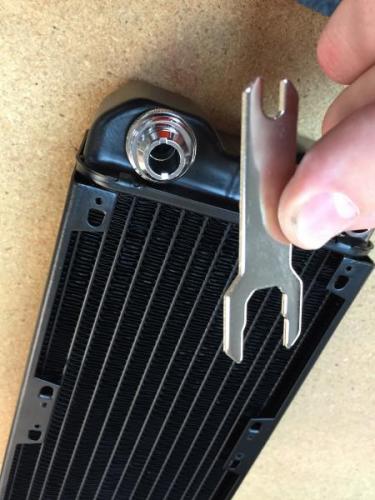
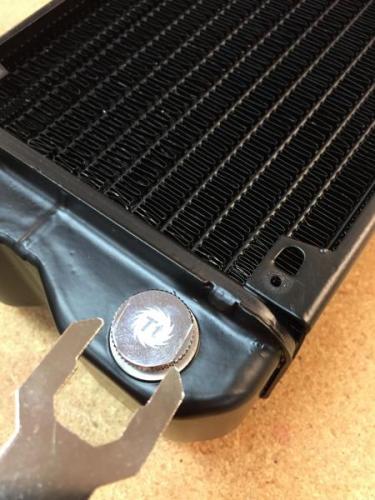
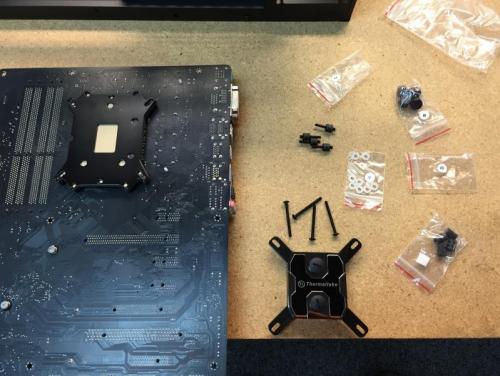
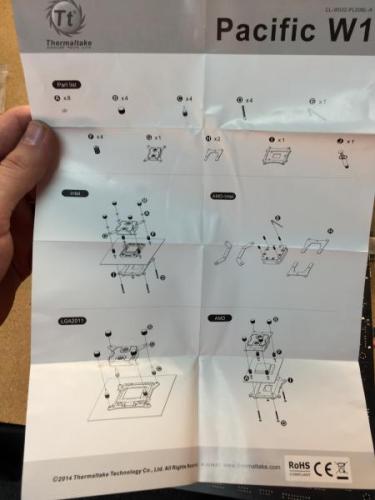
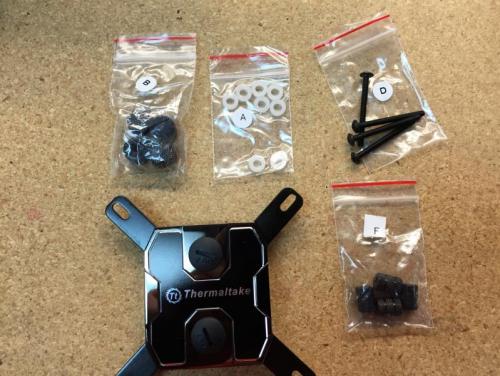
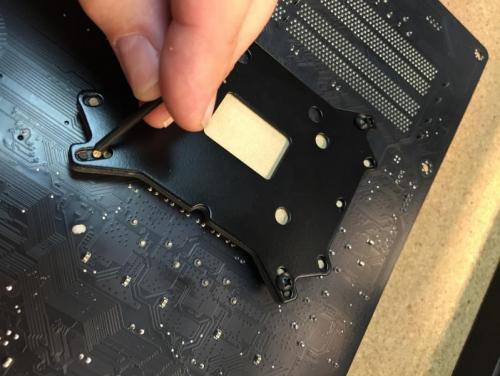
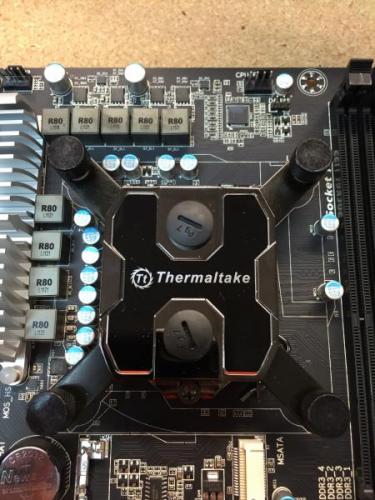
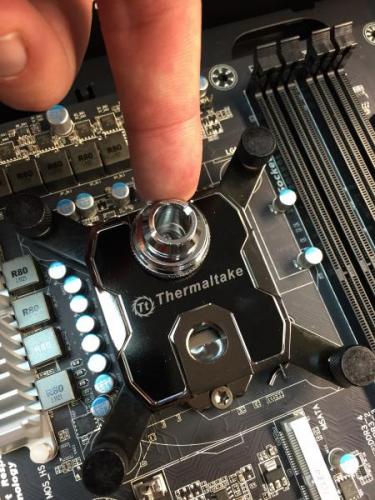
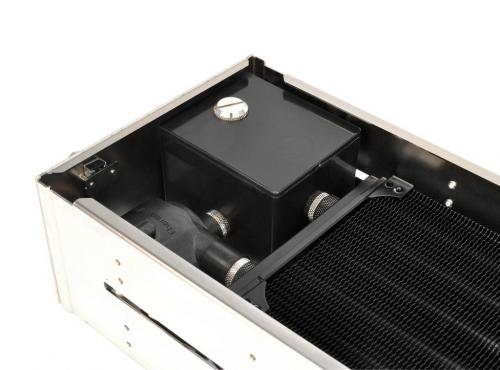
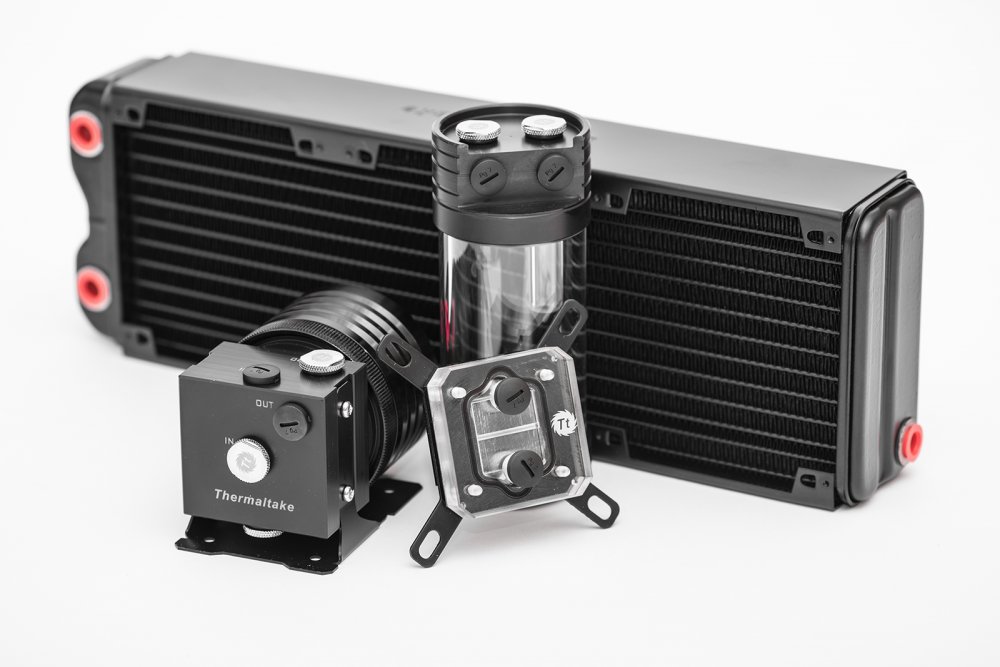
Hi everyone, With the release of our Pacific DIY components and Kits, I wanted to provide a guide focused on the RL240 kit and take you through the installation process to give users an idea of what you will get: RL240 Kit: What you get: - (1) RL240 Radiator 240x120x64mm - (1) PT40-D5 Reservoir + Pump Combo (Includes Hardware) - (1) W1 CPU Water block (Includes Hardware + Thermal Paste) - (1) 4T 1/2" Tubing (6.5ft) - (1) Coolant 1000ml (Red) + Filler Bottle - (6) 1/2" ID 3/4" OD Compression Fittings - (2) Luna 12 Red LED Fans - (1) 24-pin PSU Jumper Here is everything out of the box: Here is the PT40-D5 Reservoir + Pump: When you open the PT40-D5 packaging you will have all the accessories in bags including the mounting hardware. The brackets included allow you to mount the PT40 vertically or horizontally depending on the configuration you want to do. **VERY IMPORTANT** There are set screws on both ends of the reservoir that are to secure the Tube to both ends, these screw do not need to be tightened. Also take note, if you plan to clean your reservoir later, make sure to remove the set screws (Both sides Top/Bottom) prior to removing to avoid causing any stress to the tube when separating. Also take care of the O-rings on both sides to make sure they are in the correct place when putting back together. On the bottom you have the pump speed adjustment that should be set in the "2" position by default. I recommend leaving the speed adjustment alone until you have the system up and running to make any adjustments later. Turing the speed up is only needed when necessary, with the setting of "2" should be enough to support the default kit configuration. Here is all the included brackets and hardware for the PT40-D5 Since I am installing this in our Core V31, I plan to mount this vertically so I have installed the mounting brackets to the pump housing to secure into the chassis floor. Here is a quick look at the Core V31 that we will be installing the RL240 kit Getting ideas on how to place the PT40-D5. (Removed the HDD trays and the bottom ODD for clearance) Now for the (240mm) radiator placement and overview. First you need to remove the orange plastic plugs that came pre-installed. Give the radiator a quick look and make sure everything is ok. Here is the accessories that come included, you get mounting screws for the radiator and for the fans as well as (3) G1/4 port plugs and a wrench tool for easy installation. Before you go through installing everything on the radiator, check the location where you plan to place it and make sure it will work out with the entire system including the water loop to make sure all your fittings and tubing will have proper clearance and your tubing will have proper flow to avoid the tube from pinching around a tight space. It is also a good idea before installation of your radiator to fill the radiator with distilled water and give it a good shake to remove anything left over from the manufacturing process. Fee free to repeat this step as many times as you want until you are satisfied. You can setup the porting anyway you like, for this example I will use the (2) bottom ports on one side for my IN & Out and plug the other (2) bottom ports on the other side with the last plug for the top. Note: Do not tighten the top plug port just yet, you may need to use it for a breather port when filling The wrench is a great tool to use for tightening the ports on your components as the fittings have "slots" on the top so you can use the wrench to tighten and avoid scratching the component or fitting using a standard pair of pliers. The wrench also is designed to help secure the plug ports nicely. Remember, DO NOT over tighten, you will just damage the O-Rings if you gorilla grip the fittings into place. A snug fit is fine. Now we take a look at the W1 CPU block to prepare it for installation to the motherboard. You will get a simple installation guide showing how to install for Intel or AMD type CPU's. Take note of the accessories labeled for each Intel/AMD. Now install the back plate to your motherboard and punch out the foam holes for your CPU Socket type to install the mounting screws to. Once the back plate is installed and the mounting screws are through the motherboard, secure the CPU in place and apply thermal paste. Then seat the W1 CPU block onto your CPU first and make sure everything lines up correctly. When ready set the (4) plastic washers after placing the CPU block. Then install the (4) screw caps and tighten them in the "X" pattern to apply appropriate pressure evenly as you secure the block. These only need to be hand tight and you should be able to tell when each one is secure very easily. Now you can install the fittings on both ports, don't forget to use your wrench!


- 22 replies
-
- 2
-
-
- How-to-guide
- DIY
- (and 4 more)
-
Hi, I'm new to watercooling and just made a try with rigid tubing, pump and connections work well. I placed them outside the pc, psu with pin connected, great. Now i'm trying to connect it with my motherboard but when starting i get an error on the bios saying it has no cpu fan connected. The motherboard is Asus Prime Z390 A , i've got the D5 pump radiator cl360, waterblock from the set and the riing 120 fans. (3 pieces for the radiator en 2 for the case) I connected the fans to the controller which was supplied together with the pump. And the 2 other fans to the second controller. Both controllers have a molex to the psu. And i used the micro usb to the motherbord on a 9 pin usb connection. The cpu-fan or the w-pump both are 4 pins. How do i connect these to my cpu-fan connection ? (Sorry for the noob question, just can't figure it out) Seconds question i saw a TT Commander F6 which looks great but can i connect my Riing 120 RGB on this sinds these are 9 pins and the commander only has 3 or 4 pin connections i believe? Thanks for your help and reading this !! Bart
-
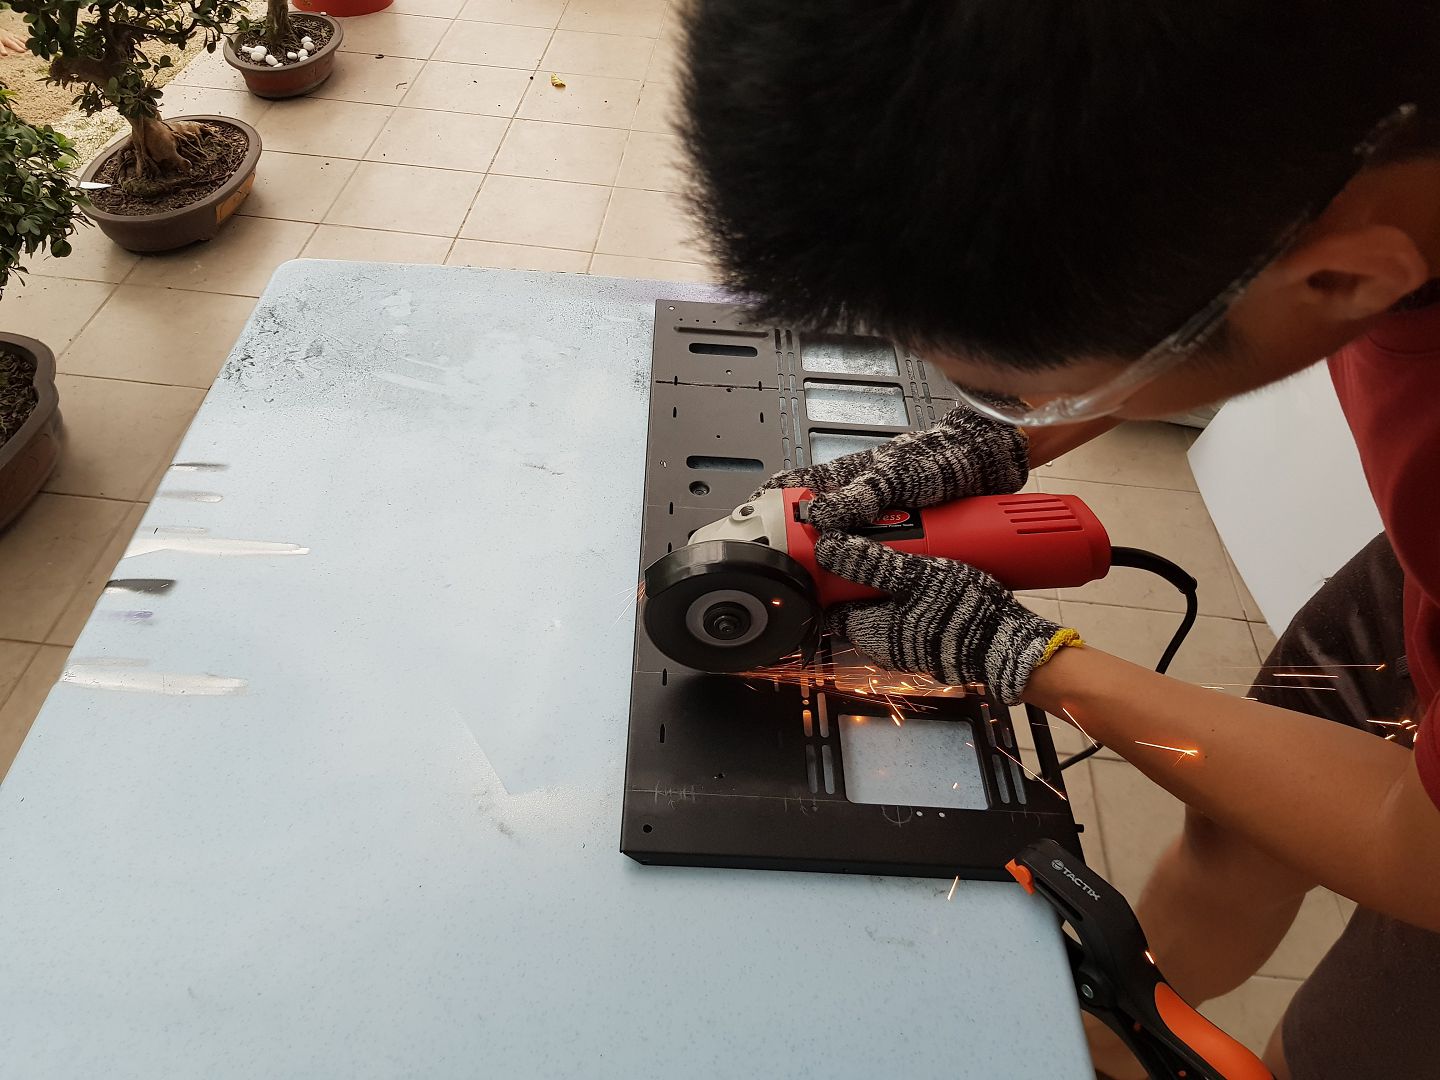
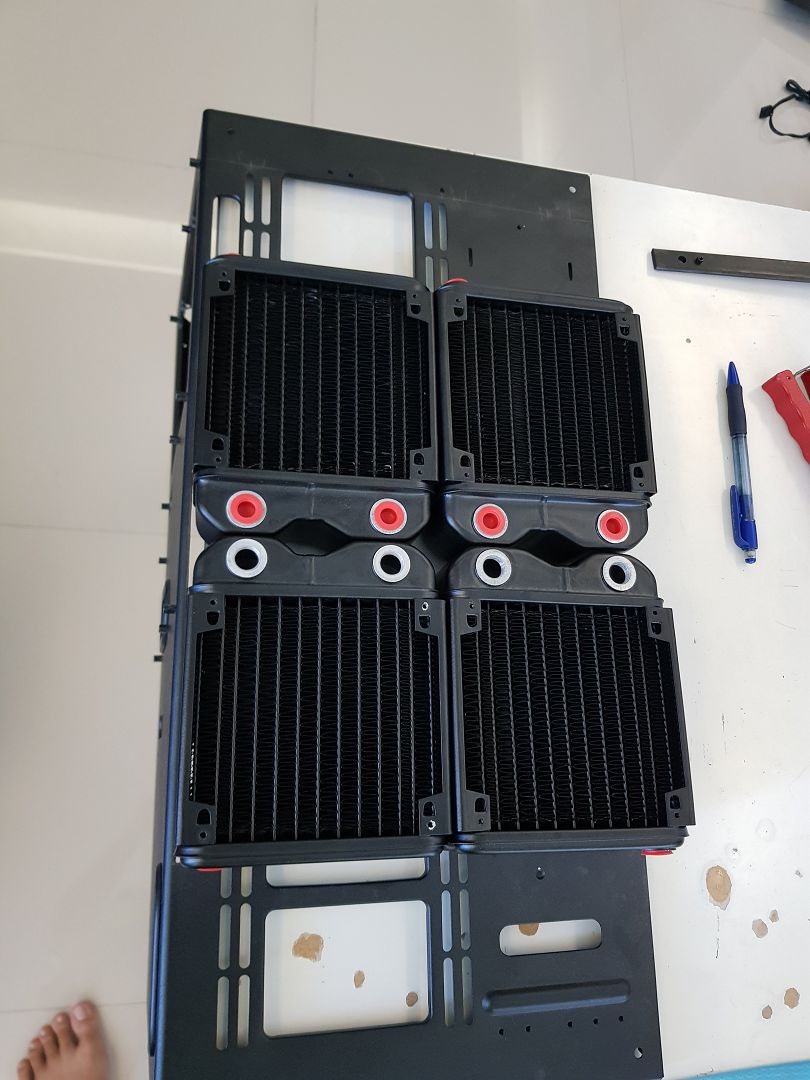
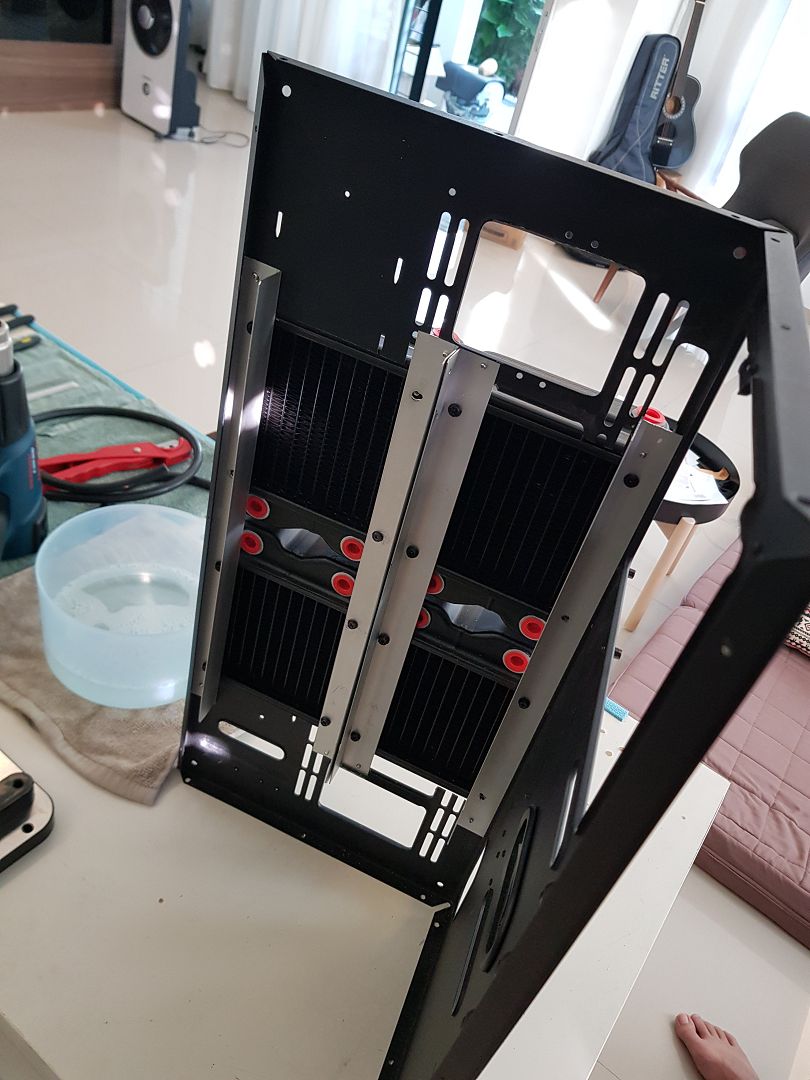
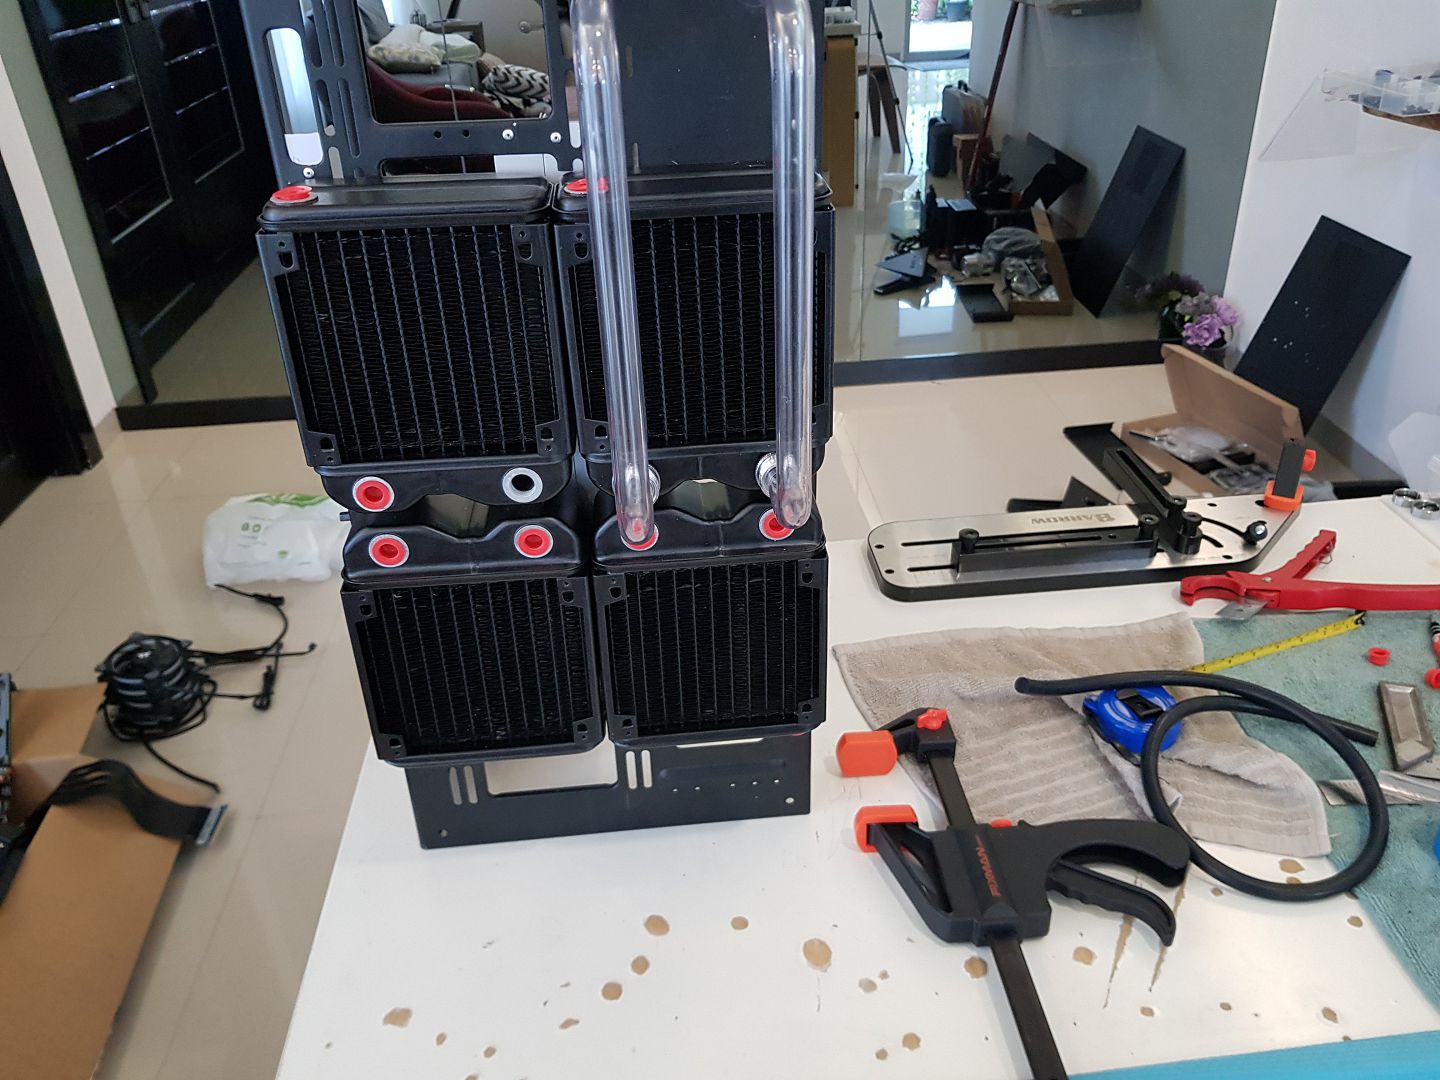
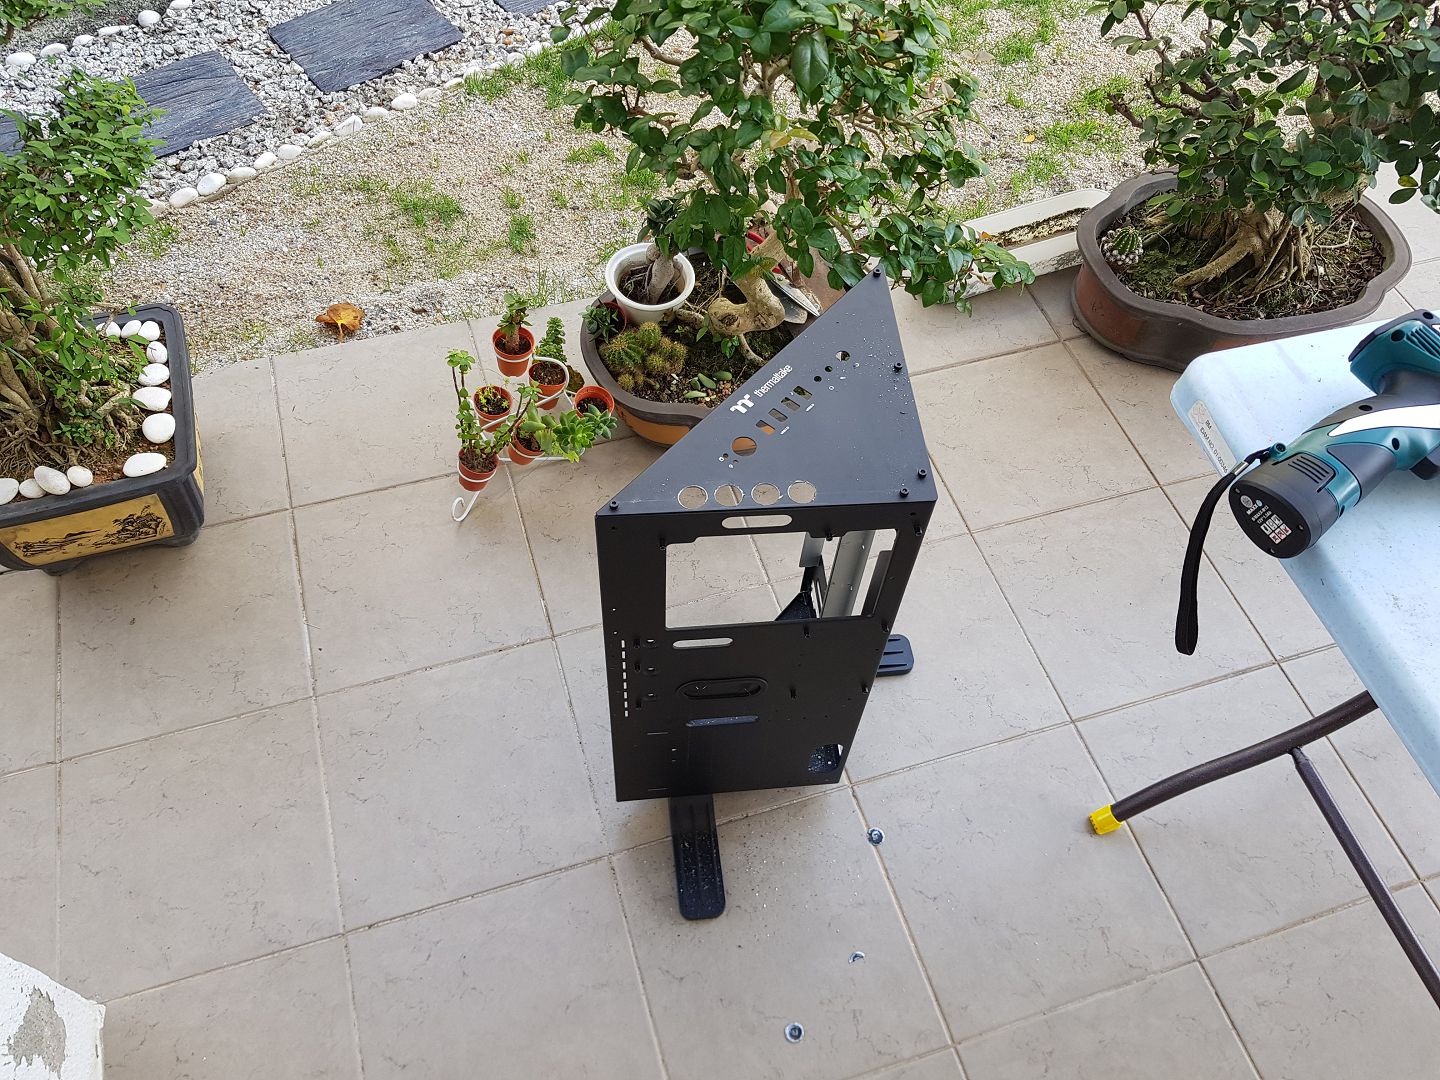
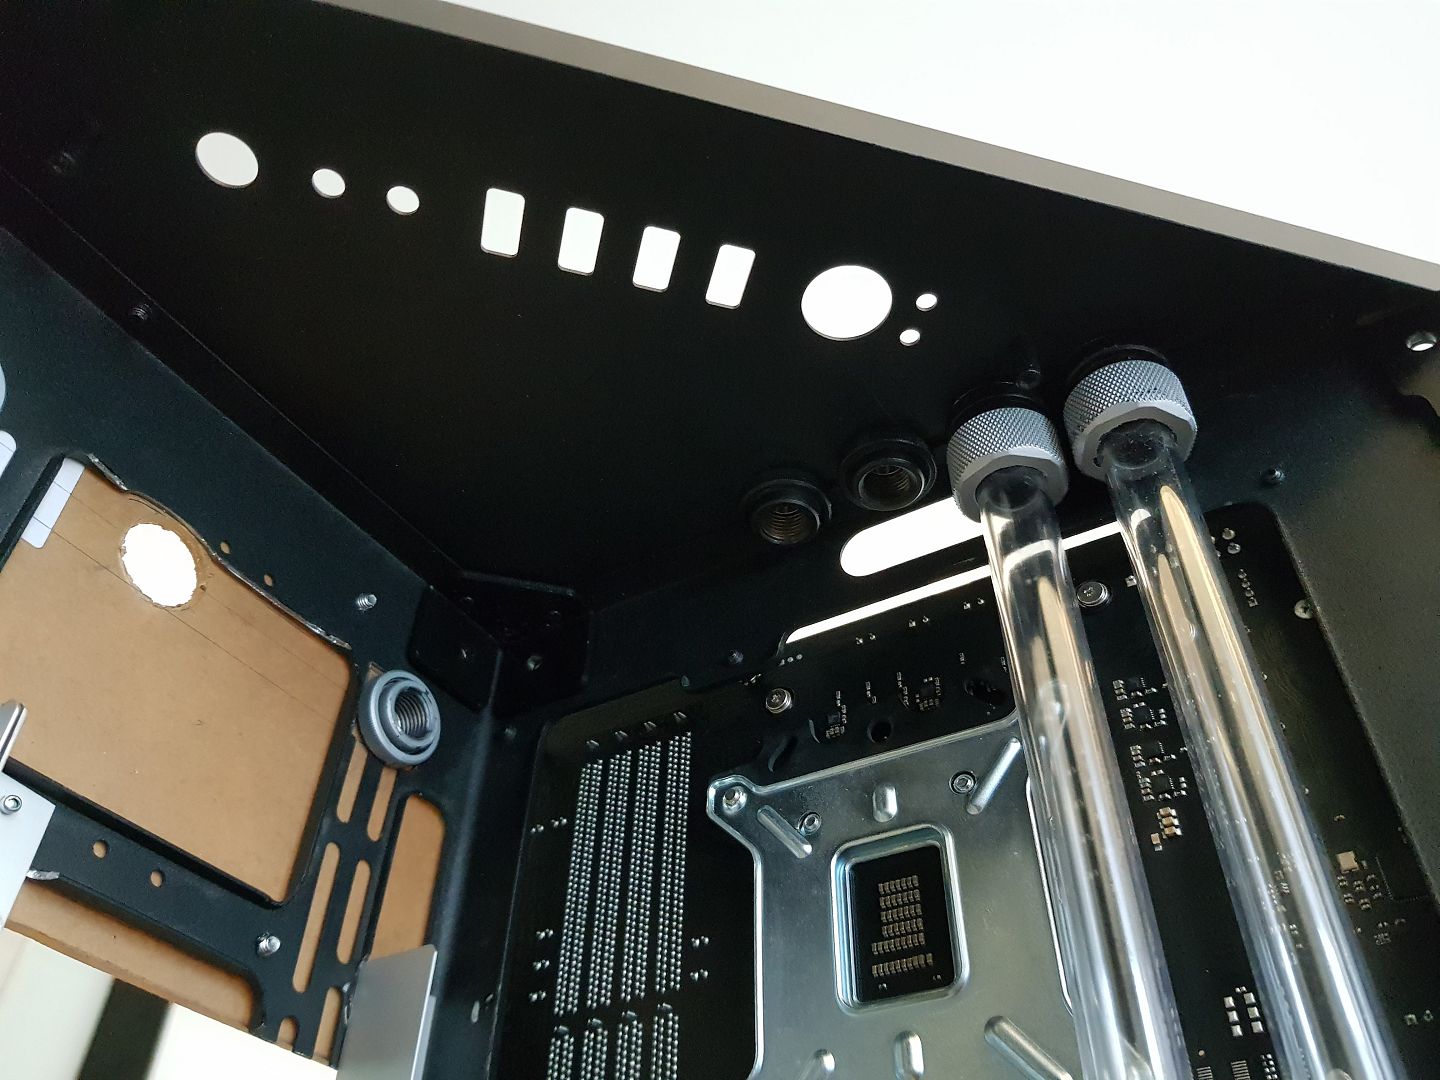
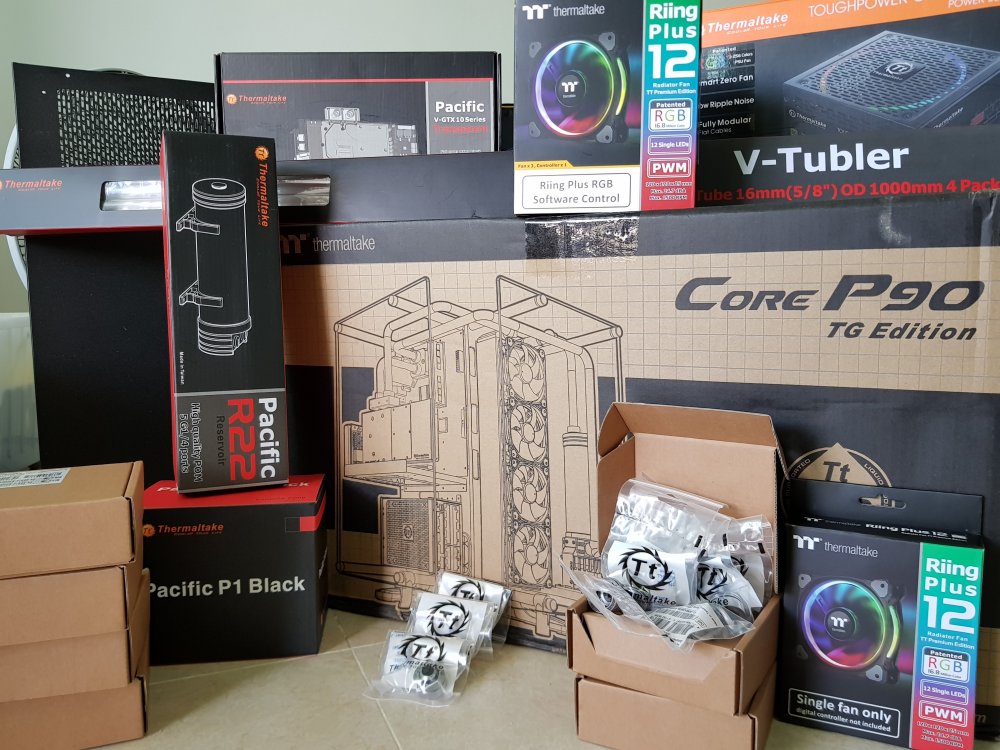
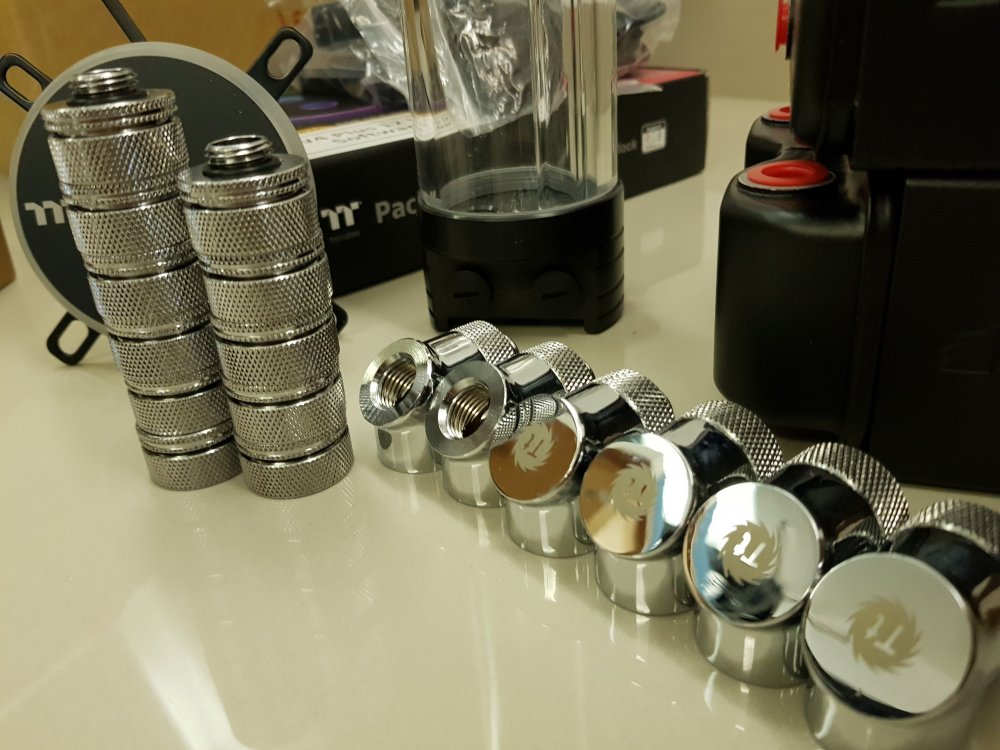
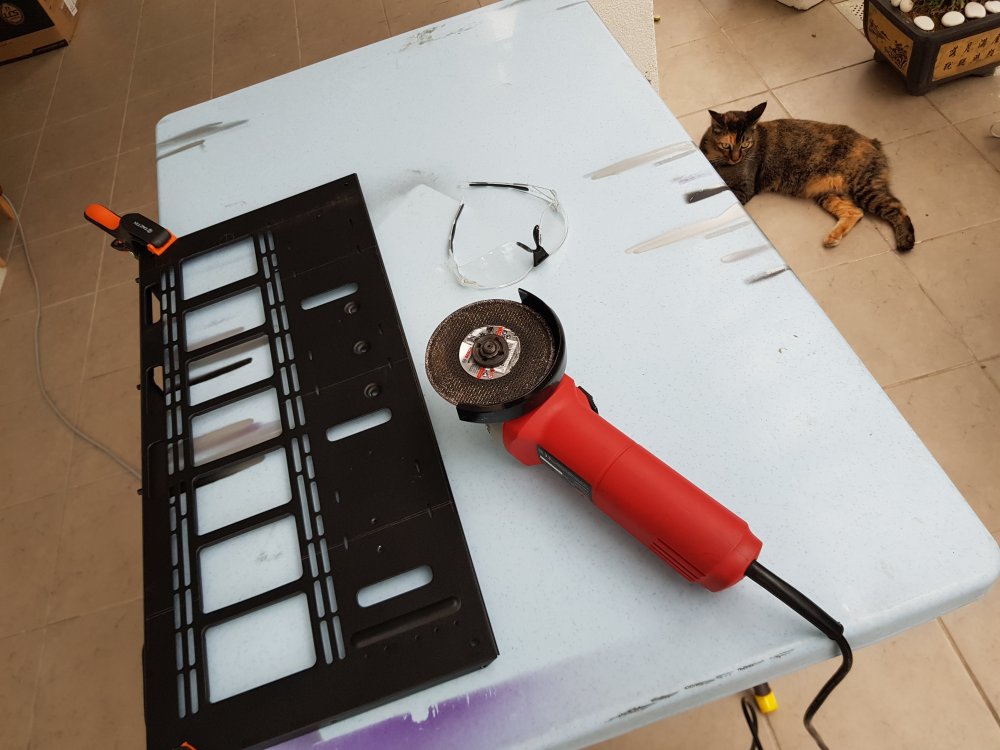
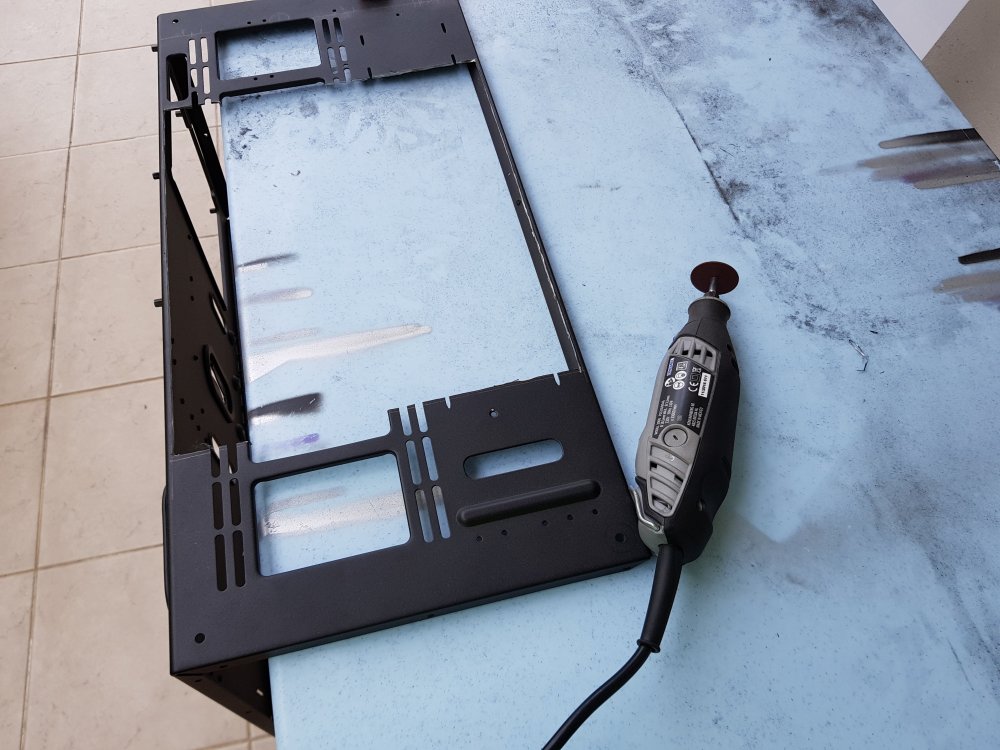
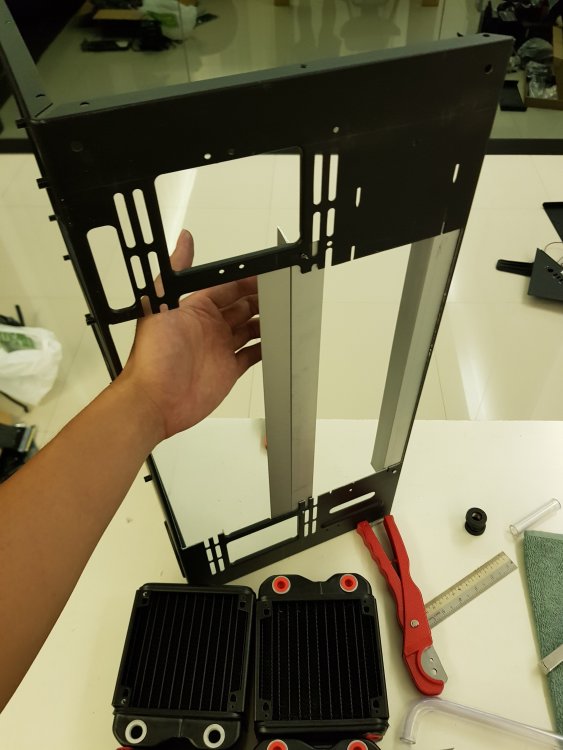
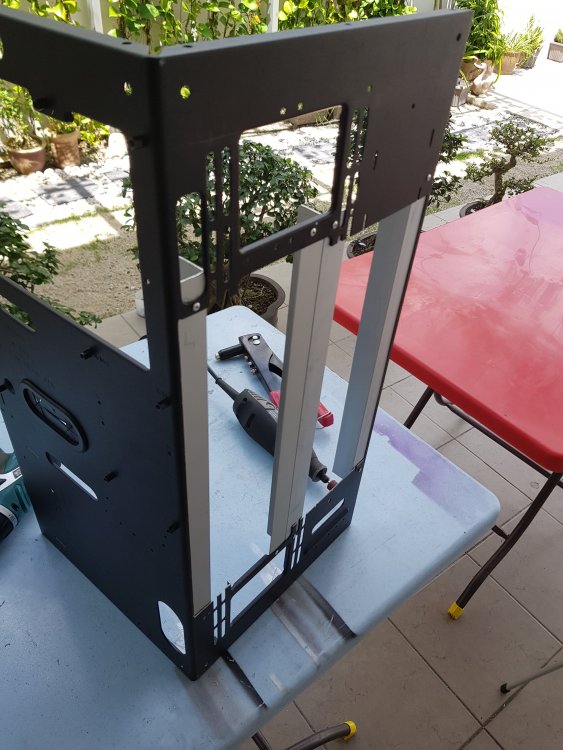
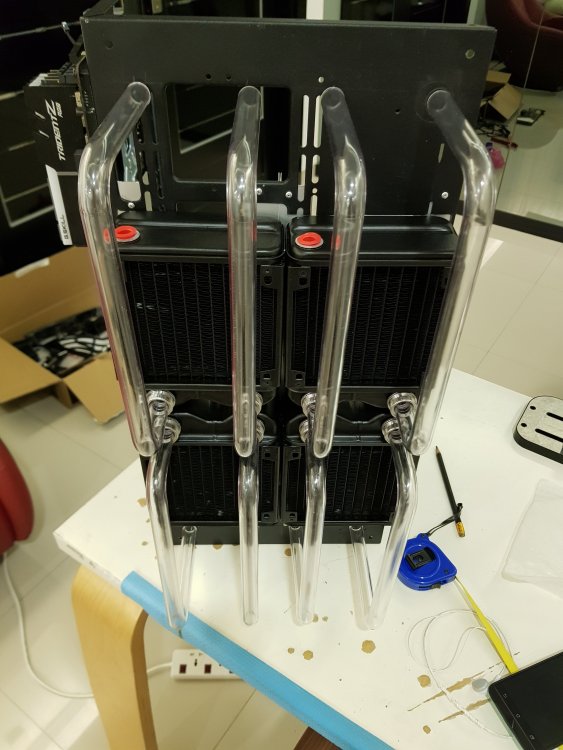
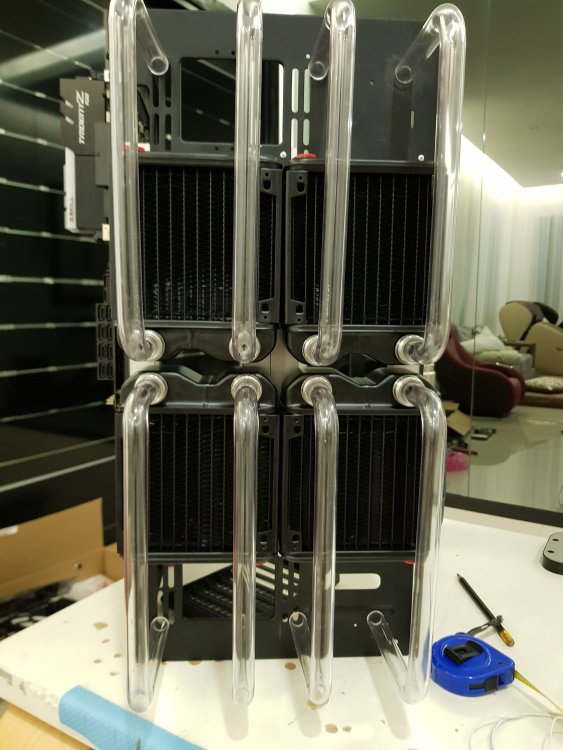
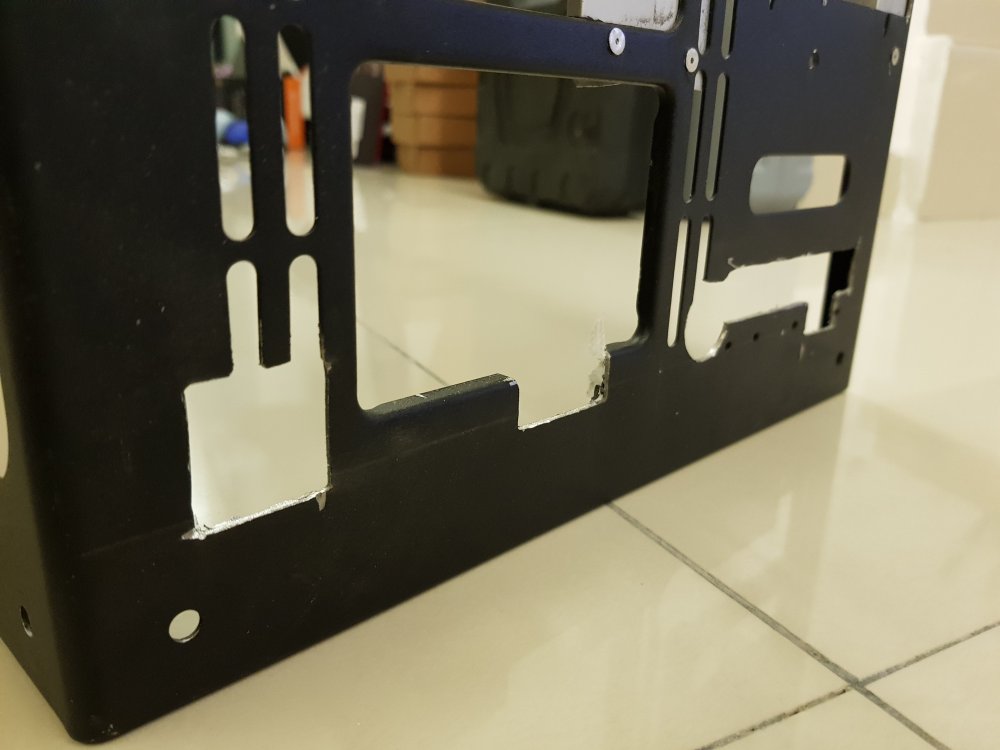
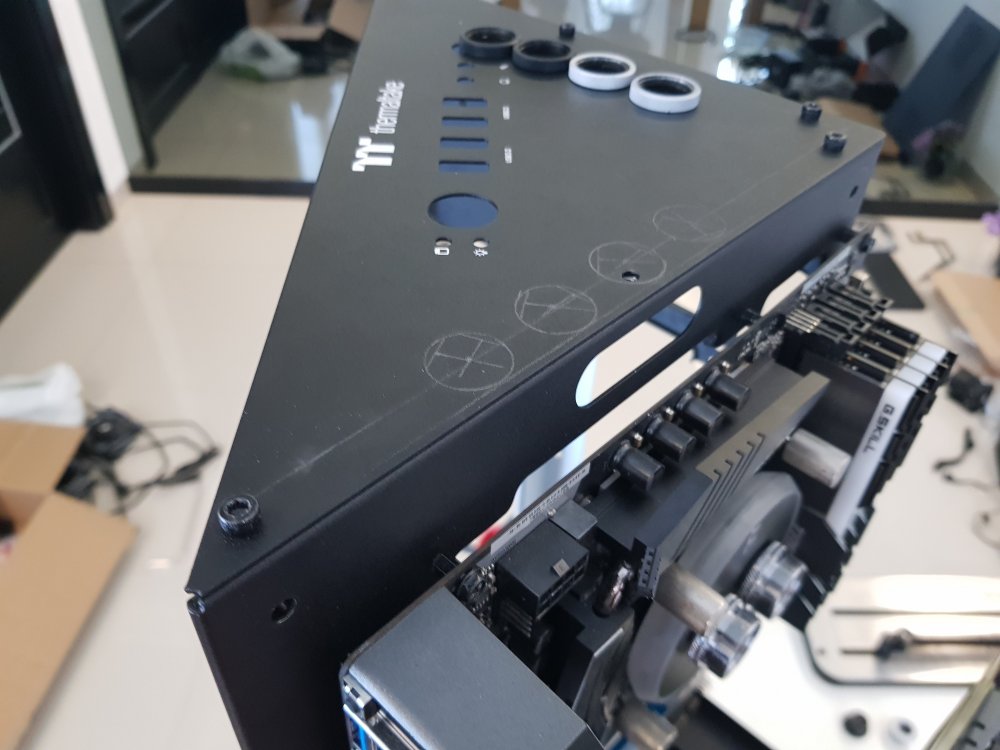
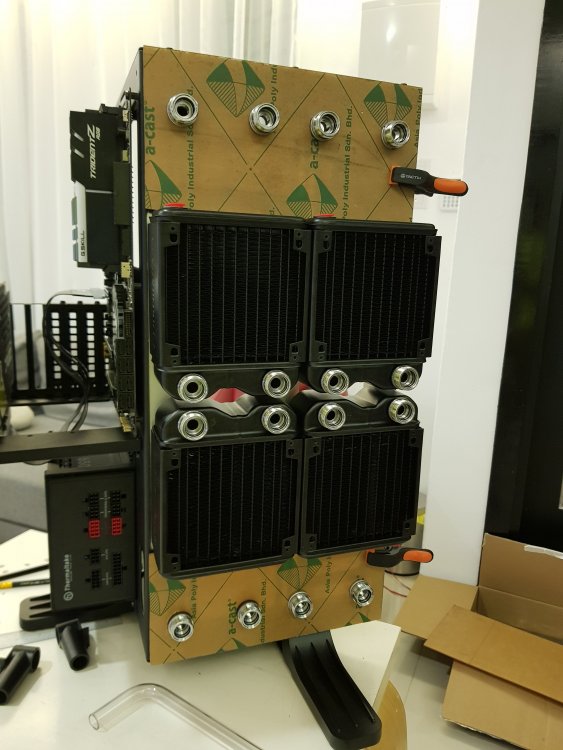
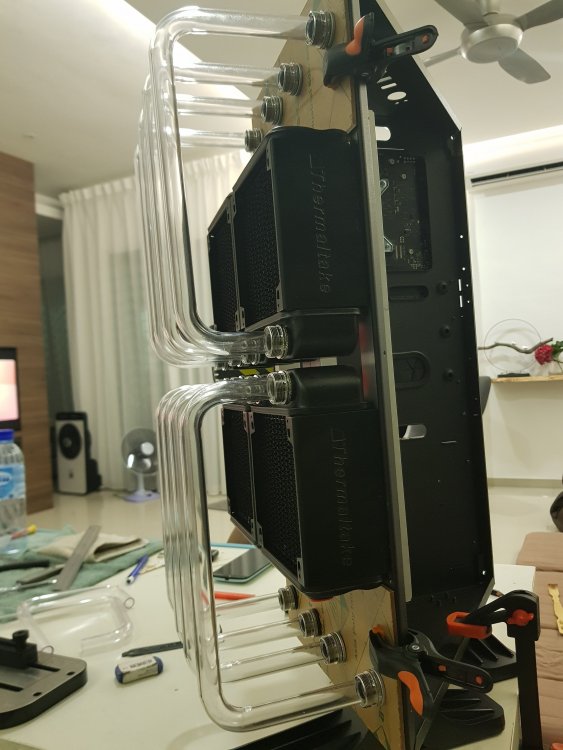
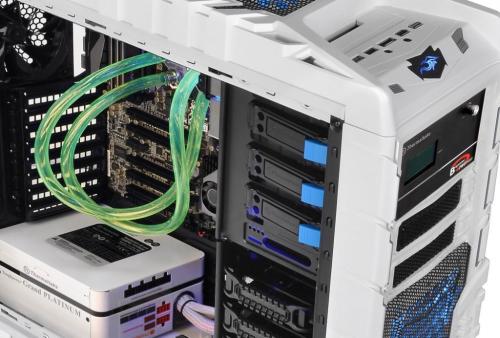
First time posting here, please forgive me if i posted the wrong format. Brief introduction of myself: Im currently a student, casual pc enthusiast who love watercooling too much and started a little bit of modding as a hobby. Got my first ever sponsor from Andy Thermaltake using my first ever build as a proposal (View 71 - JY71, build video: https://www.youtube.com/watch?v=tb3BALoAl4Y&lc=z23xdhowhybterurz04t1aokg52qnykfhp5bfgcsc0cbrk0h00410). Big fan of thermaltake, great products, got sponsorship, dream comes true, life is complete . Core p90 is such an excellent chassis and i'm so fortunate to get this chassis from thermaltake. No doubt 101% effort is going to put into this build! Mod on! Sponsored items! How crazy!! Core P90, such a sexy lady. Chrome Fittings. How elegant. Disassembled the chassis. Figuring out radiator mounting. Meow. Decided to cut out a part of the chassis and make radiator mounting using aluminium frame. Cleaning out the edges using dremel. definitely have to show off every parts that "involved" in watercooling. Bend dem tubes! Always my favourite part of building a pc, which is watercooling. Thermaltake V-Tubler is superb to work with! Holes for pass through fittings. Black and Chrome. No other colours can beat this duo!!! My core P90 backside woopssss! Smexy bare-back!


-
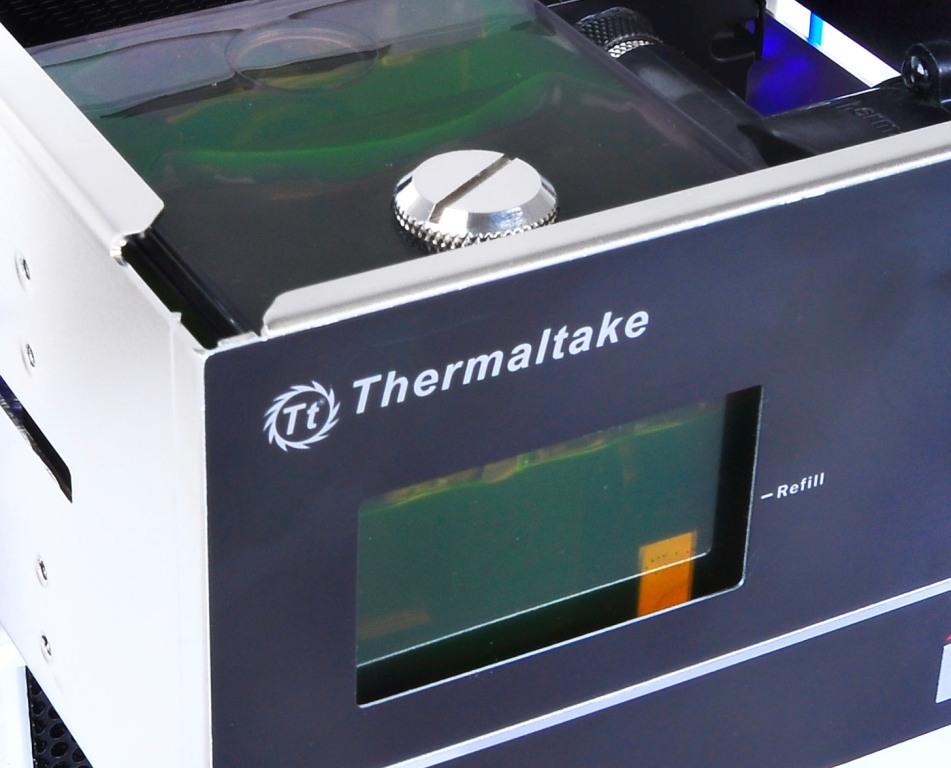
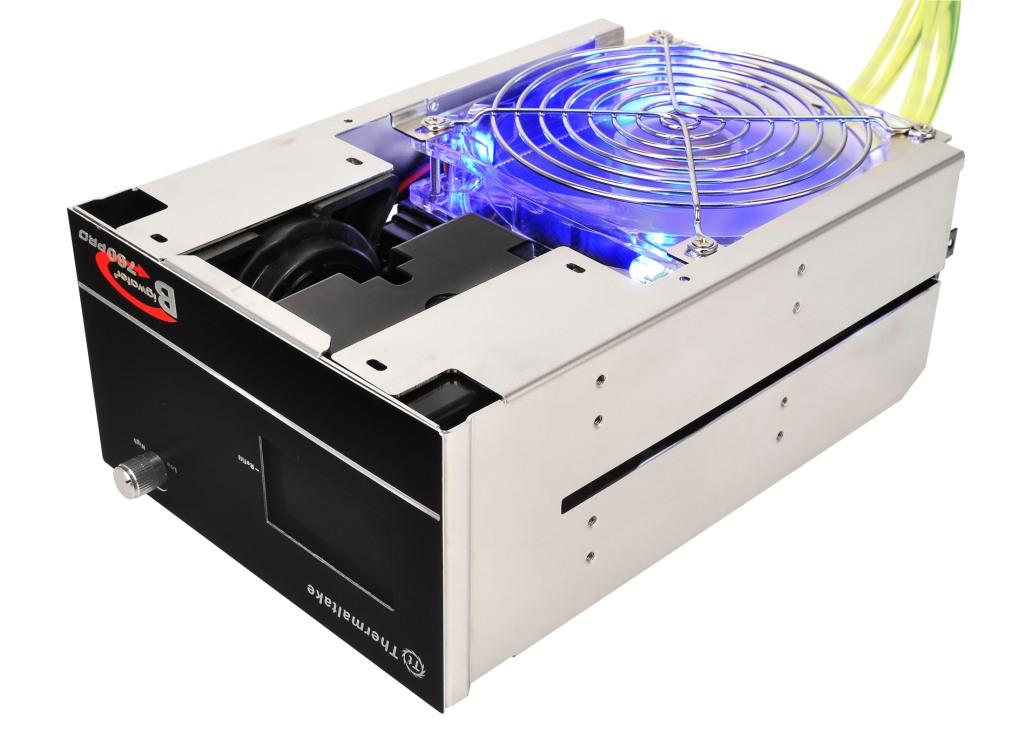
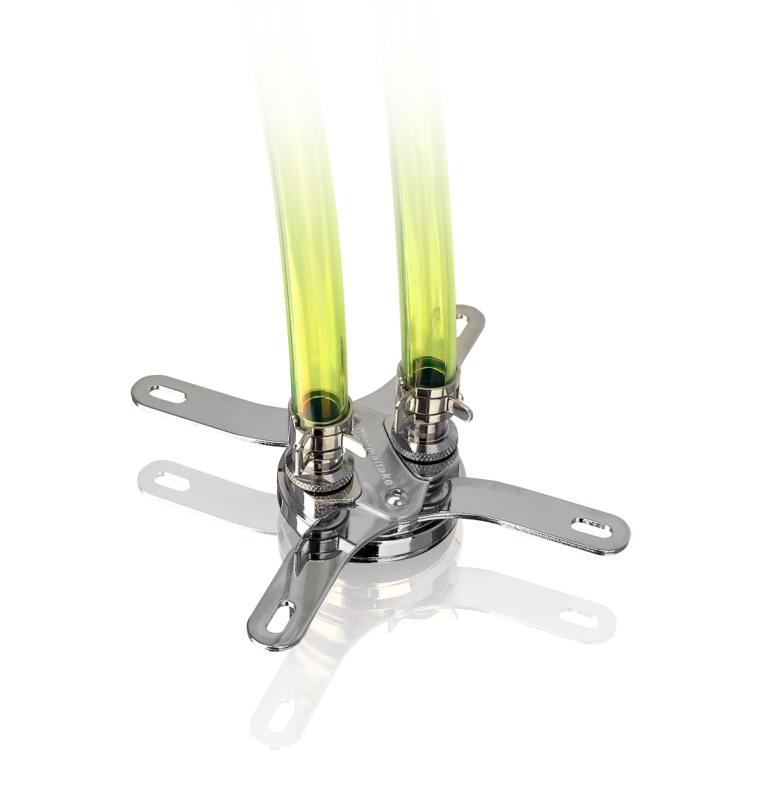
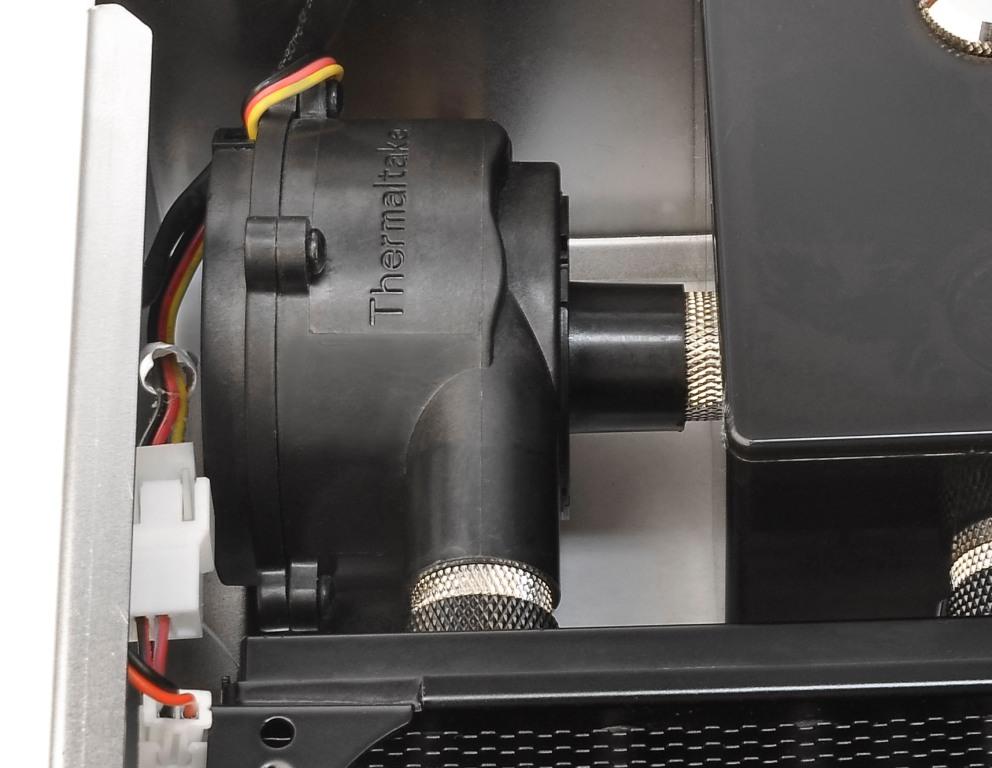
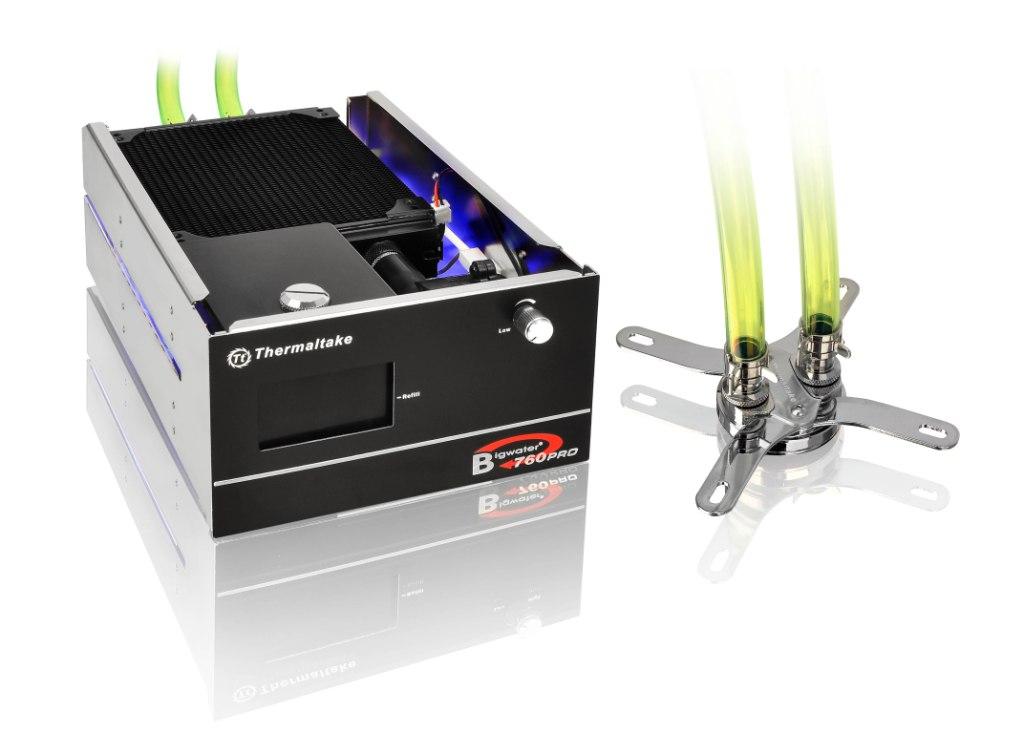
This thread is for people who are Bigwater 760 Pro owners or intereted in owning one, so feel free to ask questions or post a picture of you system with Bigwater 760 pro. official website http://www.thermaltake.com/Cooling/Liquid_Cooler_/All_in_One/C_00001962/Bigwater_760_Pro/Design.htm SPEC 2U Bay DrivesDimension : 252.8mm(L) x 145.8mm(W) x 84mm(H) Weight : 1.5kg ApplicationCPU : AMD FM2/FM1/AM3+/AM3/AM2+/AM2 Intel LGA 2011/1366/1155/1156/1150/775Water BlockMaterial : Copper Dimension : Ø 45mm x 35mm(H) Connector : For 9.5mm ID (3/8â€) tubing Weight : 156 (g)PumpDimensions : 75(L) x 70(W) x 75(H) mm  Bearing : Ceramic bearing Maximum Capacity : 500 L/ hr Rated Voltage : DC 12V Input current : 600 mA Connector : 3 pin Noise : 16 dBA Life time : 80,000 hr (MTBF)  RadiatorDimensions : 144.3(L) x 120(W) x 33(H) mm Material : Aluminum Connector : For 9.5mm ID (3/8â€) tubingFanFan Dimension : 120(L) x 120(w) x 25(H) mm Fan Speed : 1600~2400 RPM Rated Voltage : 12V Noise : 29.4 ~39.9dB Life Expectancy : 30,000 hr Connector : 3pinLiquid TankDimensions : 79.9 (L) x 67.8(W) x 76.4(H) mm Capacity : 270 c.c TubeDimensions : 9.5mm ID(3/8â€) tube Material : Green UVCoolantCapacity : 500 c.c Major Material Ingredient : Propylene Glycol


- 17 replies
-
- 8
-
-
- watercooling
- casemod
- (and 1 more)
-
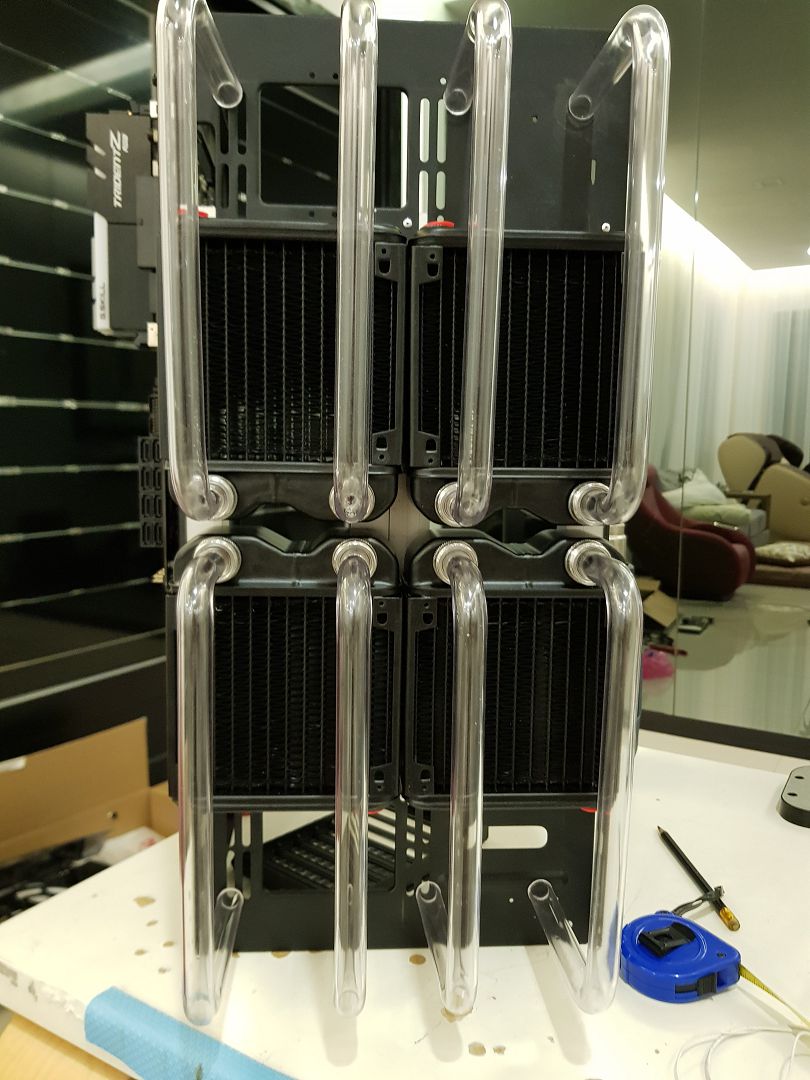
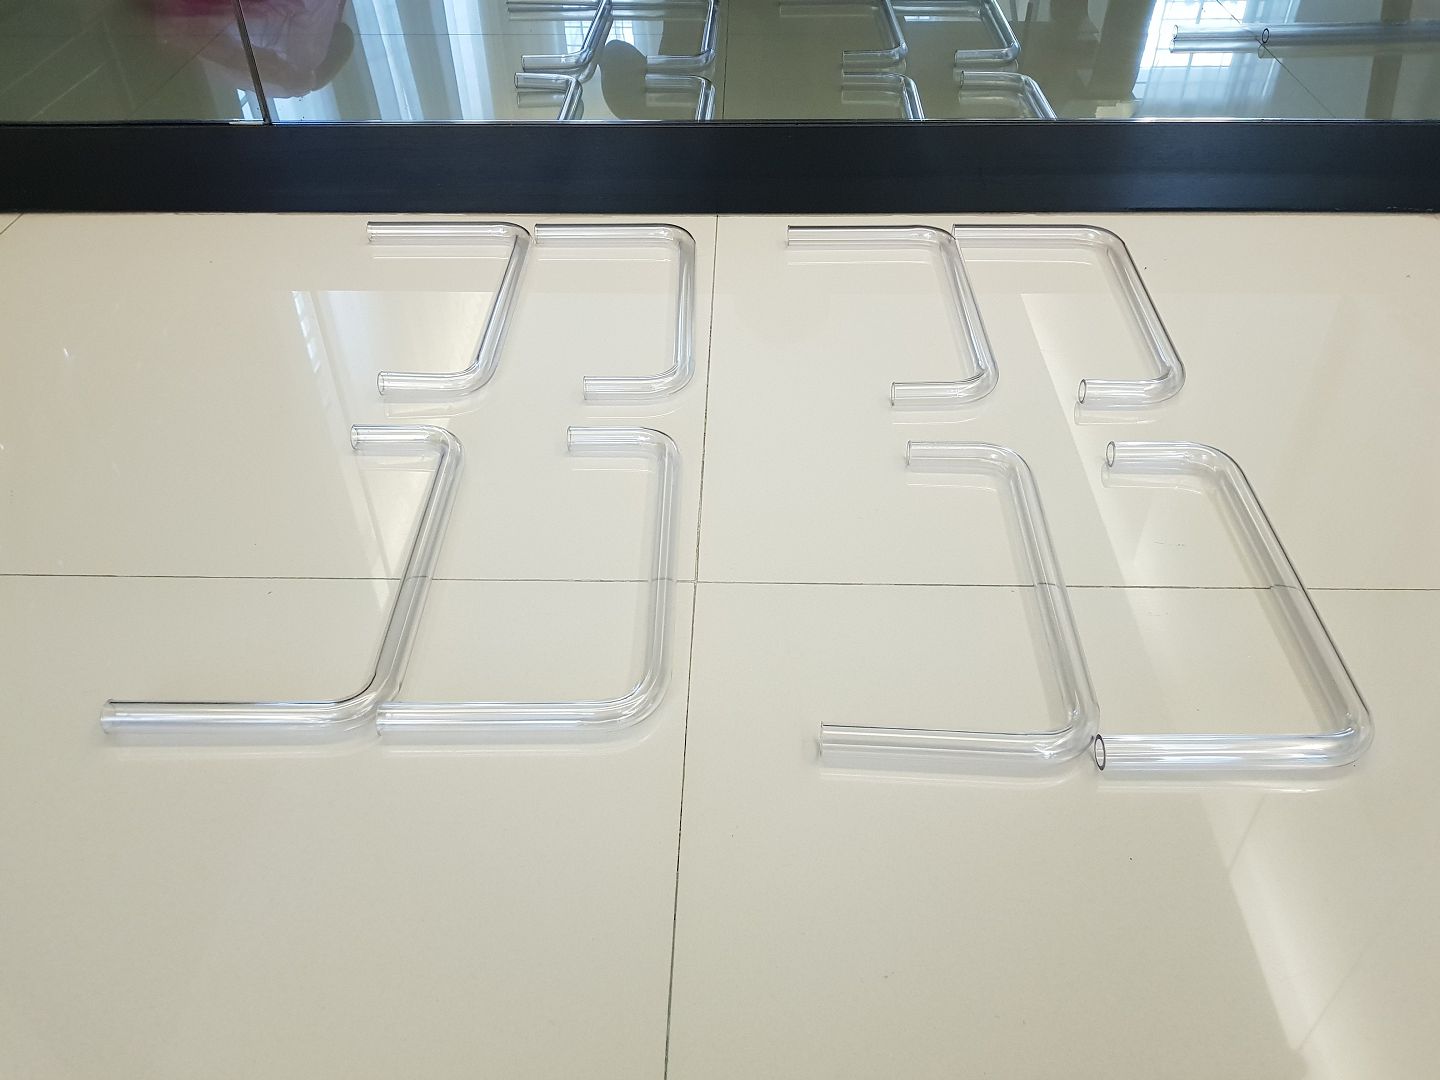
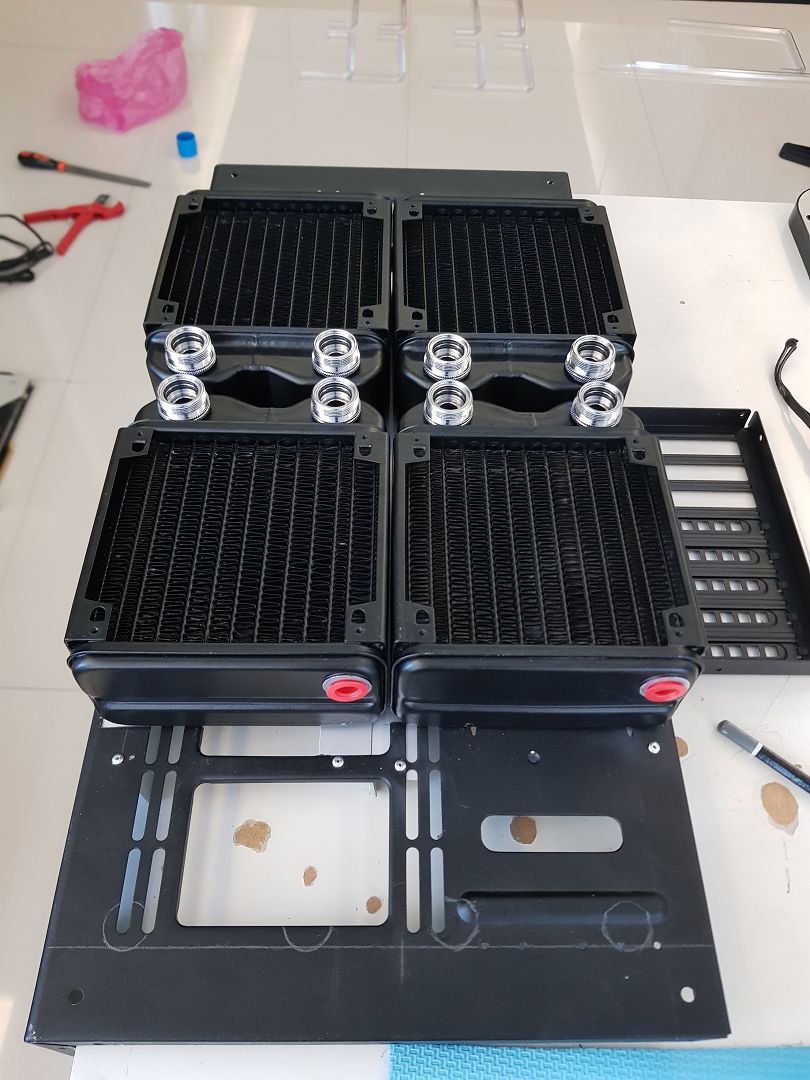
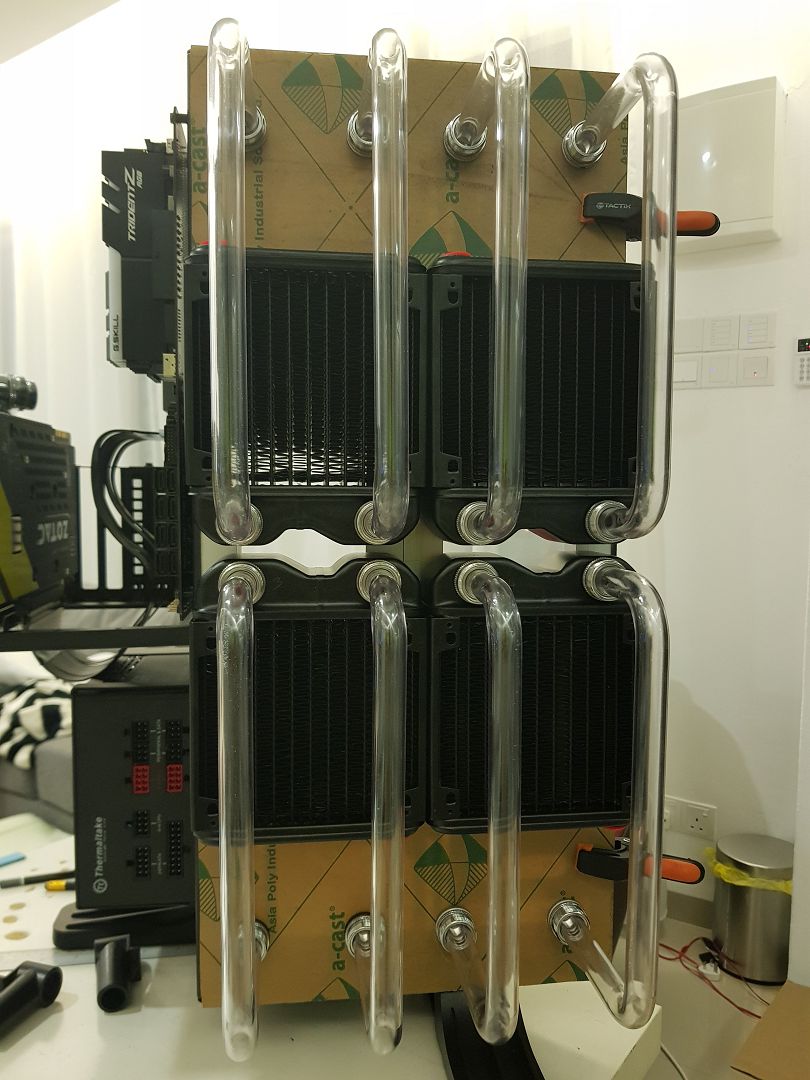
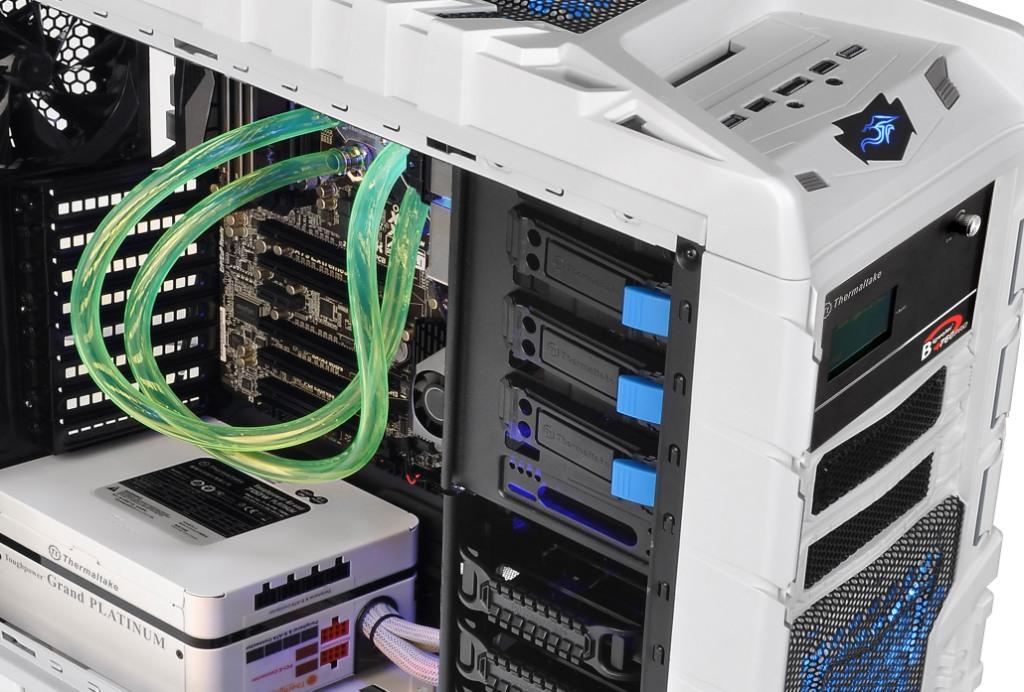
Hi Guy's I am new to this forum. I have started a new project (no name) in the x71 case. I am going to be modding the front of the case and adding temper glass. It will have a dual loop two pumps two Res and two 360 rads, I am looking at replacing the motherboard tray and add my own plus a few little surprise a long the way. Also going to we extending and sleeving all cables. Components. CPU: i7 4770K overclock to 4.6 RAM: Corsair vengeance Ram 16gb GPU: Zotec 980ti PSU: Corsair ax 860 WATERBLOCKS: EK 2x Pump: EK d5 2x RAD: EK 360 FANS: 7x 120 Riing 12 thermaltake RGB FANS: 3x 140 Riing 14 thermaltake RGB FITTINGS : Thermaltake pacific petg 16mm compression. FITTINGS : 3x EK pass through HARD TUBE: Thermaltake Petg 16mm Here are some early drawings X71 case Some of the components. Was not sure if I should use 2x 140 or 3x 120 fans still not sure what do you think? I like to draw out what I want to do and I took size for new motherboard tray. I did draw up some designs for new air intakes then got them laser cut. I had to cut some of the front case for them to fit. These are removable not sure if I am going to leave them clear or paint them. This weekend I am hoping to drill out the rivets and start the motherboard tray. Sleeve the pumps and front panel connectors. Thanks for check out my mod any question or feedback let me know below.


-
Hey all, I'm wanting to build my first custom WC loop and this seems like a great time to buy since the sale is going on. I have a few questions questions however as I look at what I want to get..... I'm thinking of going soft tubes since it seems a little easier and cheaper for beginners. I really want the new RGB waterblock thermaltake sells but its not included in any of the kits so if I were to buy all the pieces separately I'm looking at: P22-D5 Reservoir/Pump RGB Waterblock Pacific RL240 radiator (I felt like I don't "really" need a 360) Riing Fan 3 pack (I like the newest ones but they're not available right "now" in the store) Coolant V-tubler 4T Fittings This comes out to about $470 in Thermaltake's store, where as their Pacific RL360 kit (which is all the same things except an RL360 and a non rgb waterblock) is $409. I'd obviously save a good bit of money by going with the kit, but lose the ability to customize a few parts. Am I missing something or is there a discount built in for buying the kit? Another question I had is the pumps/reservoirs. What does the "-D5" pump do that the others do not? There is about a $60 premium on those. Also how big of a reservoir do I really need? Really appreciate any advice here, thank you so much!
-
Hi all, Just completed a new build and turned it on for the first time. I have the Thermaltake Floe Riing 360. It has 3 RGB fans. The waterblock and the 3 fans all light up. When I booted my computer on for the first time, the fans didn't spin. Should I be concerned? I am not sure if they only spin based on temp or that they should be spinning some on PC boot. If it helps, the other 3 case fans (2 are plugged into chas headers and 1 is plugged into CPU_OPT) are spinning
-
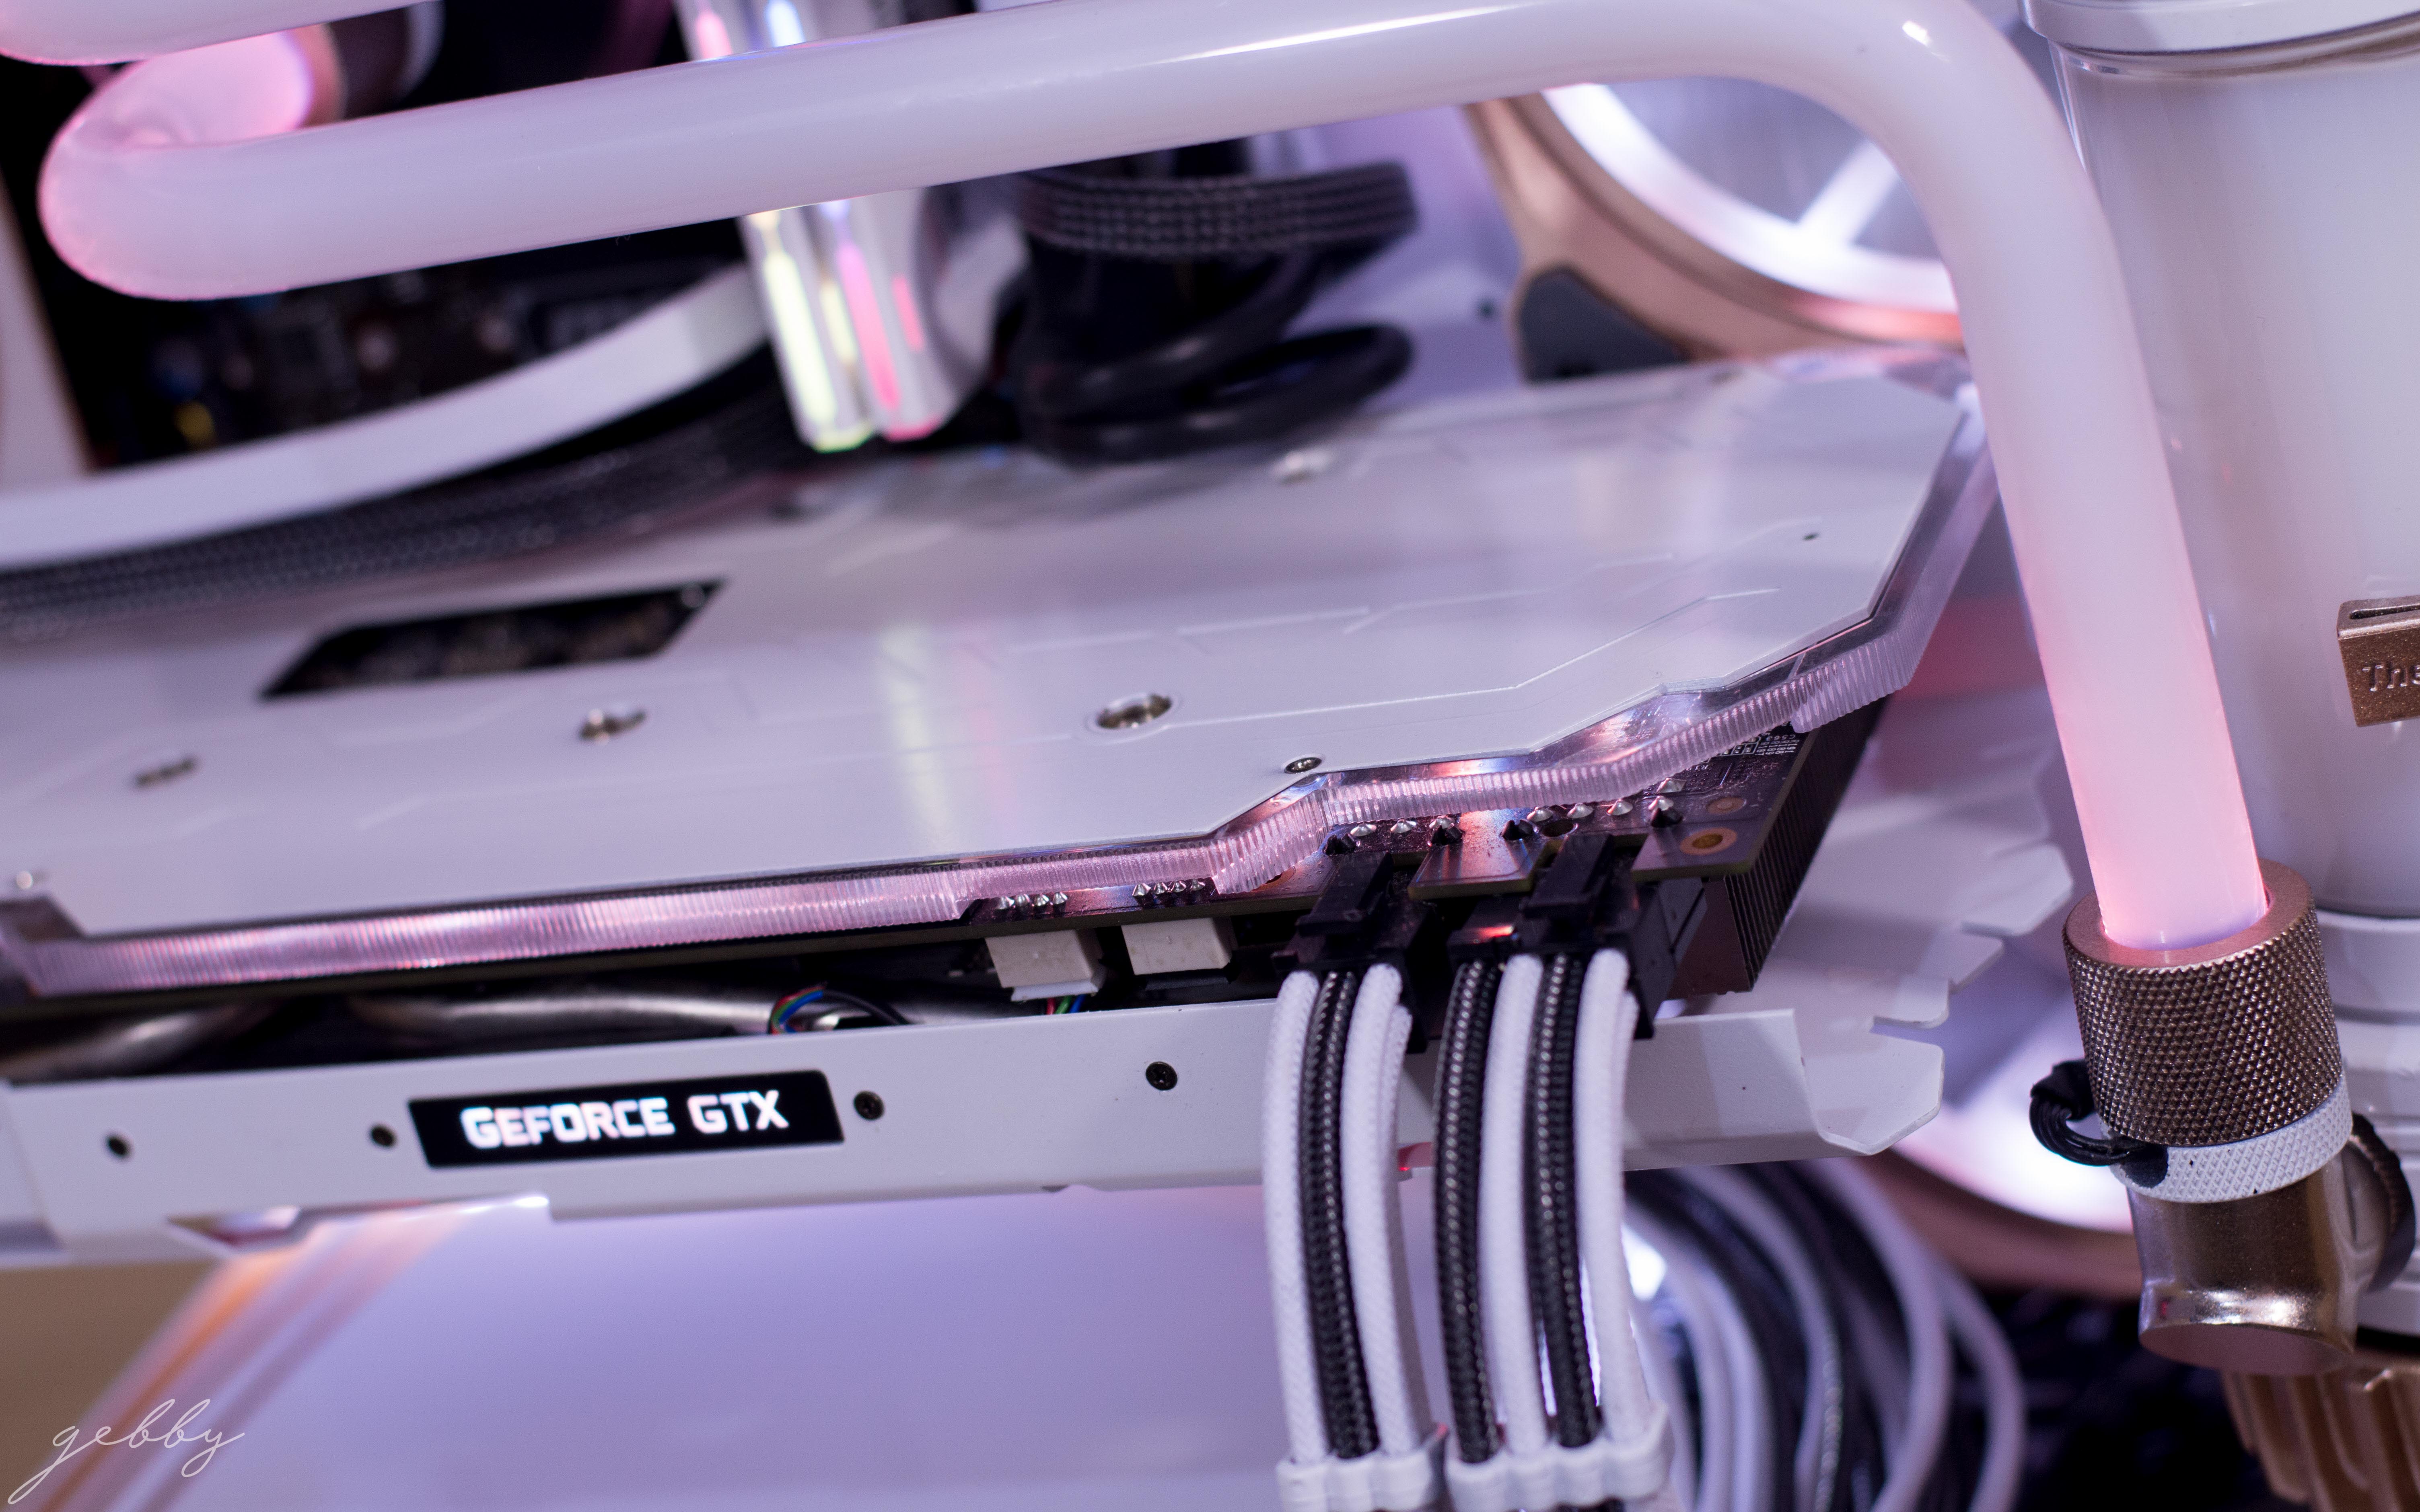
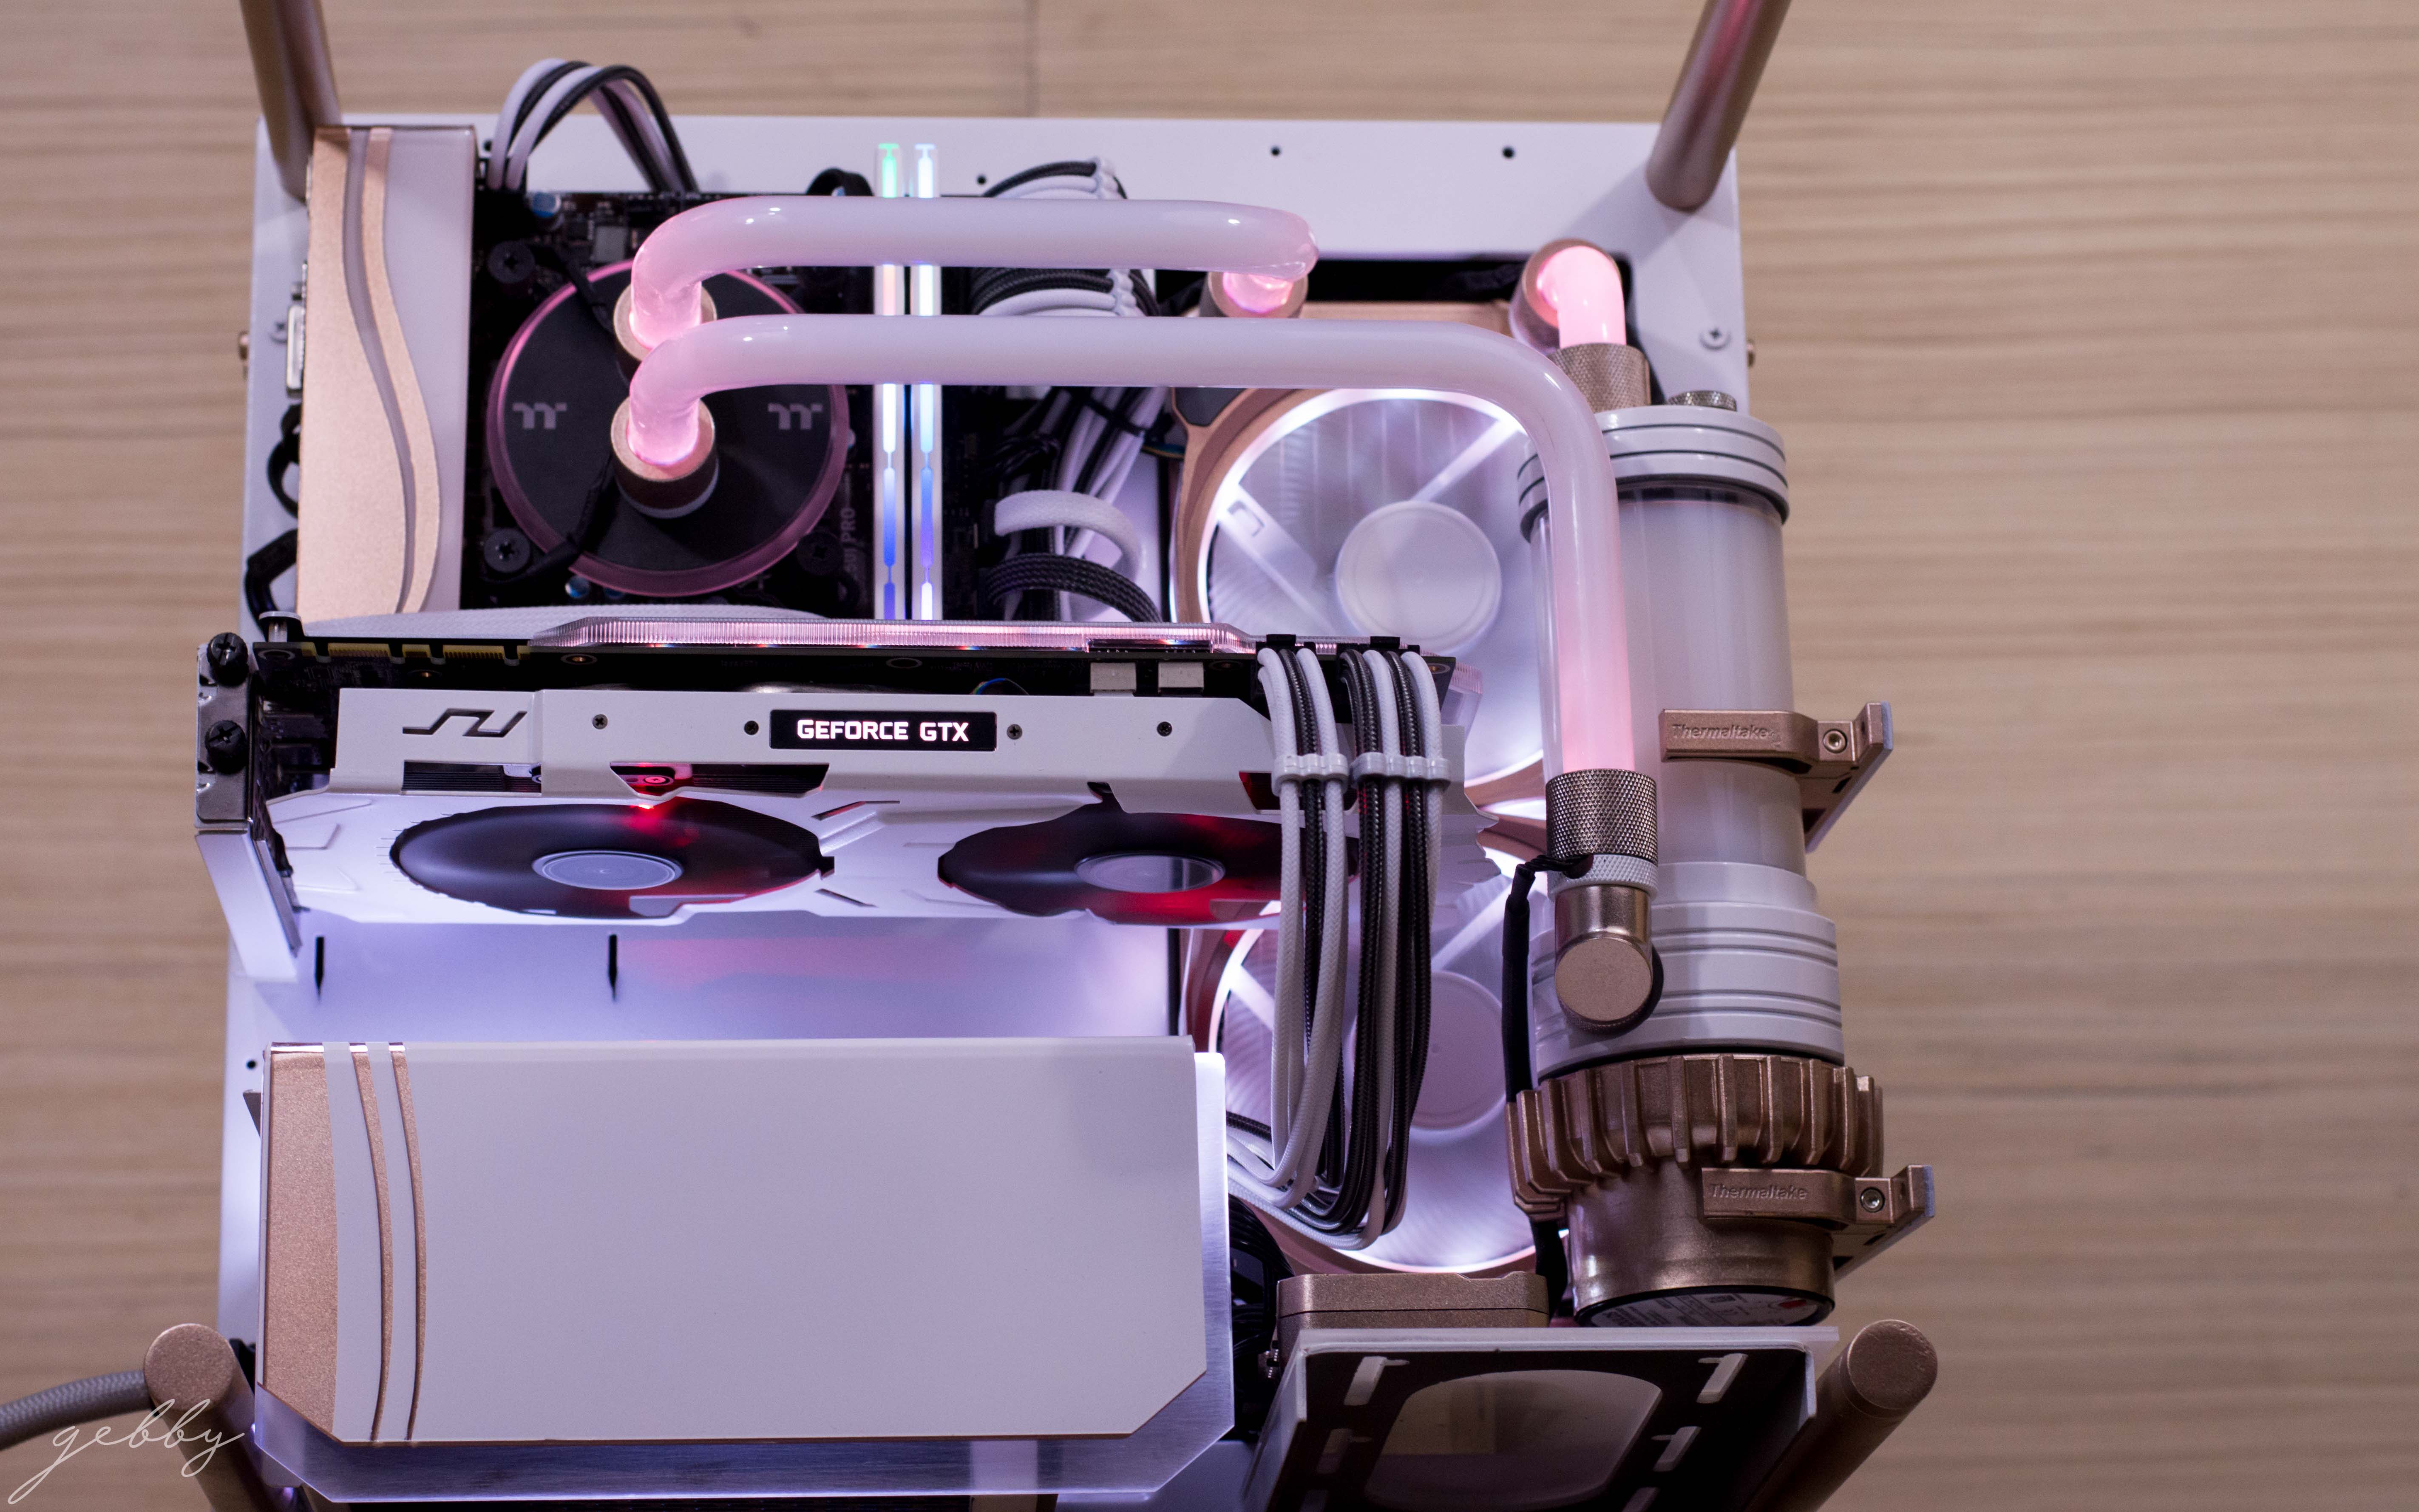
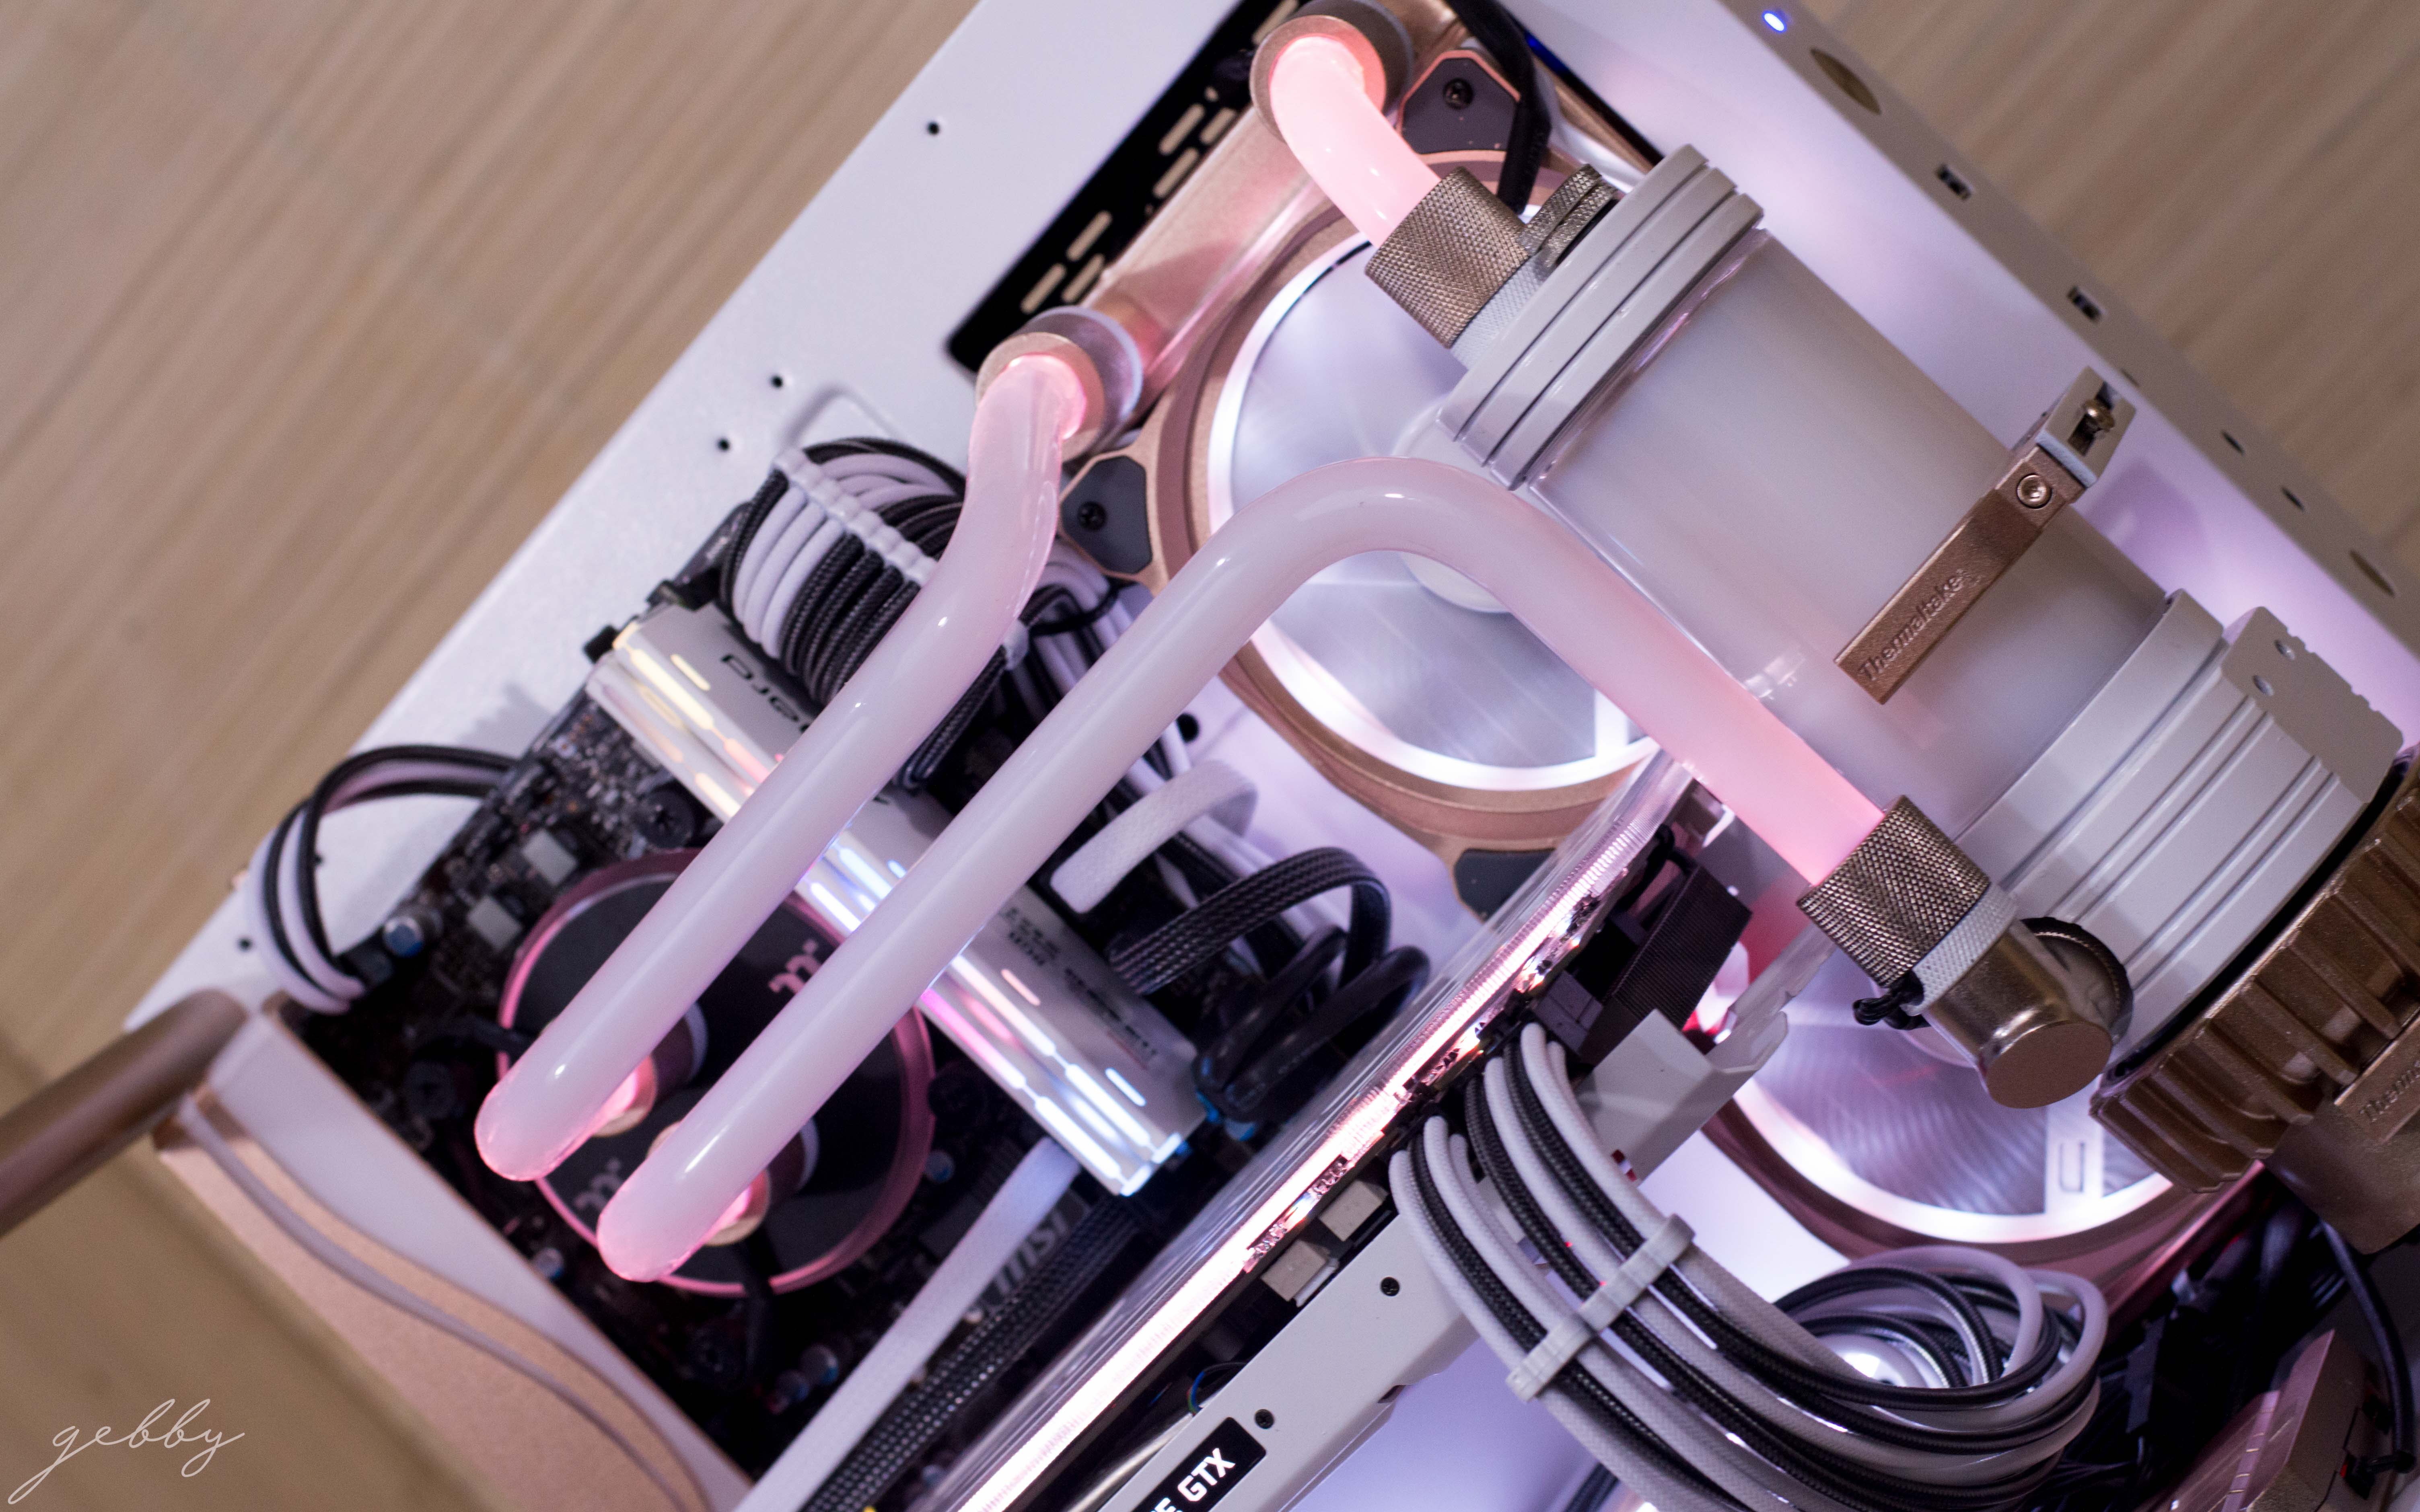
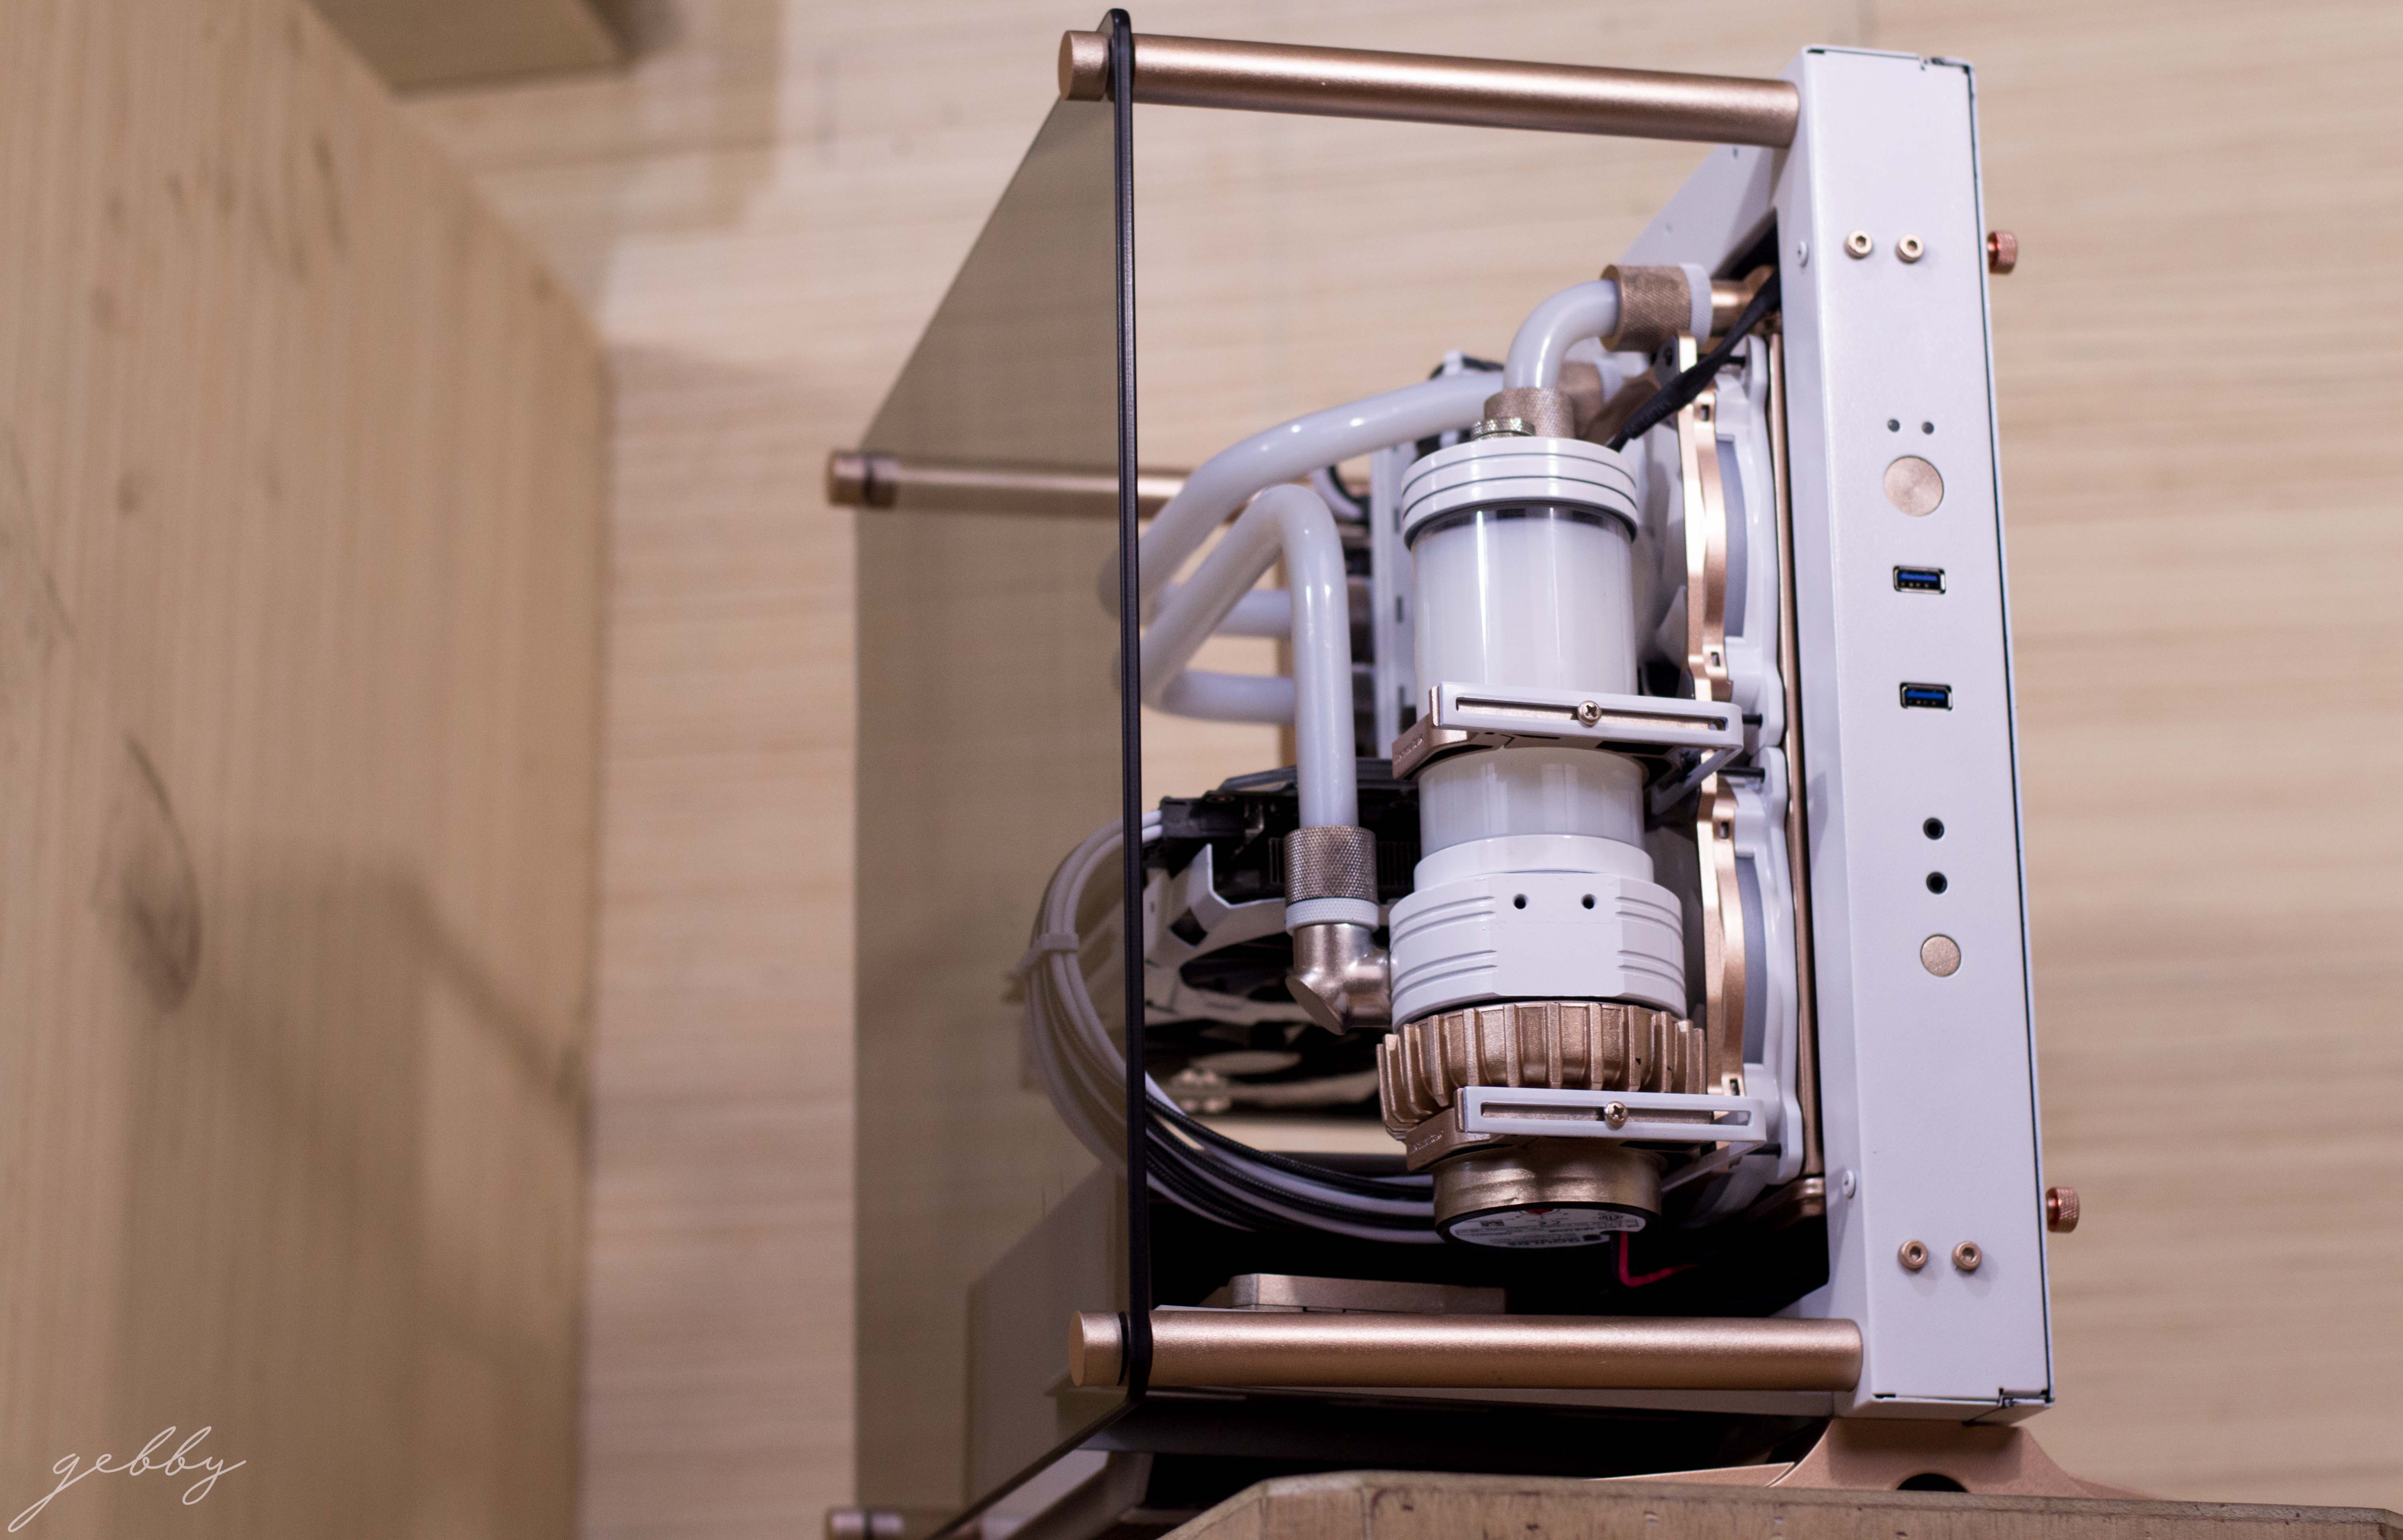
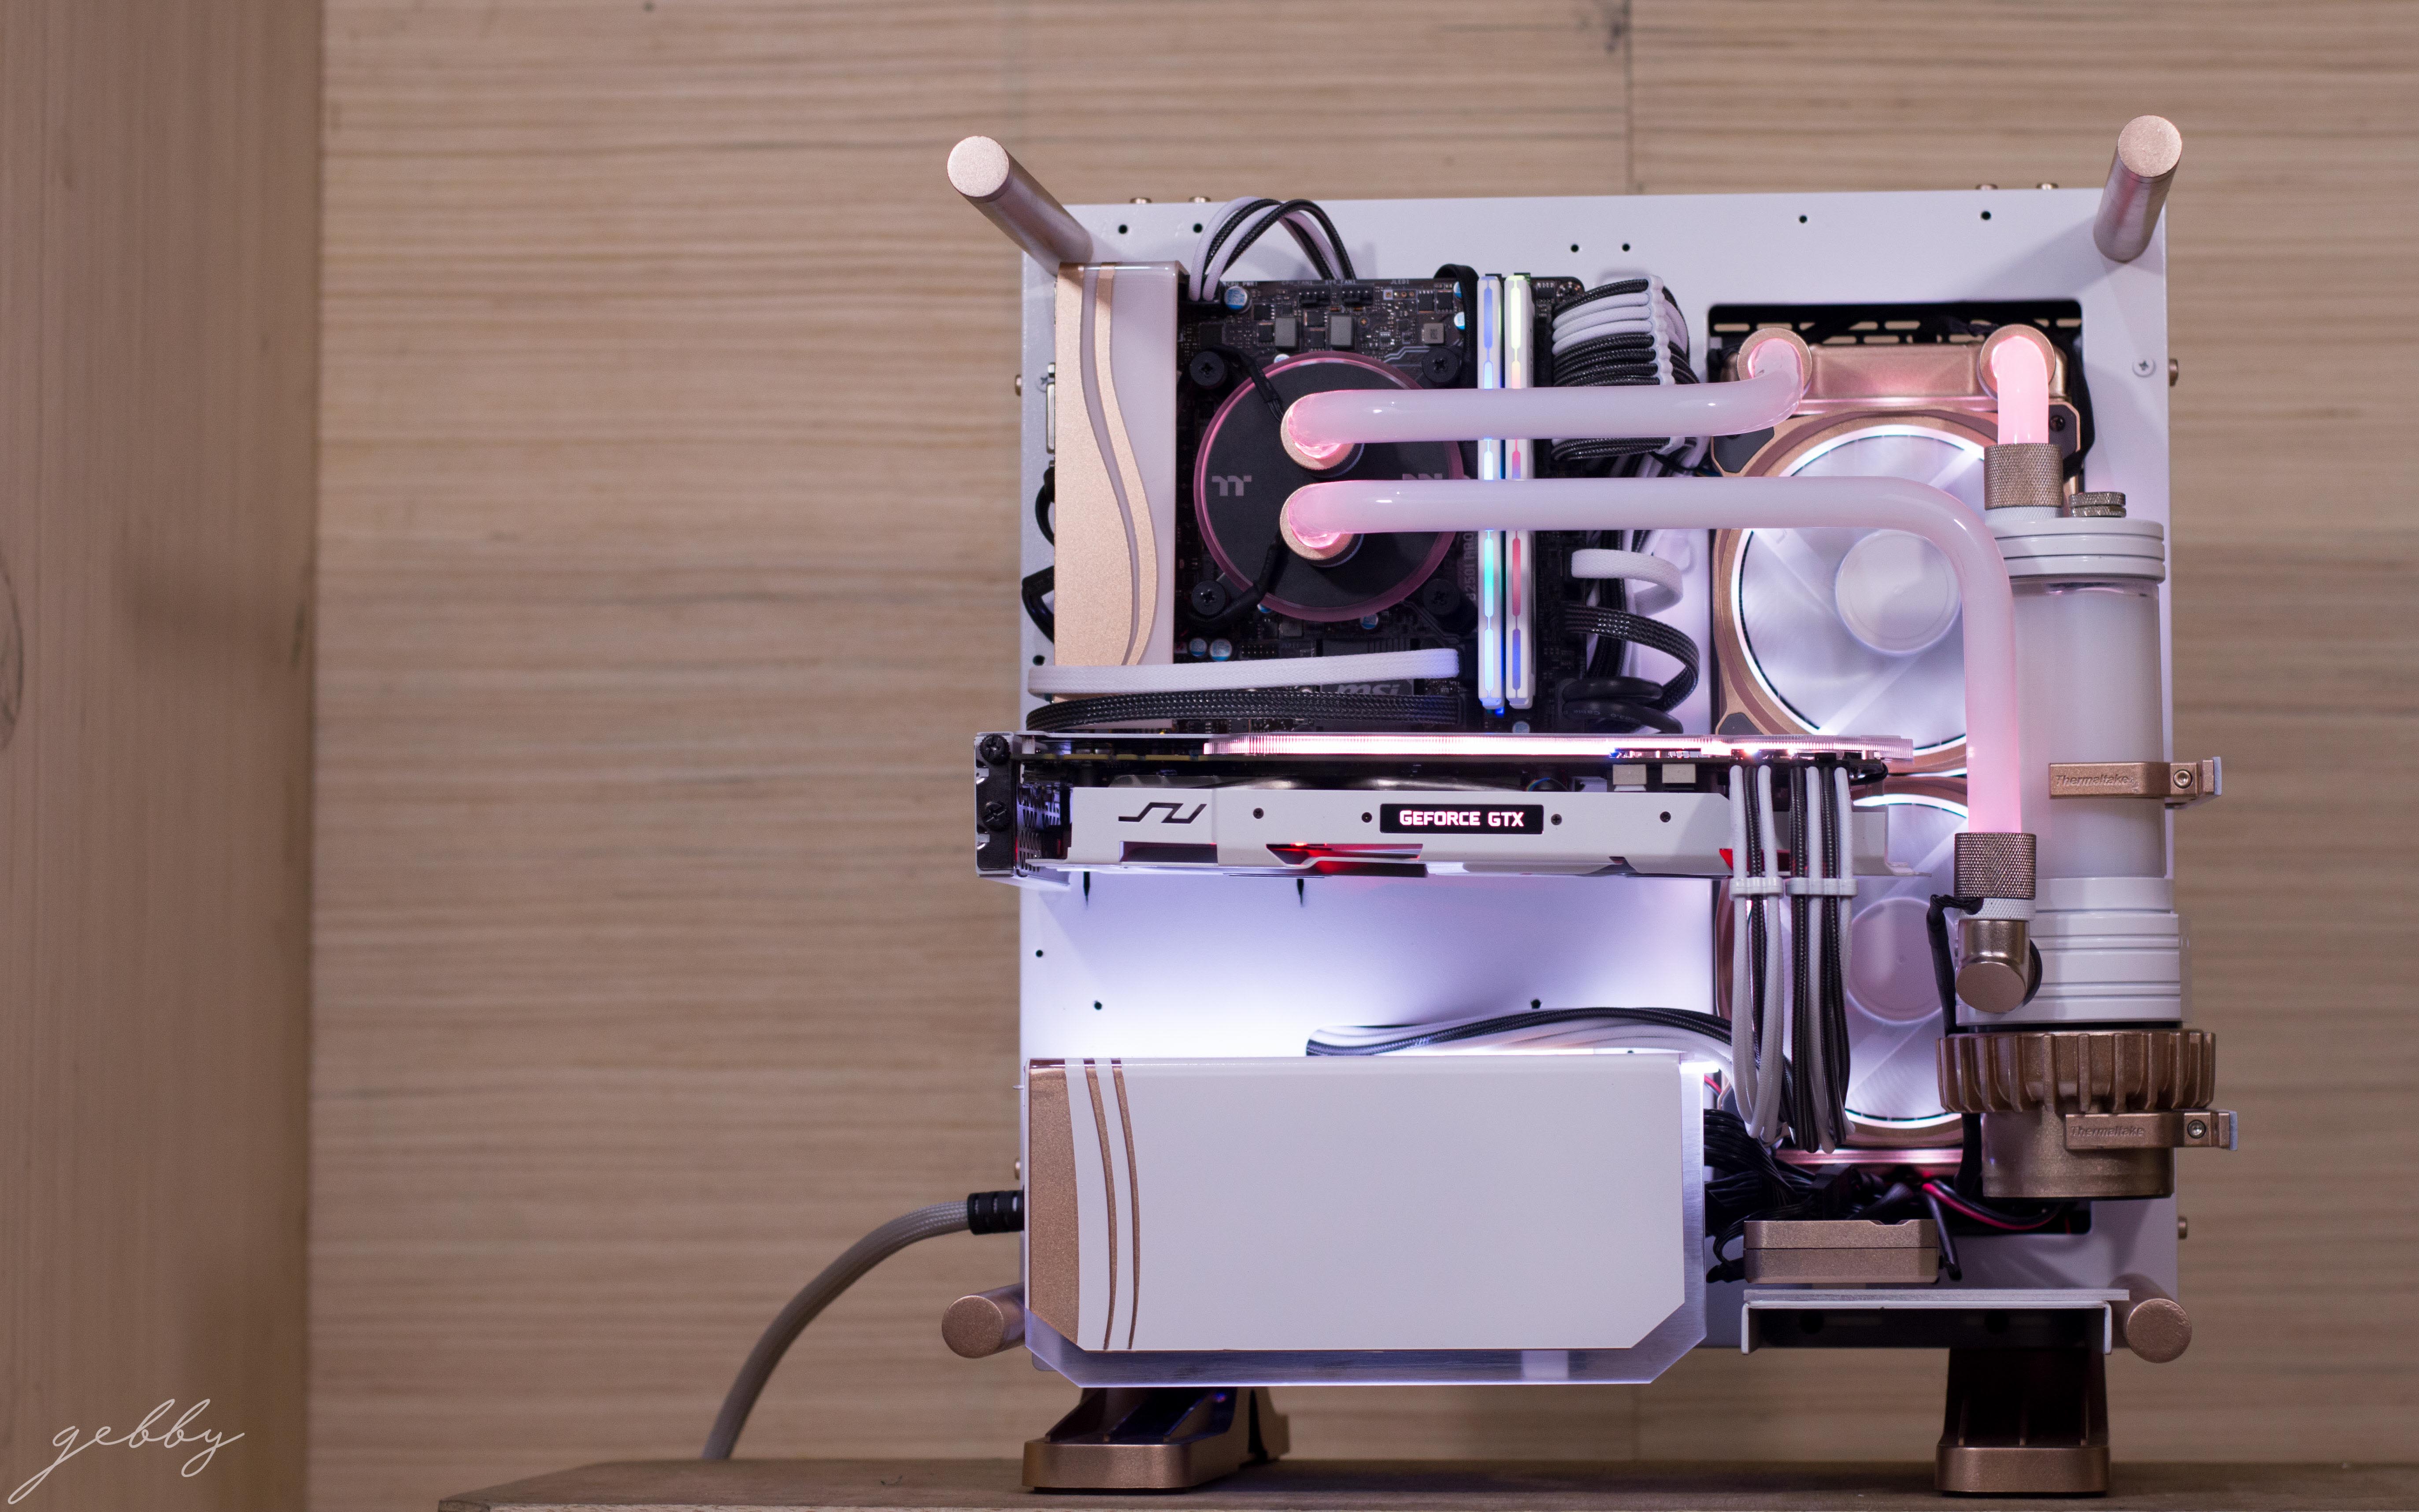
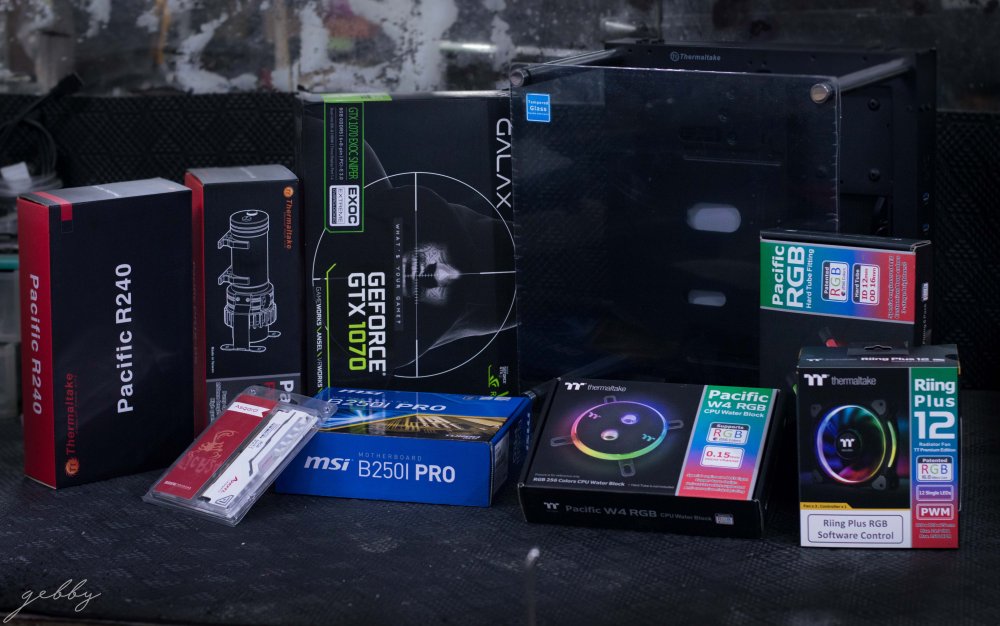
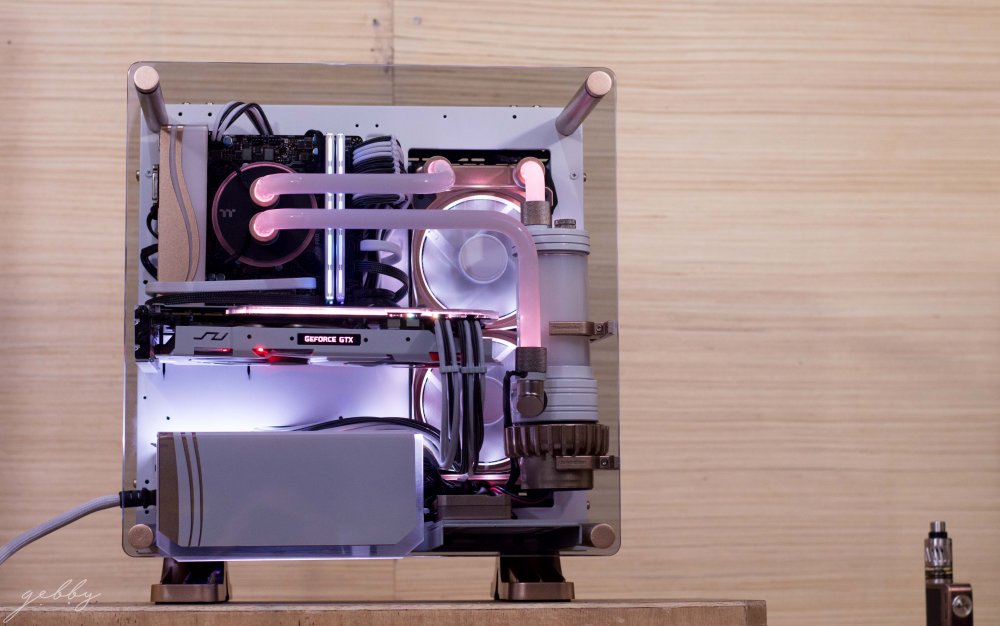
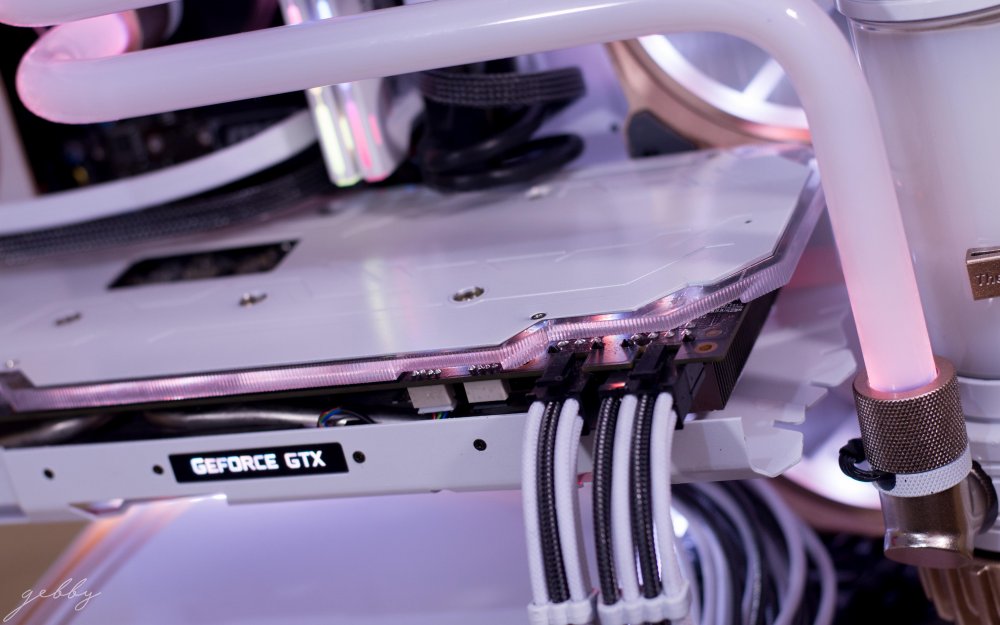
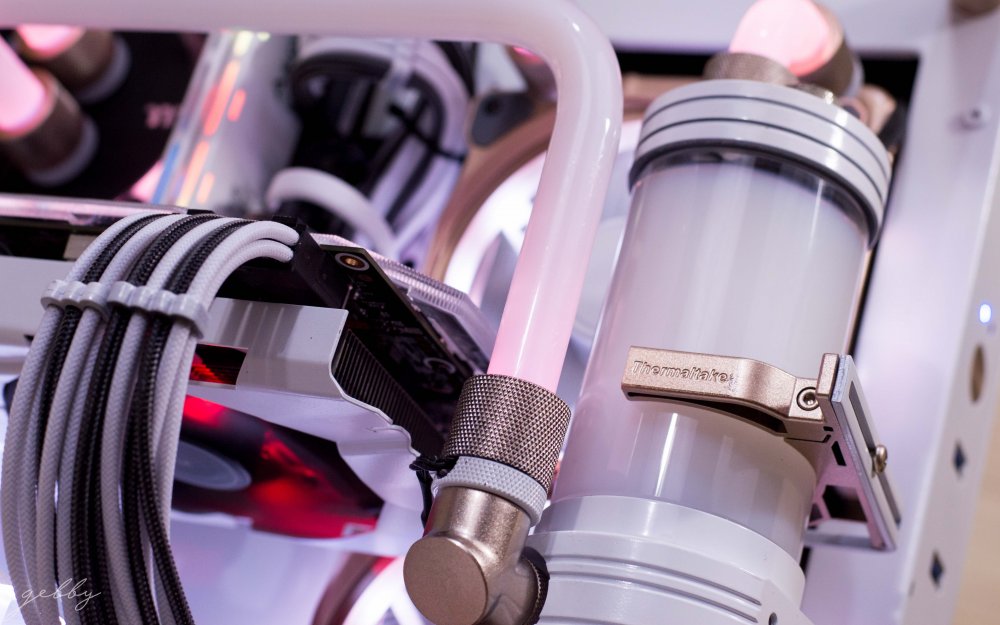
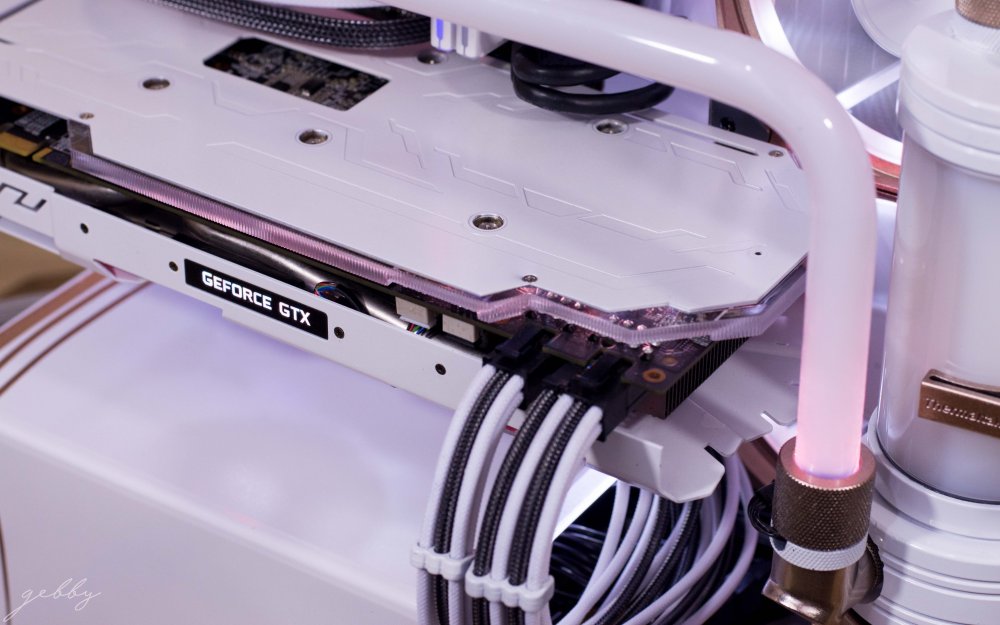
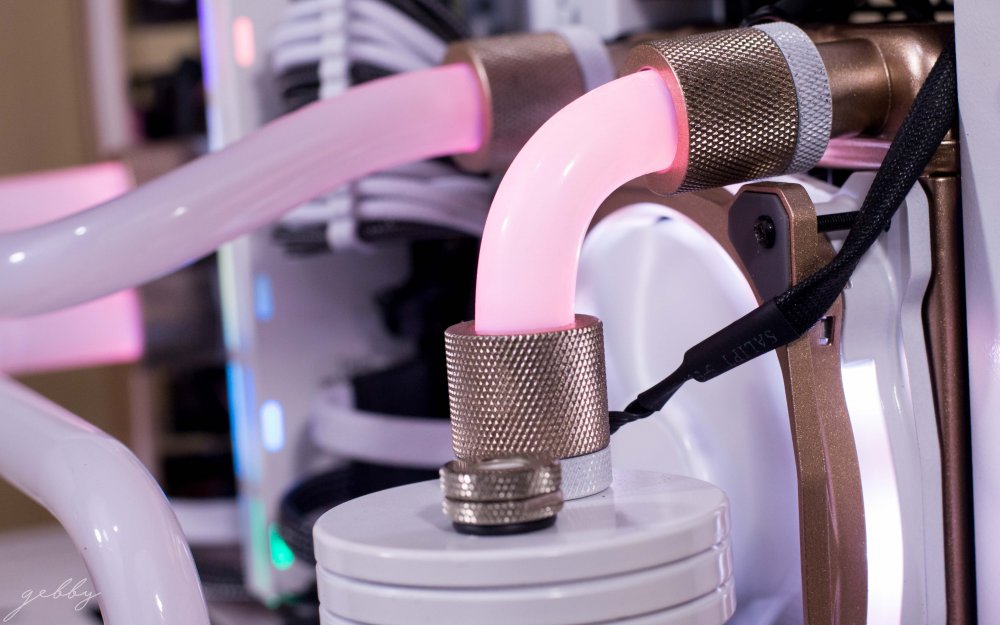
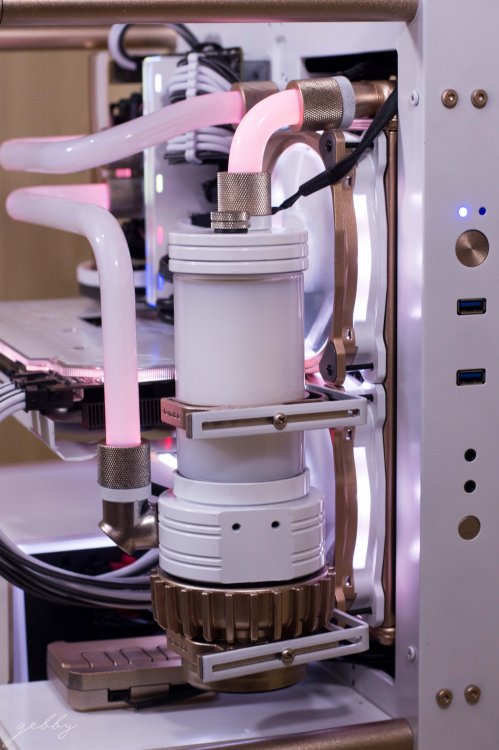
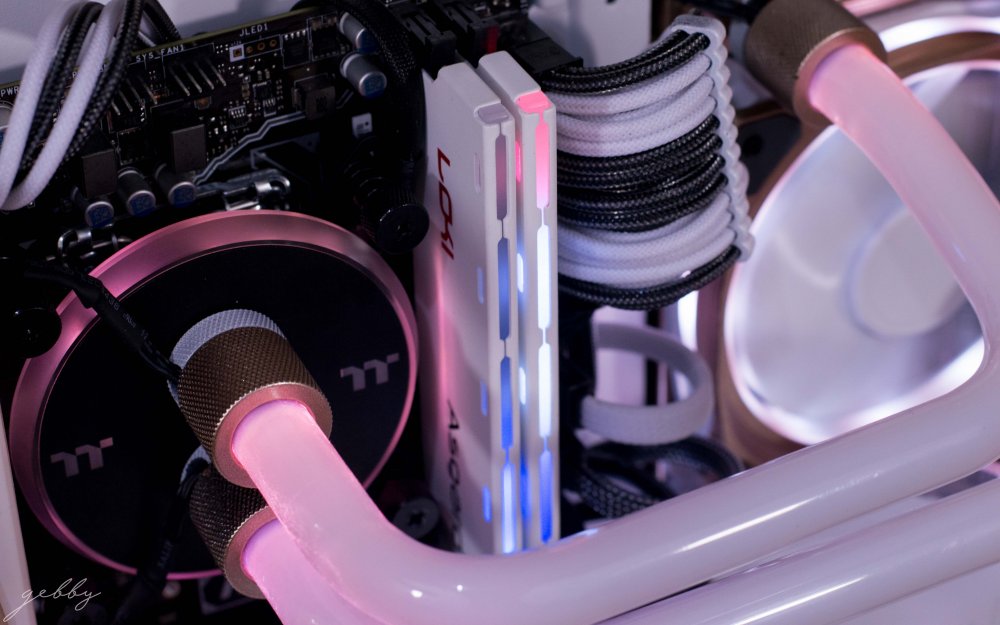
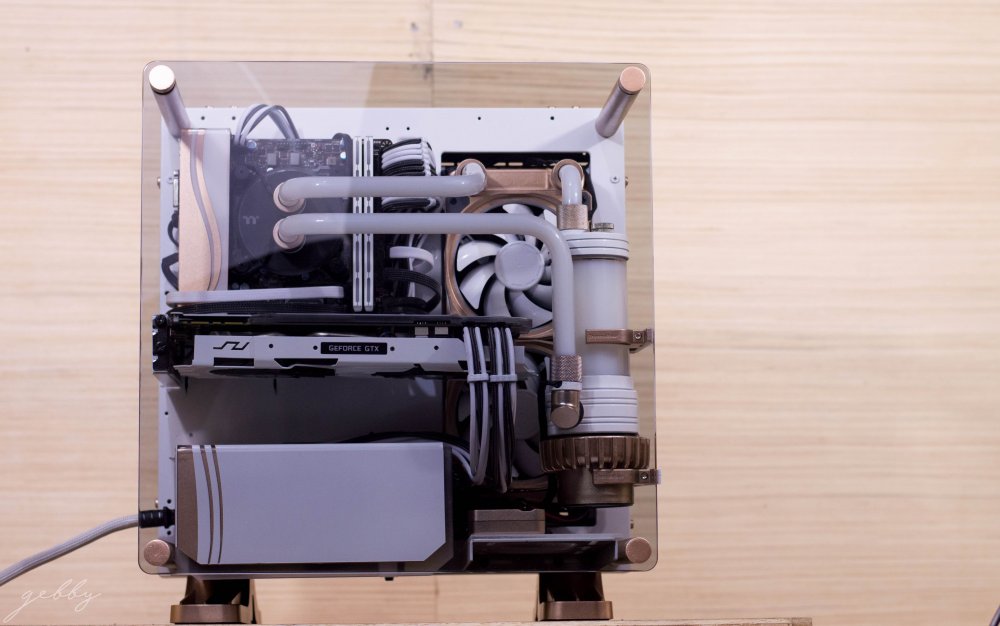
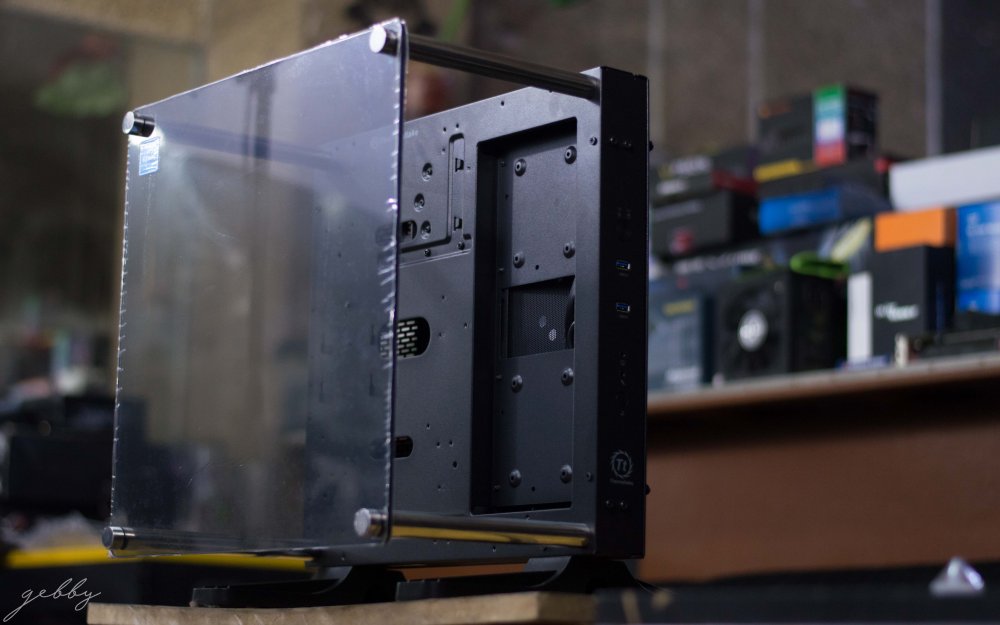
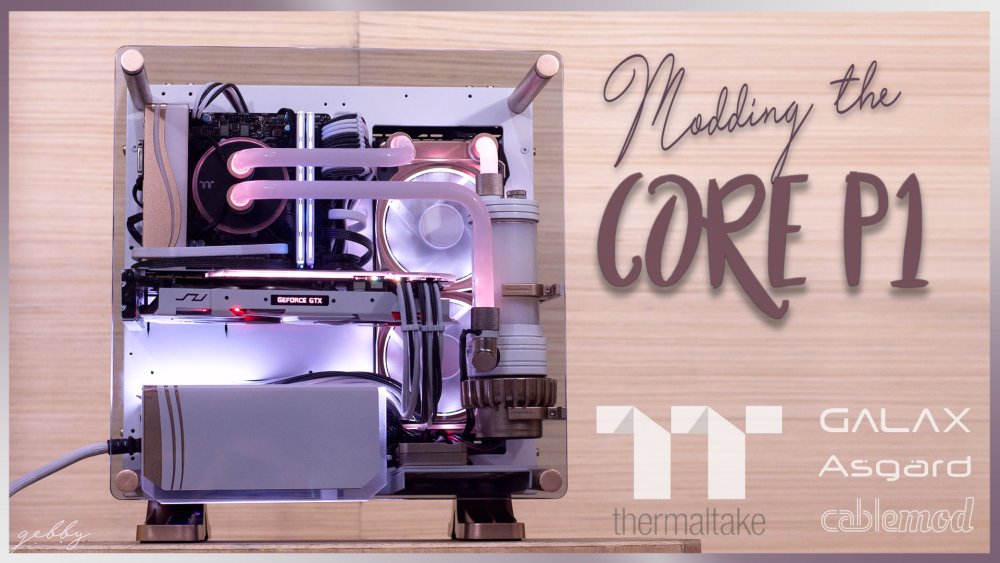
Hello everyone, My name is Gebby from JPModified. I'd like to share my project with Thermaltake using the Core P1. The theme I went with is White & Rose Gold. Not Copper, not bronze.. but Rose Gold. For me at least. Sorry I didn't have photos of the build log, but you can check out the video at the end. Massive thanks to Thermaltake for making this possible. Thanks Andy! Shout out to Galax, Asgard, and Cablemod. Thank you. ** I didn't know what to call this build so let's stick with the title for now LOL. • • • • Specs • • • • Thermaltake Core P1 MSI B250i Pro i7 7700K Asgard Loki DDR4 2x8gb Galax GTX 1070 EXOC-SNPR Sleeved cable kits & thumb screws by CableMod Thermaltake: Toughpower 850w RGB PSU Riing Plus 12 RGB Fans Pacific W4 RGB CPU Block Pacific RGB Fittings 16mm PETG Tubes Pacific D5 pump/res combo C1000 coolant white • • • • • • • • • • • • • • • • ------------------------------------------------------- You can check out the video log of this build on youtube - Thank you!


-
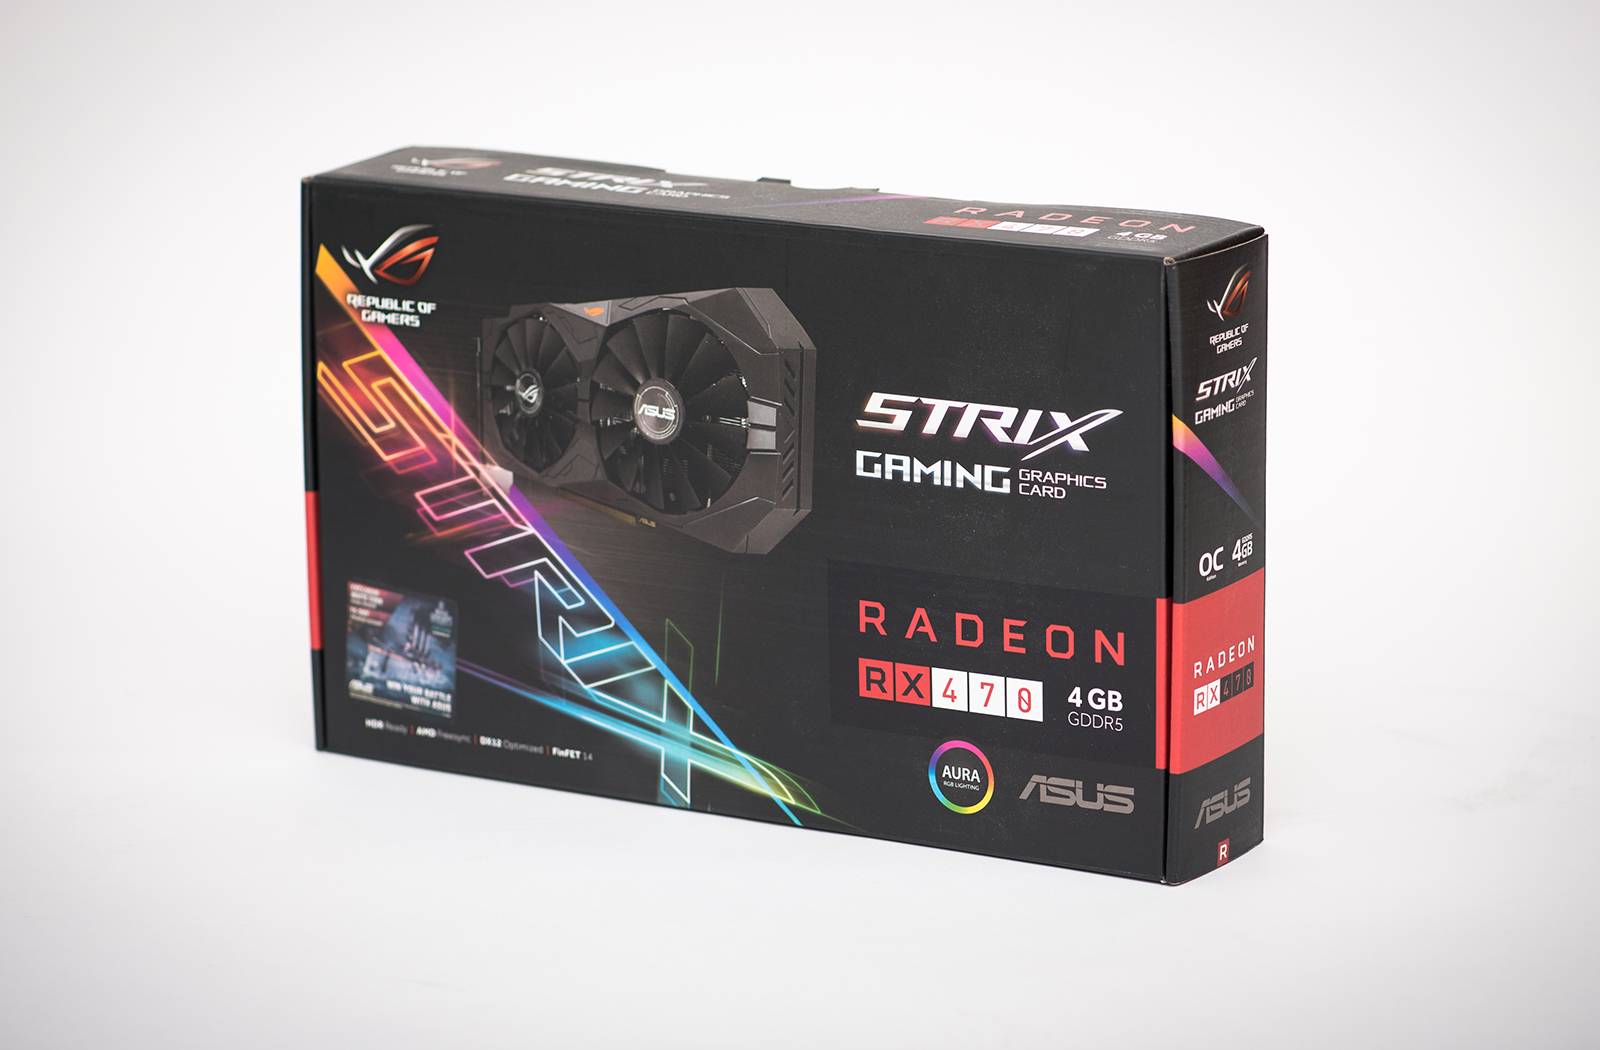
 Hello everybody! So earlier in the year, AMD approached me asking whether I would be interested in taking part in a themed mod "battle" to help promote the new RX 470. Well I've never even done a themed build before, never mind one in a head to head competition! I'll be competing against Jens Schwalbe of BIRD Customs, so it'll be no mean feat. I will be representing the UK and Jens Germany. I'd like to thank everybody at AMD involved in setting up this competition, along with all the companies who were willing to sponsor gear for it. So a big hand to Thermaltake, Asus RoG, Gigabyte and Corsair for each providing hardware that will be going into the build. As you can see, my theme for this build will be Overwatch... Like seemingly everybody else. Whilst I don't like playing the game itself much, I do like the art style. So without further ado, here are the first photos of the kit going inside!


-
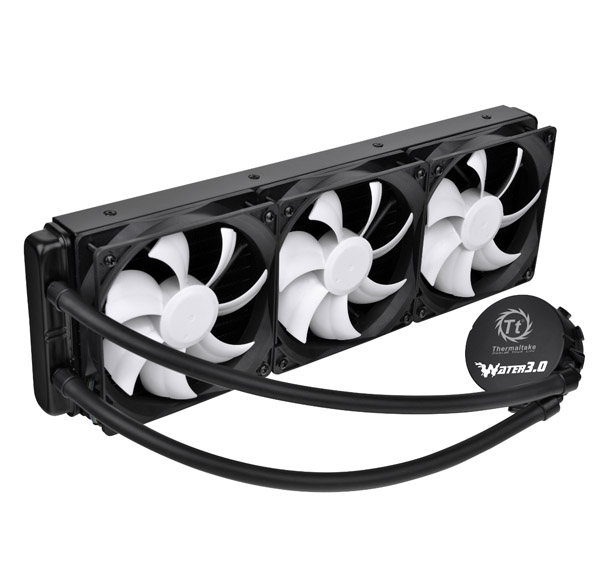
Our new All-in-one water cooling solution with an especially large 360mm radiator design, just one simple upgrade allows you to enjoy a better cooling performance. Webpage http://www.thermaltake.com/Cooling/Liquid_Cooler_/All_in_One/C_00002345/Water_3_0_Ultimate/Design.htm Check out the video Water Block Material : Copper Pump Motor speed : 3600+-150 RPM Rated Voltage : 12V Fan Dimension : 120 x 120 x 25mm Speed : 1000~2000RPM Noise Level : 20 dBA Rated Voltage : 12V Max. Air Flow : 99 CFM Connector : 4 Pin Radiator Dimension : 393x 120 x 27 mm Material : Aluminum Tube Length : 326 mm Material : Rubber Weight 1.32 kg Compatibility Intel LGA 2011 LGA 1366 Core i7 LGA 1150/1155/1156 Core i7/Core i5/Corei3 AMD FM2 / FM1 A-series AM3+ / AM3 Phenom II/Athlon II/Athlon/Sempron series AM2+ / AM2 Phenom II/Phenom/Athlon/Sempron series
- 30 replies
-
- 4
-
-
- 360mmradiator
- water 3.0
- (and 2 more)
-
Hi All, I've been thinking of picking up some RGB fans for my watercooling setup. Before I buy something, I always do my homework. Previously, I was thinking of getting NZXT AER RGB's, They are also about 30$ a pop, but their RGB light ring would be facing the rad(and defeat the purpose of RGB) if I did push-pull. I happened on TT's Riing line, but their product line is confusing and all over the place. So I dove in and tried to make sense of the situation. Please feel free to correct me if I have any details incorrect. Here is a summary of my findings so far. There are three lines of RGB fans: Riing RGB(12cm/14cm), Ring Premium RGB (12cm/14cm) and Ring Plus Premium RGB (12cm only). All are advertised as high static pressure and suitable for radiator use. The software for the Riing Premium and Riing Plus seems to suck pretty badly compared to other vendors. Note: Do not beleive Tt's pictures of the Riing RGB and Riing Premium RGB fan pictures. These fans CANNOT show more than one color on a fan at one time!! This feature is only available on the Riing Plus. macst34 Riing RGB: - Central Light guide which shows leds from both sides of the fan (as opposed to AER) - Individual Leds are NOT addressable, so one fan can only show one color for all LEDs at one time. - fans use proprietary 5 pin connector to hub - Simple 3 button controller hub (3 fans per hub) ; can daisy chain controller hubs. Riing RGB premium - Central Light guide - Individual Leds are NOT addressable, so one fan can only show one color for all LEDs at one time. - fans use proprietary 5 pin connector to hub; Fan motor seems to be the same as Ring RGB fans - USB controller hub / no buttons software control only (3 fans per hub) ; can daisy chain controller hubs. - uses "Ring RGB Tt Premium Edition" software, current version 2.1.2 - *seems the software hub and fan fin profile are the major differences compared to the Riing RGB line. Riing Plus RGB premium - Central Light guide - Individual Leds are addressable, the fan can show different colors LEDs at same time on a single fan. - proprietary 9 pin connector to hub - USB controller (different from Riing RGB premium) - uses "Ring Plus RGB Tt Premium Edition" software, current version 1.0.2 - no 14cm size. Specifications: Riing RGB** ------ (size) / (SKU)* / (fan model number) / (max pressure) / (max airflow) / (# fins) 12cm / CL-F042-PL12SW / A1225L12S / 2.01 mm-H2O / 40.60 CFM / 26.4 dB / 7 fins 14cm / CL-F043-PL14SW / A1425L12S / 1.58 mm-H2O / 51.15 CFM / 28.1 dB / 7 fins ------ Riing RGB Premium*** ------ 12cm / CL-F049-PL12SW / A1225L12S / 1.11 mm-H2O / 48.79 CFM / 24.8 dB / 11 fins 14cm / CL-F051-PL14SW / A1425L12S / 1.38 mm-H2O / 73.91 CFM / 29.4 dB / 11 fins ------ Riing plus RGB Premium**** ------ 12cm / CL-F053-PL12SW / A1225S12S / 1.54 mm-H2O / 48.34 CFM / 24.7 dB / 9 fins 14cm / unreleased? ------ *SKUs with -A include hub. SKU-B do not include a hub. references: **http://www.thermaltake.com/microsite/Riing12RGB/spec.html **http://www.thermaltake.com/microsite/Riing14RGB/spec.html ***http://www.thermaltake.com/MICROSITE/Riing12RGBRadiatorFanTTPremiumEdition/spec.html ***http://www.thermaltake.com/MICROSITE/Riing14RGBRadiatorFanTTPremiumEdition/spec.html ****http://www.thermaltake.com/Case_Fan/Case_Fan_/Riing/C_00003016/Riing_Plus_12_RGB_Radiator_Fan_TT_Premium_Edition_3_Fan_Pack_/Specification.htm
-
- 2
-
-
- Riing
- watercooling
- (and 3 more)
-
Hey guys, welcome back to another Project of mine, this time in another competition! I hope you all enjoy the progress of this one, i have around three weeks left to complete this build so lets get started! I would firstly like to thank our sponsors for this build: MWAVE, Intel, HyperX, Asus & Thermaltake SPECS: Thermaltake Core P3 Thermaltake Toughpower DPS G 650w RGB power supply Asus ROG Maximus VIII Hero Alpha Motherboard Thermaltake Custom Watercooling Asus GTX 1070 8gb Founders Edition GPU Intel I7 6700K CPU Kingston HyperX Fury 16GB DDR4 Memory 2x Kingston HyperX Savage 120gb SSD
-
Hello, my name is DJ Madrid age of 21 and also known as Kryptek PC Casemodz, I am from the Philippines. And also, thanks to Thermaltake my major sponsor for this build project, thank you so much for this oppurtunity, more power! And now, let's go to the build. This project will be named "45Deg" or "45 Degree", the position of the motherboard is something new in our eyes because normally many of the mods today are rotated into 90 degree or 180 degree inverted, so I decided to make a 45 degree rotated motherboard position. I'll be using Thermaltakes water cooling parts, case, power supply and Riing fans. Here is my isometric 3D design using Google sketchup Pro. Hope you'll like it
-
So this is my finished build in a Core x9. Specs: CPU: 4790k @4.6GHz - 1.25V GPU: 2x 290's @1150MHz core Mobo: Asus Sabertooth z97 Mk-1 Rads: 2x 480mm Hardware Labs BlackIce GTS CPU Block: EK Supremacy Evo EK GPU blocks and backplates EK res and dual d5 pump setup Feel free to ask any questions i may not have covered. Bonus points if you can guess my favorite musician.
-
Water cooling components coming soon...

-
Please answer the following question on this thread to be in the draw to win a Water 3.0 Ultimate! Week 3: 9/2 ~ 9/9 Question 3: What is the length of the radiator on Water 3.0 Ultimate?

- 182 replies
-
- 9
-
-
- watercooling
- aio
- (and 4 more)