Search the Community
Showing results for tags 'thermaltake'.
-
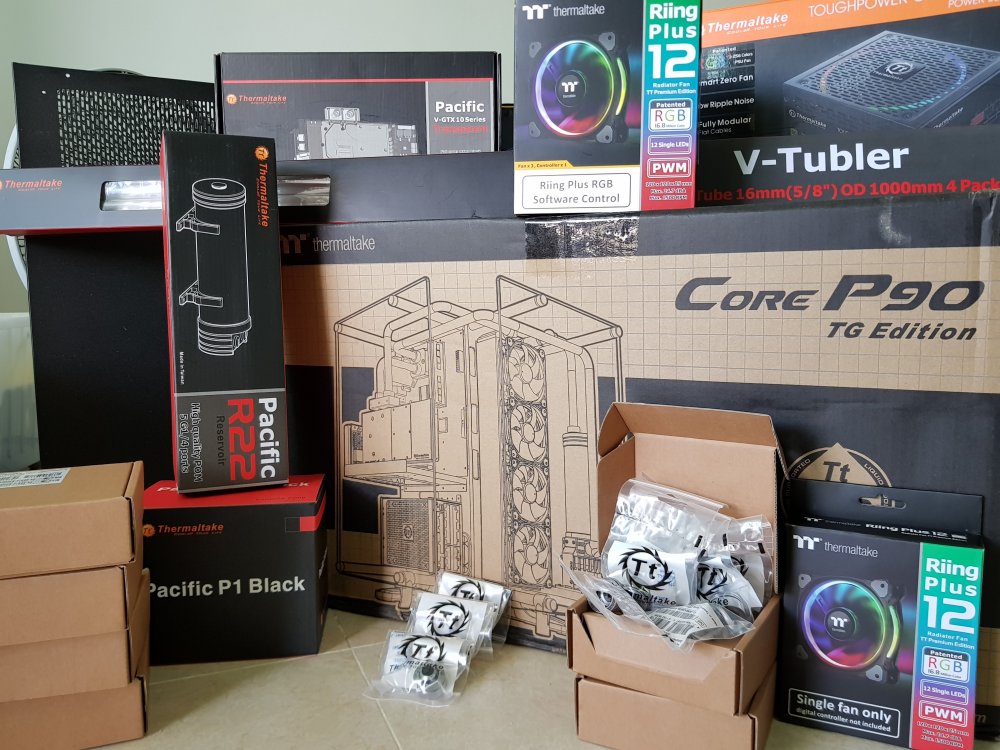
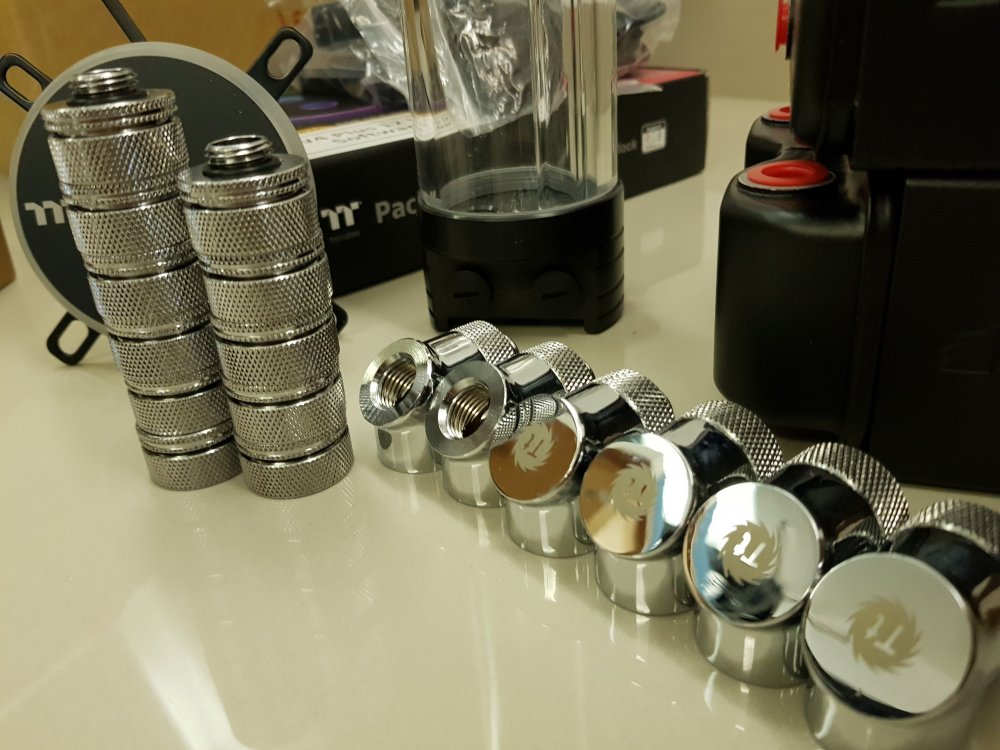
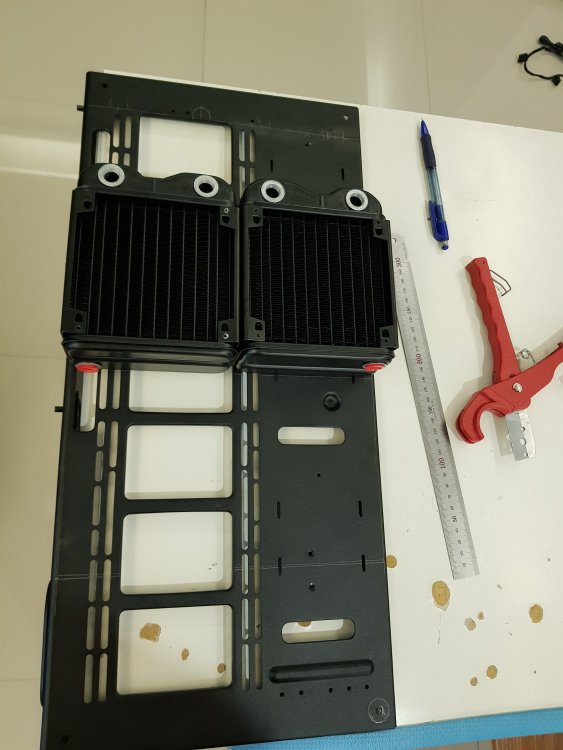
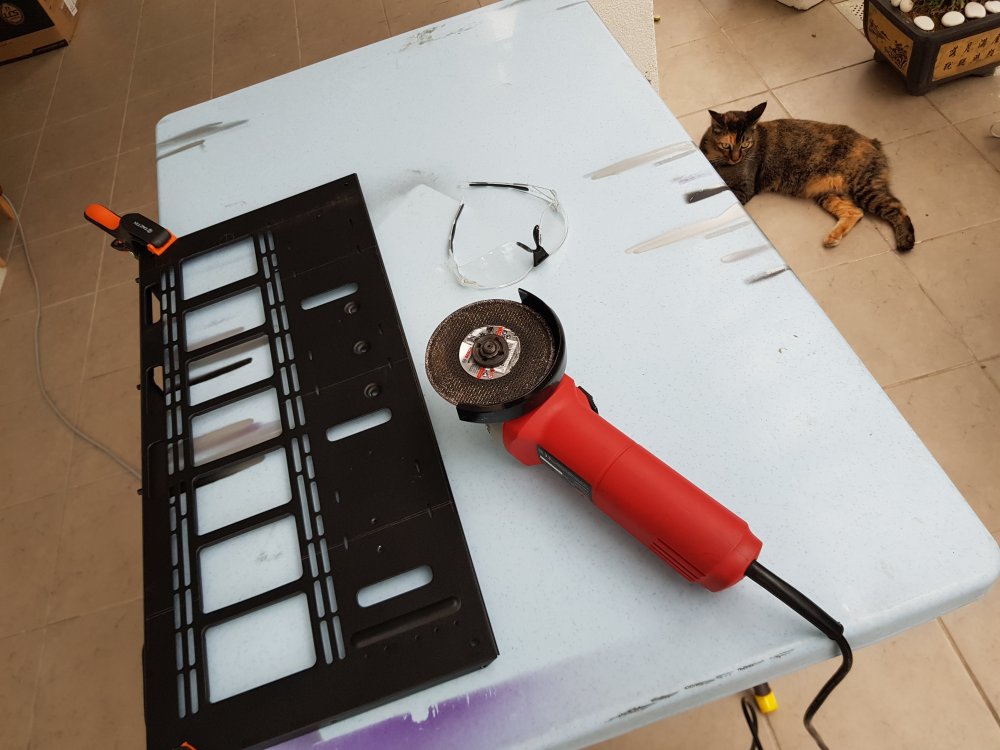
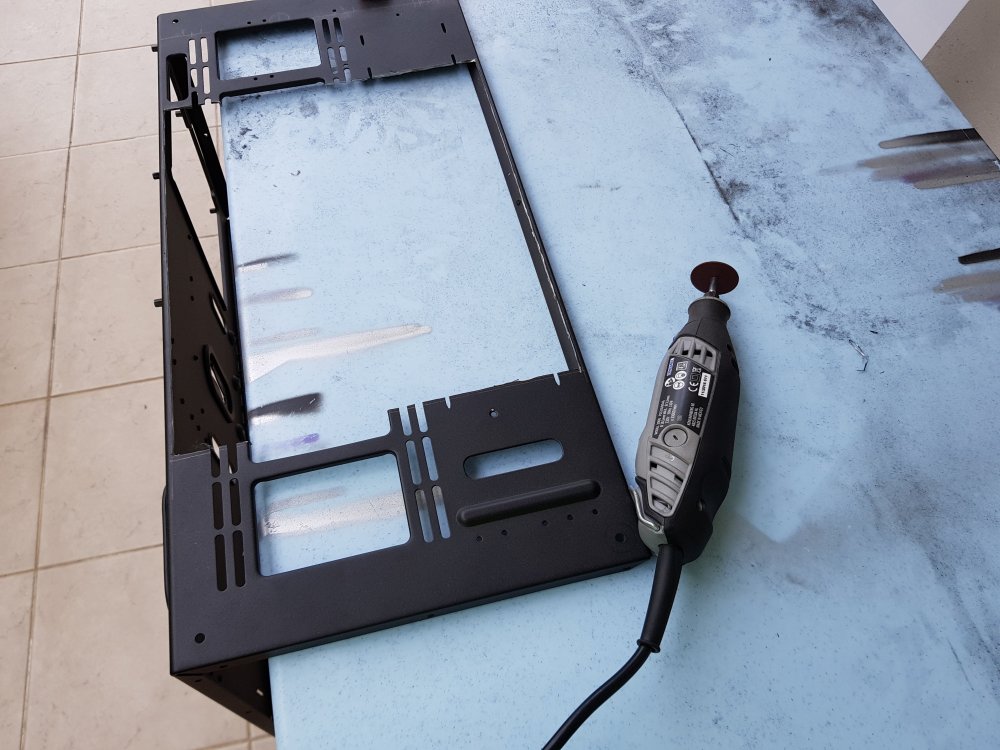
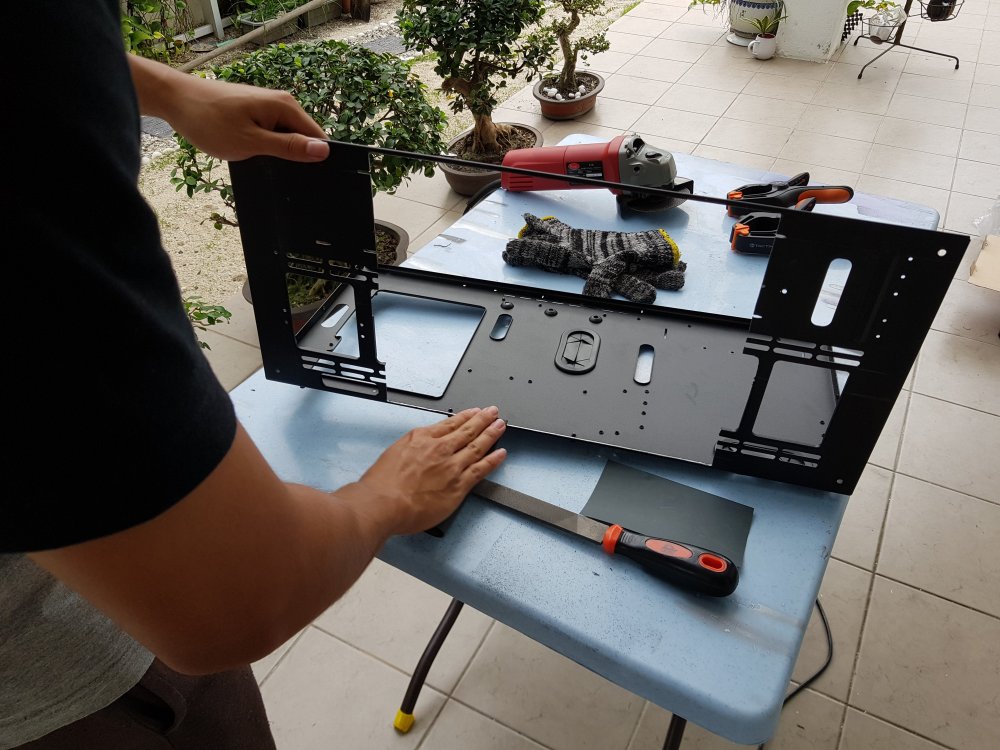
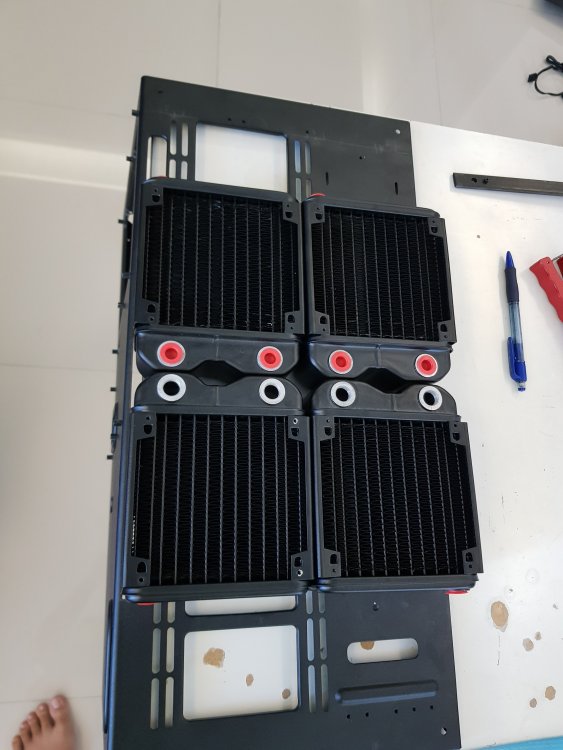
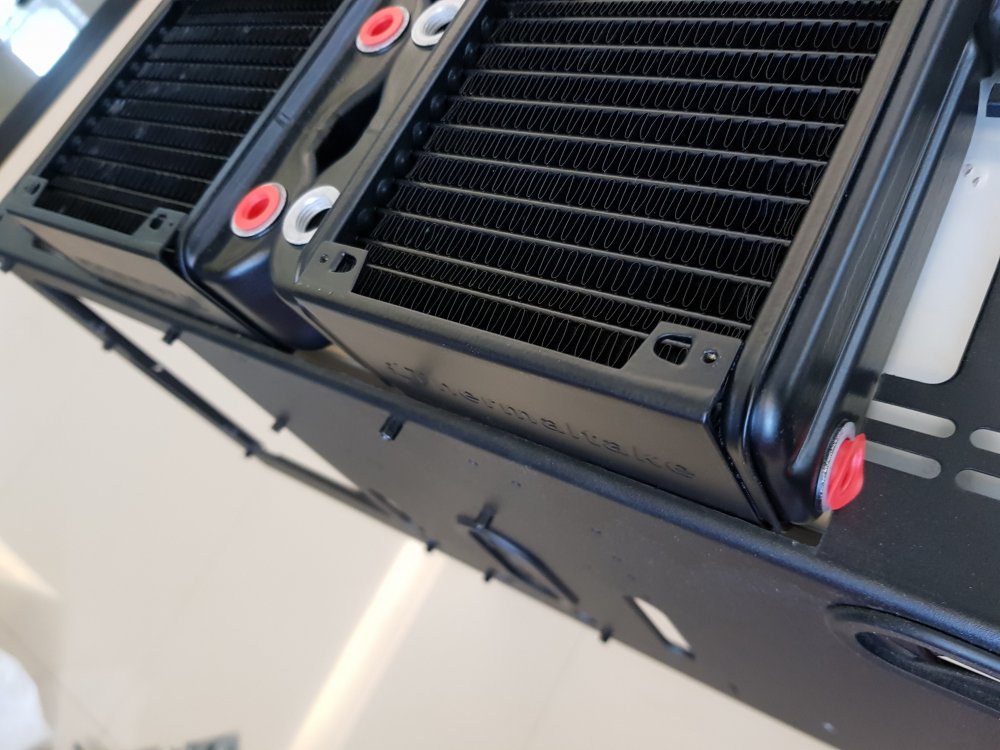
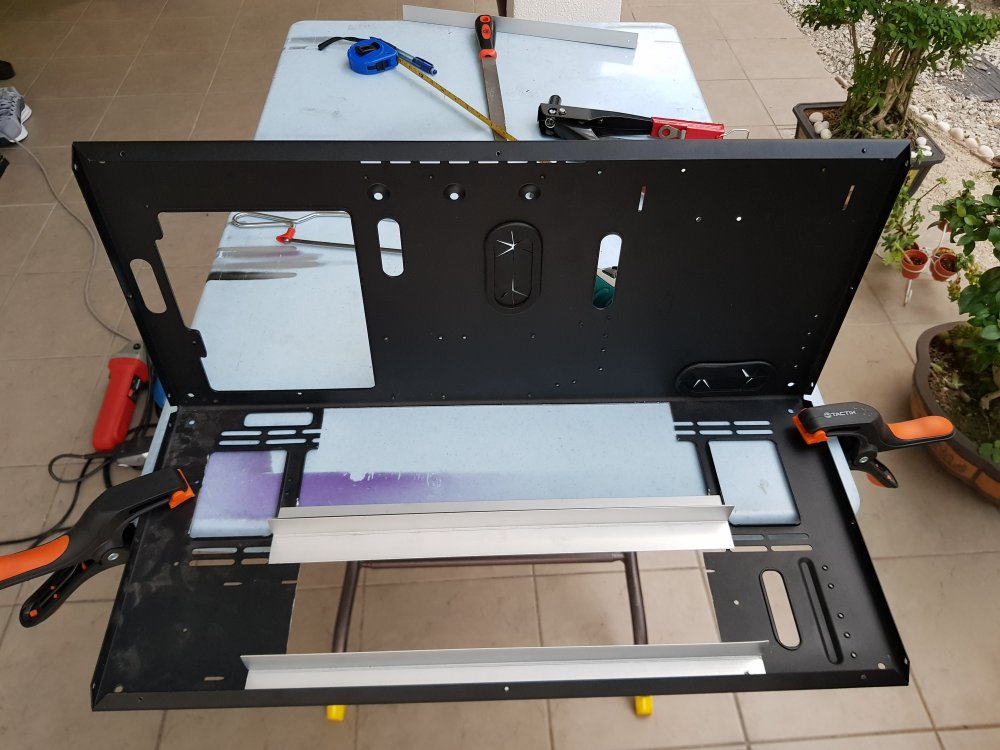
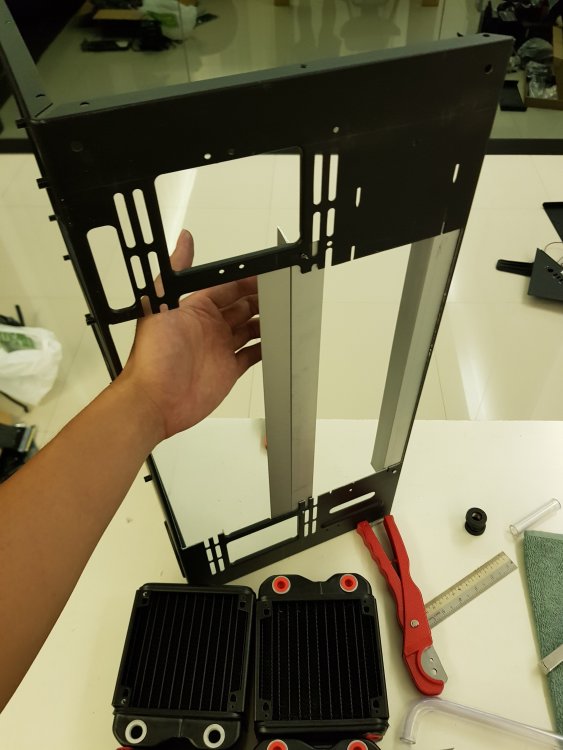
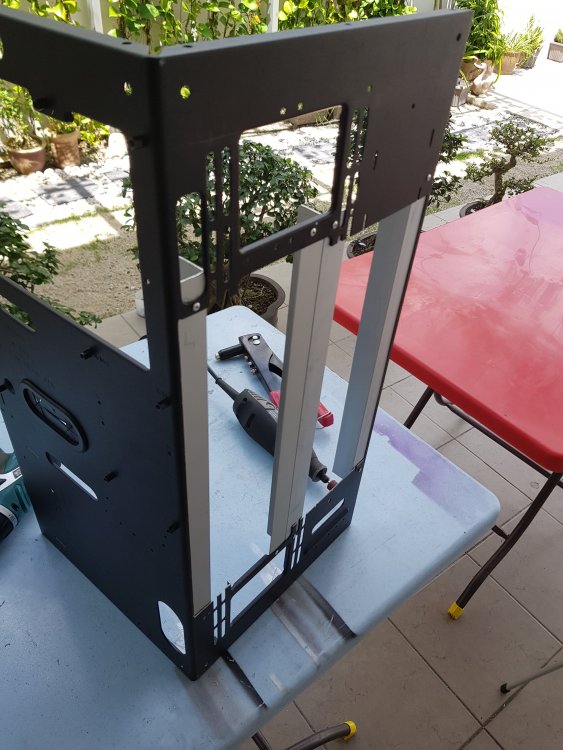
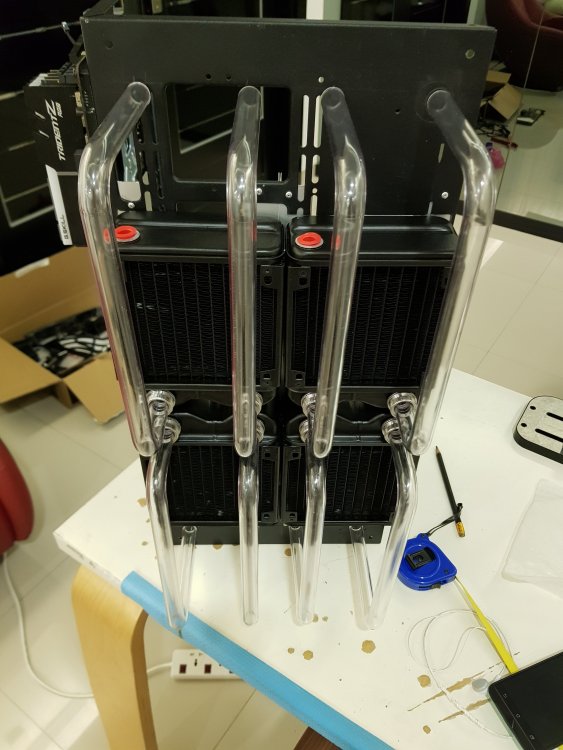
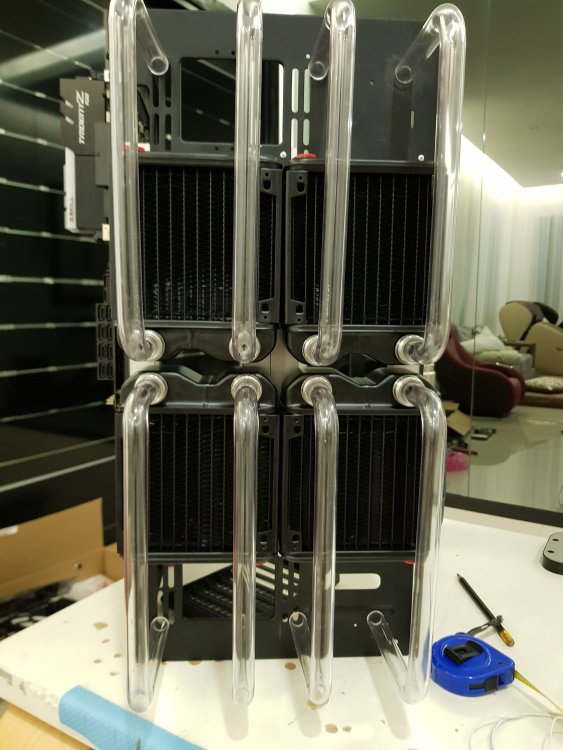
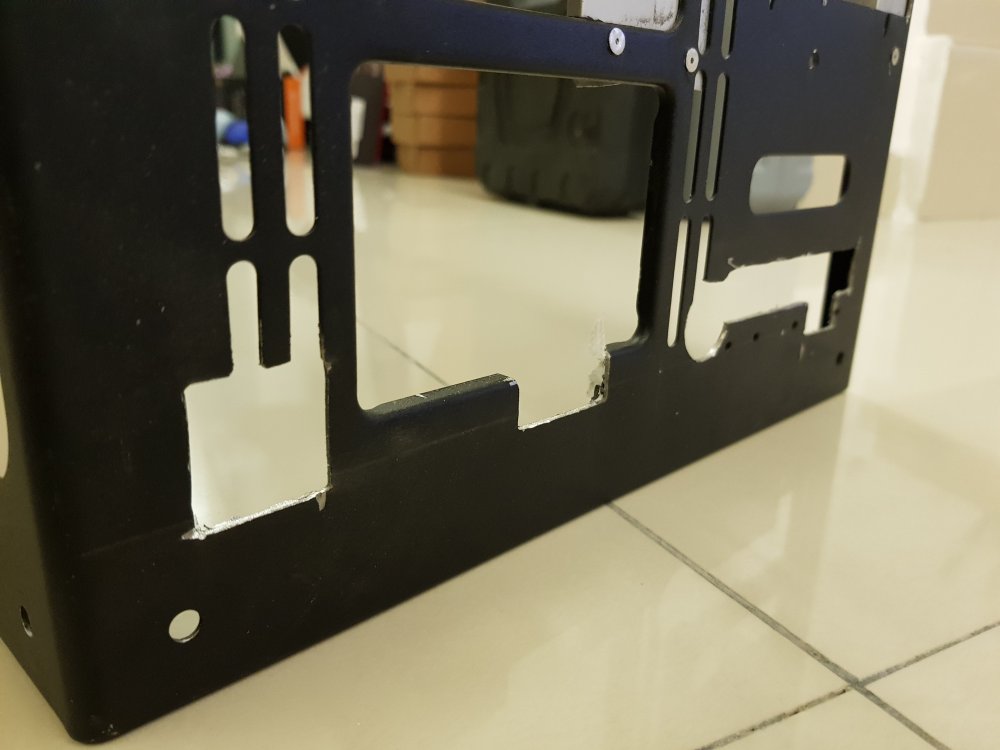
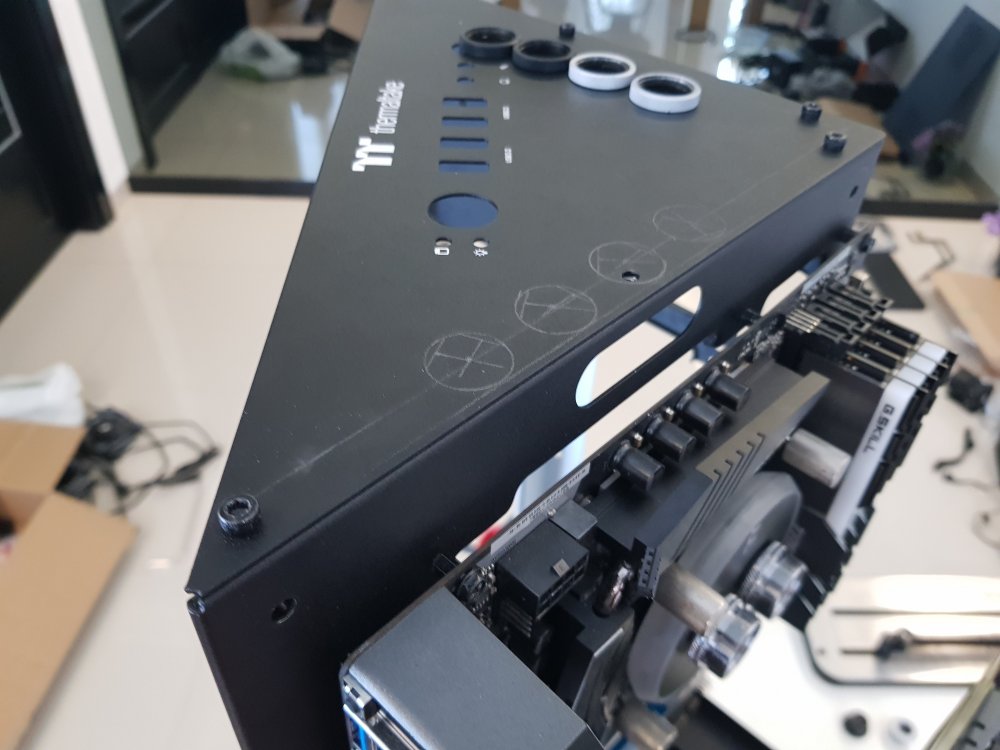
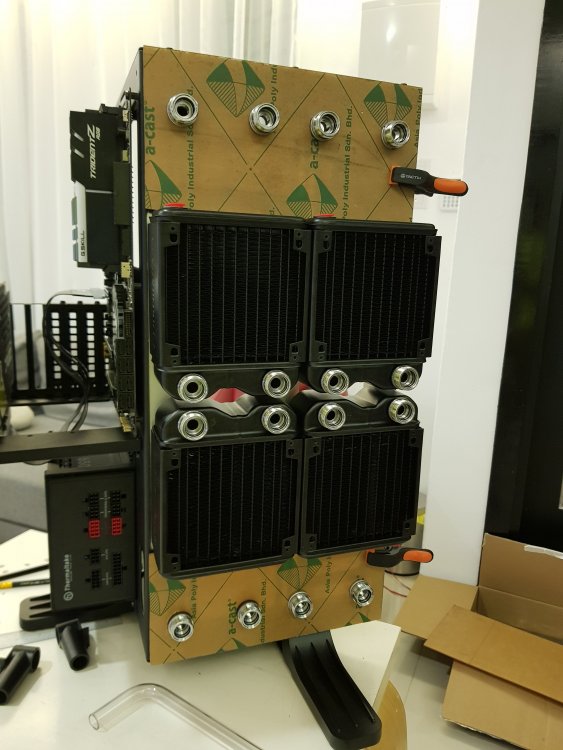
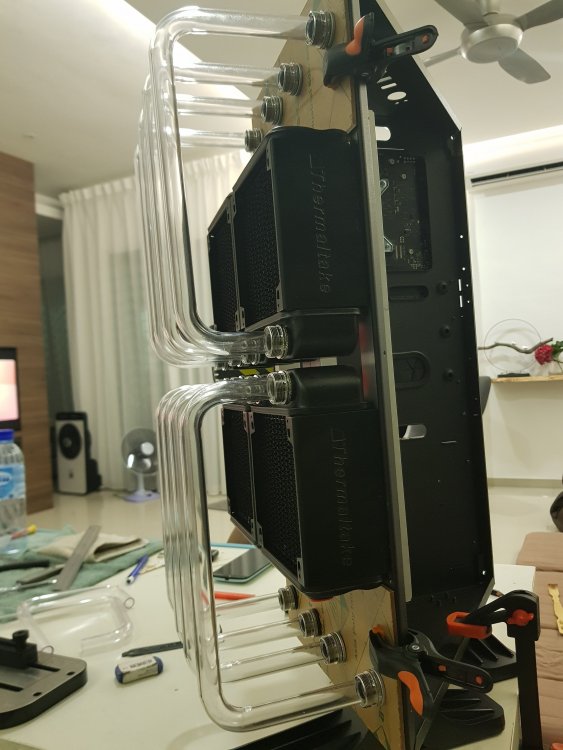
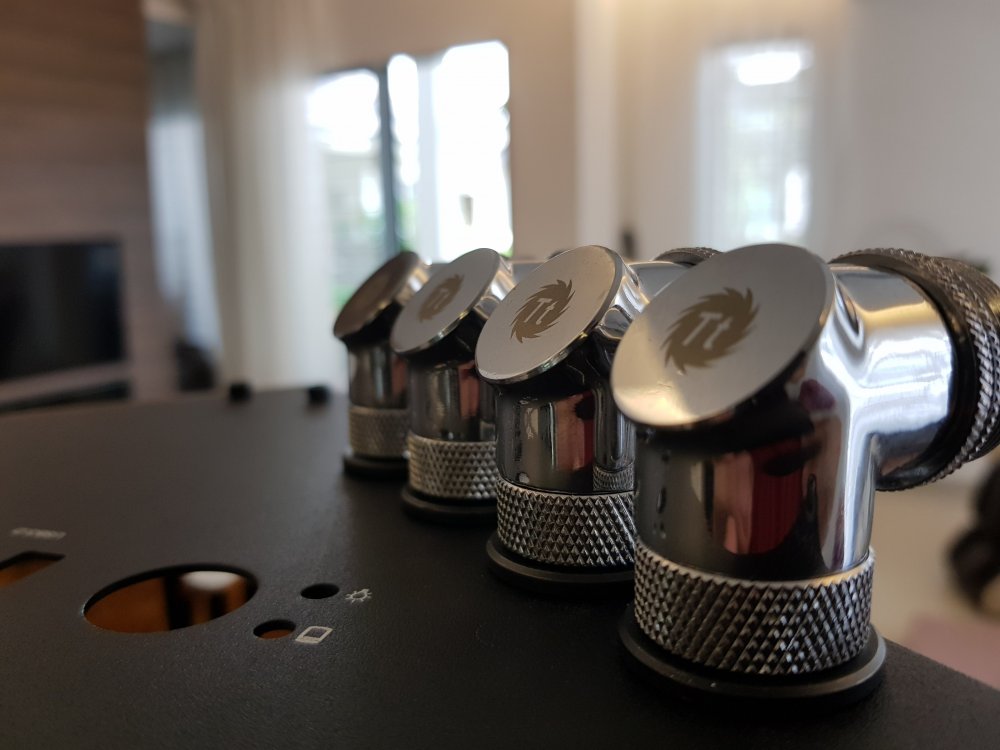
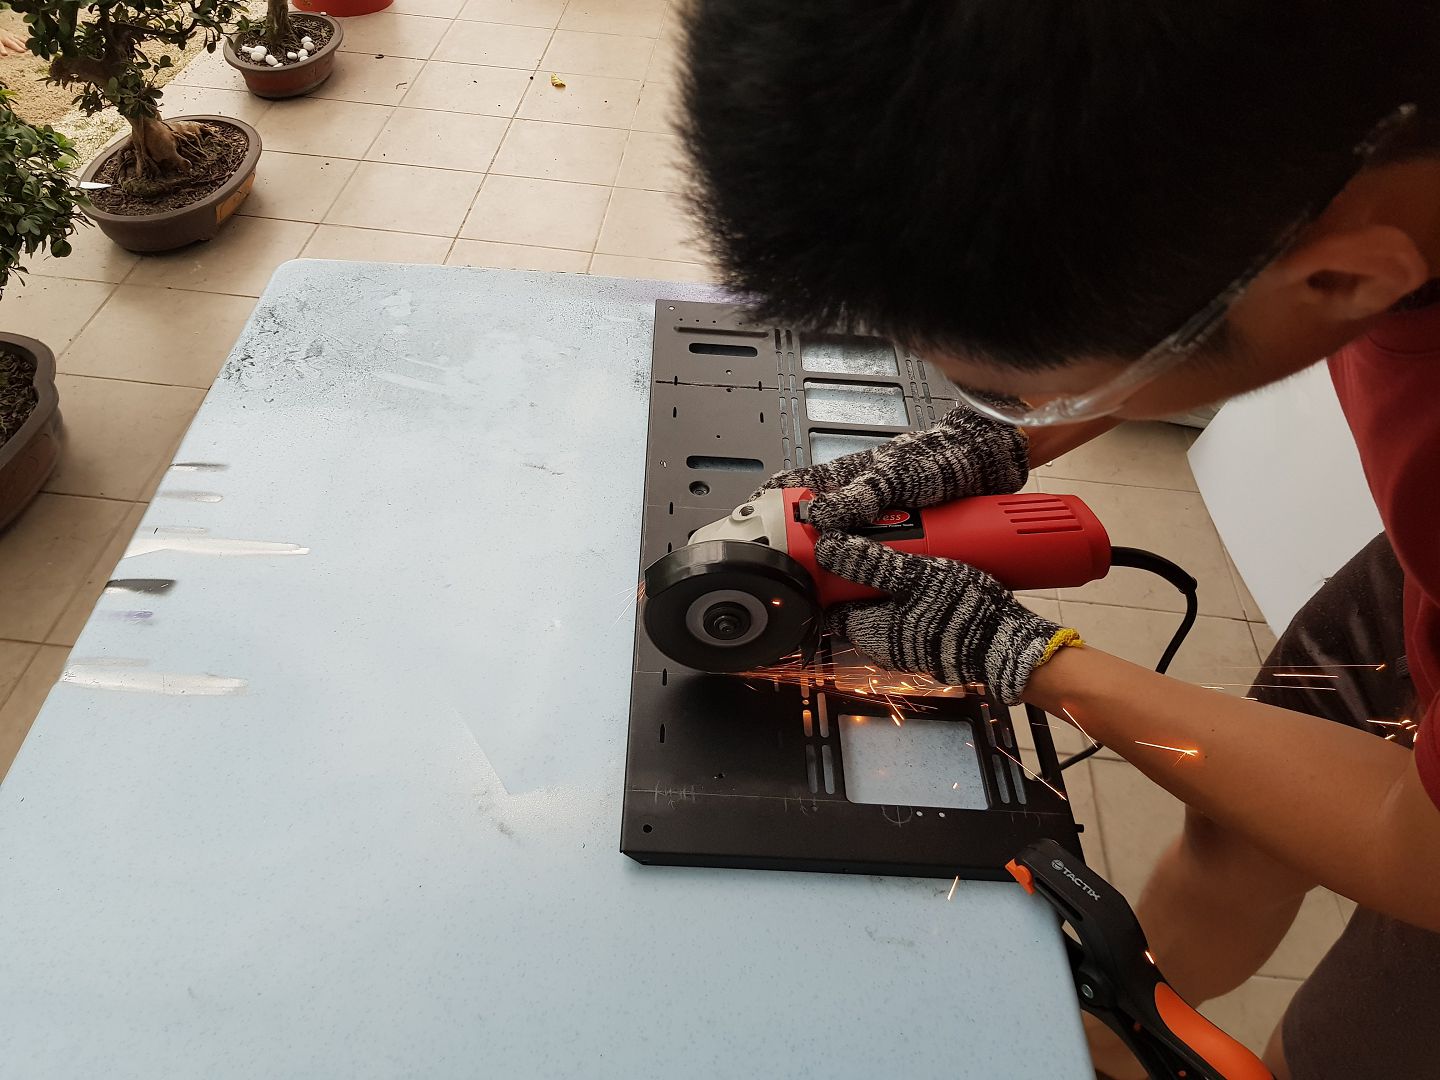
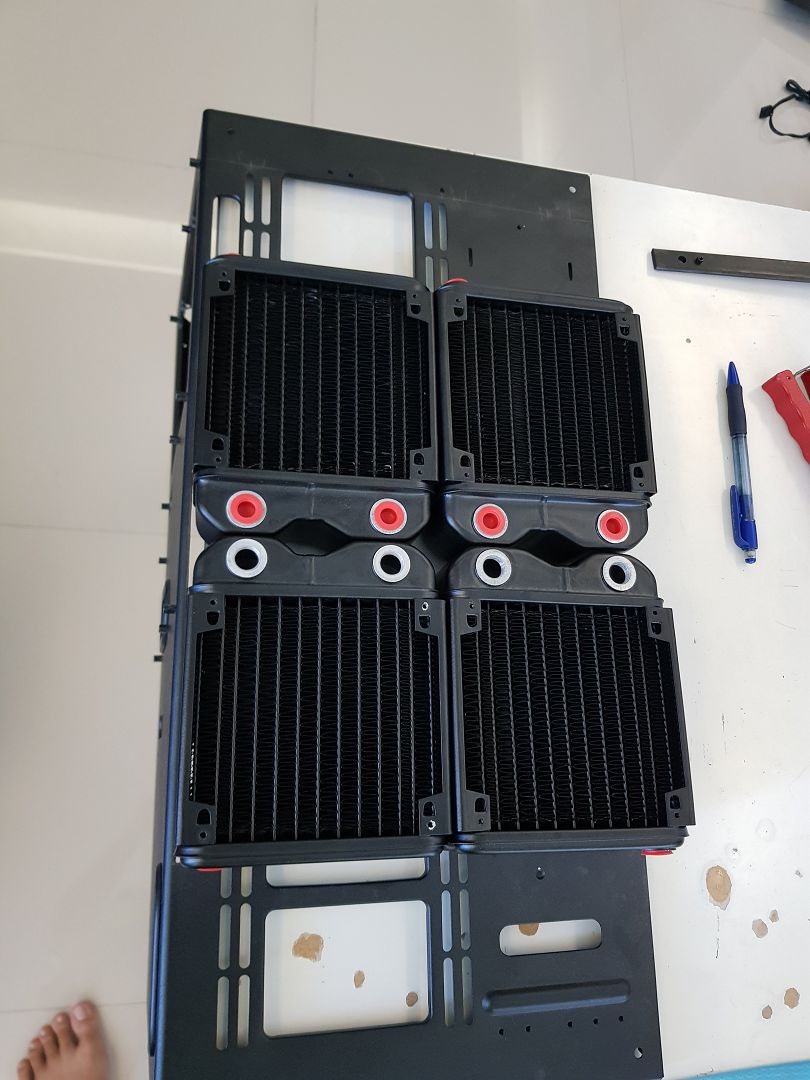
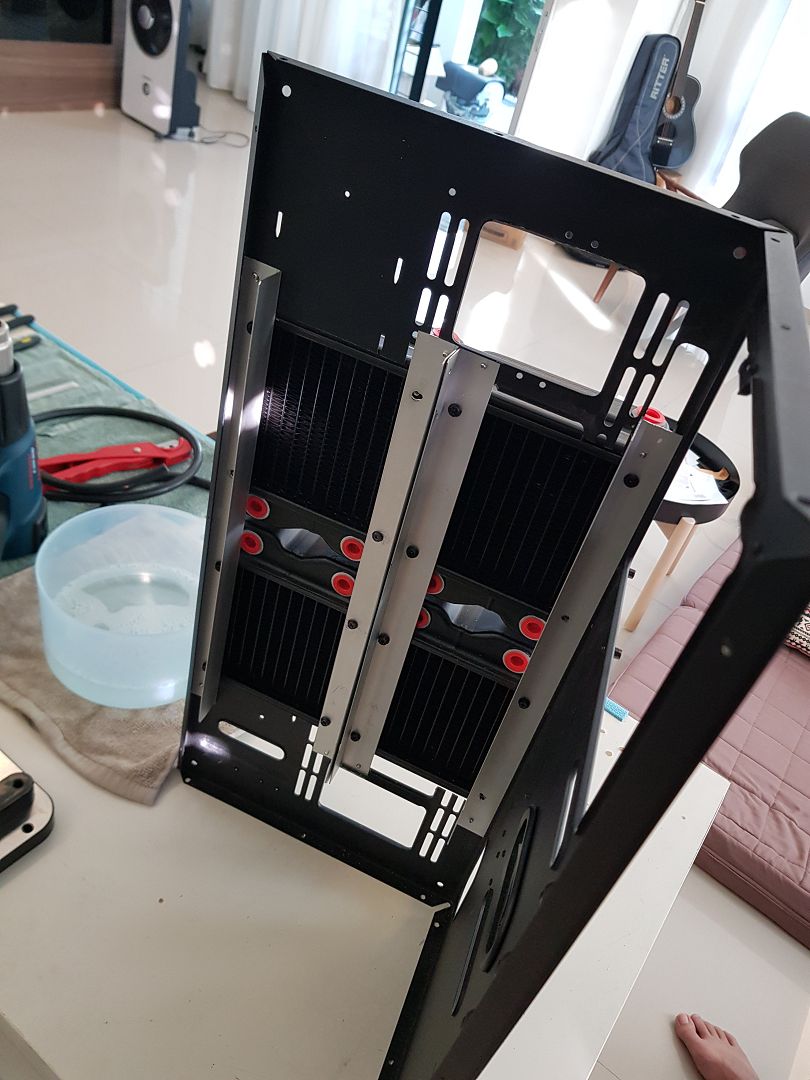
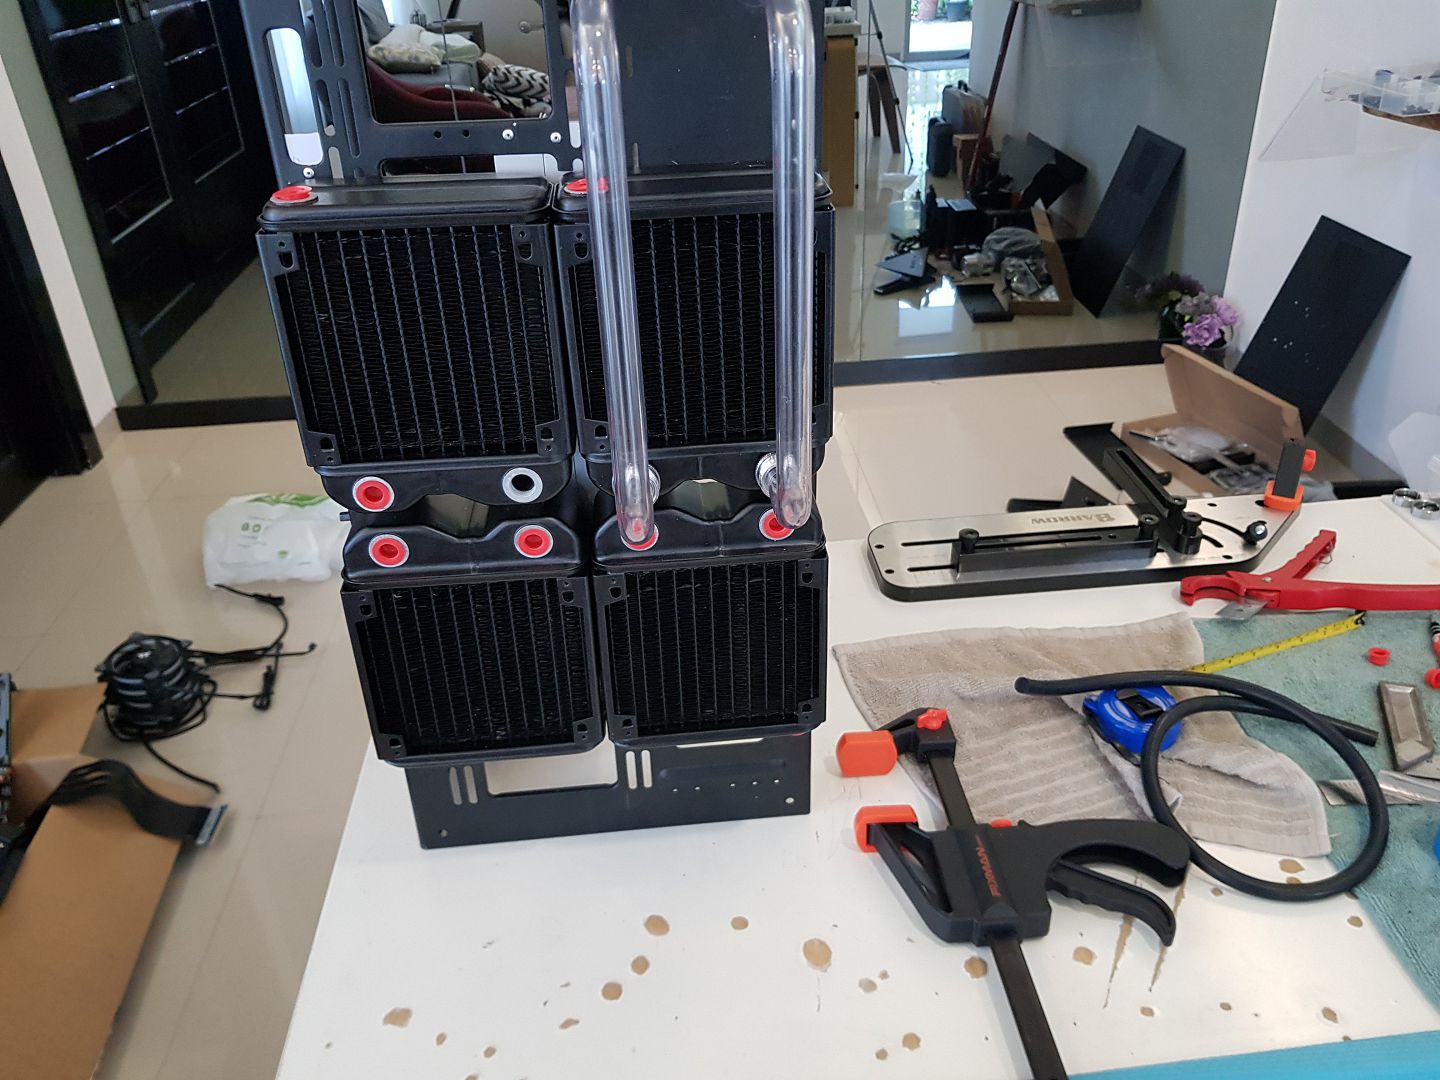
First time posting here, please forgive me if i posted the wrong format. Brief introduction of myself: Im currently a student, casual pc enthusiast who love watercooling too much and started a little bit of modding as a hobby. Got my first ever sponsor from Andy Thermaltake using my first ever build as a proposal (View 71 - JY71, build video: https://www.youtube.com/watch?v=tb3BALoAl4Y&lc=z23xdhowhybterurz04t1aokg52qnykfhp5bfgcsc0cbrk0h00410). Big fan of thermaltake, great products, got sponsorship, dream comes true, life is complete . Core p90 is such an excellent chassis and i'm so fortunate to get this chassis from thermaltake. No doubt 101% effort is going to put into this build! Mod on! Sponsored items! How crazy!! Core P90, such a sexy lady. Chrome Fittings. How elegant. Disassembled the chassis. Figuring out radiator mounting. Meow. Decided to cut out a part of the chassis and make radiator mounting using aluminium frame. Cleaning out the edges using dremel. definitely have to show off every parts that "involved" in watercooling. Bend dem tubes! Always my favourite part of building a pc, which is watercooling. Thermaltake V-Tubler is superb to work with! Holes for pass through fittings. Black and Chrome. No other colours can beat this duo!!! My core P90 backside woopssss! Smexy bare-back!


-
Hey everyone, I am back with a quick build log. Antec asked if I could do a build in their new P120 case and this is my journey. The parts I will be using are, CPU - AMD 2700x GPU - ASUS Dual RTX 2080 RAM - 16gb 3200 mhz Thermaltake WaterRam without the waterblock Motherboard - ASUS ROG Strix X470 - F Storage - Adata SX6000 256GB M.2 PSU - Antec 650W high current gamer HCG Fans - Antec Prizm 120 ARGB All the water cooling parts were supply by thermaltake and I manufactured a custom distro with integrated ddc pump for this build. This is the case. I stripped the full case down and drilled all the rivets out as I want to paint the full case a gloss black with red splash. this would be the biggest part of the build. Before, After, Once the painting was completed I needed to test fit all the parts and plan the loop and get the holes for the front distro. This will be my 1st build where I will be using a DDC pump in the distro plate, I was not 100% sure on how to do this but a did find a guide on the bit-tech youtube channel which helped a lot thanks Alex. This is my design for the front distro. Now time to cut the part. Once I cut the part, I needed to test fit the part and leak test it, I couldn't find my leak tester, so I just filled it up. We did have any leaks so it was time to add it to the build and run the tubes. Time to fill her up, Just want to say a big thank you to Antec for letting me build in their new P120 I was really surprised at how much room was in the case and a big thank you to thermaltake for supporting me in this project. Here are the final photos.
-
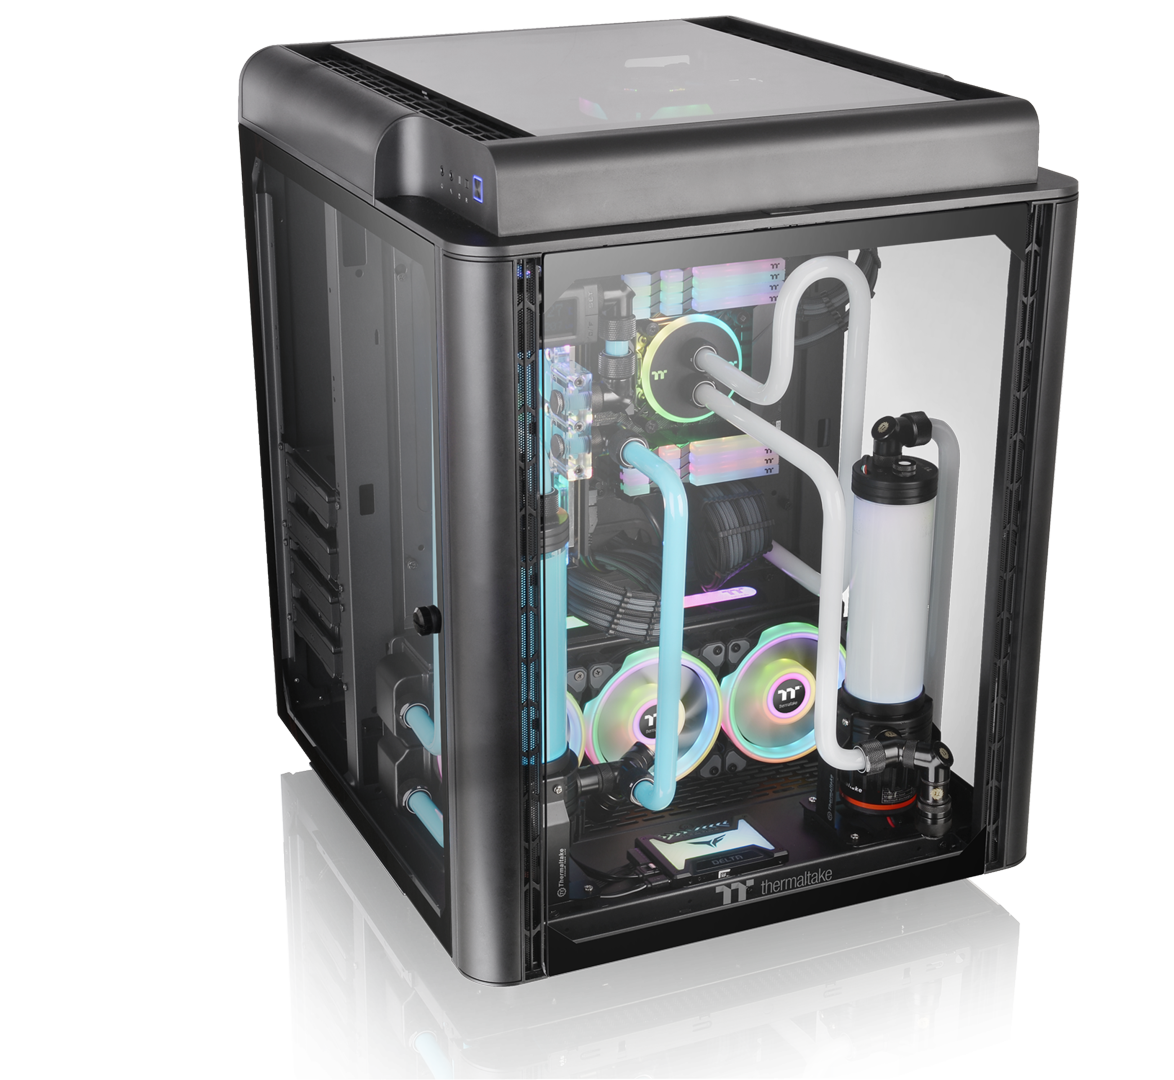
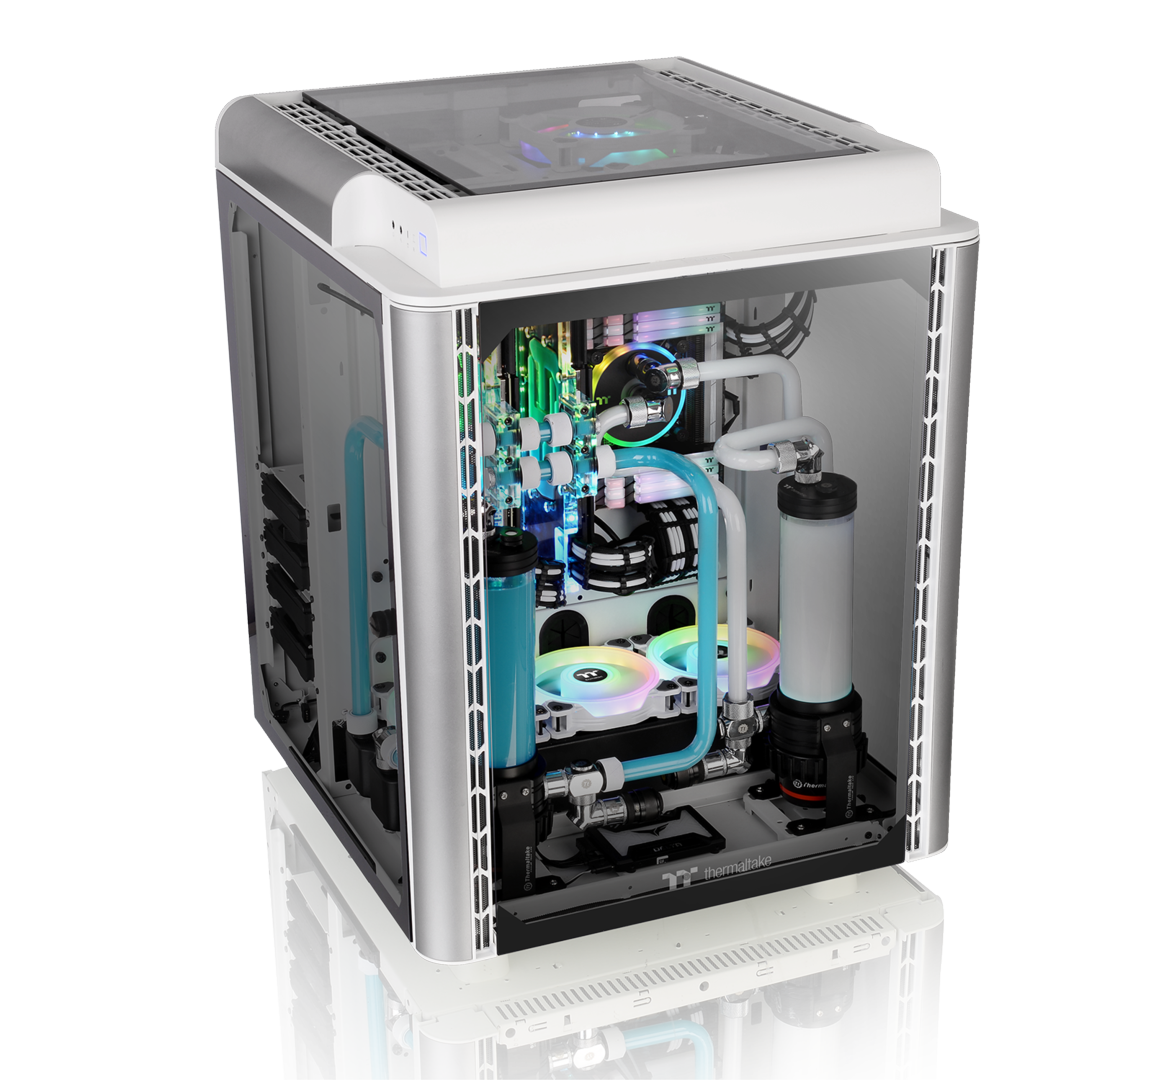
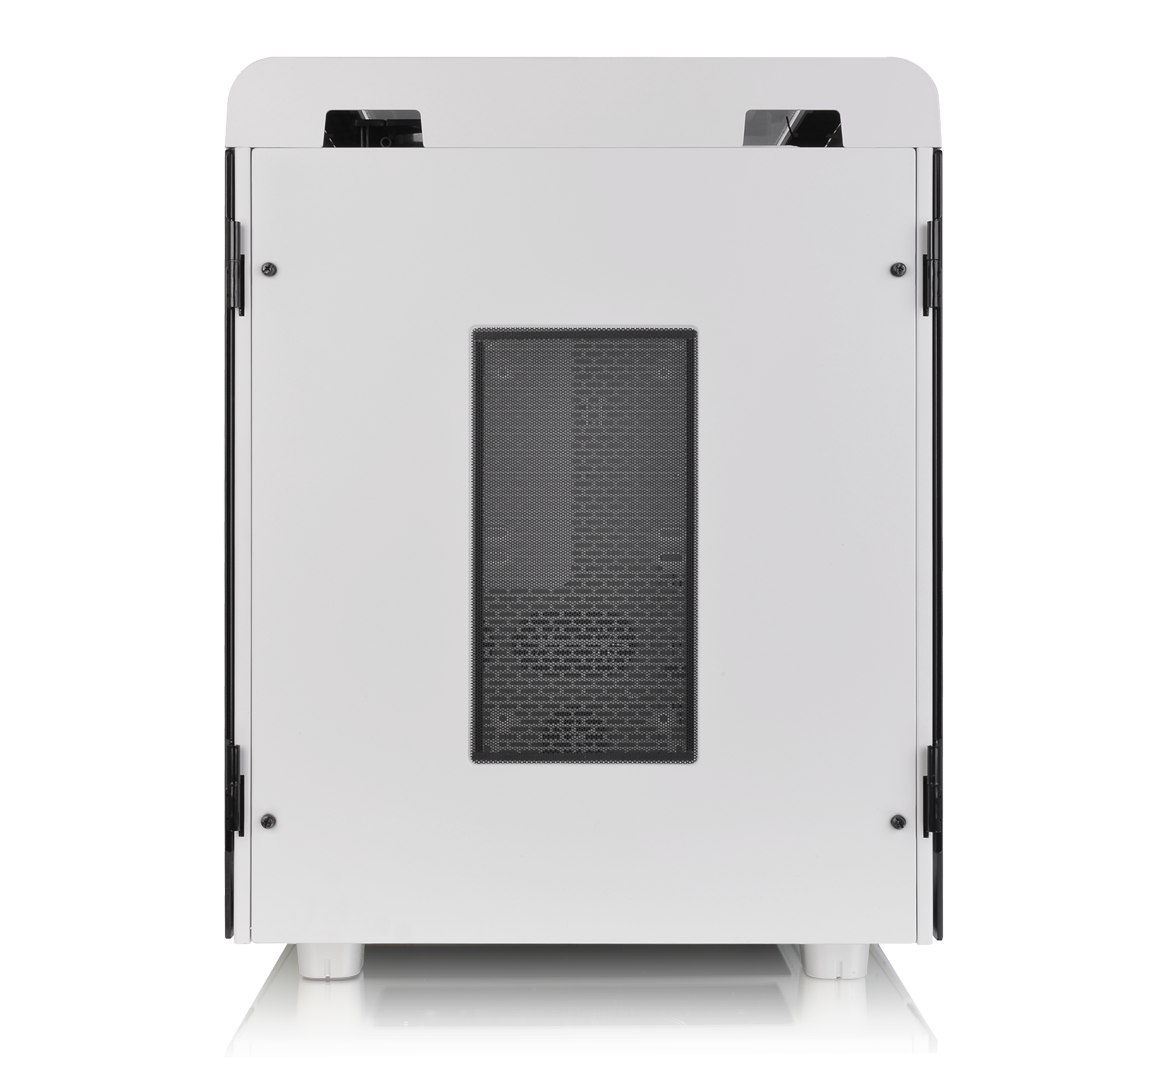
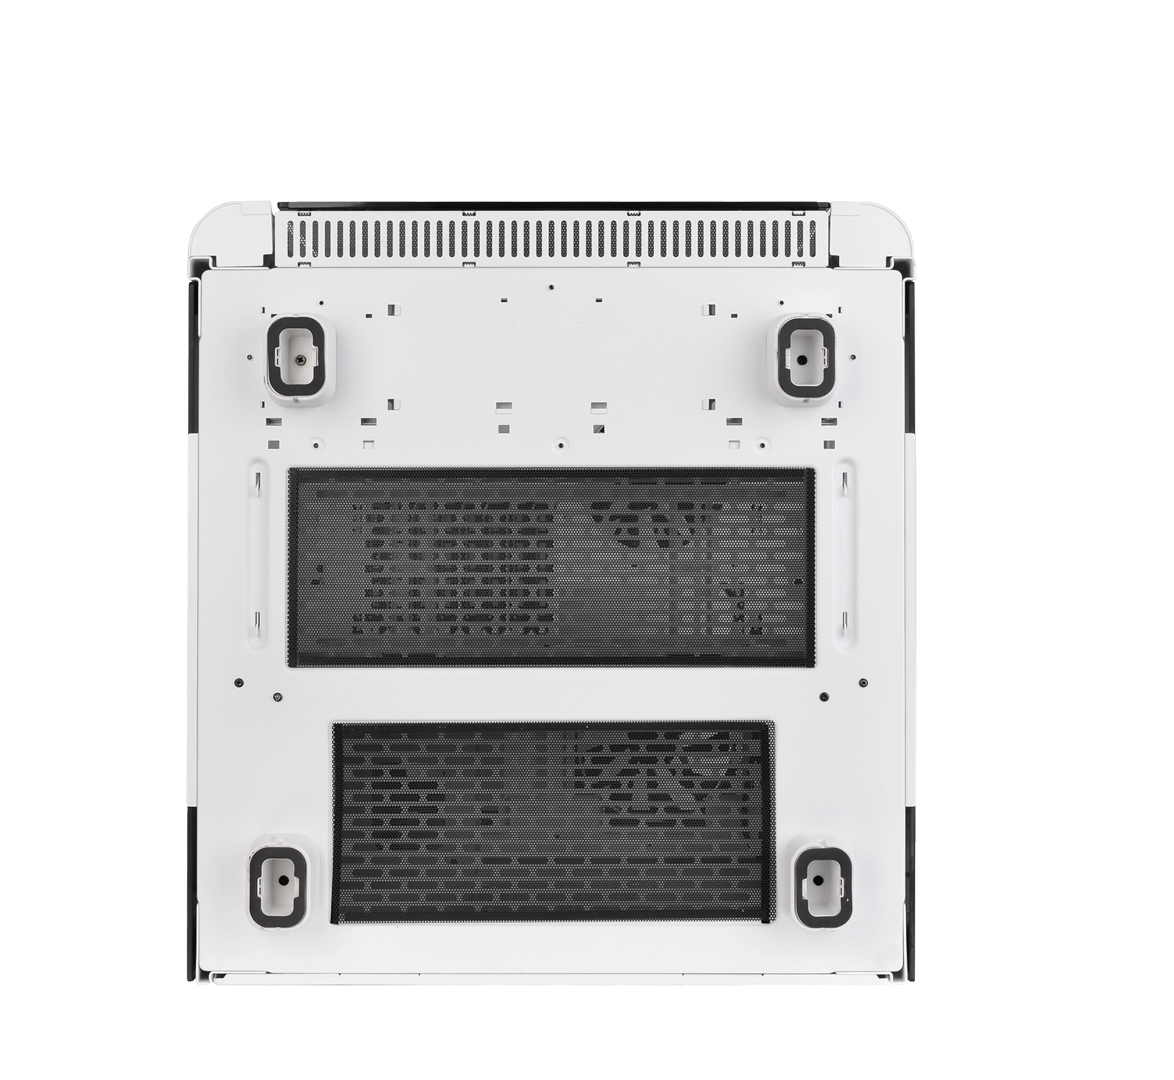
Thermaltake Level 20 HT Full Tower Chassis URL: Level 20 HT: https://www.thermaltake.com/level-20-ht-chassis.html Level 20 HT Snow Edition: https://www.thermaltake.com/level-20-ht-snow-chassis.html Thermaltake Level 20 HT Full Tower Chassis Distinctive from most cases on the market, the Level 20 HT full tower chassis is specially constructed to continue the legend of the Level 20 series case family. It features four durable 4mm thick tempered glass windows, two preinstalled 140mm standard fans on the top, and is designed with outstanding system ventilation. The chassis is a premium choice that inhabits a vertical mount design and expansion capabilities for massive custom liquid-cooled systems. The Level 20 HT takes our latest case innovations and wraps them in an ultra-modern style that’s utterly unique in the case market today. Stand out from the crowd with the Level 20 HT. Tempered Glass Window With Ultimate Viewing Angles The Level 20 HT comes with four tempered glass panels at the front, top and both sides which make it easy to display the internal components. For the front and top tempered glass panels, users can easily unlock by pressing down the locking mechanism located on the top part of the glass, allowing quick and easy access. The left and right hinged doors are also equipped with a smart lock security system allowing you to easily secure the inner components of your case. Dust Reduction Well-designed quick removal magnetic fan filters on the back and at the base provide excellent dust protection and dirt reduction, ensuring a dust-free environment. #For more features & details, kindly visit our official website Let us know what you think about our brand new model- Level 20 HT
-
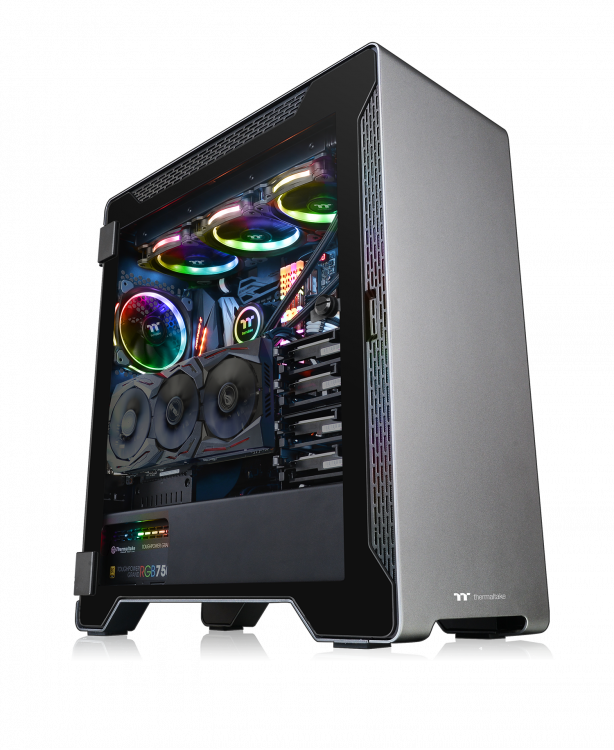
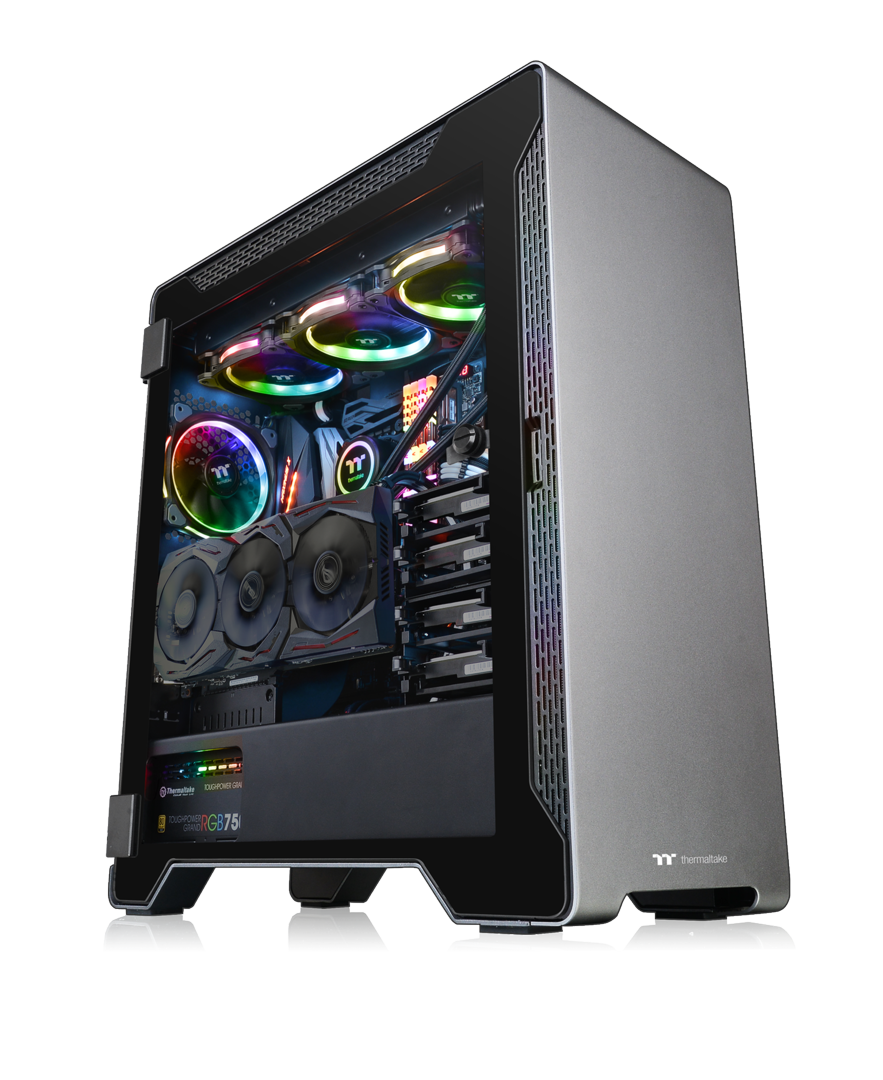
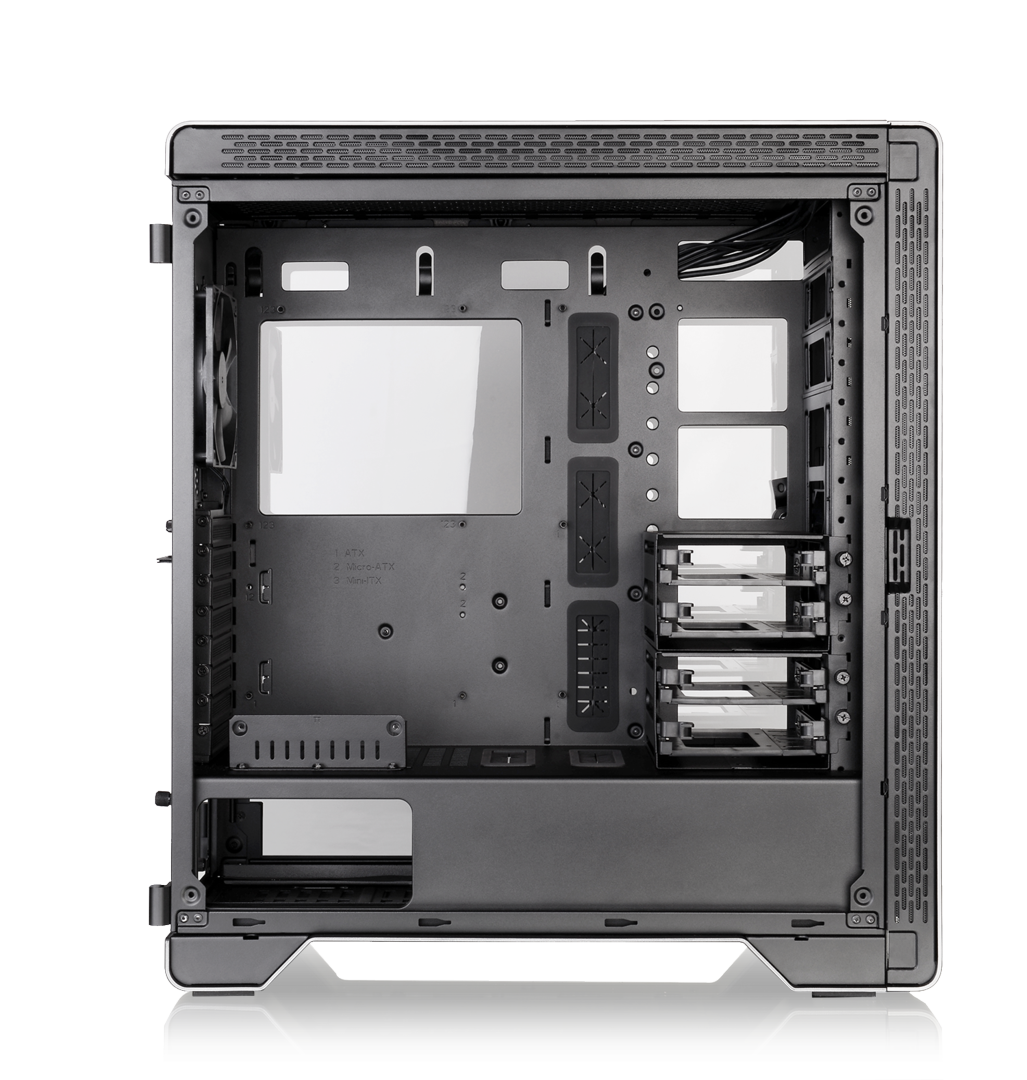
Thermaltake Aluminum Series Thermaltake A500 Aluminum Tempered Glass Edition Mid Tower Chassis *The image is for reference only. Product Link Case Build Video Thermaltake A500 Aluminum Tempered Glass Edition mid-tower chassis features a sleek aluminum front panel, two 4mm tempered glass panels, two pre-installed 120mm front fans and a 120mm rear fan for optimal system ventilation. It has a built-in power supply cover for clean and easy cable management and also supports up to a standard ATX motherboard. Accommodating the latest PC hardware including the most advanced graphic cards and air/liquid cooling solutions, the A500 Aluminum TG is designed for those who are looking for a chassis with the outstanding thermal performance that is further complemented by a clean and simply designed case.
-
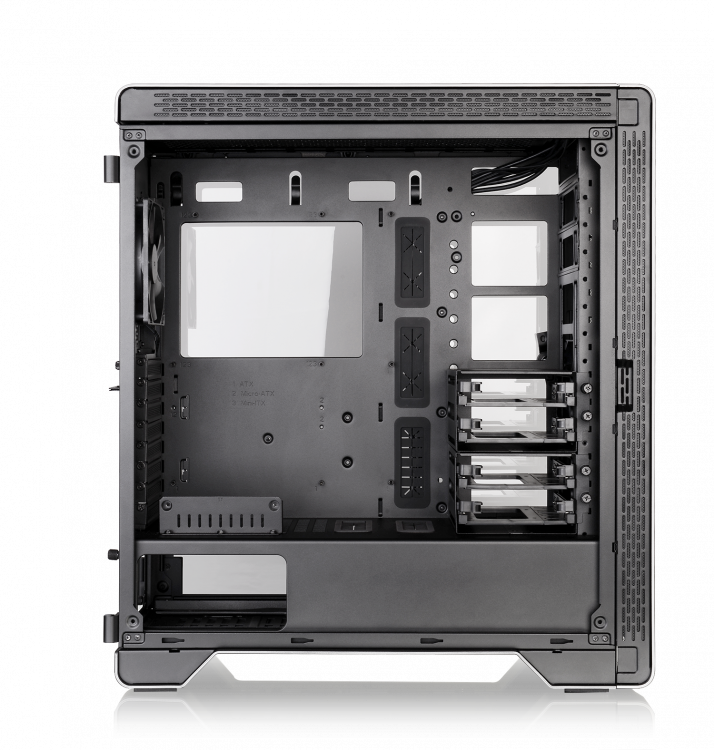
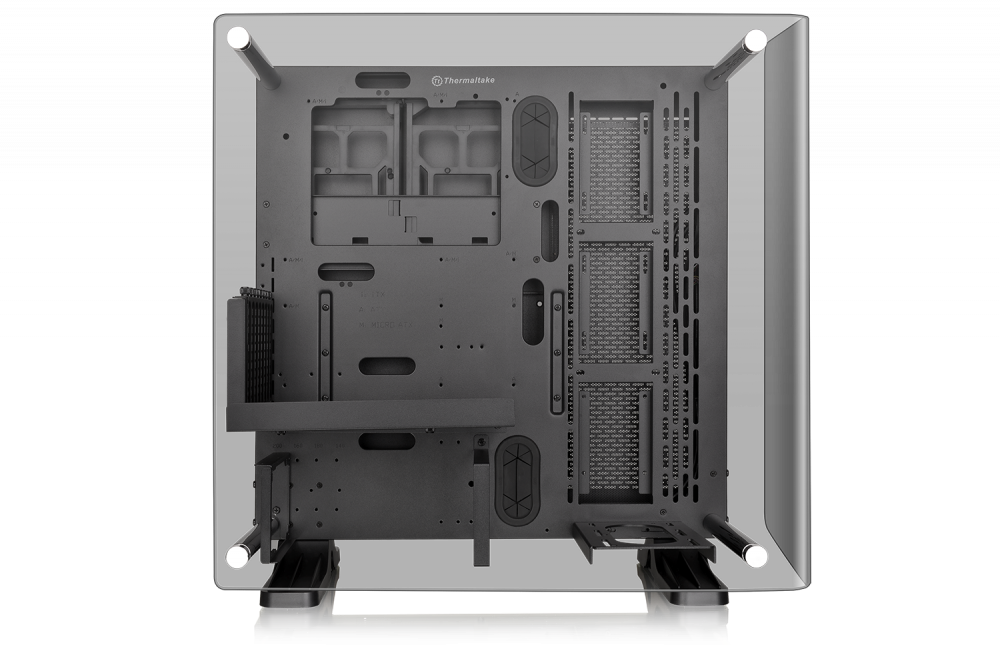
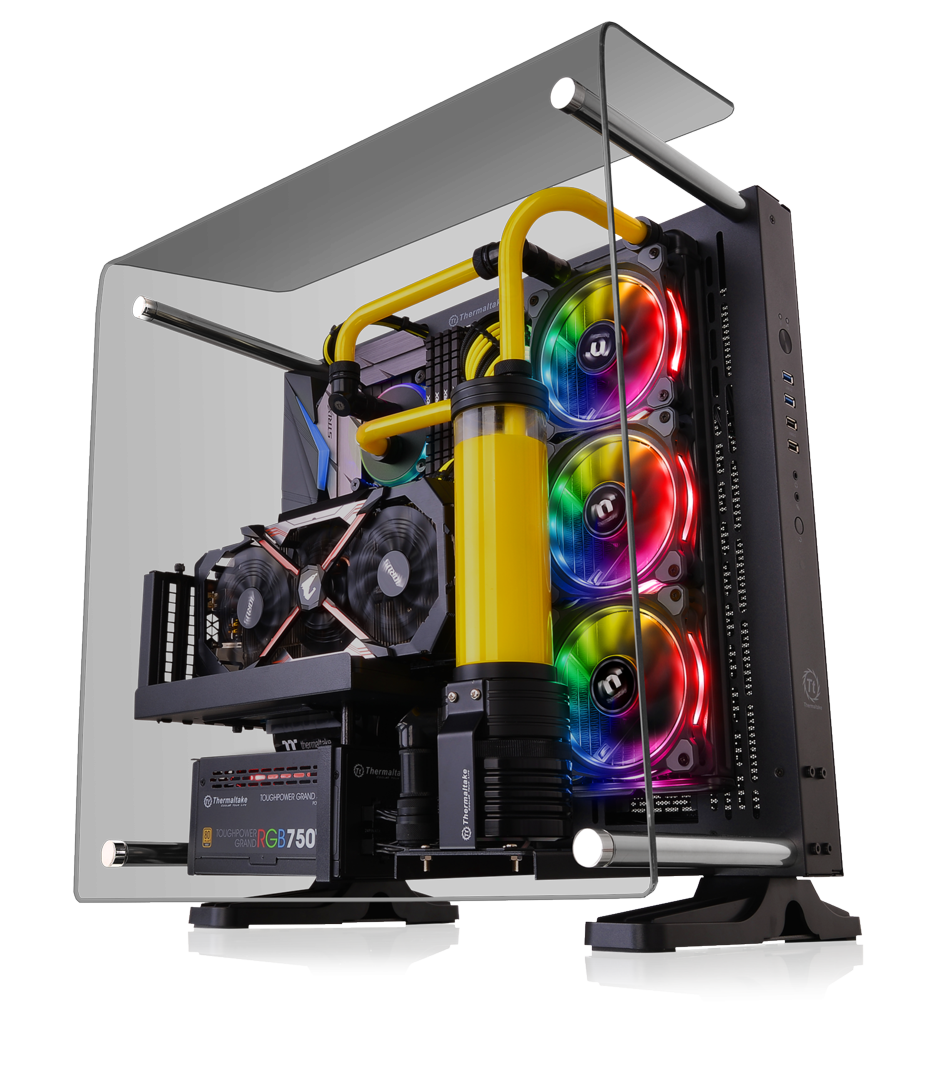
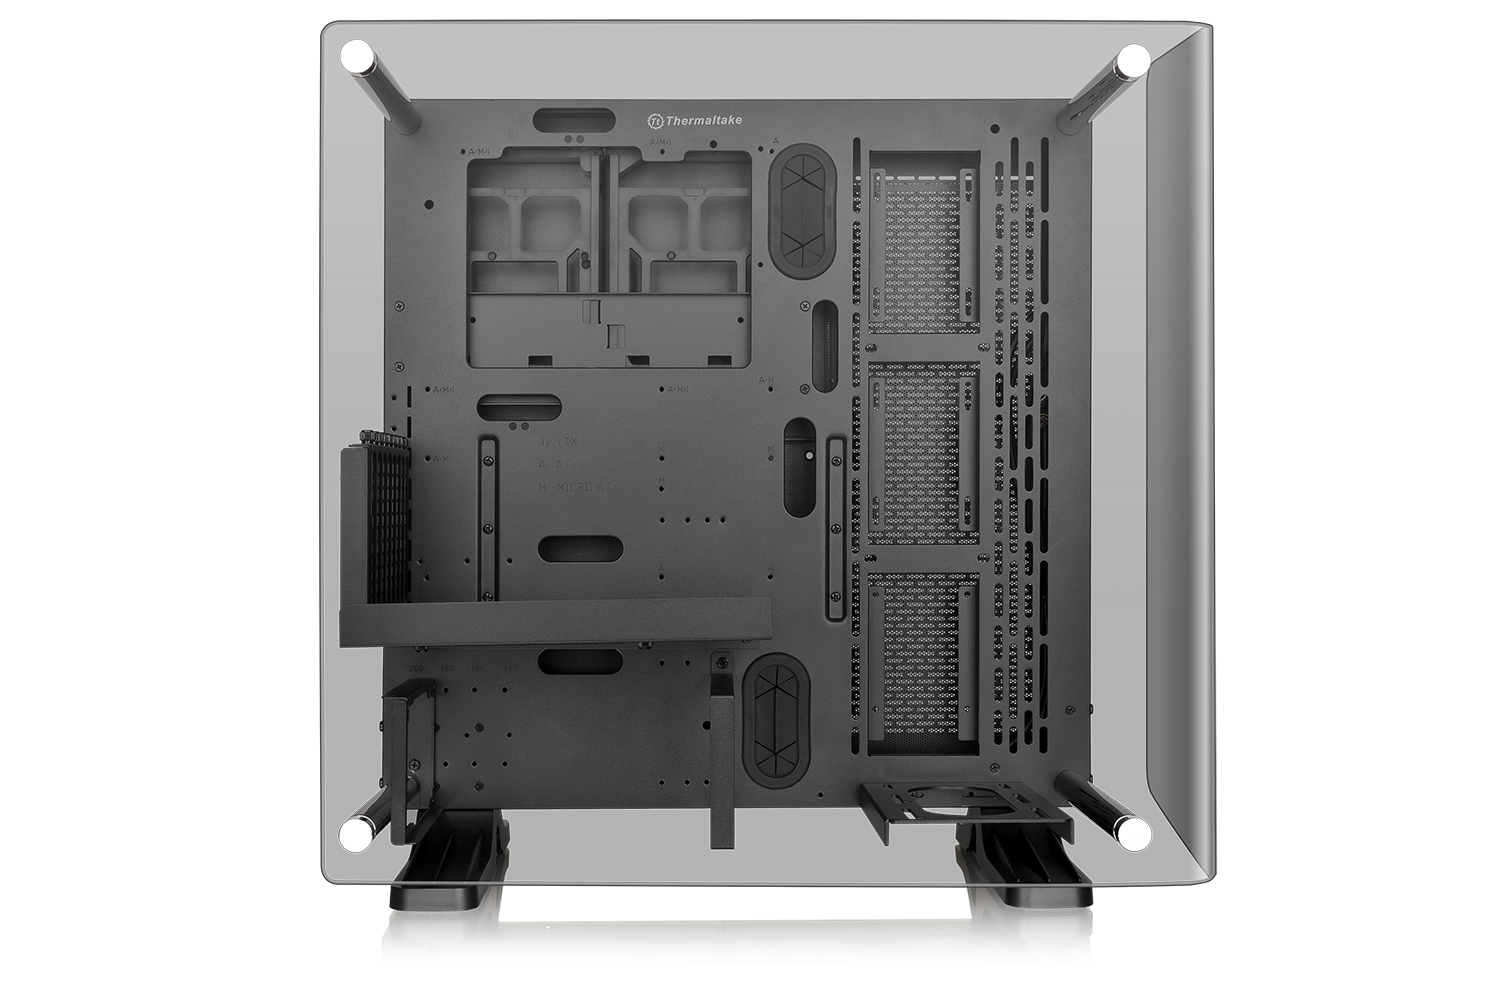
Thermaltake Core P3 Tempered Glass Curved Edition ATX Open Frame Chassis *The image is for reference only. Product Link Thermaltake has kicked open-frame chassis up to a notch and presented the Core P3 Tempered Glass Curved Edition ATX Open Frame Chassis. Open framed PC cases are all about style, about showing off your hardware and taking pride in your system. The Core P3 Curved chassis is the next step in open frame tempered glass case design, with a 90° curved panel; giving you awesome views of your hardware and more options to make your custom system a reality. The chassis is designed with dual GPU and PSU layout options and 3-way stand placements (wall mount, horizontal, and vertical placements), plenty of liquid cooling options and near unlimited flexibility when it comes to building the most advanced customized PC.
-
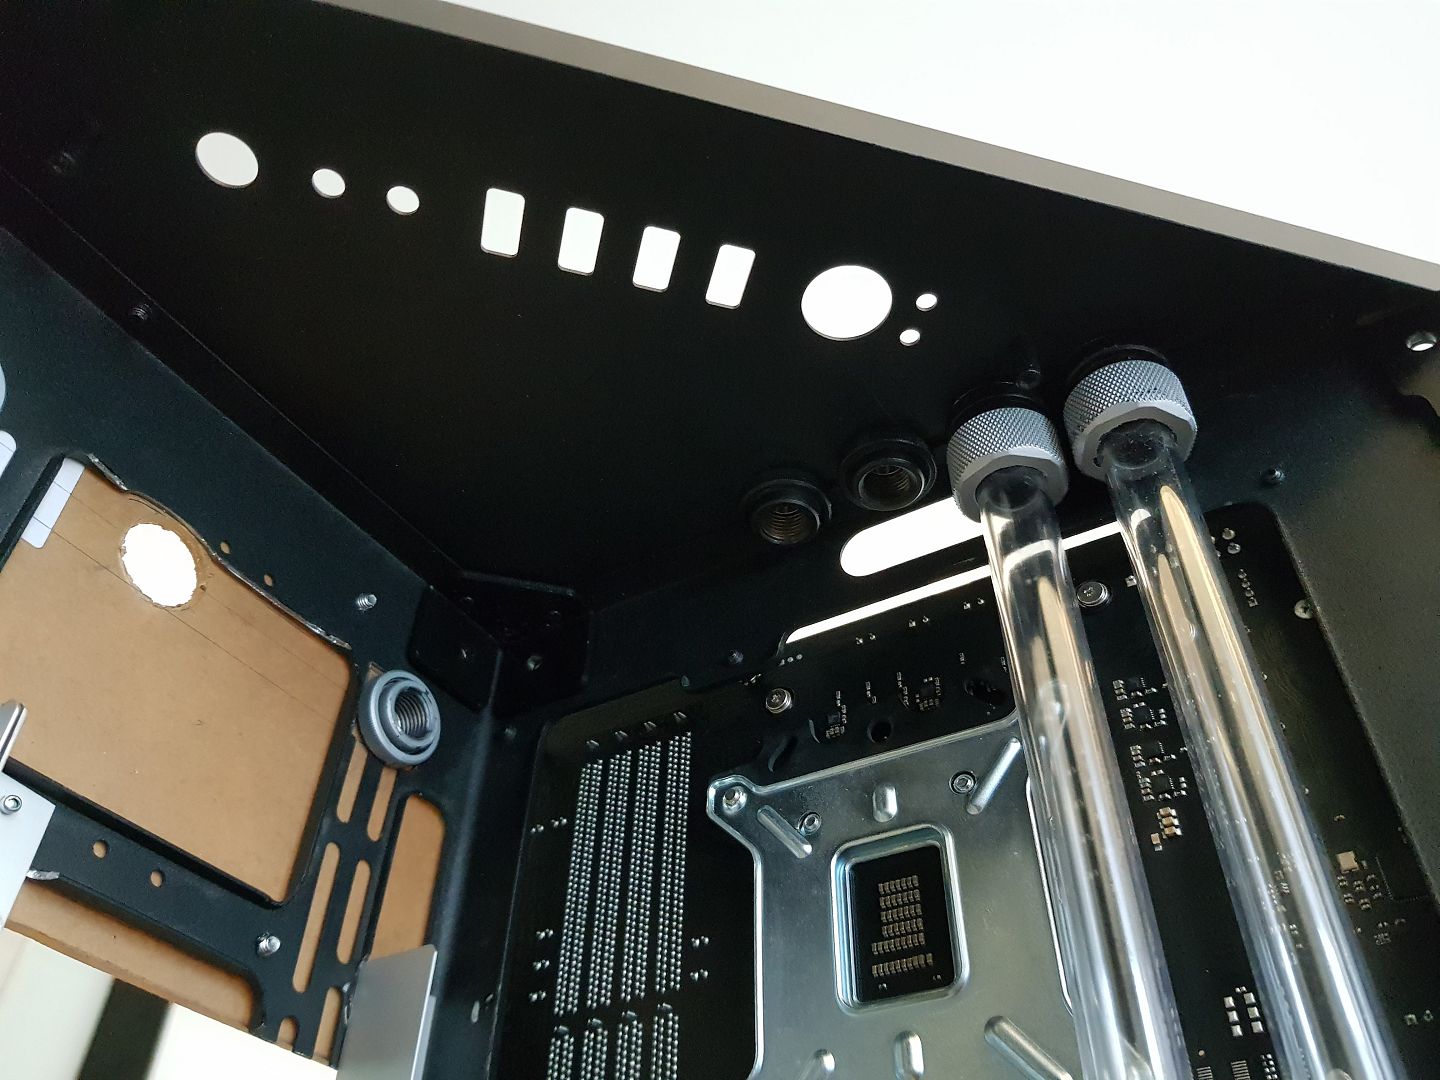
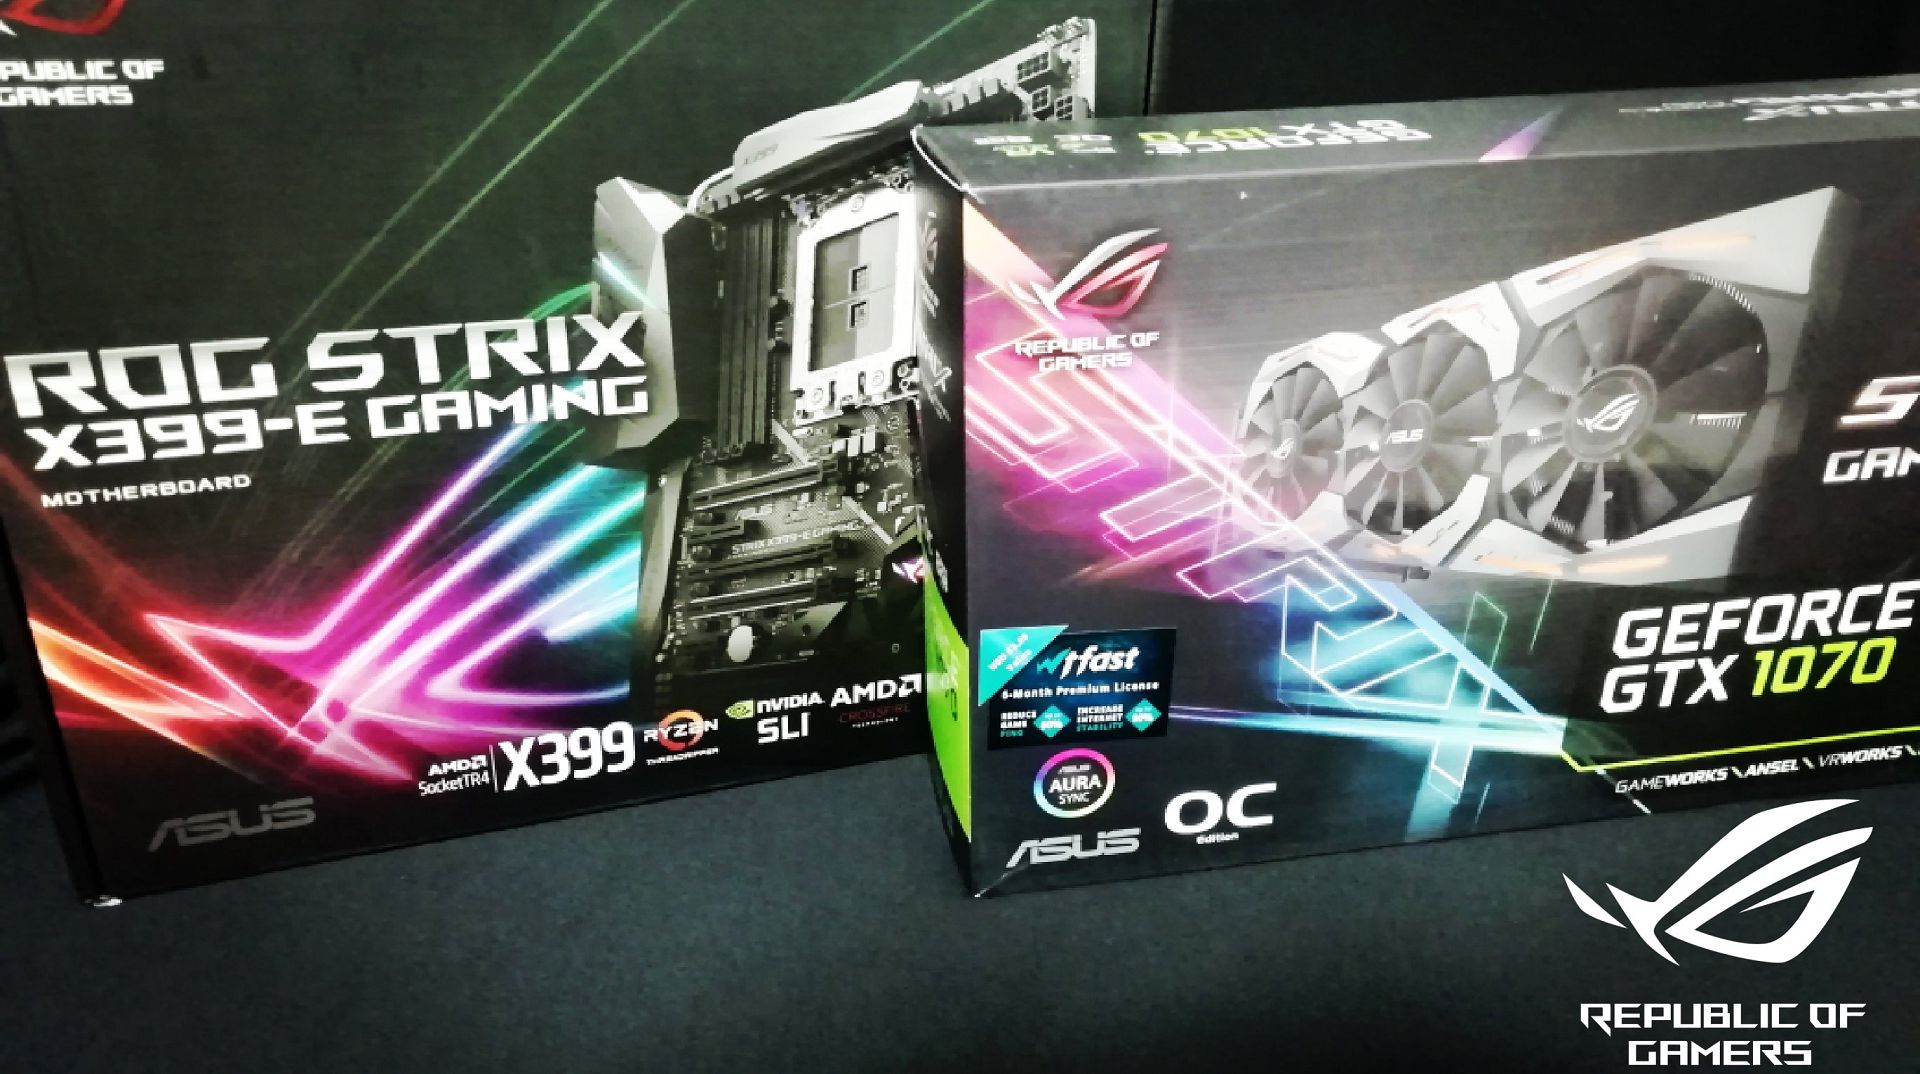
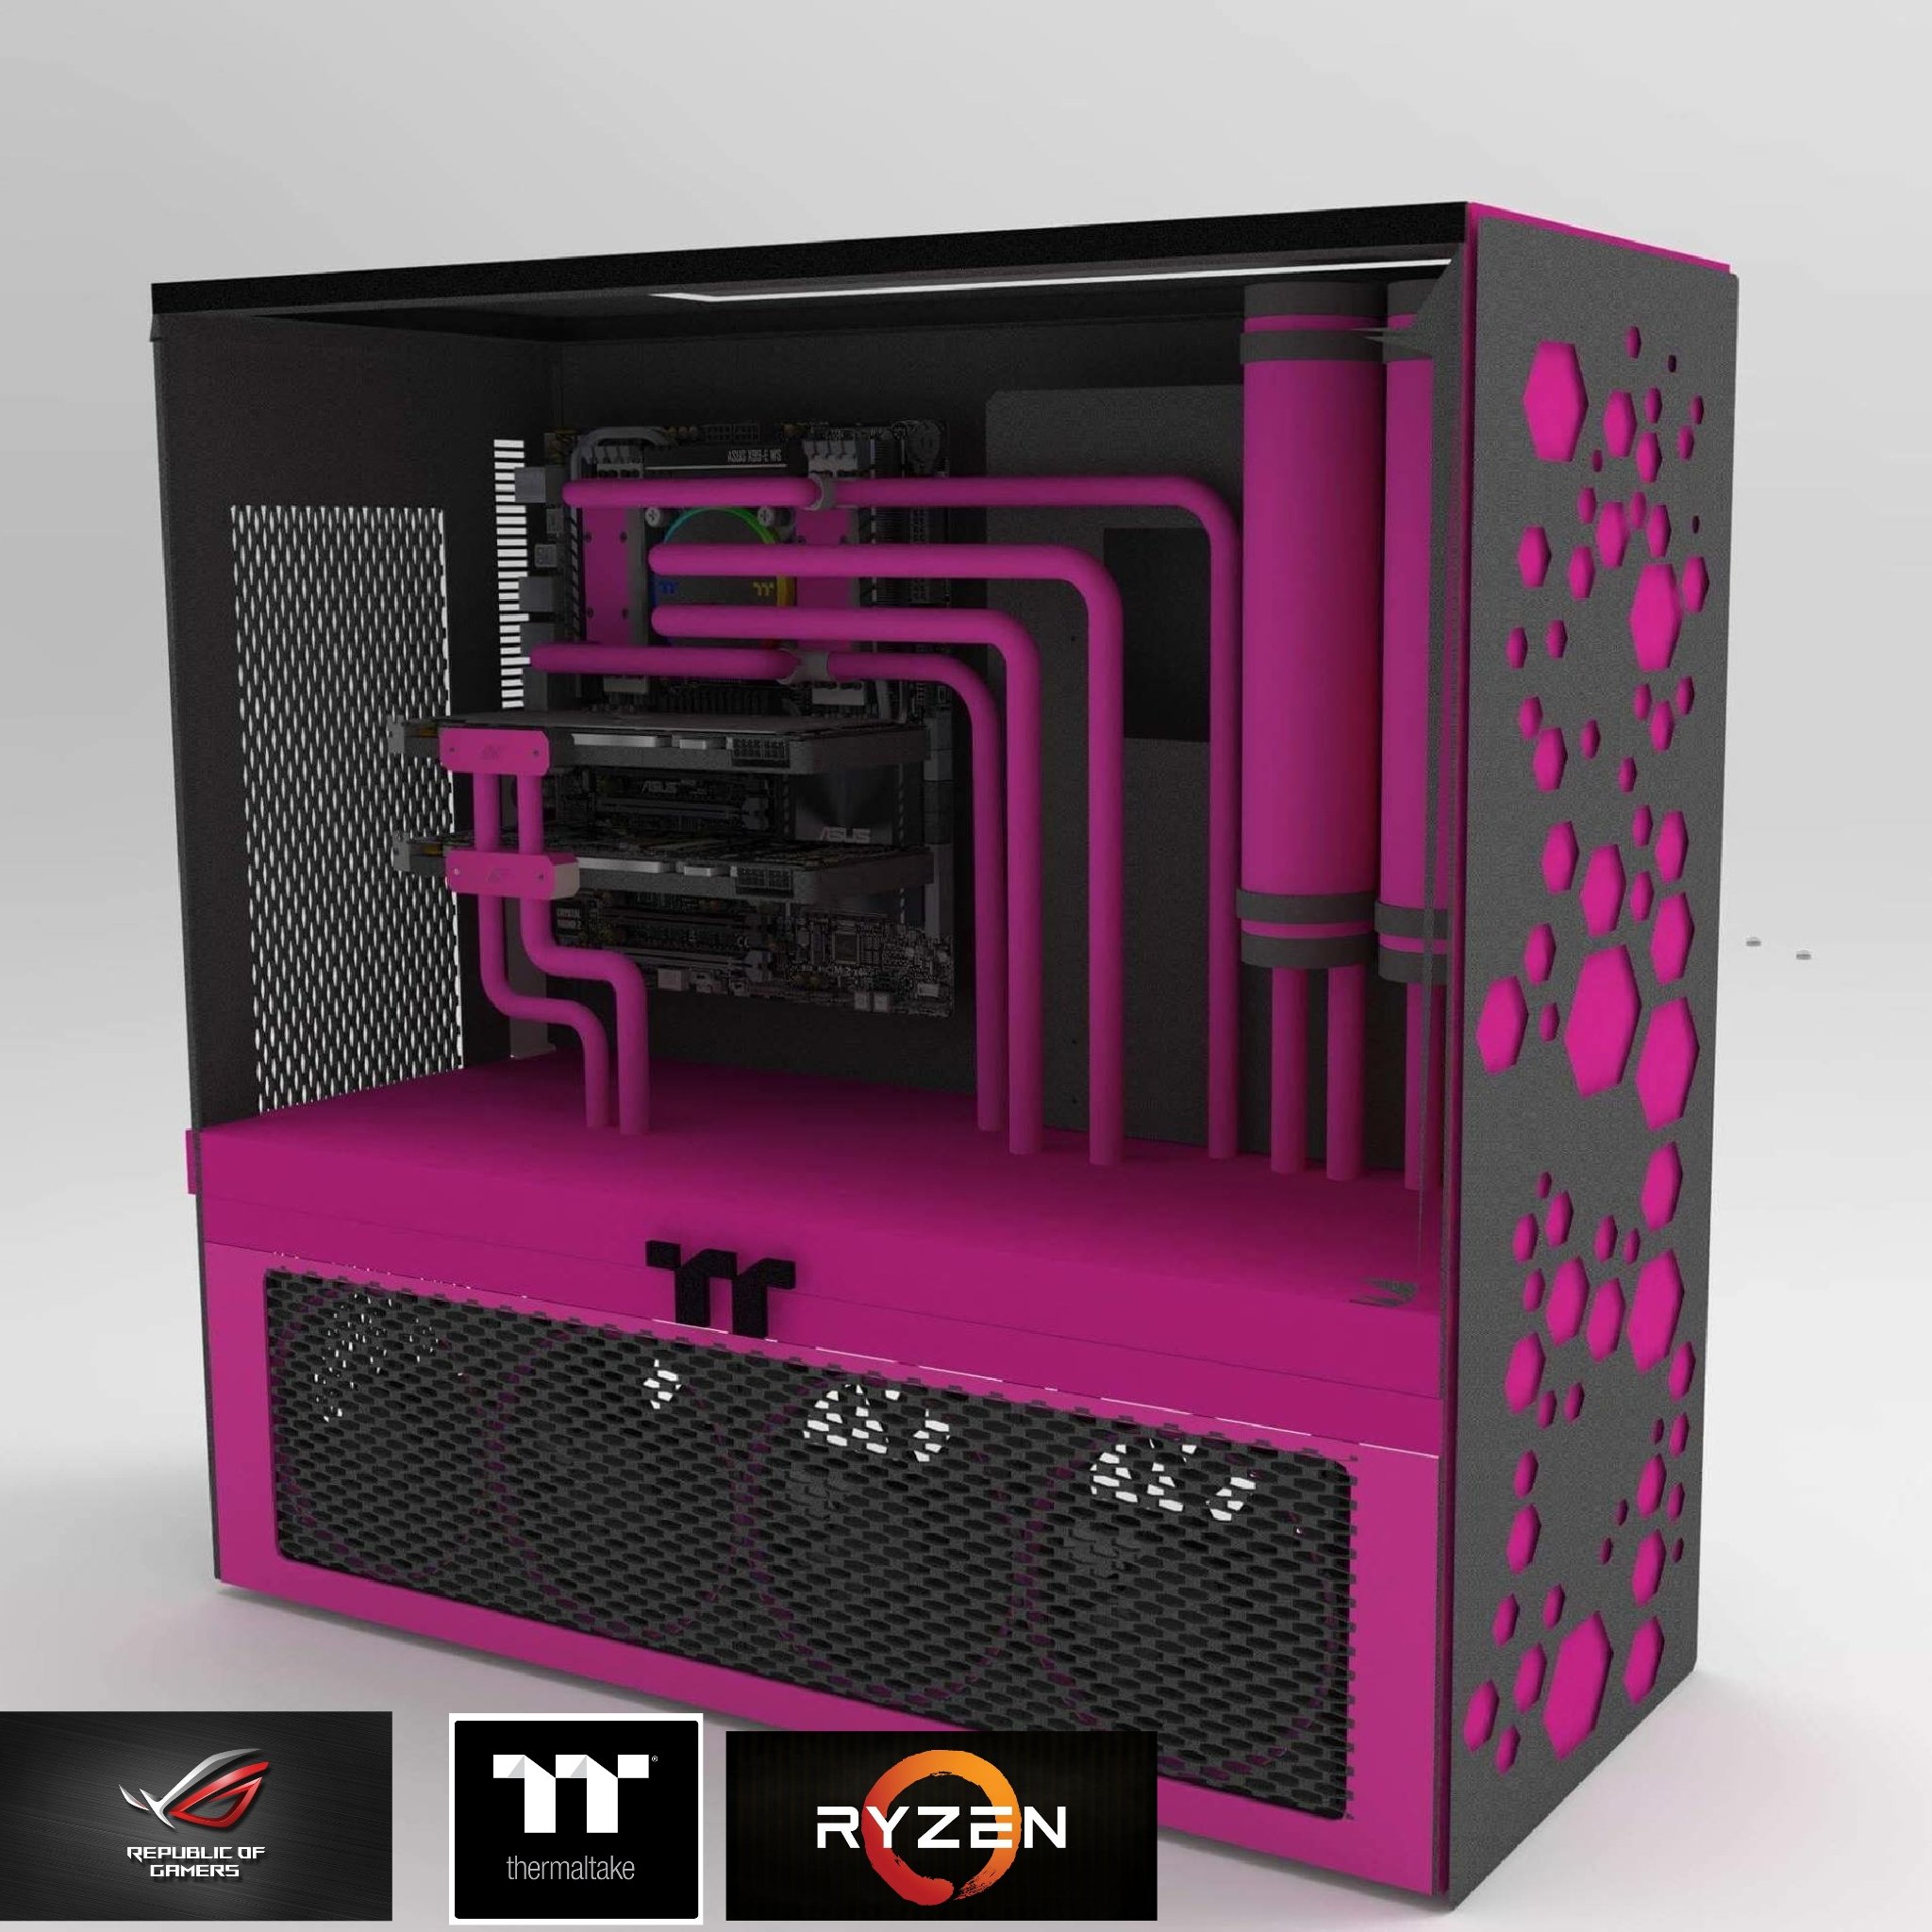
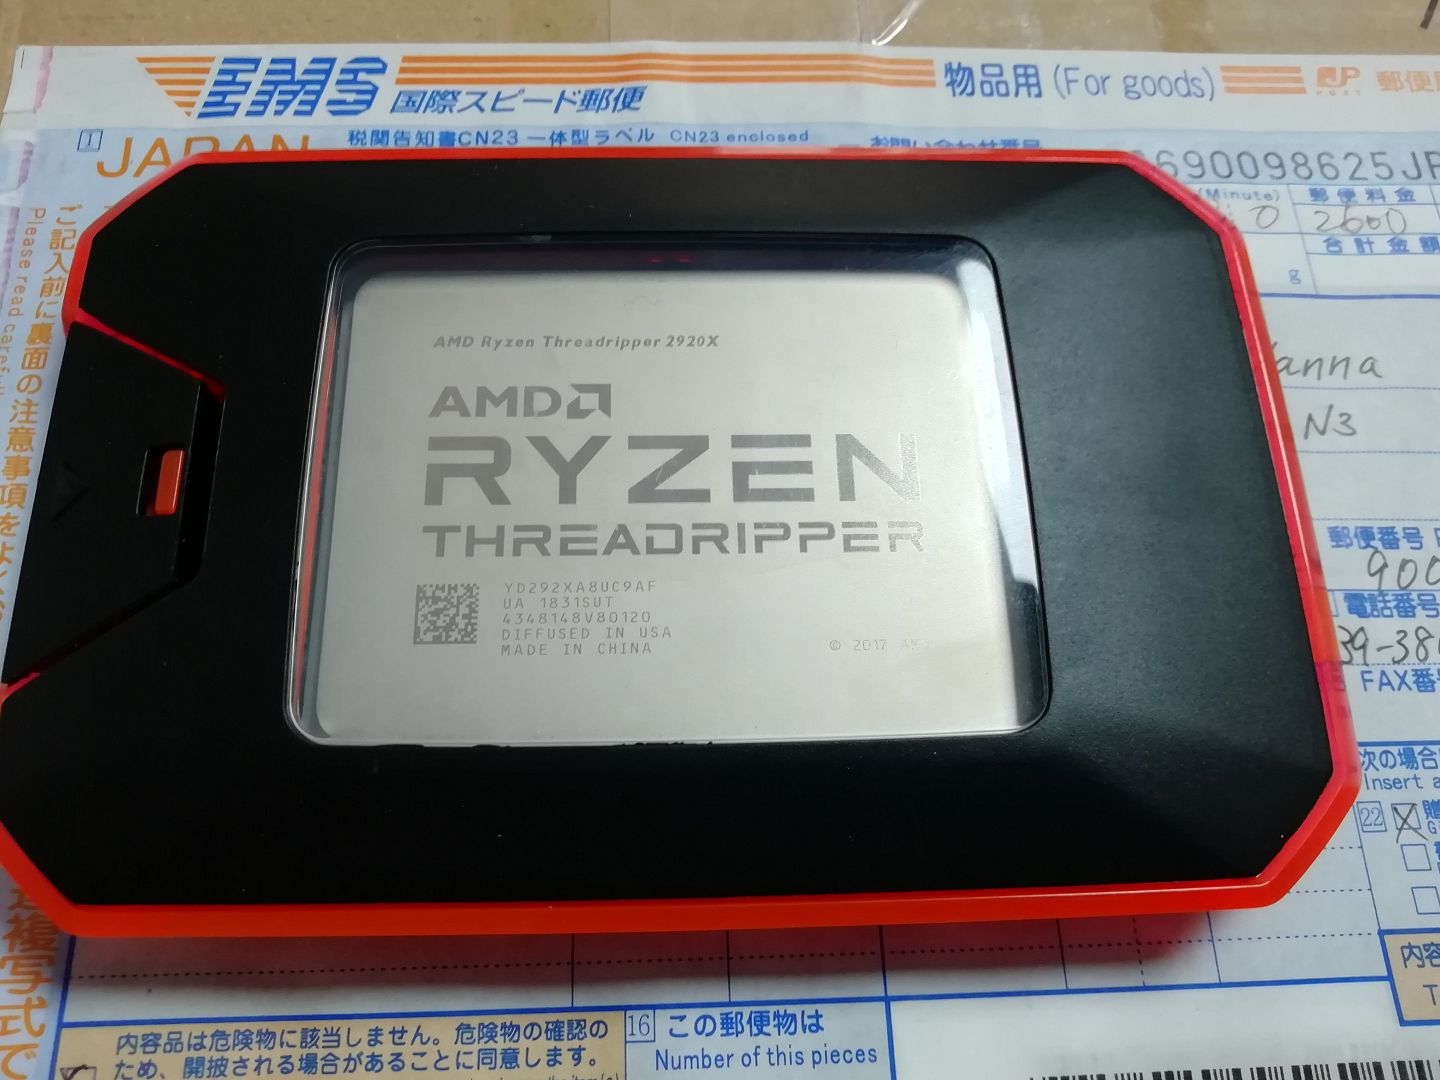
Hi all guys, I'm back to work with the next Octamachine Project. Place the approximate rendering of the Mod, The project will be structured on a Thermaltake level 20 Gt Argb case, I will modify the whole Setting of the case a little, I will use cnc-milled aluminum panels, I will make a backlit Plexiglas backlight and many other changes that you will see Going forward. Sponsors Thermaltake GoodRam Intel Component Case Thermaltake Level 20 Gt Montherboard Asus Rog x399 AMD Threadripper 2920X CPU VGA Asus strix 1070 Ram Goodram 32gb 3200mhz Watercooling Thermaltake


-
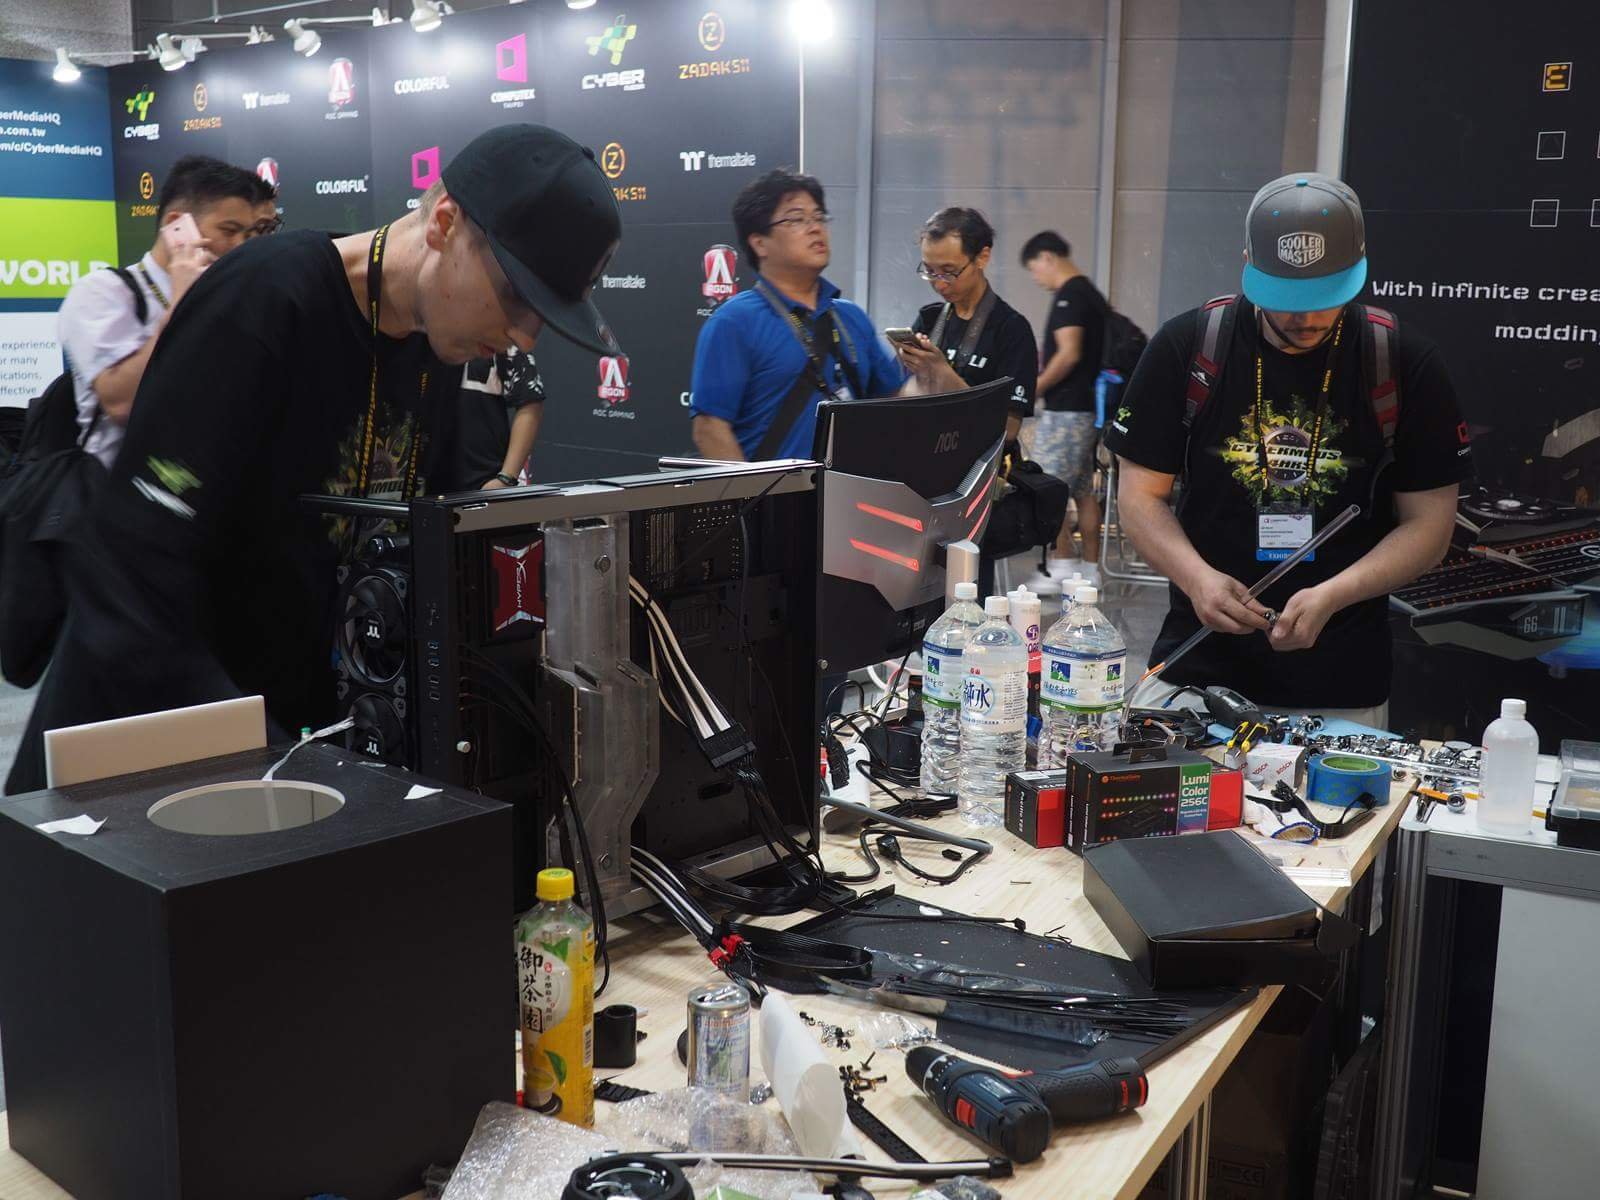
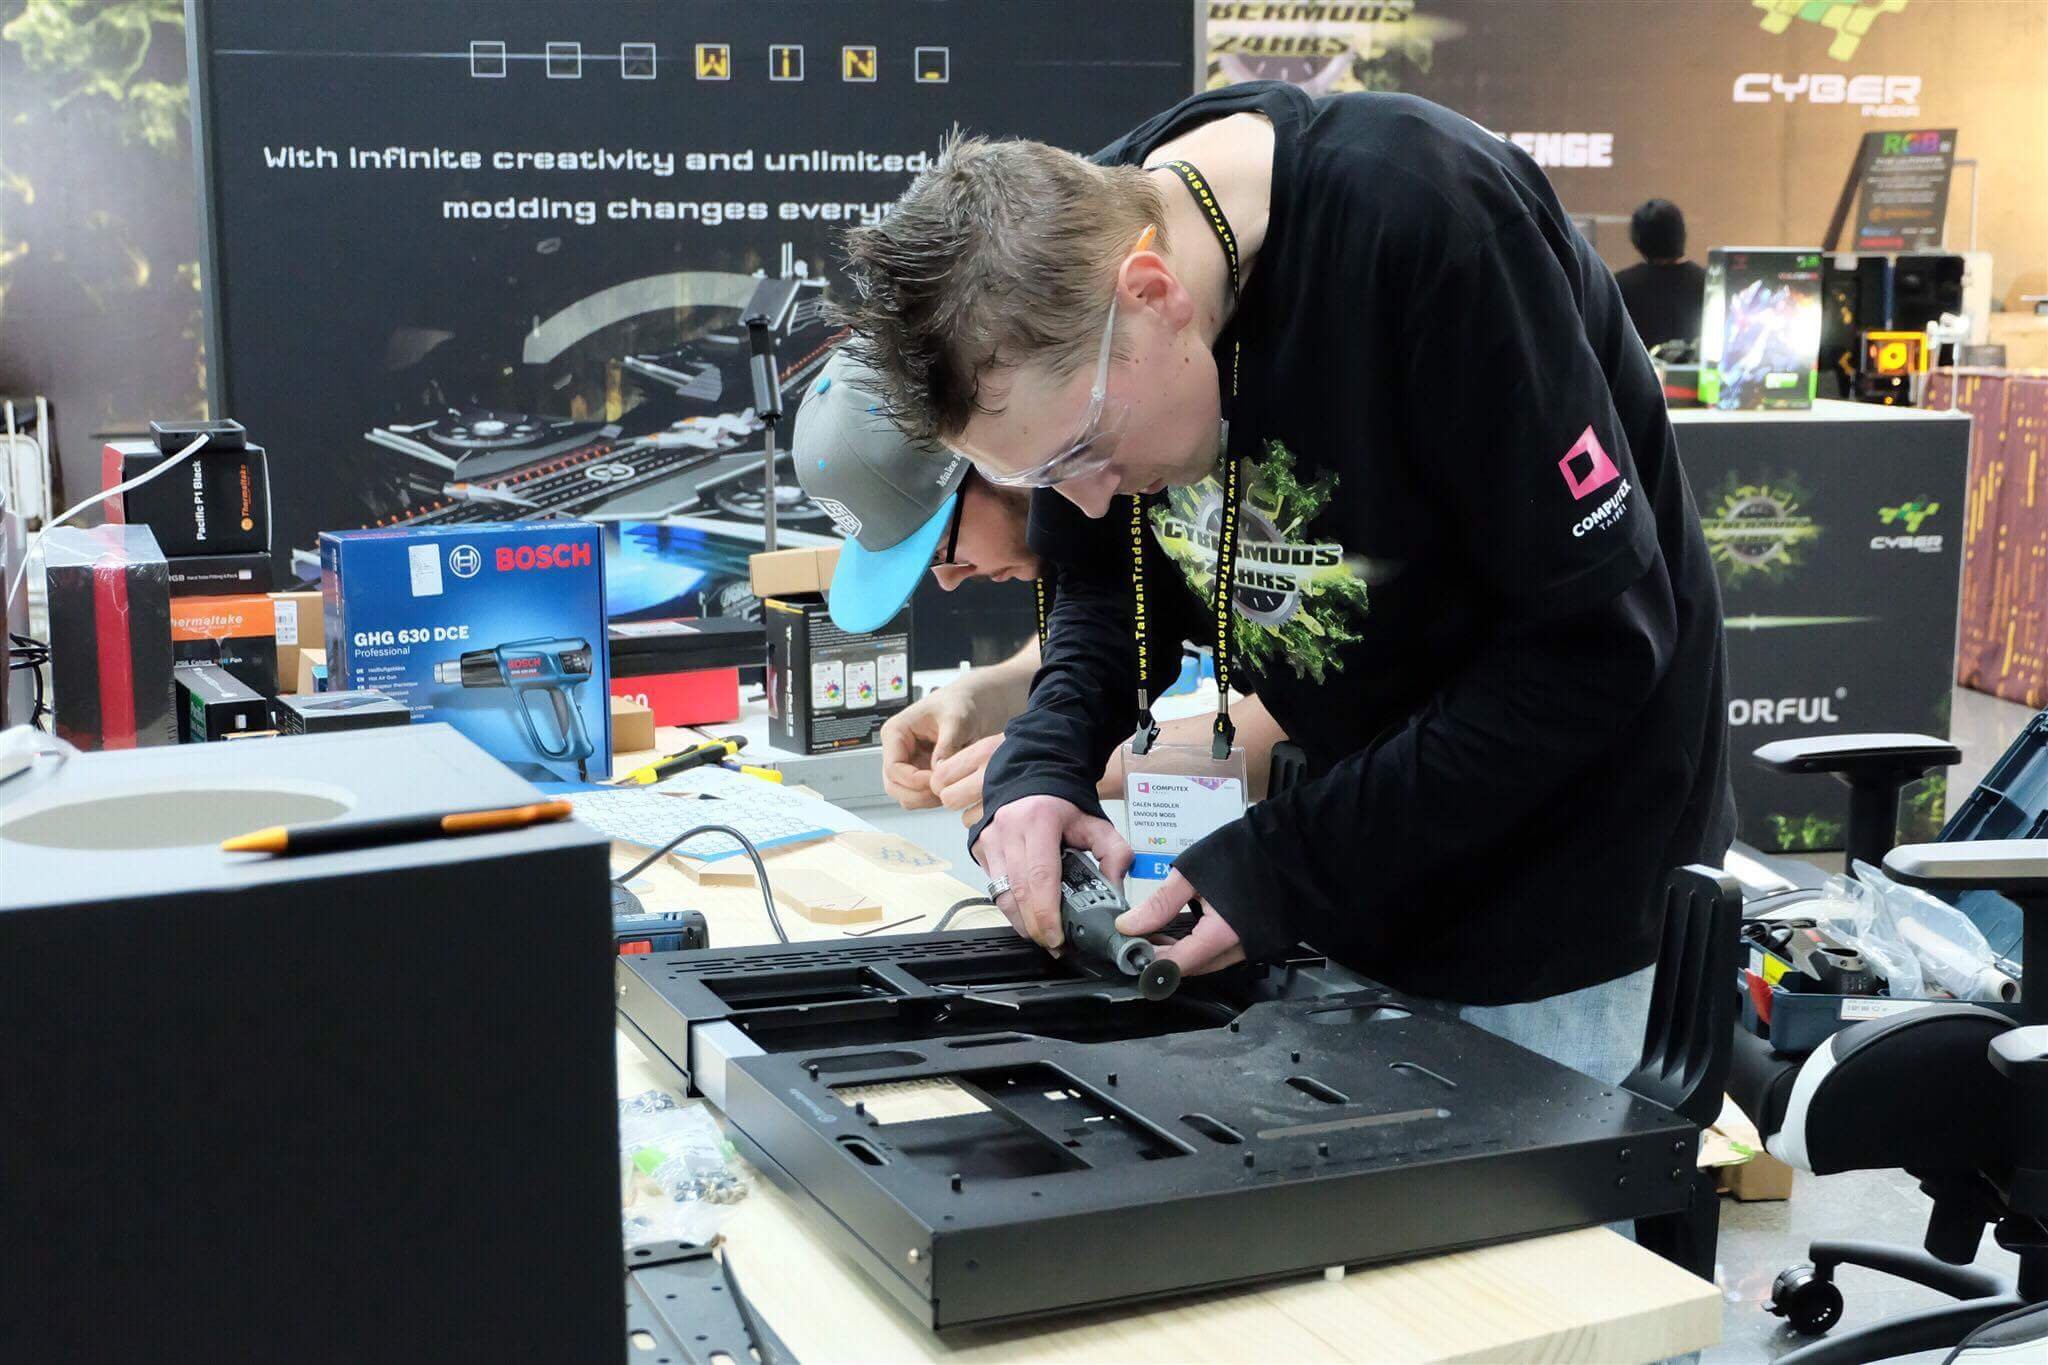
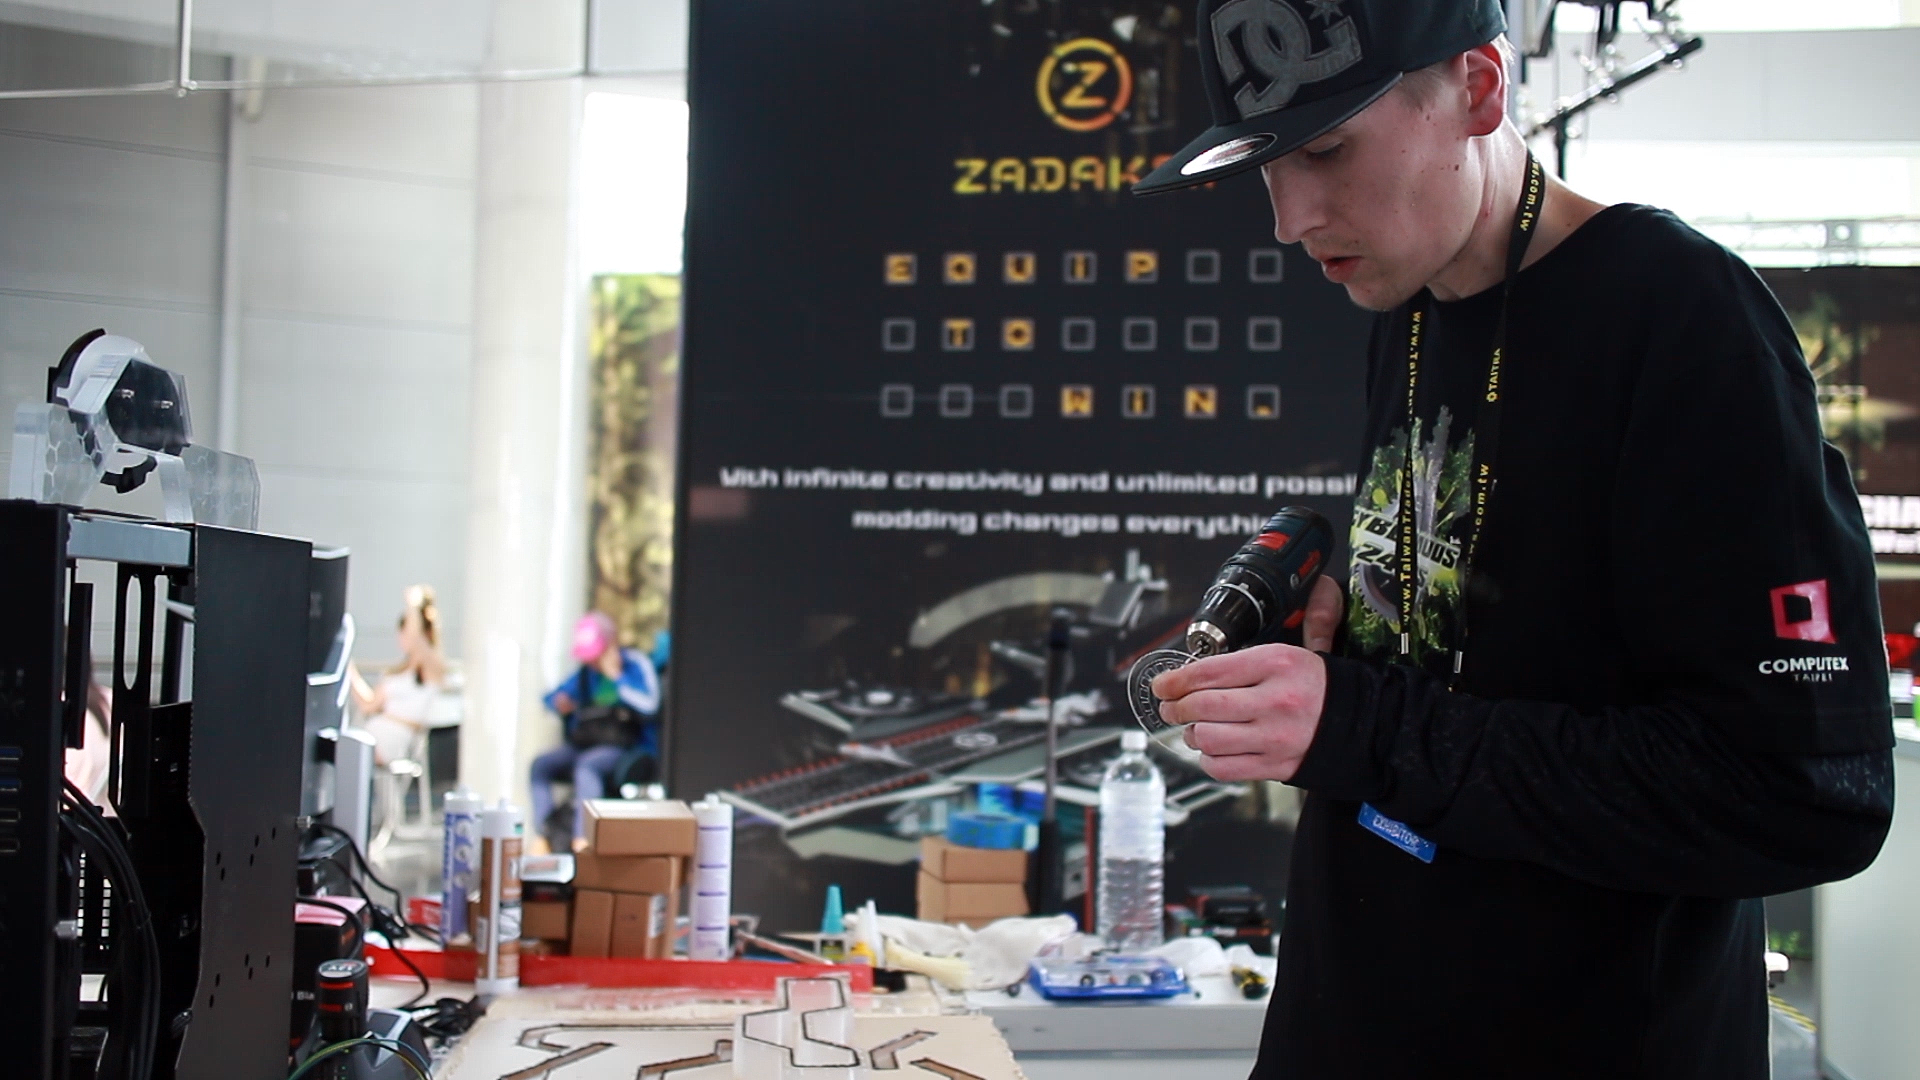
 Your Name: Calen Saddler Modding Brand / Media Name: Envious Mods Facebook Link: https://www.facebook.com/EnviousMod/ Youtube Channel Link: https://www.facebook.com/EnviousMod/ Twitter, Instagram, or other social media platforms: Instagram: https://www.instagram.com/enviousmods/ Instagram followers: 19,150 Twitter: @EnviousMods 2,546 Followers Tumblr: https://enviousmods.tumblr.com Pinterest: https://www.pinterest.com/EnviousMods/ Previous projects/build logs: CaseMOD Invitational Replicant case mod: https://forums.bit-tech.net/index.php?threads/replicant-blade-runner-2049-casemod-invitational.345959/ Geforce Garage Mod: Carbon Case Mod: https://builds.gg/builds/carbon-3903 Total fans: 26,630 (Based off of metrics; only on social media with provable sources) Why do you think you should be the next TT Talent?: I've spent years modding and working with Thermaltake products. I've also been fortunate enough to experience many of your product lines and used them within multiple mods. For me modding isn't just a hobby or something I like to do in my spare time. It's something I do all day, everyday. Modding is interwoven into every aspect of my life. I've been professionally modding for about 5 yrs or so and my main focus now is building Modded PCs for shows. However I still do a lot of personal projects so that I can learn new skills and techniques. Everyday is an opportunity to learn more and share those skills with new modders, enthusiasts and everyday builders. I thoroughly enjoy meeting new people and discussing how modding/pcs can bring a person so much joy. Thanks for the opportunity! Video; Some of my Thermaltake Case Mods: Thermaltake Live Modding Competition: (CyberMods)


-
- 3
-

-
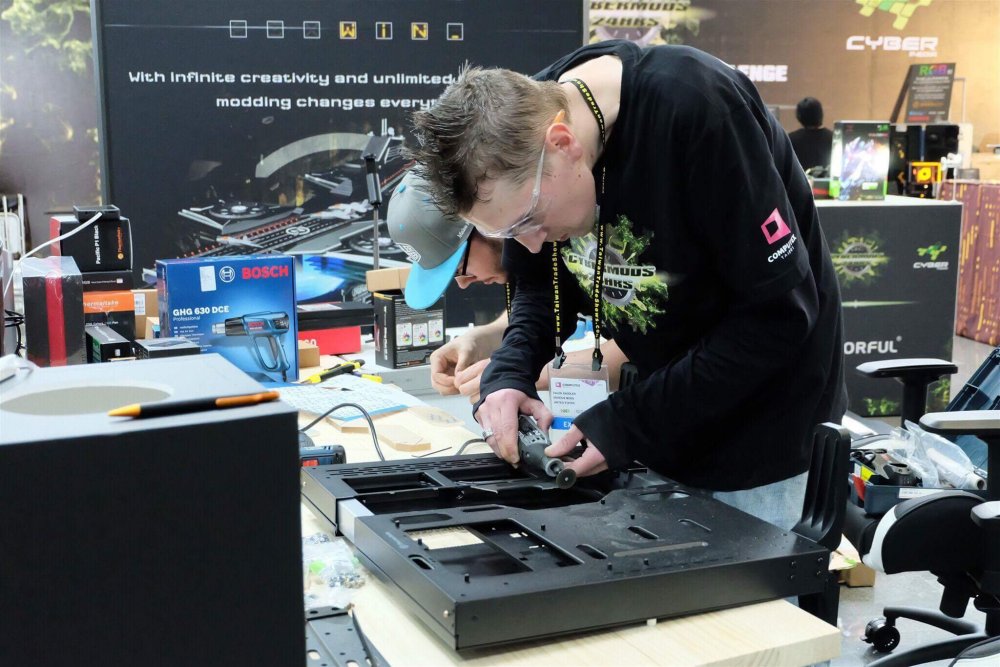
- thermaltake
- computex 2019
- (and 2 more)
-
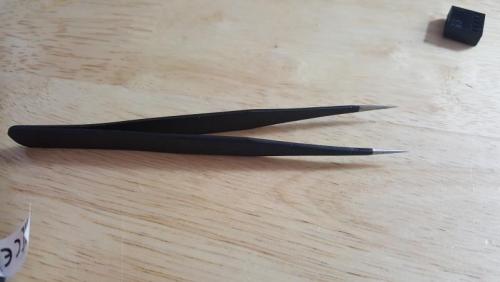
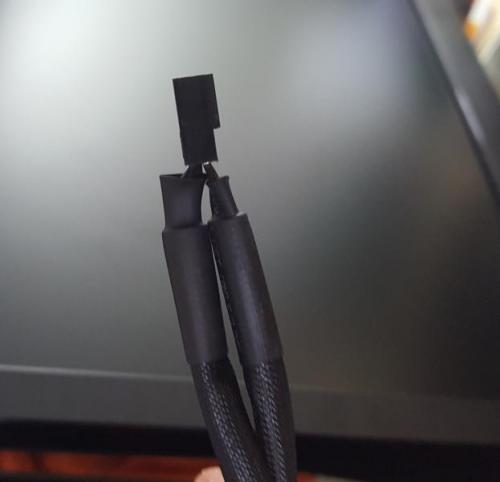
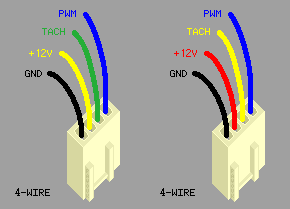
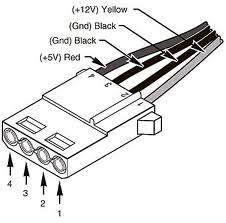
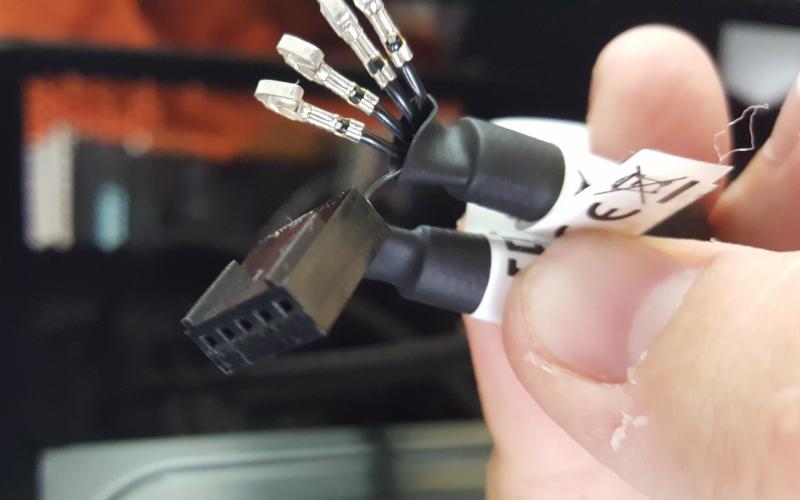
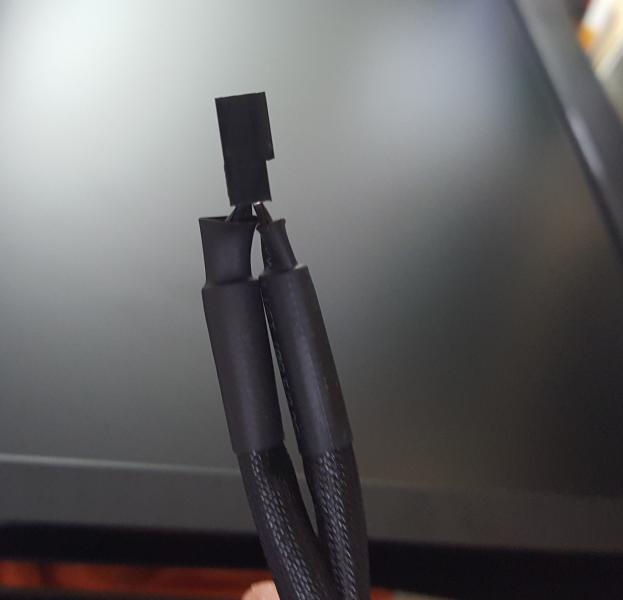
Good Time of the day everyone! I would like to share my own experience of connecting Riing RGB fans together in 1 controller. This guide will divide in two parts: One of them is how to connect 4 fans in 1 controller, using only your hands and pin extractor (or any thin tools like needle). Second part will be about connecting up to 6 fans using same tools as in first case plus 4-pin Molex cable and electric tape (or shrinking tube or soldering iron + tape). A little Preface: Why I decided to divide in two parts? The answer is very simple. MB in most cases provides 12V @1Amp. Usually it will run up to 3 fans at max speed without any drawback (loosing RPM). However in some cases you can connect 4-th and you won't notice any difference. Firstly, (too obvious) power off your PC. (Don't forget that you are doing at your own risk, this is not official Thermaltake guide) We need tool to extract pins from the head. You can use basically anything thin enough to fit a little hole on top of the head. I used this tool: The idea is very simple, we need to extract pins from one head and insert them into another head, so there will be two fans goes into 1 4-pin head. There is enough room to fit 2 wires in 1 head slot. See little holes? Press on them and pull wires. Very simple. Do you see that there is enough space in the socket? We need to insert each extracted wire into proper slot. It would go snug and fit secure. At the end we will get this: Done! Just plug it back to controller and you are good to go! Video to demonstrate: https://youtu.be/jn-x7rH3Pwg Second part! Connecting up to 6 fans. We have to follow same process as before, BUT the big difference is that we need 4-pin molex cable. How it works: 4-pin PWM MB port has 4 pins (oh man, thanks Cap. Obvious!) You can see pinout below: We will utilize power from Molex cable (it's peripheral cable goes directly in PSU) and PWM signal from Motherboard. From the power cable, which goes with fans, you need to extract only two pins +12V and GND .Other 2 leave in the head. Extracted pins you need to connect to molex +12V and GND correspondingly. Here is pinout: Just in case: MOLEX has 2 grounds and it doesn't matter which to connect. What we'll get at the end: Just plug PWM to 4-pin MB fan port and Molex ... to molex, lol. No video yet, but it works If you'll have questions, don't hesitate to ask. Maybe I just forgot to mention something... Cheers!


-
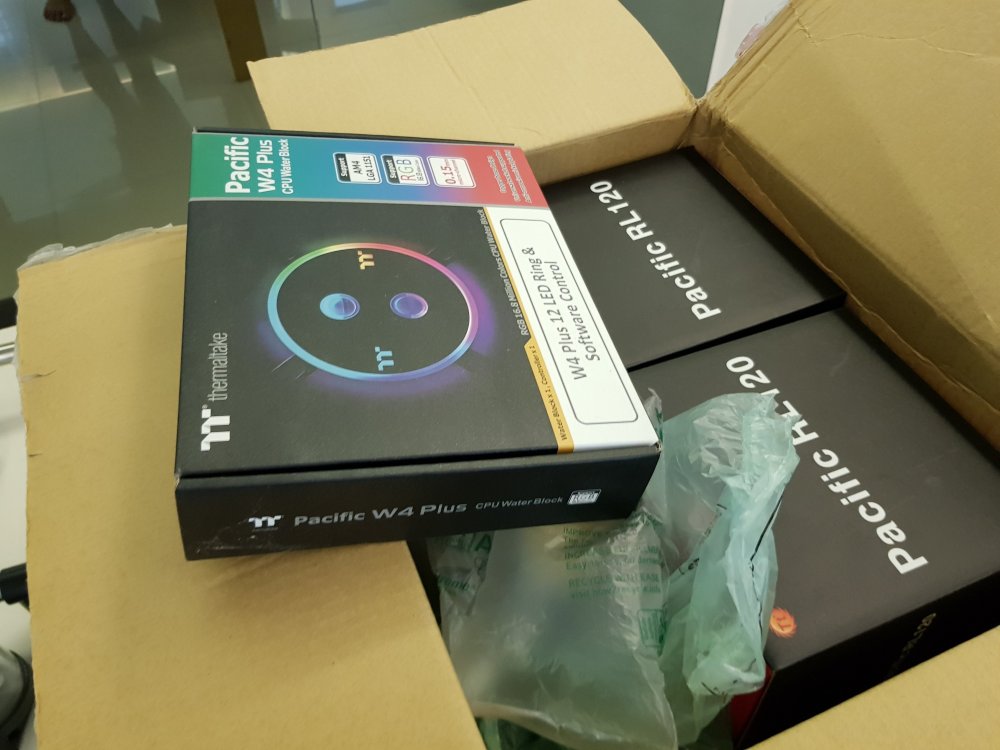
 Hello, so somehow this novice of a modder has been chosen to be one of the five competitors in this years Thermaltake Modding Trophy! Words cannot describe how much this means to me nor could I tell you the challenge ahead this brings to me as newcomer on the modding scene, I sure feel like I have a lot to prove! My design of course got me in to the competition and that is what I call '20th Century TT' so let me tell you where the idea came from although it's pretty obvious to most. As soon as I heard the competition was Thermaltake's 20th anniversary the 20th Century Fox movie studios came right to me, I thought it was a good idea and what do you know, apparently it is and I can finally show you all the design that got me here. I'm proud to be in this position and to show you all what I can do! The Main Hardware 1 x Thermaltake Level 20 XT chassis 1 x Thermaltake M360 Plus water-cooling kit 1 x Thermaltake 850W Toughpower ‘SYNC’ Edition PSU 1 x Asus Socket AM4 Motherboard (model TBC) 1 x Asus Nvidia-based graphics card (model TBC) 1 x AMD Ryzen 7 2700X CPU 1 x Adata SX600 128GB M.2 SSD 1 x Adata M.2 RGB heatsink 1 x Adata Spectrix D41 3,000MHz 16GB (2 x 8GB) DDR4 At the moment I'm still gathering a few items that I will need and soon discovered that some of the items I originally planned are no longer available so will have to search elsewhere, which isn't as easy as it sounds but not to worry. I'll update again once I have more on the way so this post may be quiet for a week or so, I just wanted to get my head in the door and say hello. First package for the build, we got this on the 28th of September for the opening ceremony at Scan HQ and what an awesome day that was all round! Second delivery was two packages, we got them last week and oh my where am I suppose to put all of this? And what a beautiful case it is! Sorry for stock photo I got excited and couldn't keep it in one piece long enough for a photo. Here's a little progress I've made over the past day, I've taken every piece of metal that isn't riveted away from the chassis and plan to paint it antique gold to help keep in with the theme, I've of course added some glitter to the two large front plastic columns, I couldn't help myself with that! I somewhat feel like it is a part of me now, I've used it on all my builds but none was as over the top as the first but that was for my daughter so was to be expected, anyhow I certainly feel it got my name out there, so less about me and more about the build in question. Not only did I paint all the metal removable but also the dust filters! Albeit a couple of them are on the bottom of the case and won't be seen but I didn't see no reason not to do them, it'll please me at the very least. I''ll have to re-do the motherboard tray as too much spraying has really buggered my wrist, from an old injury so that'll be on hold for the next few days at least, in the meantime I do plan on finding somewhere somewhat local that can supply me some acrylics, it's harder than you think to find antique gold vinyl! I'll also update with some more of the pictures from the work on the filters and such when I get around to finishing the motherboard tray so stay tuned and thanks for looking! Some more stuff came for the build and I managed to finish the motherboard tray this time around but I also had to do the redo the front columns due to an issue with the glitter I was using. Thermaltake M360 water cooling kit & Pacific W4 Plus CPU water block. Thermaltake Pacific PR22-D5 Pump & res combo. Some Thermaltake tubing, liquid, fittings and pipe bending kit, despite this will be my first time water cooling I think I have everything I need. Thermaltake ToughPower Grand RGB 850 Thermaltake Pacific Rad Plus LED Panel & Lumi Plus Oh the glorious Thermaltake Riing Plus fans! Oh what is this... It only the Thermaltake Pacific V-RTX Plus! Last and not least the motherboard tray fitted in the chassis, looking very gold at this moment indeed and there is more to come... I may need to think about how I go about this as it's very reflective. No update just yet but we do have some shots of the beautiful Thermaltake Pacific V-RTX Plus GPU block! Sadly I had to change the colour scheme slightly due to not being able to source any more antique gold acrylic, so now it's just gold! I've also done a little progress too, tomorrow I should get around to putting the block on the GPU! (Should be fun). Anyways hope you like what you see because there's even more incoming, for some it may be a little too much but right now I think it's going to look better than I expected! I got the GPU block on, no issues other than my heart rate was double of what it should of been during the process. Some of you may of noticed the little detailing I've done on the GPU backplate, I'm glad I didn't do more than that, I think it's a nice subtle touch, anything more would of been over the top... If it's not already. Forgot to add an image of the side panel that will be used for the left side of the case and starts to set off the theme I have for this build.
 -
 Greetings to all, On July 8, 2018 I bought a Thermaltake Core V71 Tower in Spain and I arrived in Colombia at the end of August, so a couple of weeks ago I was able to start with the installation and assembly of my computer parts, All the parts of the computer are Thermaltake brand (source, heatsinks, liquid cooling, etc ...) once the assembly was made in the Tower Thermaltake Core V71, there was a problem when performing the ignition and is that the three (3) Fan (heatsinks) of 200mm that brings this Tower located in the Front and top part DOES NOT ROTATE, just turn on the LEDs. In detail I checked all the connections, I made sure everything was connected correctly, later I focused specifically on the MOLEX connector which is connected to a PSU Thermaltake Toughpower RGB 850 W Gold; connecting and disconnecting repeatedly, but the fans did not turn and the result was always the same. Obviously if the Fan (dissipaters) do not rotate the functionality of the FAN LOW and FAN HIGH switches is null, but the Leds of these switches if they turn on when pressing them, I would say that their function is fine, but if the Fan does not rotate, there is no case. I have the three original 200 mm fans connected to the FAN CONTROLLER and the only thing I can think of is that it is defective ... Is there anything I could do wrong? Is it possible to CHANGE THE FAN CONTROLLER due to factory defects? Can it be repaired? Where can you change it in Colombia? Could Thermaltake send it to Colombia where I am currently residing? I think all the connections related to the fan controller are correctly. Does anyone have any ideas or recommendations? Everything else works very well, but I would like the fans to work properly and help maintain a good temperature inside my tower. I appreciate the advice and / or recommendations of everyone. ---------------------------------------------------------------------------------------------------------------------------------------------------------------------------------------------------------------------------------------------------------------------------------------------------------------------------------------------------------------------------------------------------------------------------------------------------------------------------------------- Saludos a todos, El día 8 de julio de 2018 compre una Torre Thermaltake Core V71 en España y me llegó a finales de agosto a Colombia con lo cual hace un par de semanas pude empezar con la instalación y ensamble de las partes mi computadora, Todas las partes de la computadora son de marca Thermaltake (Fuente, Disipadores, Refrigeración Líquida, etc…) una vez realizado el montaje en la Torre Thermaltake Core V71, se presentó un problema al realizar el encendido y es que los tres (3) Fan (disipadores) de 200mm que trae esta Torre ubicados en la parte Frontal y superior NO GIRAN, solo encienden los Leds. Detalladamente revisé todas las conexiones, me aseguré de que todo estuviera conectado de forma correcta, posterior me centré específicamente en el conector MOLEX el cual está conectado a una PSU Thermaltake Toughpower RGB 850 W Gold; conectando y desconectando en repetidas ocasiones, pero los Fan no giraron y siempre el resultado fue el mismo. Obviamente si no giran los Fan (disipadores) la funcionalidad de los interruptores FAN LOW y FAN HIGH es nula, pero los Leds de estos interruptores si encienden al presionarlos, diría que su función está bien, pero si los Fan no Giran no tiene caso. Tengo los tres ventiladores originales de 200 mm conectados al CONTROLADOR DEL VENTILADOR y lo único que se me ocurre es que esté defectuoso… ¿Hay algo que pude hacer mal? ¿es posible CAMBIAR EL CONTROLADOR DE VENTILADOR por defectos de fabrica? ¿Se puede reparar? ¿Dónde pueden cambiármelo en Colombia? ¿Podría Thermaltake enviarlo a Colombia donde actualmente estoy residiendo? Creo que todas las conexiones relacionadas con el controlador del ventilador están correctamente. ¿Alguien tiene alguna idea o recomendación? Todo lo demás funciona muy bien, pero me gustaría que los Fan funcionen correctamente y ayuden a mantener una buena temperatura al interior de mi Torre. Agradezco los consejos y / o recomendaciones de todos.
-
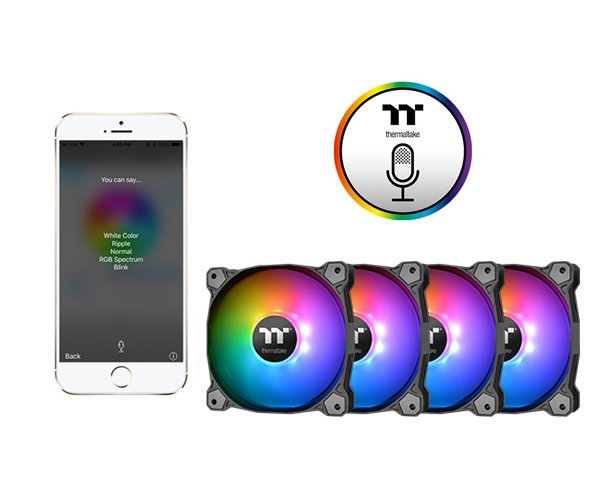
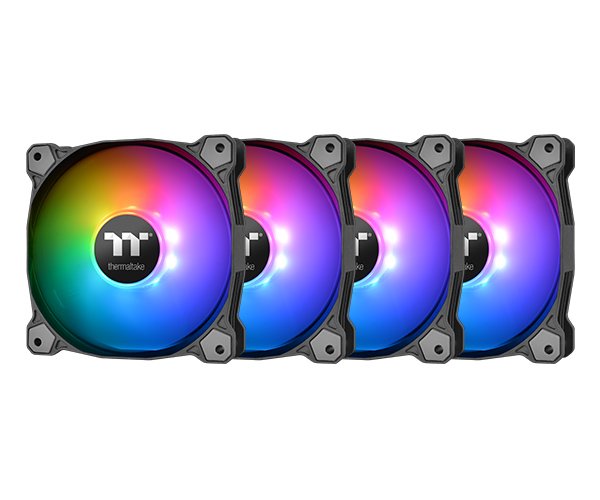
Thermaltake View 21 Tempered Glass RGB Plus Edition Mid Tower Chassis *The image is for reference only. Product Link Thermaltake View 21 Tempered Glass RGB Plus edition mid-tower chassis features three 120mm Pure Plus 12 RGB front fans, one 120mm Pure Plus 12 RGB rear fan with removable filters and full-length PSU cover for outstanding ventilation. The RGB Plus fans are custom-designed to work with our AI Voice Control software, as well as with Amazon Alexa. The lighting effects can also be synchronized with Razer’s RGB products via Razer Chroma software. The View 21 TG RGB Plus supports the latest PC hardware and all high-end GPU solutions, providing unparalleled expandability for high-end configurations and liquid cooling systems. Satisfying the market where users have opted for stylish PC chassis with advanced features and massive aesthetic appeal. SyncALL, Say "Hello TT" Thermaltake AI Voice Control Talking to TT RGB PLUS App is an easier, faster way to set lights for your systems. You can ask it to turn the lights on or off, switch lights modes, dim the lights, change light colors, or adjust lights speeds or fan speeds. Choose a video from below to see how it works. Preinstalled with 4 Pure Plus 12 RGB Fans Thermaltake Pure Plus 12 Fan TT Premium Edition. 120mm high-static pressure fans with a 16.8 million colors LED ring and 9 addressable LEDs, the Pure Plus 12 RGB features compression blades and hydraulic bearings, controlled by the patented TT RGB PLUS Software and AI interactive voice control. Sync with Razer Chroma Lighting All Thermaltake TT RGB PLUS products are able to connect into the Razer Chroma ecosystem. Users who have installed both the TT RGB PLUS Software and Razer Synapse 3 can experience synchronized gaming and RGB lighting effects on their TT RGB PLUS liquid cooling system and gaming gear! From cooldown timers, health bars, and flashy ultimate indicators, to subtle ambient lighting that sets the perfect mood for each game, Razer Chroma provides an experience that transcends the screen and into your full setup, for a truly immersive experience. Works with Amazon Alexa All Thermaltake TT RGB PLUS products support Amazon Alexa Voice Service, allowing you to control the lights or fan speeds by talking to the Alexa-enabled device. With the support of Amazon Alexa, TT RGB PLUS products also offer an additional visual cue for checking current weather condition in your location or anywhere in the world. All you have to do is simply starting the sentence with “Alexa, tell Thermaltake”, then the lighting color will correspond to the weather condition in the location.


-
I recently bought a p5 case and I need to buy some parts such as : - ssd trays on the inside of the case - gpu bracket for vertical mounting -water pump bracket where can I buy these i have looked on eBay , google and can’t find them anywhere .
-
Hello, world! My friend is making his first PC this February, but he wants to know something. What is the MAX PSU size supported by this case? He wants to use an SeaSonic M12II EVO 520W PSU , will it fit? Many thanks!
-
 Hi guys, I've linked 4 GPU's to my 1200W Power Supply Unit and I wanted to link the 5th GPU but then I noticed the PCE-I ports were all full. So I was asking myself if there is a thermaltake kabel for linking to GPU to PSU from an 8-pins port from the GPU to a 6-pins port on the PSU. Or isn't it even possible to connect the GPU to another port of 6-pins, which normally uses the 8-pins PCE-I ports? Are there any alternatives to link my 5th GPU to my PSU and motherboard? Motherboard type Z270A SLI Plus MSI. I would like to hear your advice, yours sincerely, Jorgocoin from Holland
 -
Hi guys, I've linked 4 GPU's to my 1200W Power Supply Unit and I wanted to link the 5th GPU but then I noted the PCE-I ports were all full. So I was asking myself if there is a thermaltake kabel for linking to GPU to PSU from an 8-pins port from the GPU to a 6-pins port on the PSU. Or isn't it even possible to connect the GPU to another port of 6-pins, which normally uses the 8-pins PCE-I ports? Are there any alternatives to link my 5th GPU to my PSU and motherboard? Motherboard type Z270A SLI Plus MSI. I would like to hear your advice, yours sincerely, Jorgocoin from Holland
-
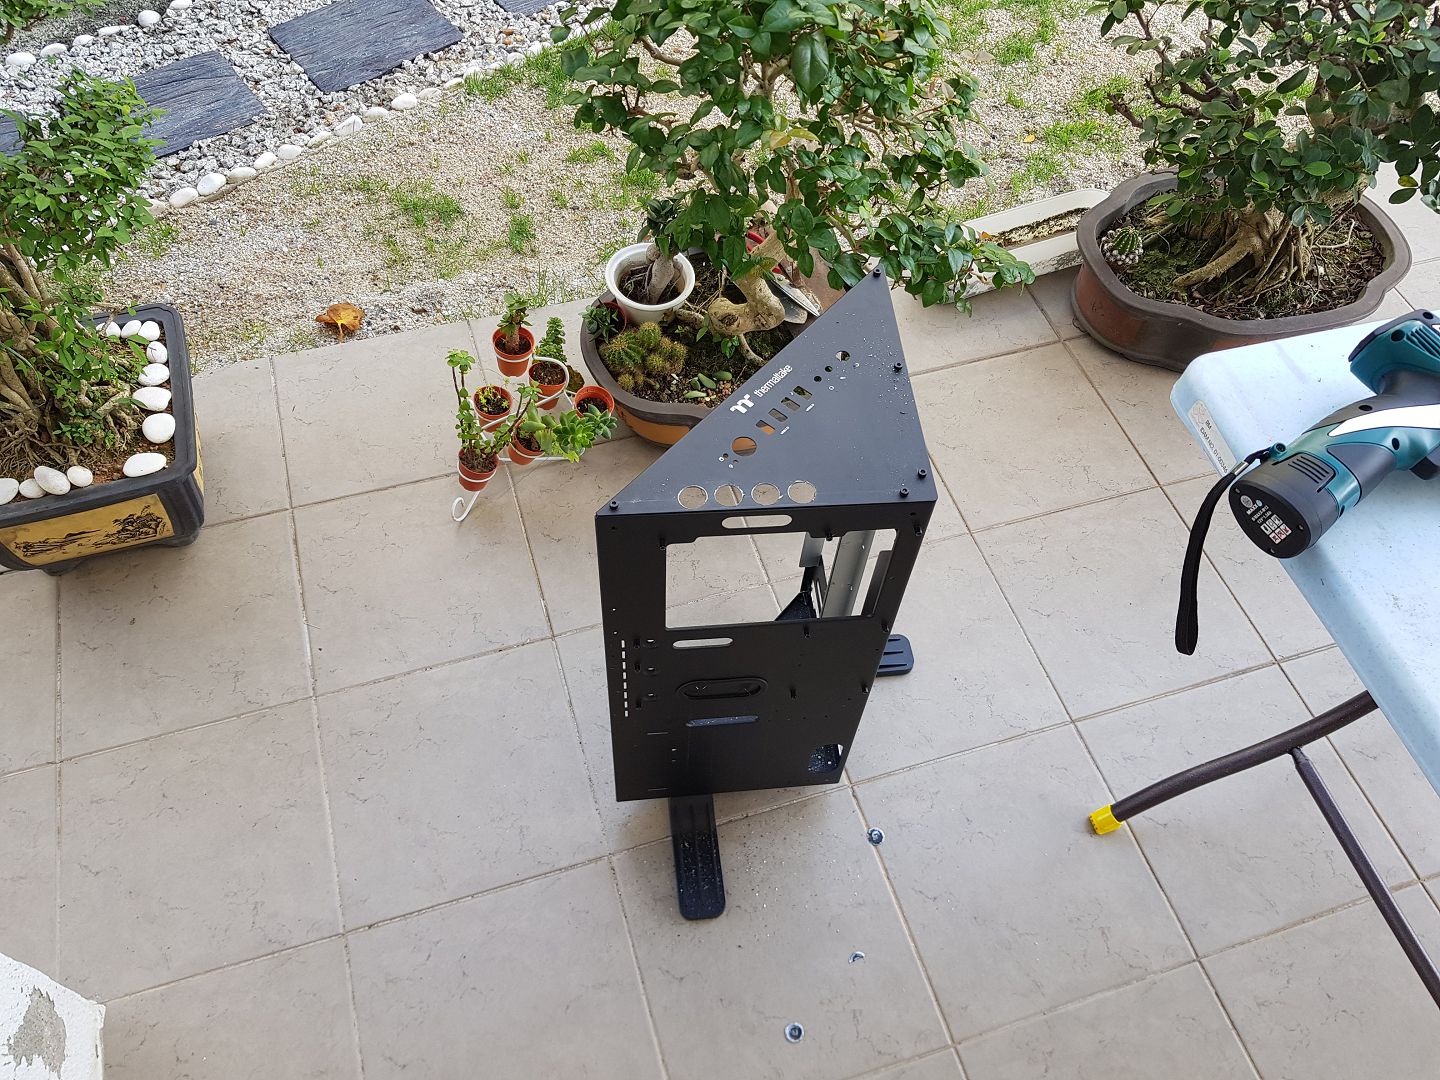
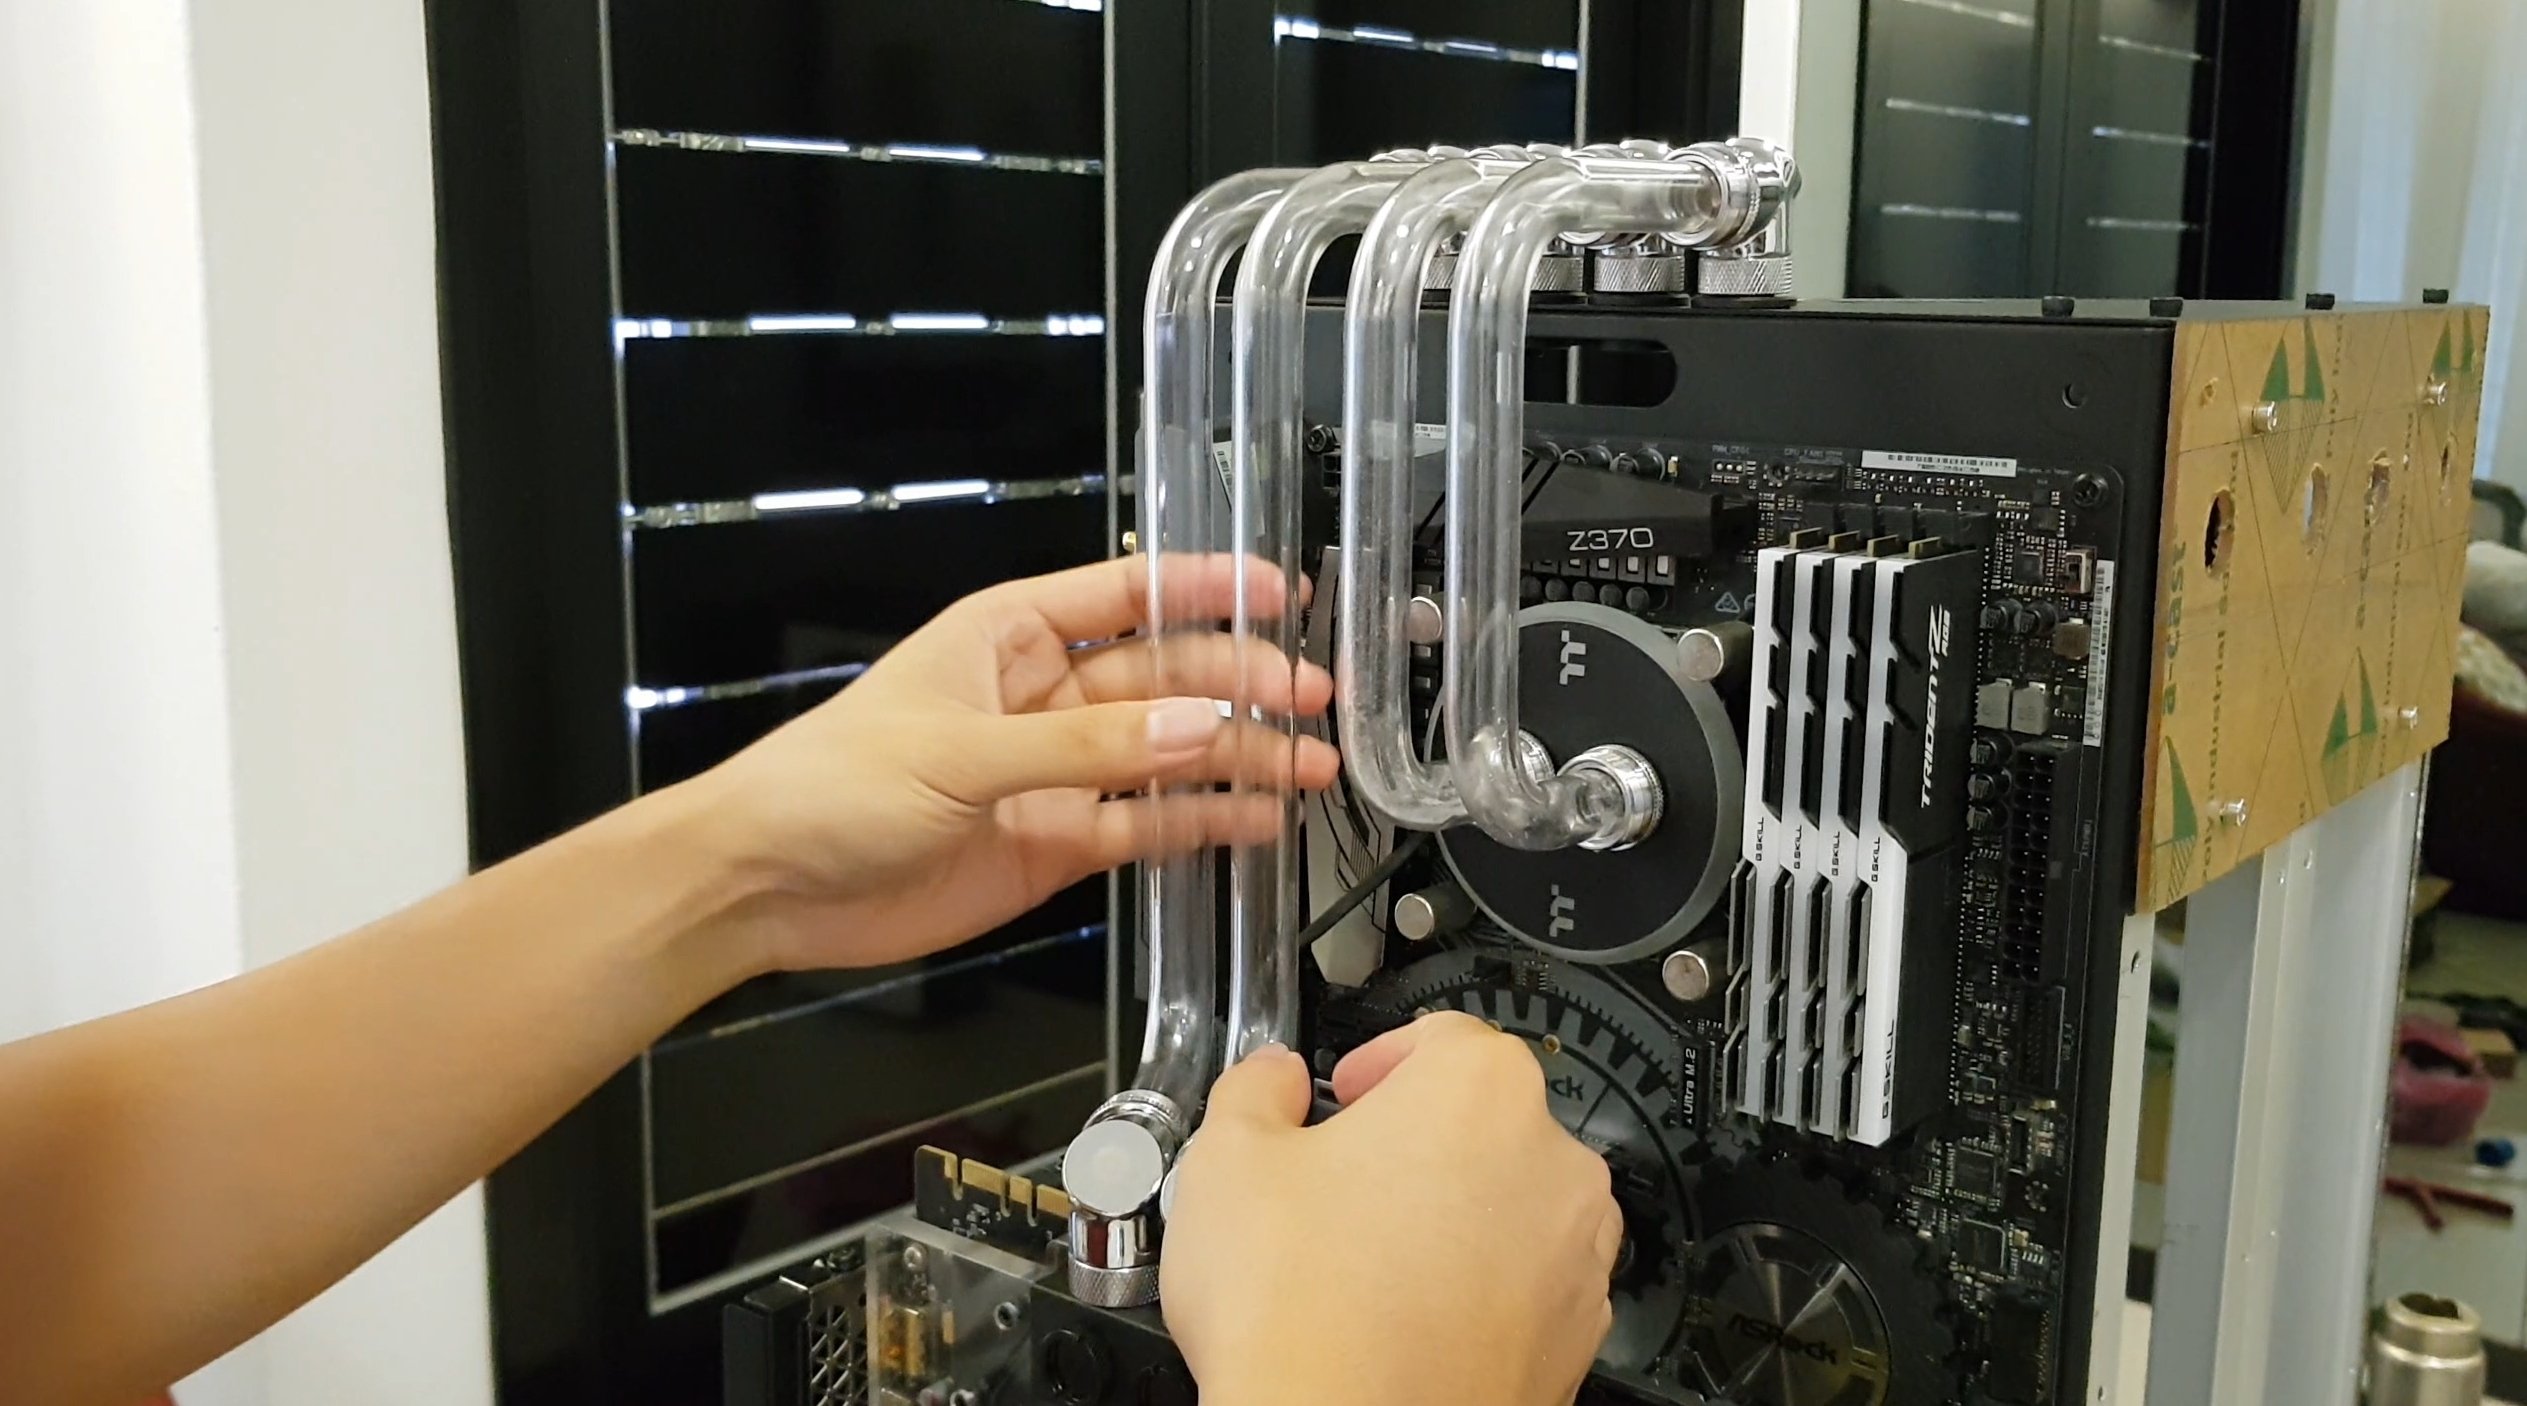
I want to share a quick project I am doing for PDXLAN which is about 3 weeks away as I write this. The project is in a Nanoxia Coolforce case and will feature parts from Thermaltake, Zadak511, Swiftech, Primochill, and others. I started the project about a month ago and have been working on it as I get time after work and on the weekends. So, first lets take a look at the case.. Now lets trim the fat and see what is left.. ya, not much left lol..but I can easily attach panels to this..so..I started making panels
- 3 replies
-
- 1
-
-
- rgb psu
- thermaltake
- (and 3 more)
-
The CHALLENGER EDGE – Comes with a brand new floating keycaps design, delivering stunning colors under each keycaps that provide gamers a more attractive and in-style look while gaming! Additionally, it was created with a splendid black brushed aluminum faceplate and double injection keycaps that makes it cooler and more extraordinary! More info: http://bit.ly/1OToYNX

-
Hey guys , i'am very new for this forum . can i post my worklog for Coolermaster competition here? it would be nice to have logs recorded here . btw here my media web www.hammanchronicle.com https://www.facebook.com/hammanchronicle/
-
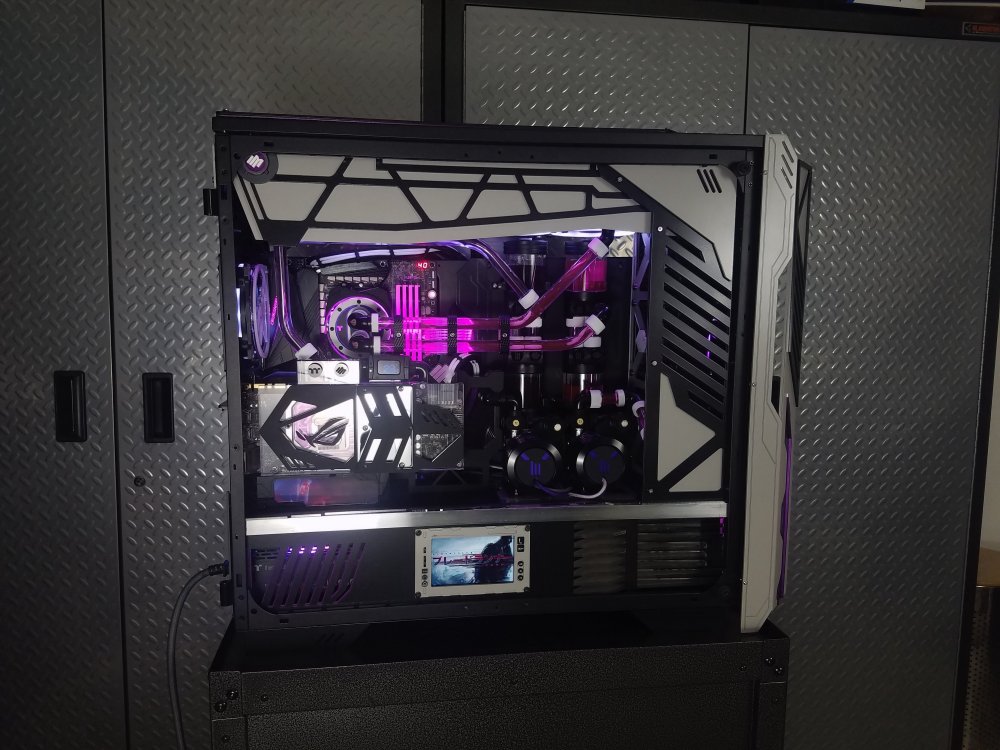
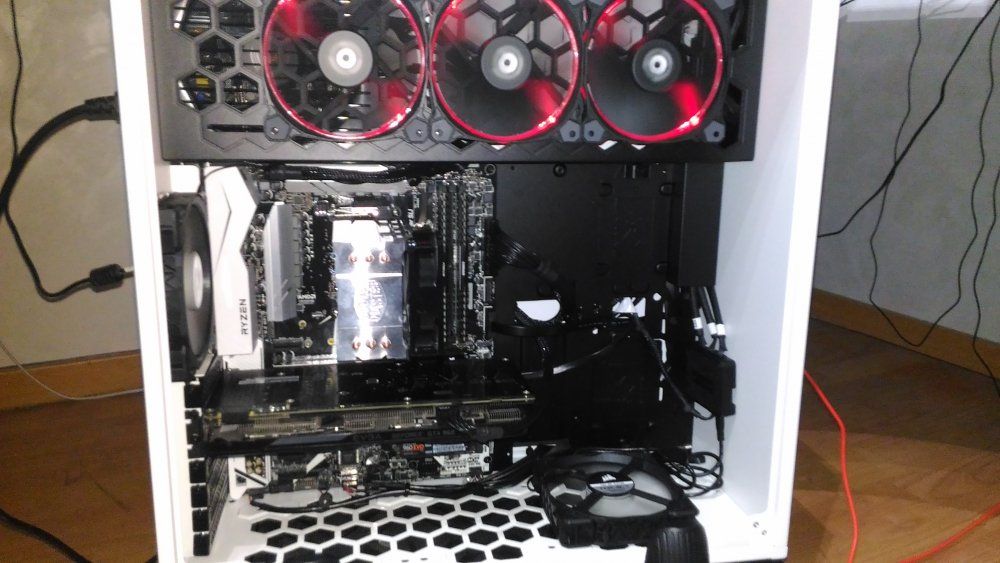
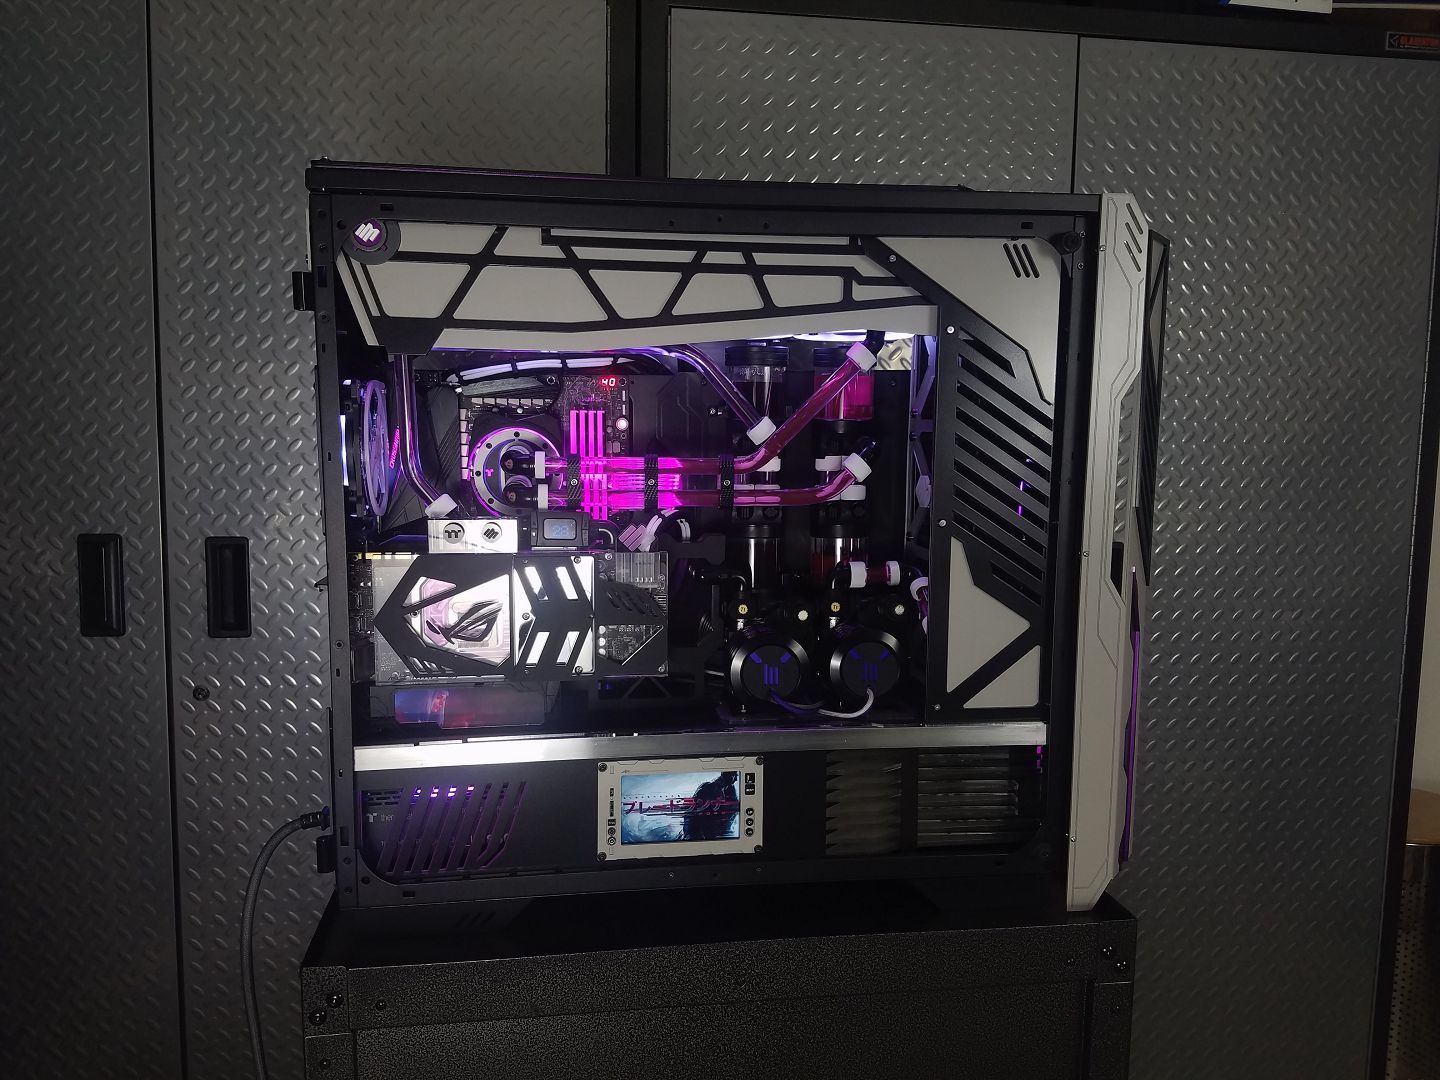
Just wanted to show off my new custom loop I just finished Building. Core V31 Case, MSI Gaming M5 Mobo, I7-7700k Overclocked to 5.3 GHZ, 8GBx2 Hyper X Savage DDR4 Ram overclocked to 3000MHZ, EVGA GTX 1080 SC2 with EKWB Waterblock, Raystorm Pro CPU waterblock, ThermalTake Pump and reservoir combo, a 280mm Radiator and a 360mm Radiator with Corsair Fans, custom RGB LED setup. Also I made that custom RGB GPU backplate with 6661 in it. A BlueRay DVDRW Drive, SSD and SSHD Drive. Random Carbon Fiber pieces. Hard Tubing and random XSPC triple seal Fittings. About to try and start my next build for the University Of Alabama's 2017 National Championship Win. Thinking of going for "The Case 900" with the MSI gaming M7 motherboard, Hard Tubing, 2 Thermaltake d5 pump reservoir combos, my gtx 1080 with a custom LED backplate of some style to represent The University Of Alabama. A black Supremacy EVO waterblock. Still Gonna use hard tubing but thinking of going with a grey and red coolant color scheme.
.thumb.jpg.5bfdeccd04ef368e5e59e14606cd21d6.jpg)
.thumb.jpg.ff382dacb812f81b5a53877b31a5f5a8.jpg)
.thumb.jpg.1e95a41a938cab3fef009ba1c0e0e8f6.jpg)
.thumb.jpg.7bd0de0a27a07a4b0792005f8246faaf.jpg)
.thumb.jpg.2c670b2d651e21ef860d87517dc741e3.jpg)

-
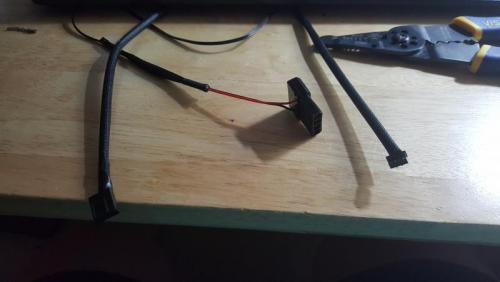
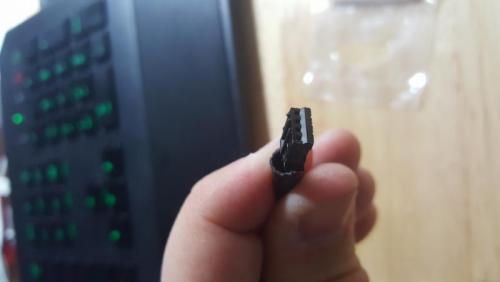
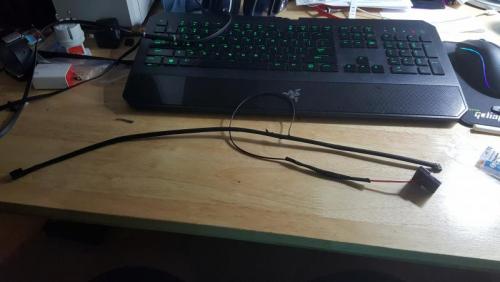
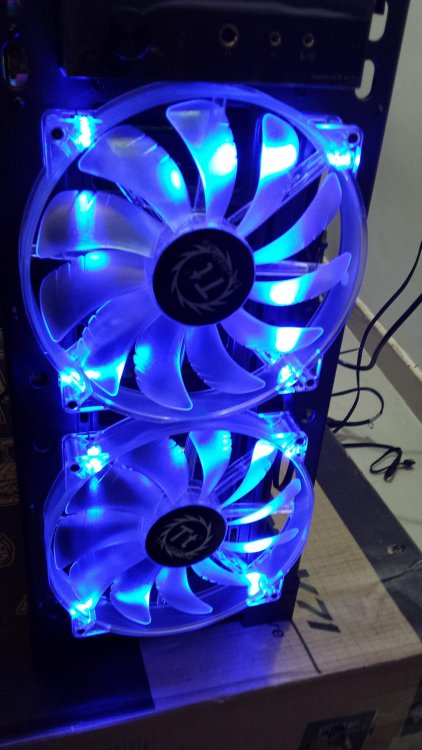
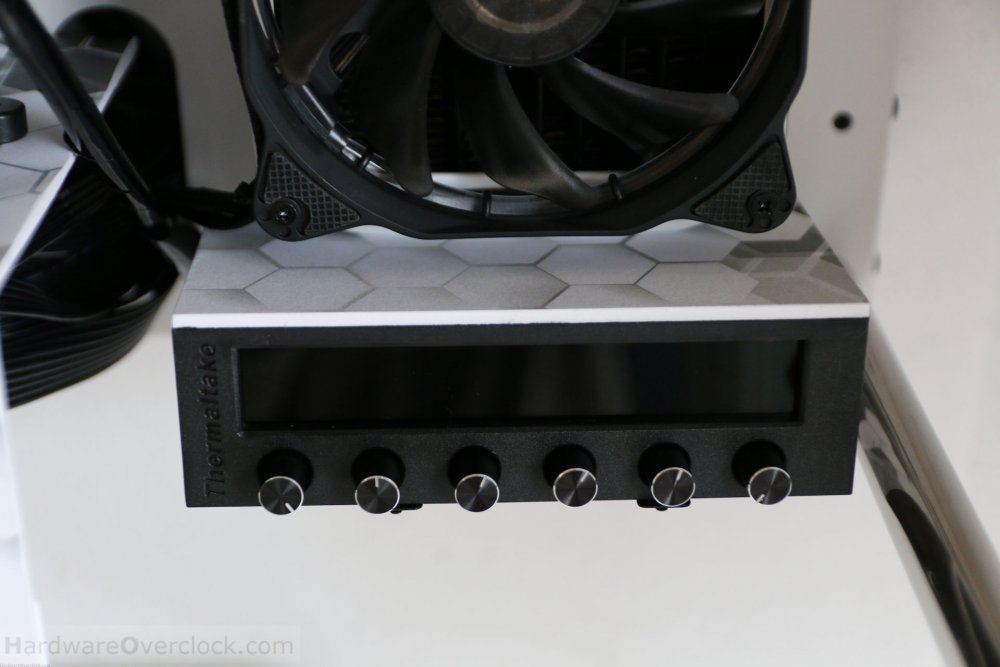
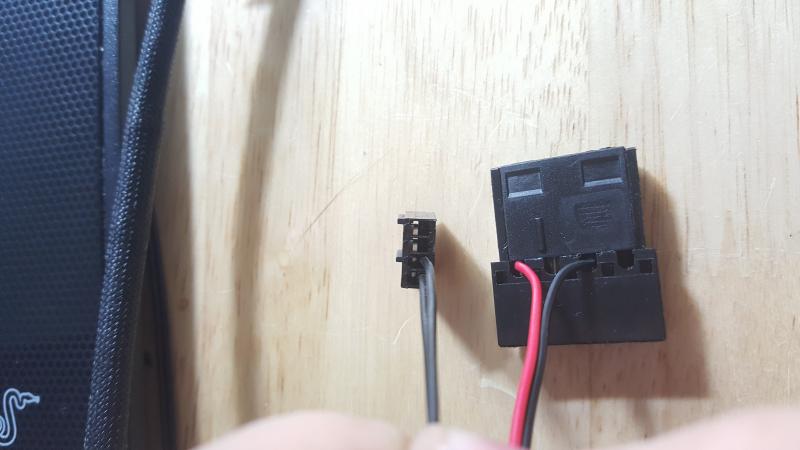
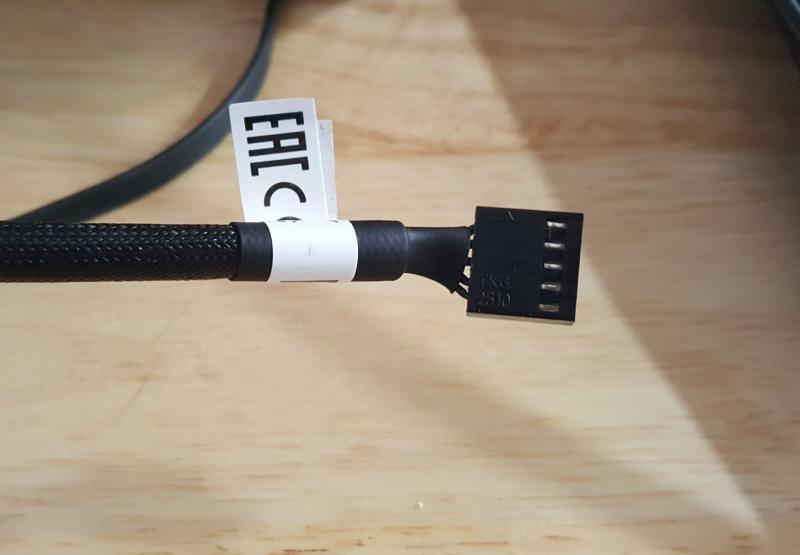
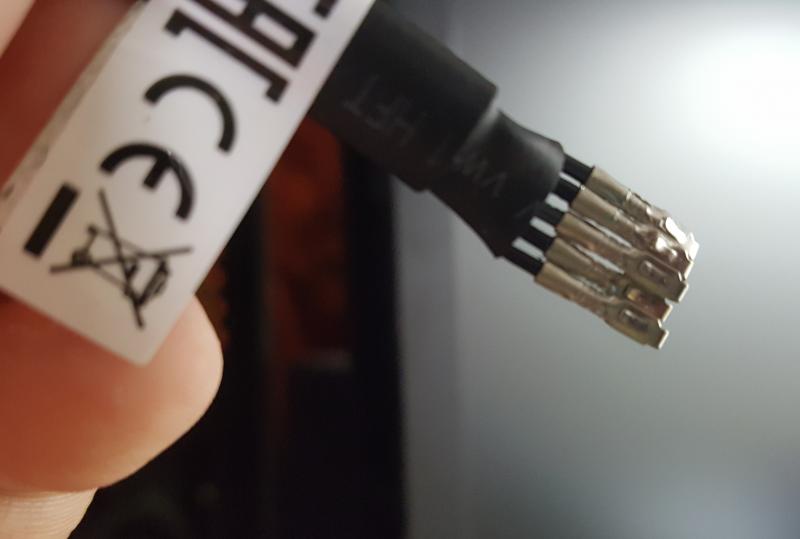
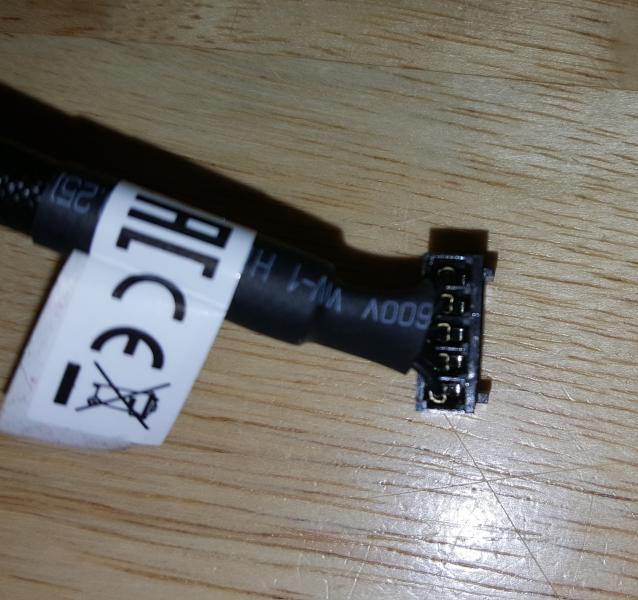
 Hello, I turn to the community about my Thermaltake Riing 12 RGB Fan TT Premium Fans. After the recent installed assets, I tried to install the software provided by the official website. Except that unfortunately, the software does not run ... I run Windows 10, and I installed the controller in my box. So if you have a solution to my problem, thank you for contacting me as soon as possible Cordially. Ps : You have attached 3 photos of my box with the controller and connections used.

-
Starting a new project! Project Thunder is based on a beautiful black X71 by Thermaltake! As all my mods, it will have custom liquid loops and this time the color theme will be a little bit different Stay tuned! Thanks to Thermaltake Technology Inc
-
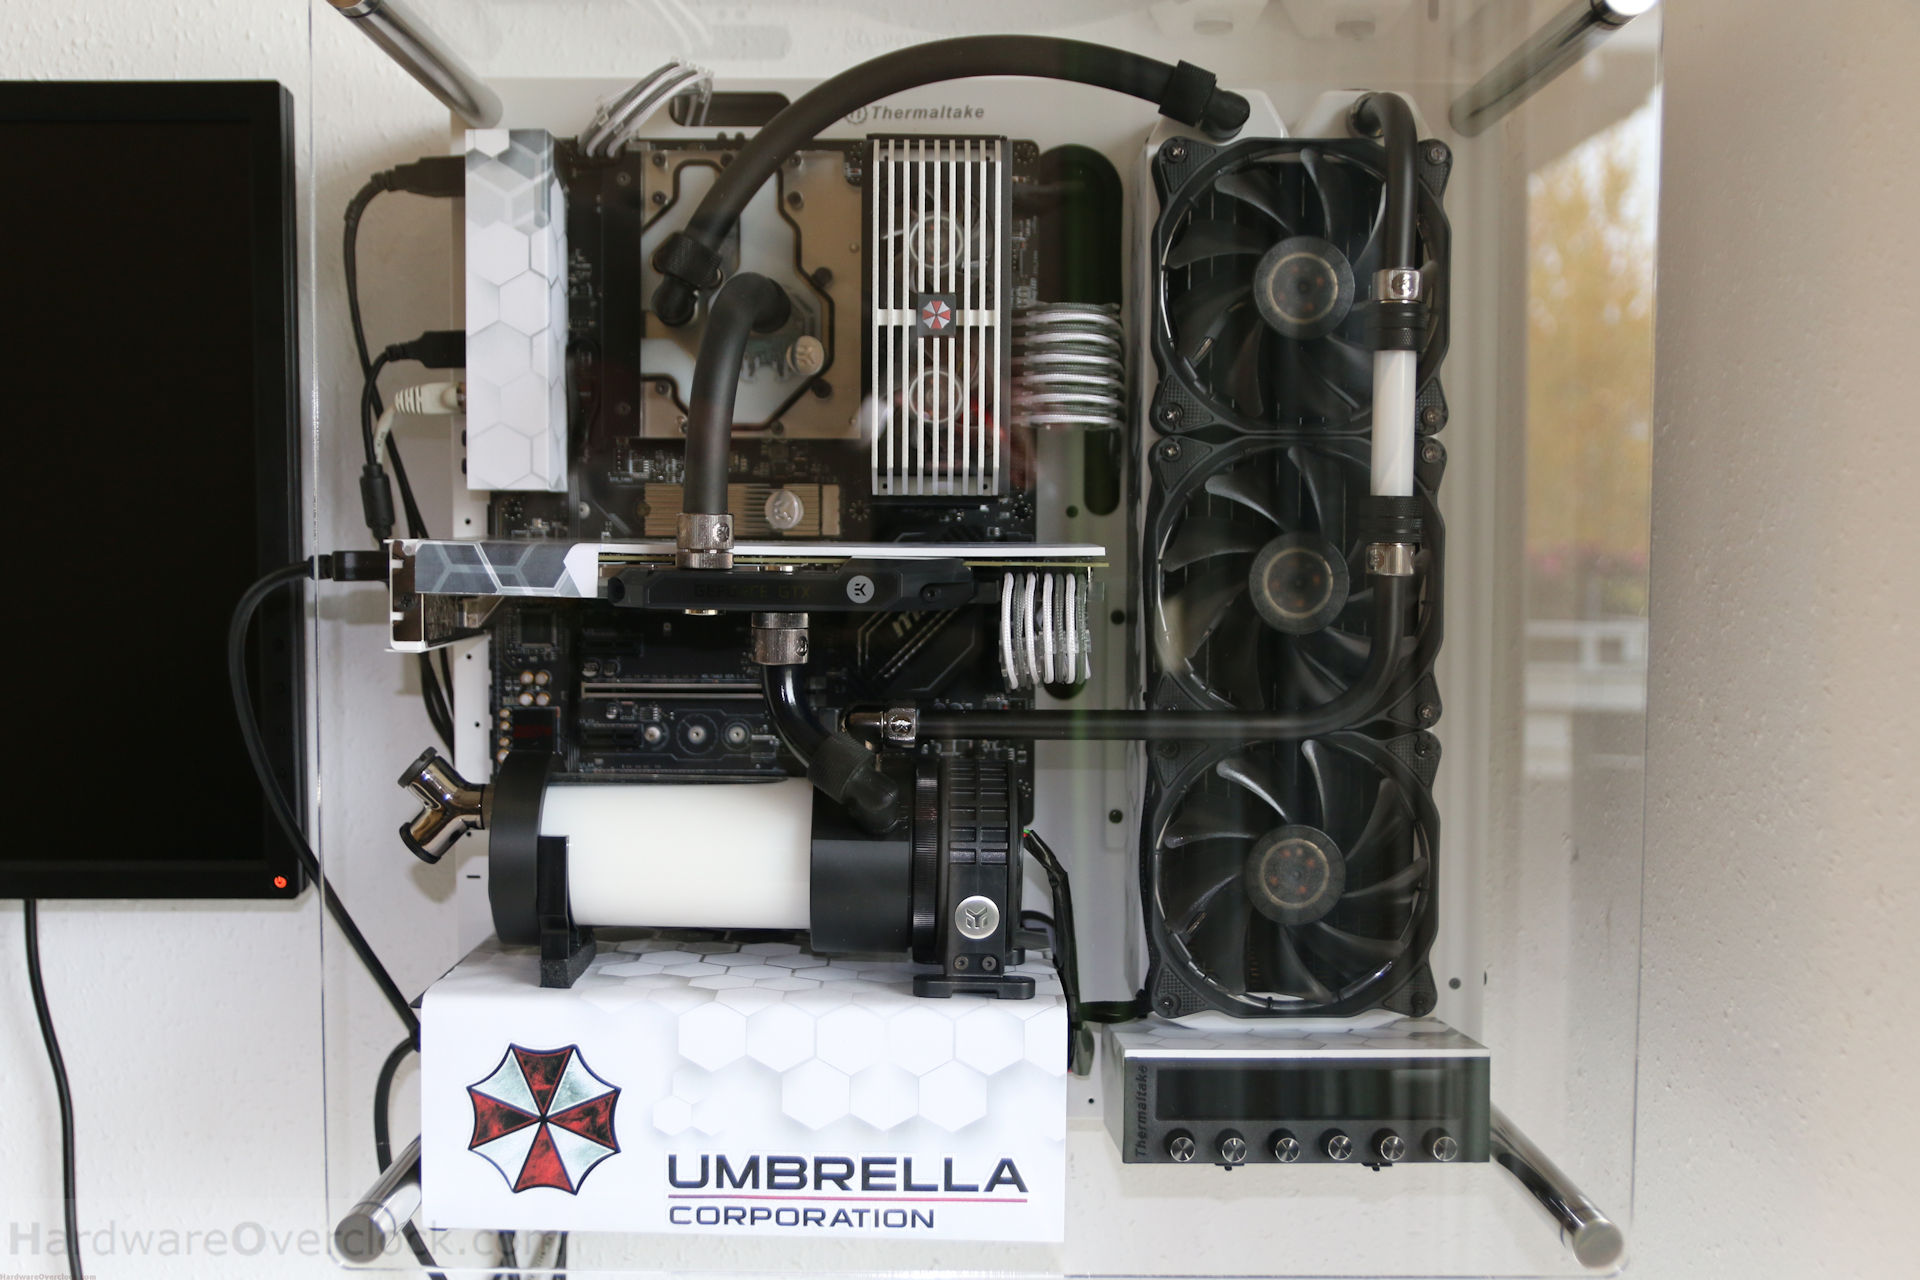
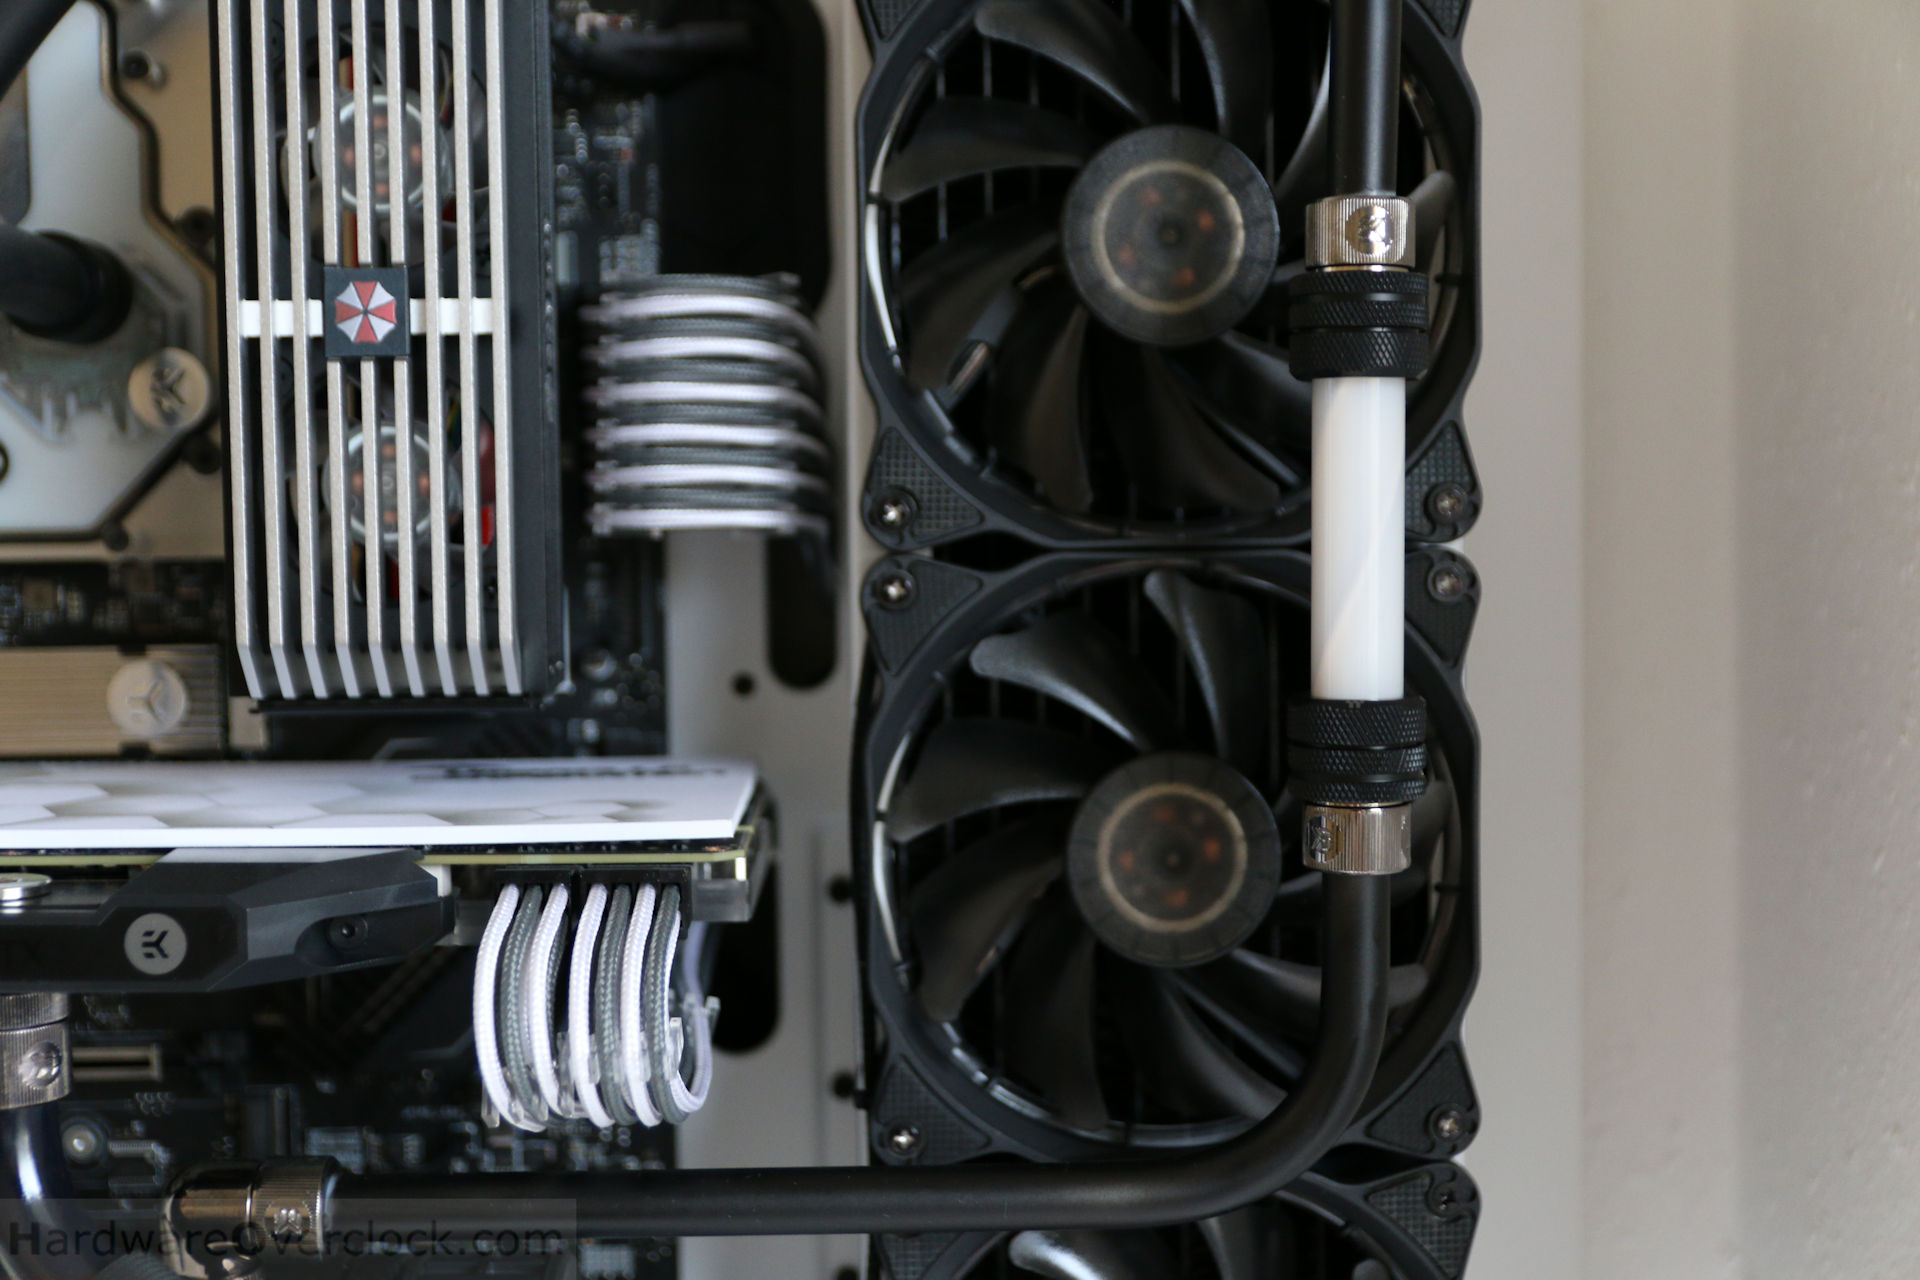
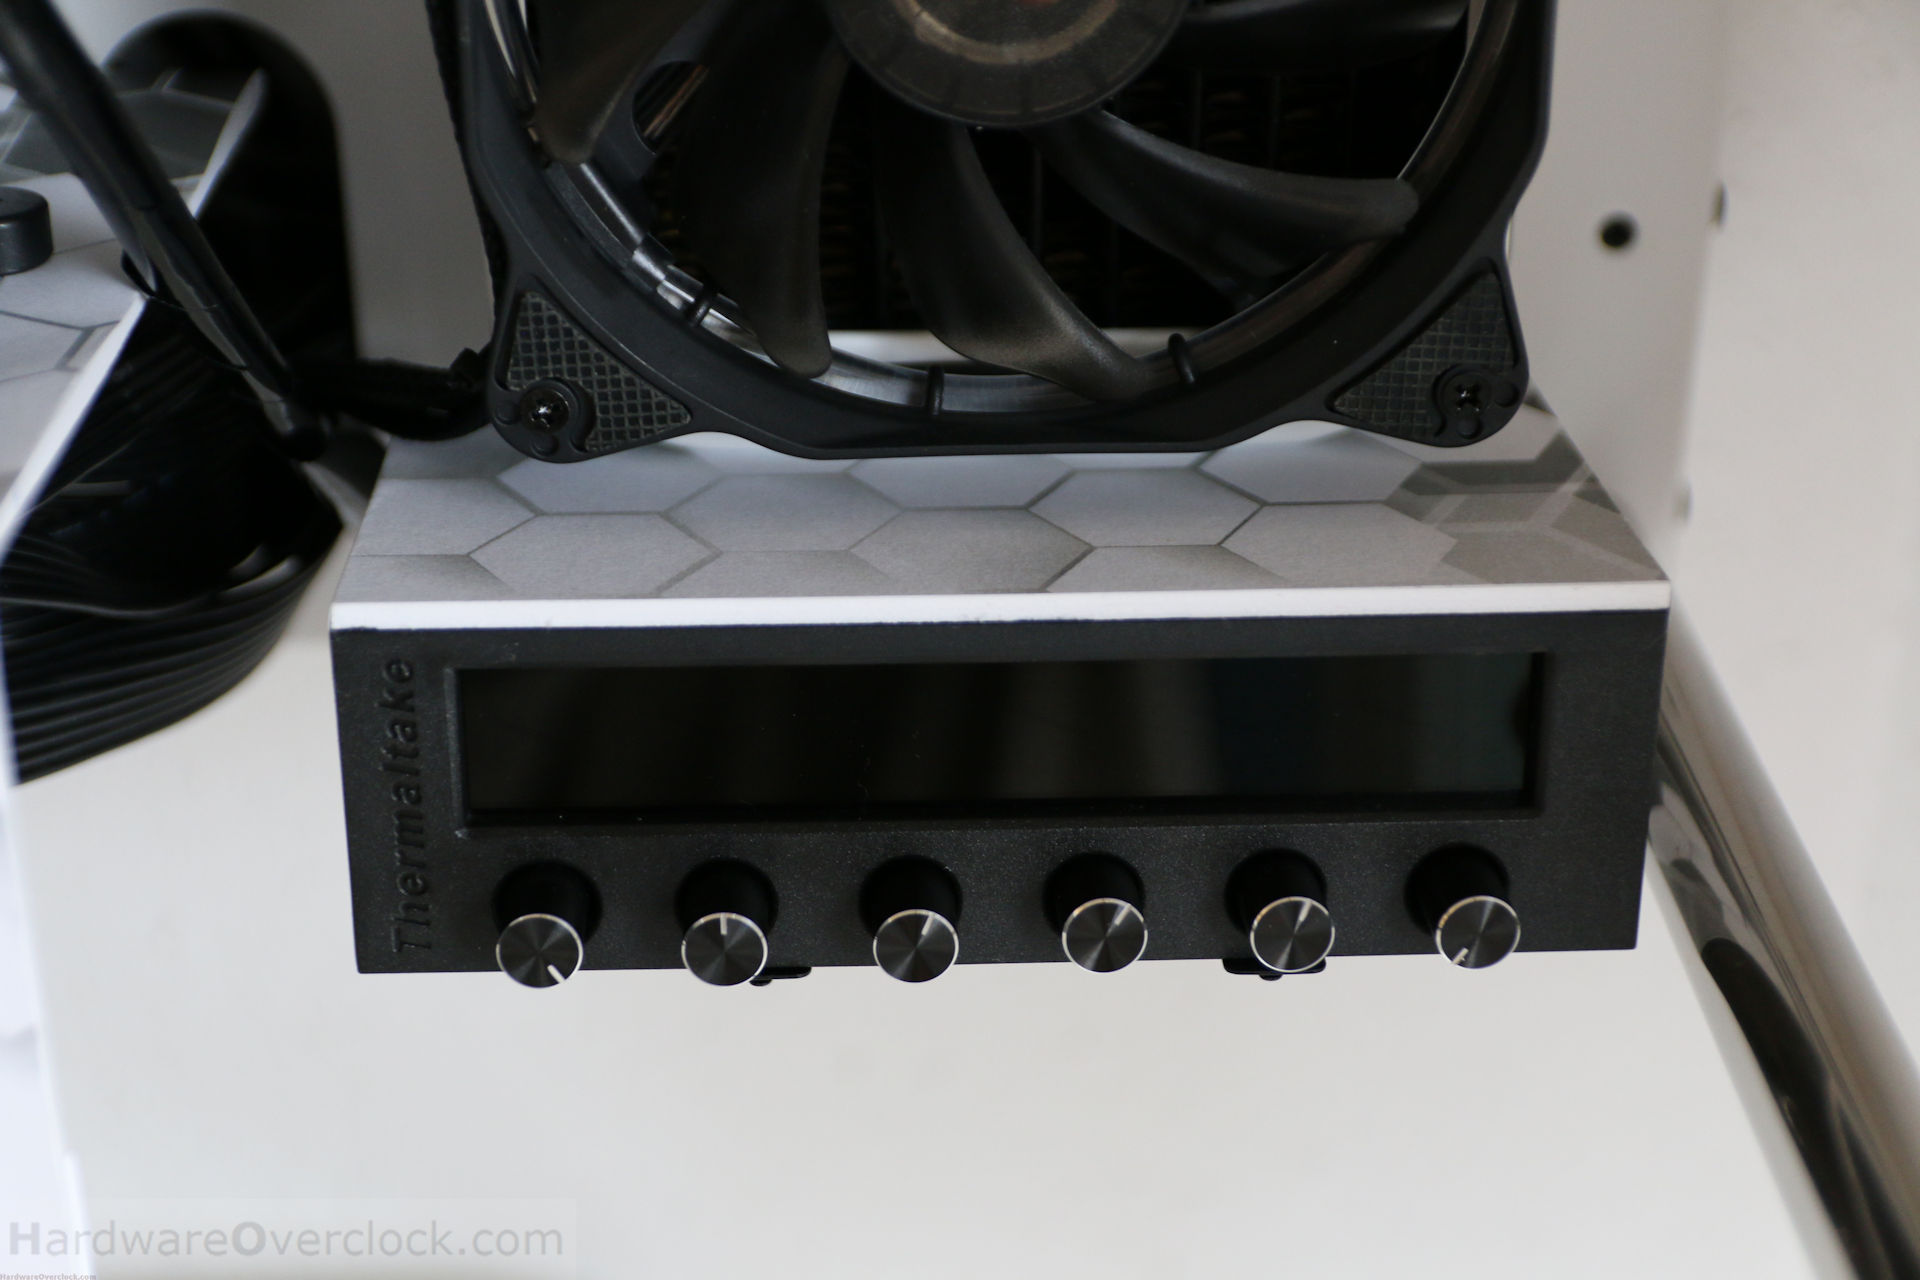
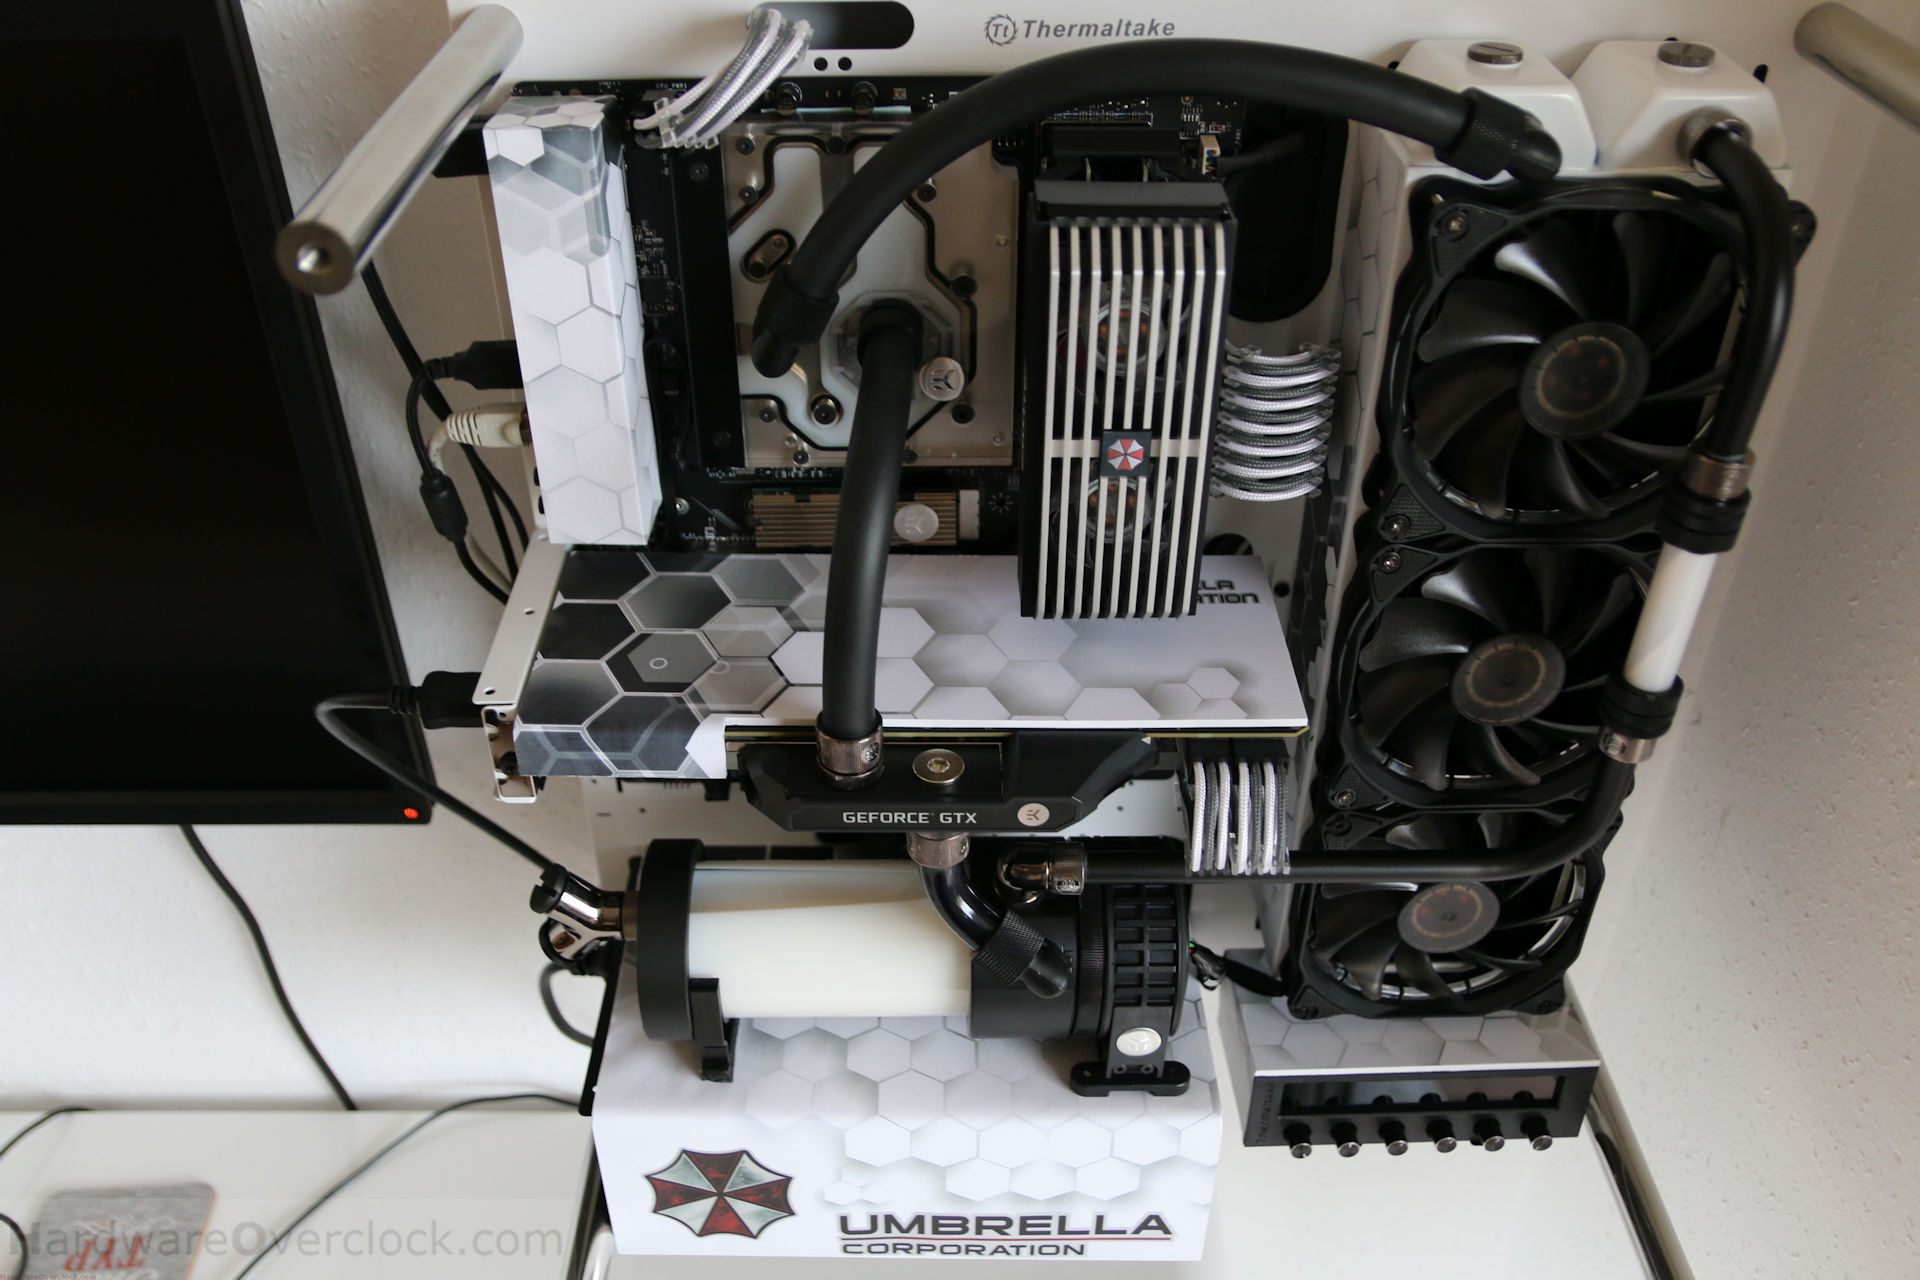
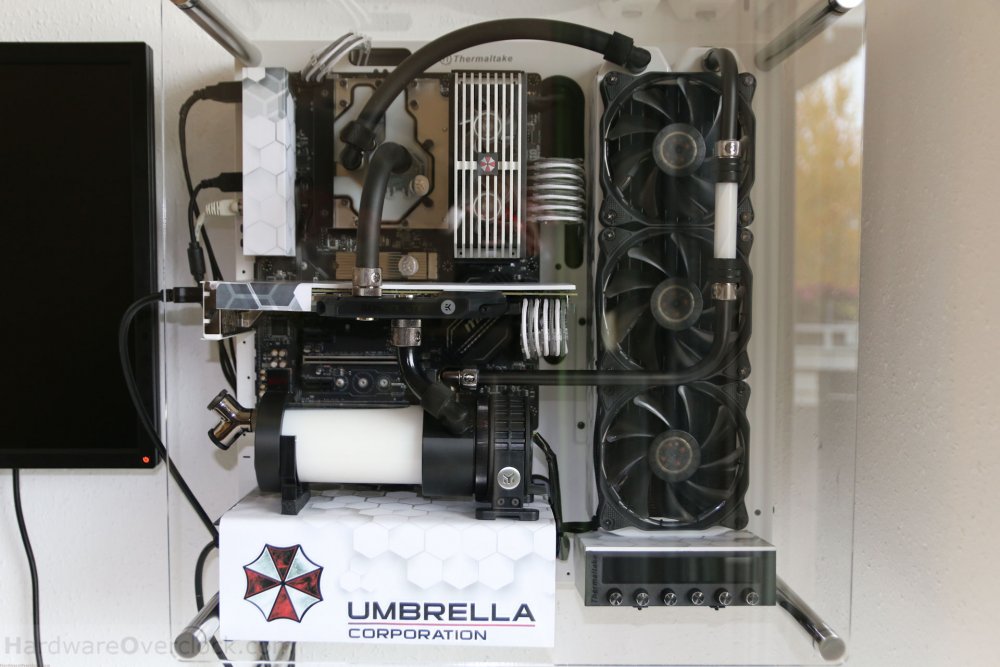
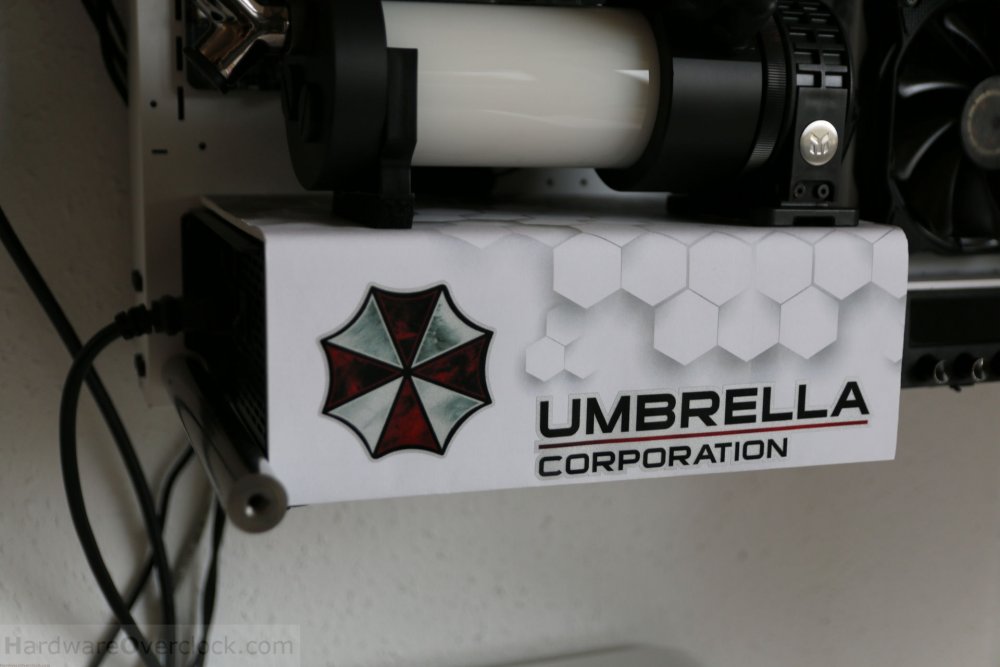
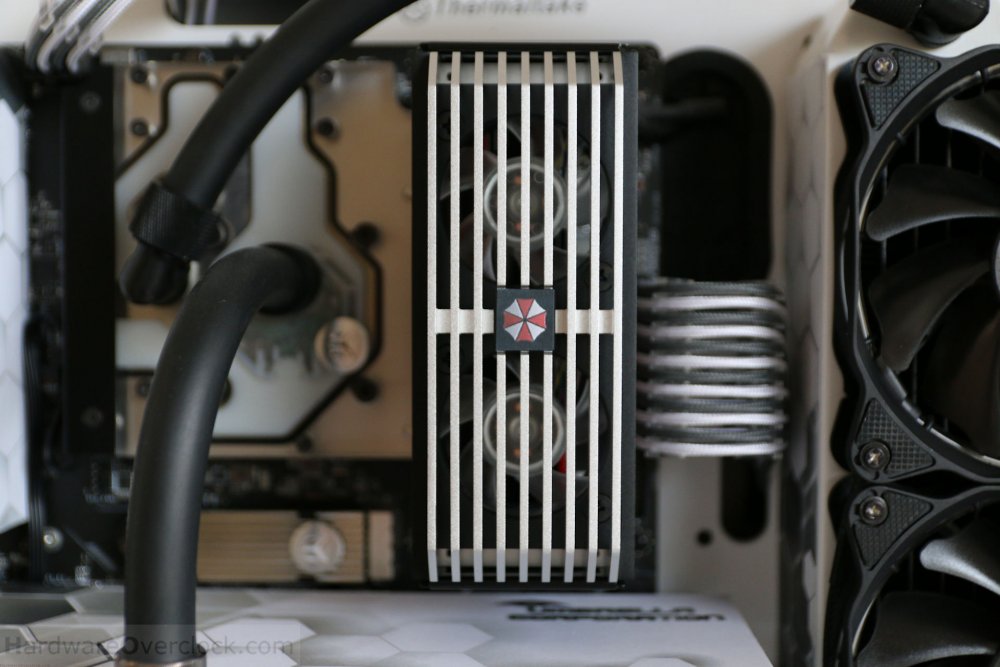
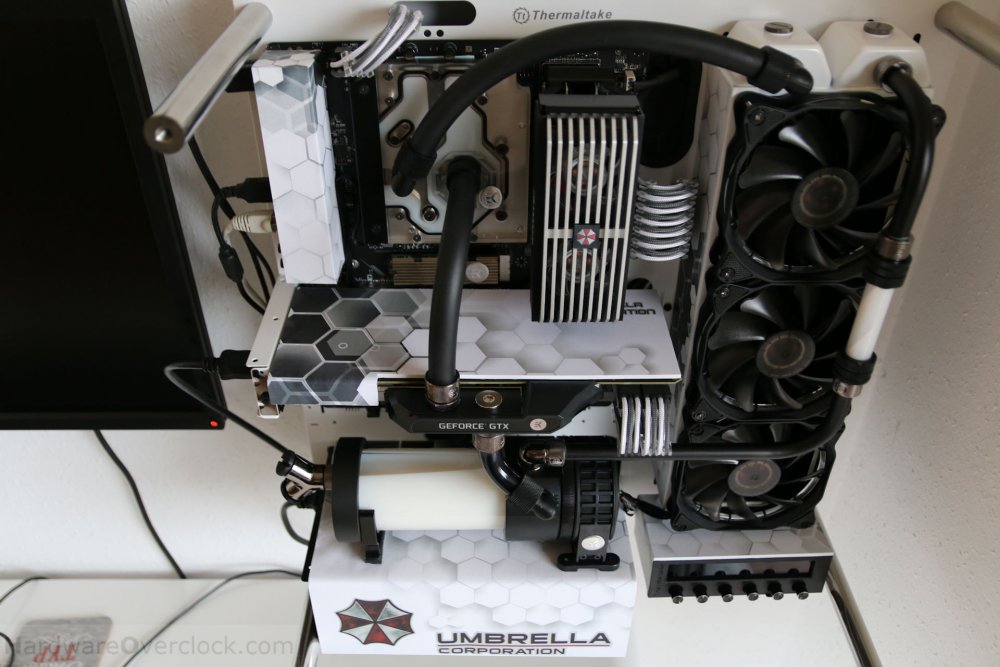
Here is my Core P3 Umbrella Corp. Mod Hardware: Thermaltake Core P3 White Edition Intel Core i7 6700K @ 4.8 GHz 32GB GSkill TridentZ 3200 MSI Z270 Gaming Pro Carbon NVidia GTX Titan X Pascal Thermaltake Toughpower Grand RGB 750W Cooling: EK Waterblocks Monoblock MSI Z270 Gaming RGB Corsair Dominator AirFlow Platinum RAM Kühler EK-FC Titan X Pascal Nickel Block Alphacool NexXxoS UT60 Full Copper 360mm Radiator White Special Edition Thermaltake Pacific Flow Indicator 2 anidees AI Halo Crimson Red LED 120mm EK-XRES 100 Revo D5 PWM (incl.pump) glass EK 12x10 Hardtubes and 16x10 PVC tubes matt Modding: Selfmade psu chasis Selfmade IO Panel Selfmade gpu backplate Umbrella Corporation Biohazard Resident Evil sticker Thermaltake Coolant C1000 White PHANTEKS cable set white/grey Hartschaumplatte 3x250x500 mm weiss Bauhaus Herma 4428 Universal-Etikett A4 for laser printer Hardtubes black matt sprayed Article with more pictures: http://hardwareoverclock.com/Thermaltake-Core-P3-Umbrella-Corporation-MOD.htm

-
Dear Tt support team I brought a new one Thermaltake Smart SE 530W form friend. I can't check my warranty period. please help me! This is my PSU photo Thank a lot JP (jediunderdog@gmail.com)
-
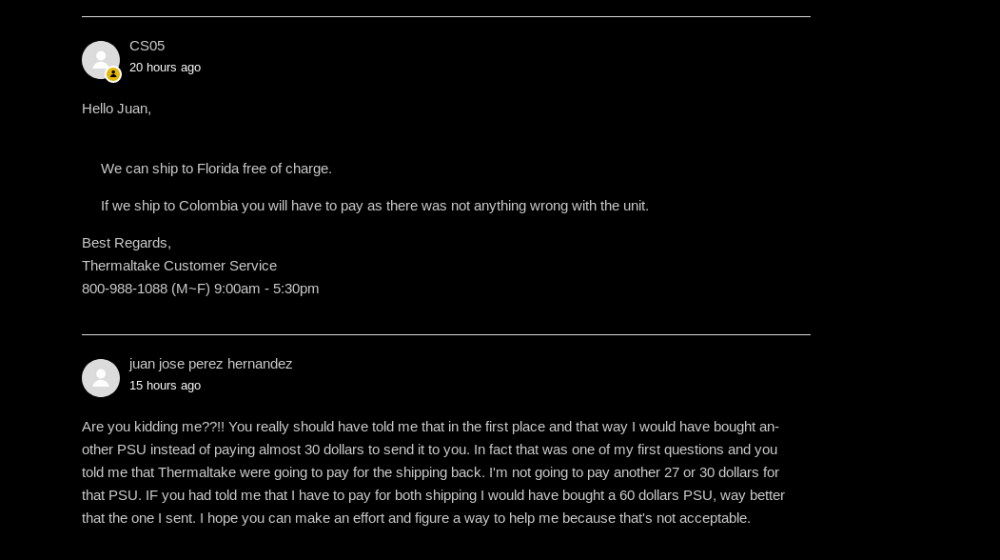
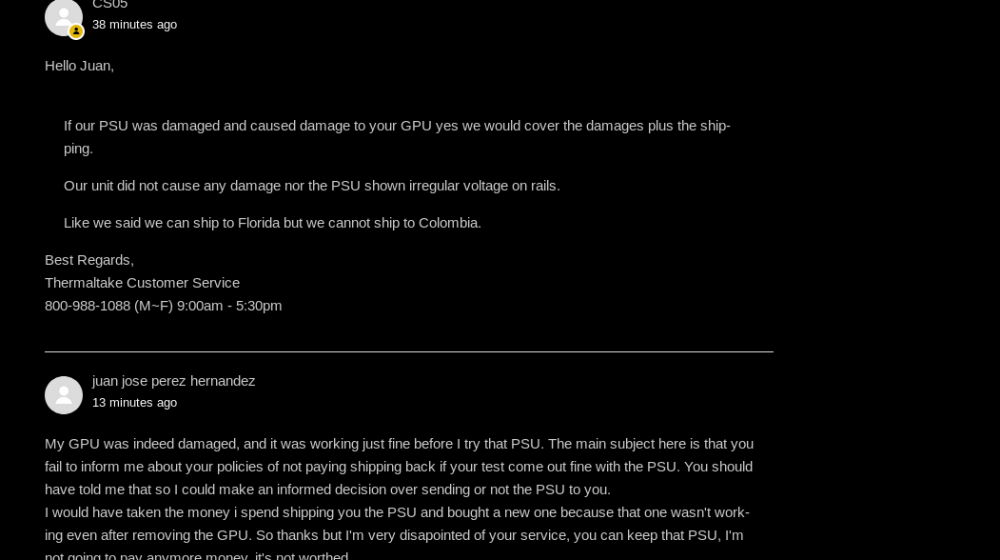
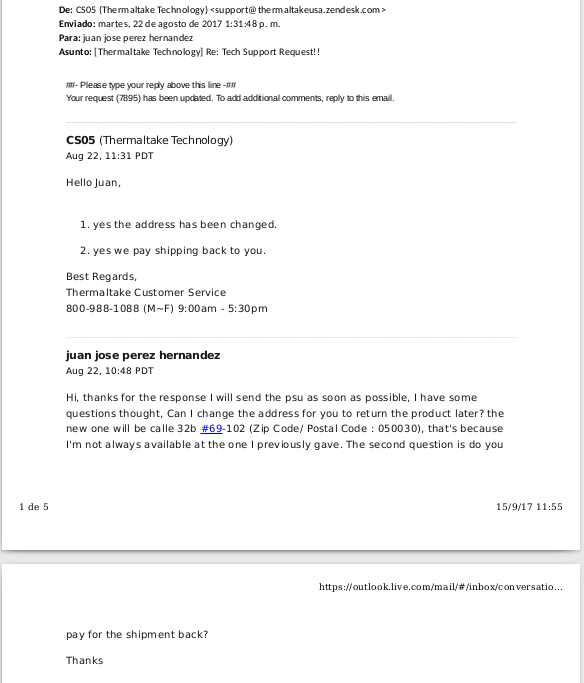
I purchased this power supply on july 14th but I was only able to test it on August 21st because I had to wait for it to arrive my country so I couldn't return it to Amazon on time. It worked fine for about 2-3 hours when suddenly my PC shutdown itself,I thought I was having electricity problems but the rest of my devices continued working fine. I Tried to power on the system again but nothing happened. I disconnected my GPU and tried to power on again, this time the system start working but after a few moments it shutdown again. I continued disconnecting things until there was only a a fan connected, only then the power supply was able to keep working. This make me believe that I was unlucky enough to end with a defective unit that can't bare to supply even the power required by the CPU. I contacted Thermaltake , and they agreed to RMA the PSU but the RMA process was a waste of time and money. I asked them if the cover the shipping costs and they said that I had to pay the shipping to them but that they will send back the product at no cost to me. I don't live in the US but I made that clear from the beginning and I filled the contact form with the information from my country, that didn't seem to be a problem to them at the time so I decided to send them the PSU. The shipping cost me around 27 dollars but that still was cheaper than buying a new PSU keeping in mind that the would send it back for free. When the PSU arrive to Thermaltake location I didn't receive any notification, I wai a couple of days and then contacted them, I didn't get any answer until a few days later when they told me that there was nothing wrong with the PSU, which is odd because I tested it with 2 different PC but I was willing to trusted them and took it back. The problem was that they weren't willing to honor their word on the free shipment to my country, they told me that they could only offer me free shipping to Florida but if I wanted my PSU to be shipped to my country I have to pay for it. I will buy a new PSU from another company. mozilla.pdf
-
Greetings, I bought a thermaltake smart 600W and it failed under 3 hourse of use. I've contacted Thermaltake support and they gave me a rma number to send back the PSU. The product arrive to Thermaltake facilites a couple of days ago but I haven't been contacted and I can't check the status of my RMA because this link doen't work: support.thermaltake.com/csErma.aspx?action=track. RMA Number is SA10008, how can I check the status of the rma? Thanks


.jpg.29090ecc6fae9e23eef6d022befb8459.jpg)
.jpg.af96568195d0d4430c0cc59982bd029d.jpg)
.jpg.4d900bd1837767415184fa9ad00ec8d6.jpg)
.jpg.7d94863e2d7760a13a07f91e5ff19121.jpg)
.jpg.93e1355b36e6f9cfc51baaa0a56ef324.jpg)